

When I think of Greek cuisine, I instantly picture vibrant colors and bold flavors. A refreshing Horiatiki salad with ripe tomatoes and tangy feta always comes to mind. And who can resist the flaky layers of Spanakopita filled with fresh spinach? These dishes not only showcase the Mediterranean’s bounty but are perfect for those seeking nourishing vegetarian options. Ready to explore 12 authentic recipes that will inspire your next meal?
Greek Salad (Horiatiki)
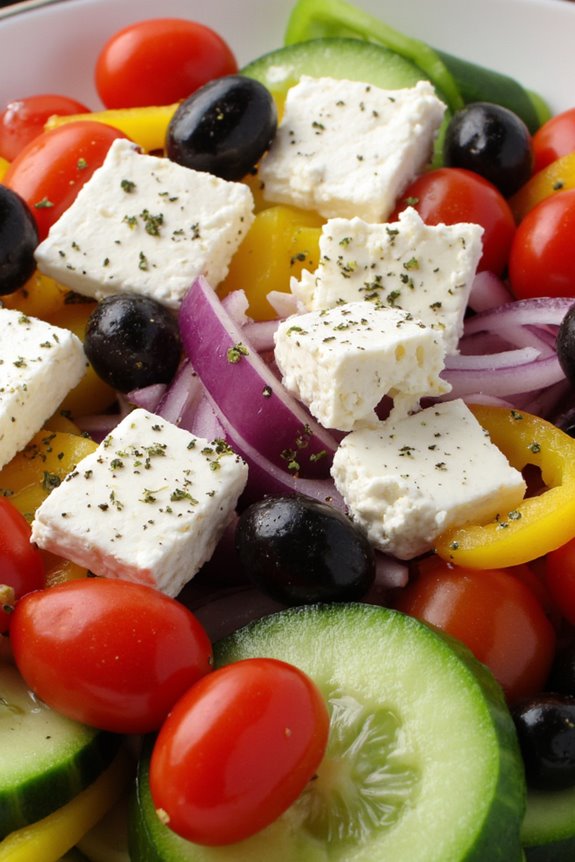
Greek Salad, or Horiatiki, is a vibrant and invigorating dish that embodies the essence of Mediterranean cuisine. This traditional salad is a delightful combination of fresh vegetables, tangy feta cheese, and olives, all drizzled with quality olive oil and sprinkled with oregano. It’s a staple in Greek households and is often served as a meze or alongside grilled meats and fish. The beauty of Horiatiki lies in its simplicity, allowing the natural flavors of the ingredients to shine through.
To prepare a classic Greek Salad, you’ll want to use the freshest produce available. Vine-ripened tomatoes, crisp cucumbers, sweet bell peppers, and red onions come together to create a colorful and nutritious dish. The addition of kalamata olives and creamy feta cheese provides a rich contrast to the crunchy vegetables. With just a few basic ingredients and a straightforward preparation method, you can enjoy a taste of Greece right in your own kitchen.
Ingredients (Serves 4-6):
- 4 medium ripe tomatoes, chopped
- 1 large cucumber, peeled and diced
- 1 bell pepper (red or green), diced
- 1 small red onion, thinly sliced
- 200g (7oz) feta cheese, crumbled or in large blocks
- 100g (3.5oz) kalamata olives, pitted
- 4 tablespoons extra virgin olive oil
- 1 tablespoon red wine vinegar (optional)
- 1 teaspoon dried oregano
- Salt and pepper, to taste
Cooking Instructions:
- Prepare the Vegetables: Begin by washing all the fresh vegetables thoroughly. Chop the tomatoes into bite-sized pieces, ensuring to remove any excess seeds. Peel the cucumber, then slice it in half lengthwise and dice it into small chunks. Dice the bell pepper, and thinly slice the red onion. Place all the chopped vegetables in a large mixing bowl.
- Add the Olives and Feta: Once the vegetables are in the bowl, add the kalamata olives. If you prefer, you can leave the feta cheese in large blocks or crumble it over the salad. The choice depends on your preference for texture and presentation.
- Dress the Salad: In a small bowl, whisk together the extra virgin olive oil and red wine vinegar (if using). Drizzle this dressing over the salad ingredients. Sprinkle with dried oregano, and season with salt and pepper to taste. Remember to go easy on the salt as the feta and olives are already salty.
- Toss and Serve: Gently toss the salad with your hands or a large spoon to combine all the ingredients, being careful not to break the feta too much. Allow the salad to sit for about 10 minutes to let the flavors meld together before serving.
- Presentation: Serve the salad in a large bowl or on individual plates. For an authentic touch, you can garnish with additional olives and a sprinkle of oregano.
Extra Tips:
When preparing Horiatiki, the quality of the ingredients is key. Opt for organic or locally sourced vegetables whenever possible, as they’ll enhance the overall flavor of the salad.
Additionally, feel free to customize the salad by adding other ingredients like capers or fresh herbs such as parsley or basil. Always serve the salad fresh, as it tastes best when the vegetables are crisp and vibrant. Enjoy it as an invigorating side dish or a light main course during warm weather!
Spanakopita (Spinach Pie)

Spanakopita is a traditional Greek pastry filled with a delightful mixture of spinach, herbs, and feta cheese, all enveloped in layers of flaky phyllo dough. This savory pie is a staple in Greek cuisine, often enjoyed as a snack or as part of a larger meal. Each bite offers a crispy exterior and a warm, flavorful filling, making it a beloved dish for vegetarians and non-vegetarians alike.
Whether served as an appetizer at a family gathering or as a main dish paired with a salad, spanakopita never fails to impress.
Preparing spanakopita requires some patience and care, particularly when handling the delicate phyllo dough. However, the effort is well worth it when you savor the rich flavors and textures of this classic dish. While traditional recipes may vary, the essential ingredients of spinach, feta, and herbs remain constant, ensuring a delicious outcome that embodies the essence of Greek cooking.
Ingredients (serving size: 4-6 people):
- 1 package (16 oz) phyllo dough, thawed
- 1 lb fresh spinach, chopped (or 1 package frozen spinach, thawed and drained)
- 1 cup feta cheese, crumbled
- 1/2 cup ricotta cheese
- 1 large onion, finely chopped
- 2 cloves garlic, minced
- 1/4 cup fresh dill, chopped (or 1 tablespoon dried dill)
- 1/4 cup fresh parsley, chopped
- 2 large eggs, beaten
- Salt and pepper to taste
- 1/2 cup olive oil or melted butter (for brushing)
Cooking Instructions:
- Prepare the filling: In a large skillet, heat a tablespoon of olive oil over medium heat. Add the chopped onion and sauté until it becomes translucent, about 5 minutes. Stir in the minced garlic and cook for an additional minute. Add the chopped spinach and cook until wilted (if using fresh) or heated through (if using frozen). Remove from heat and let the mixture cool slightly.
- Combine the ingredients: In a mixing bowl, combine the cooked spinach mixture with the crumbled feta, ricotta cheese, chopped dill, chopped parsley, and beaten eggs. Season with salt and pepper to taste. Mix well until all ingredients are evenly incorporated.
- Prepare the phyllo dough: Preheat your oven to 375°F (190°C). On a clean, dry surface, lay out a sheet of phyllo dough and brush it lightly with olive oil or melted butter. Top with another sheet of phyllo and brush it again. Repeat this process until you have 4-5 layers.
- Assemble the pie: Place a generous portion of the spinach filling along one edge of the phyllo layers, leaving some space at the edges. Fold the sides over the filling and carefully roll the phyllo dough to create a log. Place the rolled spanakopita seam-side down on a greased baking sheet. Repeat with the remaining phyllo and filling.
- Bake the spanakopita: Brush the tops of the rolled spanakopita with olive oil or melted butter. Bake in the preheated oven for 25-30 minutes, or until the pastry is golden brown and crispy. Remove from the oven and let cool for a few minutes before slicing.
Extra Tips: When working with phyllo dough, it’s important to keep the sheets covered with a damp cloth to prevent them from drying out. If you’re short on time, consider making mini spanakopita triangles instead of a large pie; these bite-sized versions can be easier to handle and perfect for entertaining.
Additionally, feel free to experiment with the filling by adding ingredients like artichokes or sun-dried tomatoes for a unique twist on this classic dish. Enjoy your homemade spanakopita!
Moussaka With Eggplant and Potatoes

Moussaka is a classic Greek dish that has become beloved around the world for its layers of flavor and satisfying textures. Traditionally made with ground meat, this vegetarian version replaces meat with hearty vegetables, making it a delightful choice for anyone who enjoys a plant-based meal. The combination of eggplant, potatoes, and a rich béchamel sauce creates a comforting and filling dish that can easily impress your guests or serve as a cozy family dinner.
To achieve the best results, it’s crucial to layer the ingredients thoughtfully, allowing each component to shine through. The eggplant is roasted to enhance its natural sweetness, while the potatoes provide a sturdy base for the dish. The creamy béchamel sauce, infused with aromatic nutmeg, adds a luxurious touch that ties the entire dish together. With a bit of patience and care, you can create a moussaka that’s both beautiful and delicious.
Ingredients (Serves 4-6):
- 2 large eggplants, sliced into 1/2 inch rounds
- 4 medium potatoes, peeled and sliced into 1/4 inch rounds
- 1 large onion, chopped
- 3 cloves garlic, minced
- 1 can (14oz) diced tomatoes
- 1 teaspoon dried oregano
- 1 teaspoon ground cinnamon
- 1/2 teaspoon salt
- 1/4 teaspoon black pepper
- 1 tablespoon olive oil
- 1 cup grated cheese (such as feta or a vegetarian alternative)
For the béchamel sauce:
- 4 tablespoons butter
- 1/4 cup all-purpose flour
- 2 cups milk
- 1/4 teaspoon nutmeg
- 1/2 cup grated cheese (such as parmesan or a vegetarian alternative)
- Salt and pepper to taste
Cooking Instructions:
1. Prepare the Eggplant: Preheat your oven to 400°F (200°C). Arrange the sliced eggplants on a baking sheet and lightly brush both sides with olive oil. Sprinkle with salt and let them sit for about 15 minutes. This will draw out excess moisture and bitterness.
After 15 minutes, pat the eggplants dry with a paper towel and bake in the oven for 20-25 minutes until tender and slightly golden.
2. Cook the Potatoes: While the eggplant is baking, bring a pot of salted water to a boil. Add the sliced potatoes and cook for about 5-7 minutes until just tender but not fully cooked. Drain and set aside.
3. Make the Tomato Mixture: In a large skillet, heat a tablespoon of olive oil over medium heat. Add the chopped onions and cook until translucent, about 5 minutes. Stir in the minced garlic and cook for another minute.
Then, add the diced tomatoes, oregano, cinnamon, salt, and pepper. Simmer the mixture for about 10 minutes, allowing the flavors to meld.
4. Prepare the Béchamel Sauce: In a saucepan, melt the butter over medium heat. Whisk in the flour and cook for about 1-2 minutes until it turns slightly golden. Gradually whisk in the milk, ensuring there are no lumps.
Continue to cook, stirring constantly, until the sauce thickens, about 5-7 minutes. Remove from heat and stir in the nutmeg and grated cheese, seasoning with salt and pepper to taste.
5. Assemble the Moussaka: In a greased baking dish, layer half of the potato slices at the bottom. Follow with half of the roasted eggplant, then half of the tomato mixture.
Repeat the layers with the remaining potatoes, eggplant, and tomato mixture. Finally, pour the béchamel sauce over the top, spreading it evenly.
6. Bake: Reduce the oven temperature to 350°F (175°C) and bake the moussaka for about 45 minutes, or until the top is golden and bubbling. Allow it to cool for about 15-20 minutes before serving to help the layers set.
Extra Tips:
When preparing moussaka, it’s vital to allow it to rest after baking. This resting period helps the layers stabilize, making it easier to cut and serve without falling apart.
Additionally, you can customize the filling with other vegetables like zucchini or bell peppers for added flavor and nutrition. Moussaka also tastes even better the next day, as the flavors continue to develop, making it a perfect dish for leftovers!
Fava (Yellow Split Pea Purée)

Fava, a traditional Greek dish made from yellow split peas, is both nutritious and delicious. This creamy, velvety purée isn’t only a staple in Greek vegetarian cuisine but also incredibly versatile. It can be served warm or cold, accompanied by a variety of sides, such as crusty bread, olives, or fresh vegetables. The rich flavor of fava comes from the simple ingredients and the cooking process, which allows the natural sweetness of the split peas to shine through.
This dish isn’t only a fantastic source of plant-based protein but also packed with fiber, making it a healthy choice for any meal. Whether you’re looking for a hearty appetizer or a satisfying main dish, fava is sure to please. The creamy texture combined with a drizzle of olive oil and a sprinkle of lemon juice creates a harmonious balance of flavors that will transport you straight to the sun-drenched shores of Greece.
Ingredients (Serves 4-6)
- 1 cup yellow split peas
- 4 cups water
- 1 medium onion, chopped
- 2 garlic cloves, minced
- 1/4 cup olive oil
- 1 teaspoon salt (or to taste)
- Freshly ground black pepper (to taste)
- Juice of 1 lemon
- Chopped fresh parsley (for garnish)
Cooking Instructions
- Rinse the Split Peas: Begin by rinsing the yellow split peas under cold running water. This step helps to remove any impurities or dust, ensuring your dish is clean and fresh.
- Cook the Peas: In a large pot, combine the rinsed split peas and water. Bring the mixture to a boil over medium-high heat. Once boiling, reduce the heat to low and simmer for about 30-40 minutes, or until the peas are soft and tender. Stir occasionally to prevent sticking.
- Sauté the Aromatics: While the peas are cooking, heat the olive oil in a small skillet over medium heat. Add the chopped onion and sauté until it becomes translucent, about 5-7 minutes. Then, add the minced garlic and cook for another minute, ensuring it doesn’t burn.
- Blend the Mixture: Once the split peas are cooked, remove them from the heat and let them cool slightly. Transfer the cooked peas to a blender or food processor. Add the sautéed onion and garlic, salt, pepper, and lemon juice. Blend until smooth and creamy, adjusting the consistency with a little water if necessary.
- Taste and Adjust Seasoning: Taste the fava purée and adjust the seasoning with more salt, pepper, or lemon juice as desired. The flavors should be well-balanced and vibrant.
- Serve: Transfer the fava to a serving bowl or platter. Drizzle with additional olive oil and garnish with chopped parsley before serving. Enjoy it warm or at room temperature.
Extra Tips
When preparing fava, soaking the yellow split peas for a few hours before cooking can reduce the cooking time and enhance the texture. Additionally, for an extra layer of flavor, consider adding a pinch of smoked paprika or cumin to the purée.
Serve the fava with an assortment of toppings, such as capers, diced red onion, or a sprinkle of feta cheese for a delightful twist.
Briam (Greek Ratatouille)
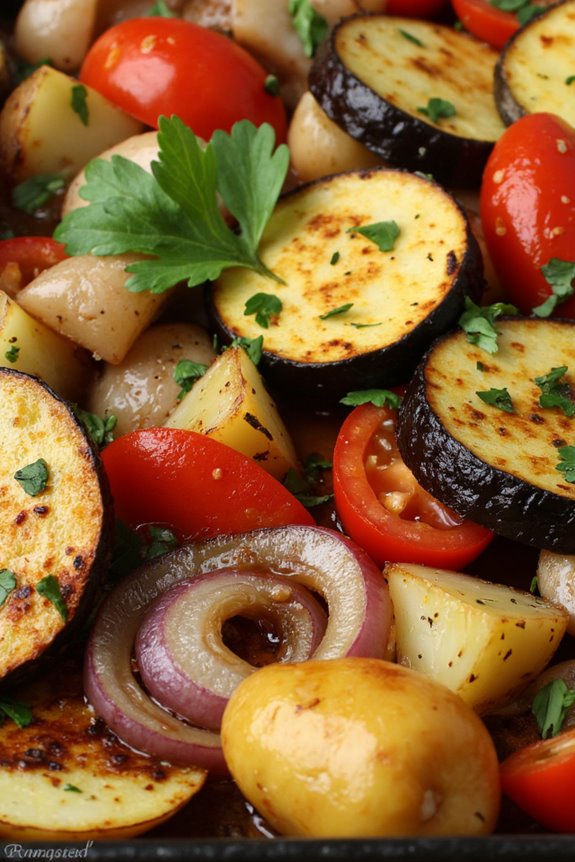
Briam is a traditional Greek dish that beautifully showcases the flavors of summer vegetables, making it an excellent choice for a vegetarian meal. This hearty dish is often compared to ratatouille, but it carries its own unique twist with a blend of Mediterranean herbs and a drizzle of olive oil that brings it to life.
The combination of roasted eggplant, zucchini, potatoes, tomatoes, and aromatic herbs makes Briam not only a delicious vegetarian option but also a colorful centerpiece for any meal.
The beauty of Briam lies in its simplicity and versatility. You can adjust the vegetables based on what you have on hand or what’s in season, making it a flexible dish for any occasion. Serve it warm or at room temperature, and pair it with crusty bread or a light salad for a satisfying and nourishing meal.
Whether you’re hosting a gathering or enjoying a quiet dinner at home, Briam will surely delight your taste buds.
Ingredients (serving size: 4-6 people)
- 2 medium eggplants, sliced into rounds
- 3 medium zucchinis, sliced into rounds
- 3 medium potatoes, peeled and sliced into rounds
- 2 large tomatoes, chopped
- 1 large onion, thinly sliced
- 4 cloves garlic, minced
- 1/2 cup olive oil
- 1 tablespoon dried oregano
- 1 tablespoon fresh parsley, chopped
- Salt and pepper to taste
- Optional: 1 bell pepper, sliced
Cooking Instructions
- Preheat the Oven: Begin by preheating your oven to 375°F (190°C). This guarantees that your Briam will cook evenly and the vegetables will roast beautifully.
- Prepare the Vegetables: In a large bowl, combine the sliced eggplants, zucchinis, potatoes, tomatoes, onion, and garlic. If you’re using bell pepper, add that as well. This mixture will form the base of your dish.
- Season the Vegetables: Drizzle the olive oil over the vegetable mixture. Sprinkle with dried oregano, salt, and pepper. Toss everything gently to guarantee the vegetables are well coated with oil and seasonings. This step is essential for enhancing the flavors.
- Arrange in a Baking Dish: Transfer the seasoned vegetable mixture into a large baking dish, spreading it out evenly. You can layer the vegetables for a more aesthetically pleasing presentation or mix them for a more rustic look.
- Bake the Briam: Place the baking dish in the preheated oven and bake for about 50-60 minutes. Stir the mixture occasionally during cooking to guarantee even roasting. The vegetables should become tender and slightly caramelized.
- Garnish and Serve: Once the Briam is cooked, remove it from the oven and let it cool for a few minutes. Before serving, sprinkle with fresh parsley for a burst of color and flavor.
Extra Tips
For an extra depth of flavor, consider adding a splash of balsamic vinegar or a pinch of red pepper flakes for a subtle kick.
You can also experiment with different herbs, such as thyme or basil, to give the dish your personal touch. If you make a larger batch, Briam keeps well in the fridge and tastes even better the next day, as the flavors continue to meld.
Enjoy this delicious dish as a main course or a side, and savor the vibrant tastes of Greek cuisine!
Stuffed Peppers (Gemista)
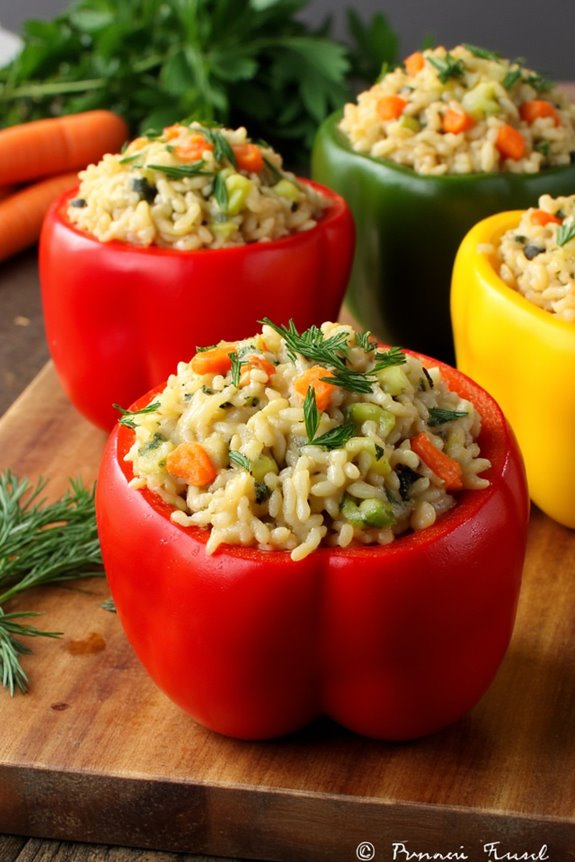
Stuffed Peppers, known as Gemista in Greece, are a vibrant and delicious vegetarian dish that celebrates the rich flavors of Mediterranean cuisine. This traditional recipe features bell peppers filled with a savory mixture of rice, fresh herbs, and vegetables, all baked to perfection. Not only are these stuffed peppers visually appealing, but they also provide a wholesome and satisfying meal for both vegetarians and meat lovers alike.
Gemista is often enjoyed during the summer months when peppers are at their peak freshness, making it a delightful option for a family dinner or a gathering with friends.
Preparing Stuffed Peppers is a simple yet rewarding process. The beauty of this dish lies in its versatility; you can customize the filling with seasonal vegetables, grains, or spices according to your preference. The result is a fragrant and colorful dish that’s sure to impress.
Serve the stuffed peppers with a side salad or some crusty bread, and you’ll have a wholesome meal that embodies the essence of Greek cooking.
Ingredients (Serves 4-6):
- 6 medium bell peppers (any color)
- 1 cup uncooked rice (preferably short-grain)
- 2 cups vegetable broth or water
- 1 large onion, finely chopped
- 2 cloves garlic, minced
- 1 cup diced tomatoes (fresh or canned)
- 1 medium zucchini, diced
- 1 medium carrot, grated
- 1/2 cup fresh parsley, chopped
- 1/2 cup fresh dill, chopped
- 1 teaspoon dried oregano
- Salt and pepper, to taste
- 1/4 cup olive oil
- Lemon wedges, for serving (optional)
Cooking Instructions:
- Prepare the Peppers: Preheat your oven to 375°F (190°C). Cut the tops off the bell peppers and remove the seeds and membranes. Lightly brush the outside of the peppers with olive oil and place them in a baking dish, cut side up.
- Cook the Rice: In a medium saucepan, heat 1 tablespoon of olive oil over medium heat. Add the chopped onion and garlic; sauté until soft and translucent, about 3-4 minutes. Stir in the rice and cook for an additional 2 minutes, allowing the rice to absorb the flavors.
- Mix the Filling: Add the diced tomatoes, zucchini, grated carrot, parsley, dill, oregano, salt, and pepper to the rice mixture. Pour in the vegetable broth or water and bring to a boil. Once boiling, reduce the heat to low, cover the pot, and let it simmer for about 15-20 minutes, or until the rice is tender and the liquid is absorbed.
- Stuff the Peppers: Carefully spoon the rice mixture into each bell pepper, filling them generously but leaving a little space at the top. Drizzle a bit of olive oil over the stuffed peppers for added flavor.
- Bake: Add about half a cup of water to the bottom of the baking dish to create steam. Cover the dish with aluminum foil and bake in the preheated oven for 30 minutes. Then remove the foil and bake for an additional 10-15 minutes, allowing the tops to become slightly golden.
- Serve: Once the peppers are tender and the filling is hot, remove them from the oven. Serve warm with a squeeze of fresh lemon juice over the top, if desired.
Extra Tips:
For an added depth of flavor, consider adding some chopped olives, capers, or even feta cheese to the rice filling. You can also experiment with different grains, such as quinoa or farro, for a unique twist.
If you have leftover filling, it can be baked in a small dish alongside the peppers. Gemista can be made ahead of time and reheats well, making it a great option for meal prep or entertaining. Enjoy your culinary journey into Greek vegetarian cuisine!
Tzatziki Sauce
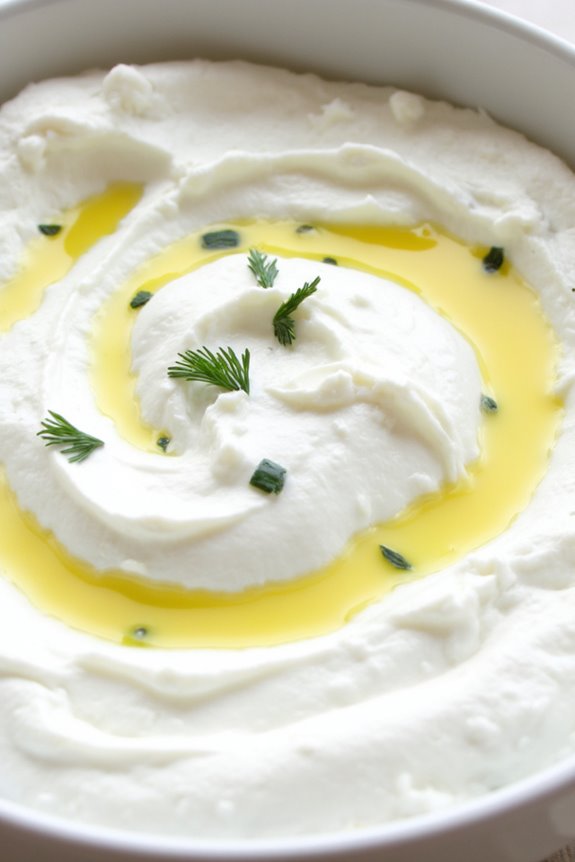
Tzatziki sauce is a revitalizing and creamy yogurt-based dip that’s a staple in Greek cuisine, often served alongside grilled meats, pita bread, or as a part of a meze platter. This sauce isn’t only delicious but also incredibly easy to prepare, making it a perfect addition to any summer meal or gathering.
The combination of tangy Greek yogurt, crisp cucumbers, and aromatic garlic creates a delightful flavor that complements a variety of dishes. Plus, it’s a fantastic way to incorporate some veggies into your meal while keeping things light and healthy.
This versatile sauce can be made ahead of time, allowing the flavors to meld beautifully in the refrigerator. Whether you’re hosting a barbecue or just looking for a quick snack, tzatziki sauce is sure to impress your guests and family alike.
Serve it as a dip with fresh veggies or as a sauce drizzled over grilled vegetables or falafel for a delightful vegetarian option. Here’s how you can create this classic Greek dip at home.
Ingredients (Serves 4-6):
- 2 cups Greek yogurt
- 1 medium cucumber, grated and excess water squeezed out
- 2 cloves garlic, minced
- 2 tablespoons olive oil
- 1 tablespoon white vinegar or lemon juice
- Salt, to taste
- Fresh dill or mint, chopped (optional, for garnish)
Cooking Instructions:
1. Prepare the Cucumber: Start by washing the cucumber thoroughly. Once clean, grate the cucumber using a box grater or a food processor.
After grating, place the cucumber in a clean kitchen towel or cheesecloth and twist it to squeeze out as much excess moisture as possible. This step is essential to avoid a watery tzatziki.
2. Combine Ingredients: In a medium mixing bowl, combine the Greek yogurt, grated cucumber, minced garlic, olive oil, and white vinegar or lemon juice.
Stir the mixture gently until all ingredients are well incorporated. The yogurt should be smooth and creamy, with the cucumber and garlic evenly distributed.
3. Season to Taste: Add salt to the mixture according to your taste preference. Start with a pinch, and then adjust as necessary.
If desired, you can also fold in some chopped fresh dill or mint for added flavor. This will give your tzatziki a revitalizing herbaceous note.
4. Chill the Sauce: Once everything is mixed, cover the bowl with plastic wrap or transfer the tzatziki into an airtight container.
Refrigerate for at least an hour before serving. This chilling time allows the flavors to meld and intensify, resulting in a more flavorful dip.
5. Serve: After chilling, give the tzatziki a quick stir and transfer it to a serving dish.
Garnish with a drizzle of olive oil and a sprinkle of fresh herbs if you like. Serve it alongside pita bread, fresh vegetables, or as a condiment for grilled dishes.
Extra Tips:
When making tzatziki sauce, using high-quality Greek yogurt will make a significant difference in taste and texture.
It’s also essential to squeeze out the excess moisture from the cucumber to maintain the right consistency of the dip. Feel free to experiment with flavors by adding a pinch of smoked paprika or a squeeze of lemon juice for a zesty kick.
Tzatziki can be stored in the refrigerator in an airtight container for up to four days, making it a great make-ahead option for busy days or gatherings.
Gigantes Plaki (Baked Giant Beans)
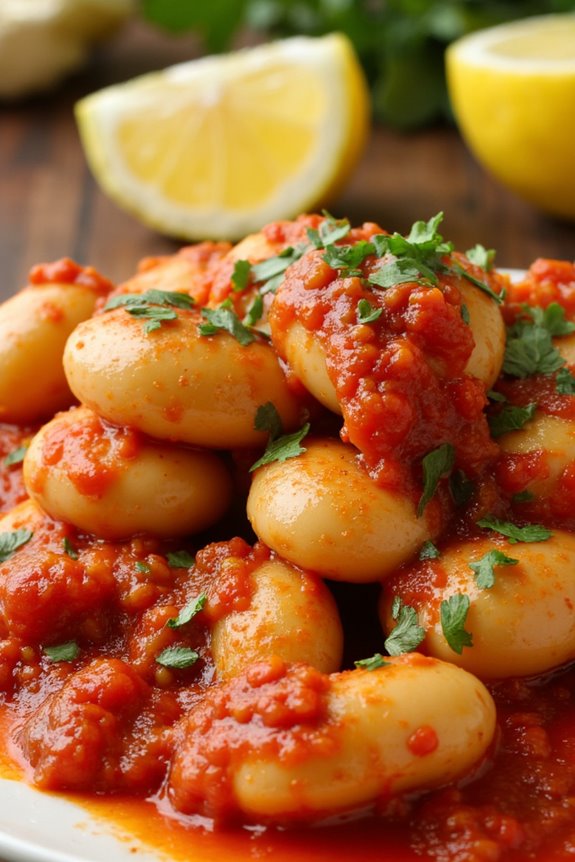
Gigantes Plaki is a traditional Greek dish that showcases the rich flavors and wholesome ingredients of Mediterranean cuisine. This hearty recipe features giant white beans, known as “gigantes,” which are slow-baked in a savory tomato sauce infused with aromatic herbs and spices. The result is a comforting and nutritious meal that can be served as a main dish or a side, making it perfect for both casual family dinners and festive gatherings.
The dish isn’t only vegetarian but also packed with protein and fiber, making it a satisfying choice for everyone.
Preparing Gigantes Plaki is a straightforward process that requires minimal hands-on time, allowing the beans to soak up all the delicious flavors as they bake. This dish is often enjoyed warm but can also be served at room temperature, making it versatile for any occasion.
Garnished with fresh parsley and sometimes feta cheese, this vibrant dish is sure to impress both vegetarians and meat-lovers alike.
Ingredients (Serves 4-6):
- 2 cups dried giant white beans (gigantes)
- 1/4 cup olive oil
- 1 large onion, finely chopped
- 3 cloves garlic, minced
- 1 can (14 oz) crushed tomatoes
- 2 tablespoons tomato paste
- 1 teaspoon dried oregano
- 1 teaspoon dried thyme
- 1/2 teaspoon sugar
- Salt and pepper to taste
- 1/4 cup fresh parsley, chopped (for garnish)
- Lemon wedges (for serving)
Cooking Instructions:
- Soak the Beans: Place the dried gigante beans in a large bowl and cover them with water. Let them soak overnight or for at least 8 hours to soften. This step is essential as it reduces cooking time and helps the beans become tender.
- Preheat the Oven: After the beans have soaked, preheat your oven to 375°F (190°C). This temperature is ideal for slow baking and allows the flavors to meld beautifully.
- Cook the Beans: Drain the soaked beans and transfer them to a pot. Add fresh water to cover the beans by about 2 inches. Bring to a boil and then reduce the heat to a simmer. Cook for about 30-40 minutes until the beans are just tender (they shouldn’t be fully cooked). Drain and set aside.
- Prepare the Tomato Sauce: In a large skillet, heat the olive oil over medium heat. Add the chopped onion and sauté for about 5 minutes until it becomes translucent. Stir in the garlic and cook for an additional minute until fragrant.
- Combine Ingredients: Add the crushed tomatoes, tomato paste, dried oregano, dried thyme, sugar, salt, and pepper to the skillet. Mix well and let the sauce simmer for about 10 minutes, allowing the flavors to develop.
- Mix Beans and Sauce: In a large baking dish, combine the partially cooked beans with the tomato sauce, making sure the beans are well coated. If needed, add a little water to guarantee there’s enough sauce for the beans to absorb as they bake.
- Bake the Dish: Cover the baking dish with aluminum foil and place it in the preheated oven. Bake for about 1 hour. After 30 minutes, remove the foil to allow the beans to brown slightly on top.
- Serve: Once the beans are tender and the sauce is thickened, remove the dish from the oven. Garnish with fresh parsley and serve with lemon wedges on the side for a burst of freshness.
Extra Tips:
For an added depth of flavor, consider incorporating some chopped bell peppers or carrots into the sauce during the sautéing process.
You can also experiment with different herbs like dill or basil to suit your taste. If you have leftovers, Gigantes Plaki keeps well in the refrigerator for a few days and can be enjoyed cold or reheated.
Serve it alongside some crusty bread for a complete meal, and don’t forget to drizzle a little extra olive oil on top before serving for that authentic Greek touch!
Lentil Soup (Fakes)

Lentil Soup, known as Fakes in Greece, is a beloved dish that embodies the essence of Mediterranean cuisine. This hearty and nutritious soup isn’t only packed with flavor but also offers a delightful way to enjoy the health benefits of lentils.
Fakes is a staple in Greek households, especially during the winter months, as it warms the soul and provides a satisfying meal without the need for meat. Enjoyed with a drizzle of olive oil and a sprinkle of vinegar, this soup is a true reflection of the simplicity and richness of Greek vegetarian cooking.
The preparation of Fakes is straightforward, making it an excellent choice for both novice cooks and seasoned chefs. With just a handful of ingredients, this lentil soup can be made in under an hour, allowing you to savor a wholesome meal without spending all day in the kitchen.
Pair it with crusty bread or a simple side salad, and you have a complete meal that’s both filling and fulfilling.
Ingredients (Serves 4-6):
- 1 cup brown or green lentils, rinsed and drained
- 1 medium onion, finely chopped
- 2 garlic cloves, minced
- 2 medium carrots, diced
- 1 medium potato, diced
- 1 (14 oz) can of diced tomatoes (or 2 fresh tomatoes, chopped)
- 4 cups vegetable broth or water
- 1/4 cup olive oil
- 1 teaspoon dried oregano
- 1 teaspoon cumin
- Salt and pepper to taste
- Fresh parsley, chopped (for garnish)
- Red wine vinegar (optional, for serving)
Cooking Instructions:
1. Sauté the Aromatics**: In a large pot, heat the olive oil over medium heat. Add the chopped onion and sauté** for about 5 minutes, or until it becomes translucent.
Then, add the minced garlic and cook for an additional minute, stirring frequently to avoid burning.
2. Add Vegetables: Incorporate the diced carrots and potatoes into the pot. Sauté the mixture for another 5-7 minutes, allowing the vegetables to soften slightly and absorb the flavors of the garlic and onion.
3. Add Lentils and Spices: Stir in the rinsed lentils, dried oregano, and cumin. Mix everything well, ensuring the lentils are coated with the oil and spices, allowing them to toast slightly for about 2 minutes.
4. Incorporate Tomato and Broth: Pour in the diced tomatoes (with their juices) and the vegetable broth or water. Stir everything together, bringing the mixture to a gentle boil.
5. Simmer the Soup: Once boiling, reduce the heat to low and cover the pot. Let the soup simmer for about 30-35 minutes, or until the lentils are tender and the flavors are well combined.
Stir occasionally and add more water if the soup appears too thick.
6. Season to Taste: After the lentils are cooked, taste the soup and adjust the seasoning with salt and pepper as needed. If desired, you can also add a splash of red wine vinegar for an extra zing.
7. Serve: Ladle the soup into bowls and garnish with fresh chopped parsley. Drizzle a little olive oil on top for added richness, and serve with crusty bread or over rice for a complete meal.
Extra Tips:
When making Fakes, feel free to customize the recipe to your liking by adding other vegetables such as spinach or bell peppers for added nutrition and flavor.
If you prefer a creamier texture, you can blend a portion of the soup using an immersion blender or a regular blender, then return it to the pot. This soup can also be made in advance and stored in the refrigerator, as the flavors deepen over time, making it an excellent option for meal prep.
Enjoy it warm, and don’t hesitate to experiment with different herbs and spices to make the dish your own!
Greek Vegetables and Rice (Lahanodolmathes)

Lahanodolmathes, or Greek stuffed cabbage rolls, are a delightful vegetarian dish that showcases the flavors of Greece through its vibrant ingredients. This traditional recipe features tender cabbage leaves wrapped around a mixture of rice, herbs, and vegetables, all simmered in a tangy tomato sauce. The dish isn’t only delicious but also incredibly nutritious, making it a perfect option for vegetarians and anyone looking to enjoy wholesome Greek cuisine.
Preparing lahanodolmathes may seem intimidating at first, but with a little patience and practice, you’ll be able to create these lovely rolls that are sure to impress family and friends alike. The combination of fragrant herbs like dill and mint, paired with the subtle sweetness of the cabbage, creates a comforting meal that can be served warm or at room temperature. This dish is perfect for gatherings and can also be made ahead of time, making it a practical choice for busy weekdays.
Ingredients (Serves 4-6)
- 1 large head of cabbage
- 1 cup long-grain rice, rinsed
- 2 cups vegetable broth
- 1 medium onion, finely chopped
- 2 cloves garlic, minced
- 1 medium carrot, grated
- 1 medium zucchini, grated
- 1/4 cup fresh dill, chopped
- 1/4 cup fresh mint, chopped
- 1 teaspoon salt
- 1/2 teaspoon black pepper
- 1/4 cup olive oil
- 1 can (14 oz) crushed tomatoes
- 1 tablespoon lemon juice
Cooking Instructions
1. Prepare the Cabbage: Bring a large pot of salted water to a boil. Carefully remove the core from the cabbage and place the whole head in the boiling water. Cook for about 5-7 minutes, or until the leaves are tender and pliable. Once done, remove the cabbage from the pot and let it cool.
Once cool, carefully peel off 12-15 leaves and set aside.
2. Make the Filling: In a large skillet, heat the olive oil over medium heat. Add the chopped onion and garlic, sautéing until the onion becomes translucent, about 3-4 minutes. Stir in the grated carrot and zucchini, cooking for an additional 2-3 minutes.
3. Combine Ingredients: In a large bowl, combine the sautéed vegetables with the rinsed rice, fresh dill, mint, salt, and black pepper. Pour in the vegetable broth and mix well. Allow the filling to rest for about 10-15 minutes so the rice can absorb some of the flavors.
4. Stuff the Cabbage Leaves: Take a cabbage leaf and place about 2-3 tablespoons of the filling at the base of the leaf. Fold in the sides and roll from the bottom up to create a tightly packed roll. Repeat this process until all leaves and filling are used.
5. Cook the Rolls: In a large pot, pour in the crushed tomatoes and add the lemon juice. Place the stuffed cabbage rolls seam-side down in a single layer in the pot. If necessary, you can layer them. Pour any remaining sauce over the rolls. Cover the pot and simmer on low heat for about 45-60 minutes, or until the rice is fully cooked and the flavors meld together.
6. Serve: Once cooked, carefully remove the rolls from the pot using a slotted spoon. Serve warm with additional lemon wedges on the side if desired.
Extra Tips
When preparing lahanodolmathes, consider using a variety of fresh herbs to enhance the flavor profile of the dish. You can also experiment with adding different vegetables to the filling, such as bell peppers or spinach, to suit your taste.
If you want a more tangy flavor, drizzle some extra lemon juice over the rolls before serving. Additionally, these cabbage rolls can be made ahead of time and reheated, making them a convenient option for busy weeknights or meal prep.
Chickpea Stew
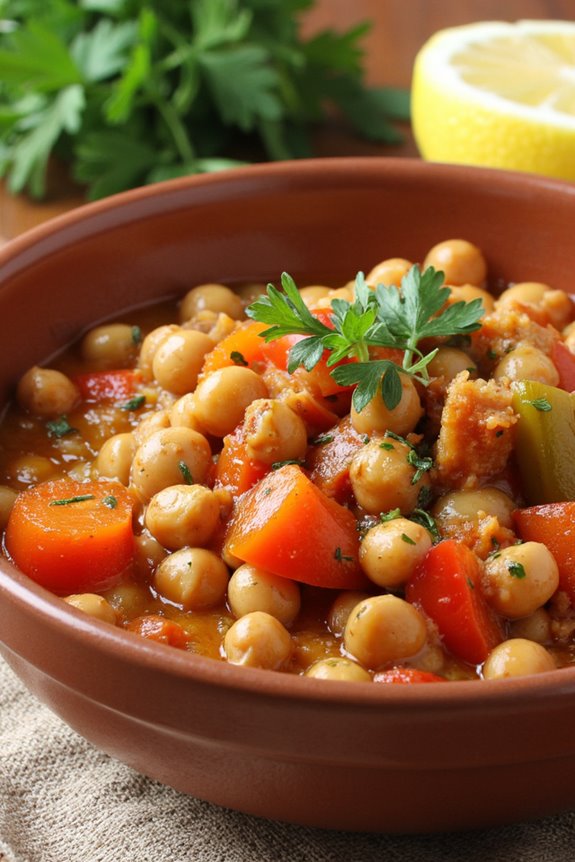
Chickpea stew is a hearty and nutritious dish that brings the flavors of Greece to your table. This vegan-friendly meal isn’t only satisfying but also packed with protein, fiber, and essential vitamins. The combination of chickpeas, fresh vegetables, and aromatic spices creates a comforting stew that’s perfect for any occasion, whether it’s a cozy family dinner or a gathering with friends.
Plus, it’s easy to make and can be prepared in advance, making it a fantastic addition to your meal prep routine.
In Greek cuisine, chickpeas, or “revithia,” are often celebrated for their versatility and health benefits. This chickpea stew is a wonderful way to incorporate these legumes into your diet. With a rich tomato base, fragrant herbs, and a touch of olive oil, this dish isn’t only delicious but also embodies the essence of Mediterranean cooking.
Serve it with warm crusty bread or over a bed of rice for a complete meal that everyone will enjoy.
Ingredients (Serves 4-6):
- 2 cups canned chickpeas, drained and rinsed
- 1 large onion, chopped
- 3 cloves garlic, minced
- 2 medium carrots, diced
- 1 bell pepper, chopped
- 2 medium tomatoes, diced (or 1 can of diced tomatoes)
- 4 cups vegetable broth
- 2 teaspoons ground cumin
- 1 teaspoon smoked paprika
- 1 teaspoon dried oregano
- 2 tablespoons olive oil
- Salt and pepper, to taste
- Fresh parsley, chopped (for garnish)
- Lemon wedges (for serving)
Cooking Instructions:
- Prepare the Vegetables: Start by washing and chopping the vegetables. Dice the onion, carrots, and bell pepper, and mince the garlic. Freshly diced tomatoes can be used or canned tomatoes for convenience. Having everything prepped will streamline the cooking process.
- Sauté Aromatics: In a large pot, heat the olive oil over medium heat. Add the chopped onions and sauté for about 5 minutes until they become translucent. Stir in the minced garlic and cook for an additional 1-2 minutes until fragrant. This step builds the foundation of flavors for the stew.
- Add Vegetables: Add the diced carrots and bell pepper to the pot. Sauté for another 5-7 minutes until the vegetables start to soften. Stir occasionally to prevent sticking. This will enhance the stew’s texture and flavor.
- Incorporate Spices: Sprinkle in the ground cumin, smoked paprika, and oregano. Mix well and cook for about 1 minute to toast the spices slightly, which will release their essential oils and deepen the flavor of the dish.
- Add Chickpeas and Tomatoes: Stir in the rinsed chickpeas and diced tomatoes (with their juices if using canned). Mix everything together well to combine. This step guarantees that the chickpeas absorb the flavors of the spices and vegetables.
- Pour in Broth: Add the vegetable broth to the pot and bring the mixture to a boil. Once boiling, reduce the heat to a simmer and let it cook for about 20-25 minutes. This allows the flavors to meld and the stew to thicken.
- Season and Serve: Taste the stew and season with salt and pepper as needed. Once done, remove from heat and let it sit for a few minutes before serving. Garnish with freshly chopped parsley and serve with lemon wedges on the side for an added zing.
Extra Tips:
To enhance the flavor of your chickpea stew, consider adding a splash of red wine or a tablespoon of tomato paste while cooking. If you prefer a thicker stew, allow it to simmer for a longer period or mash some of the chickpeas with a fork to create a creamier texture.
Additionally, feel free to mix in other vegetables like zucchini or spinach based on your preference or what you have on hand. Enjoy your hearty Greek chickpea stew!
Olive Oil Cake

Olive oil cake is a delightful and moist dessert that brings the flavors of the Mediterranean straight to your kitchen. This cake isn’t only simple to make but also highlights the rich, fruity taste of high-quality olive oil, making it a great vegetarian option that’s perfect for any occasion.
Its light yet indulgent texture makes it suitable for serving at family gatherings, dinner parties, or even as an afternoon snack with a cup of tea.
The beauty of olive oil cake lies in its versatility. You can dress it up with fresh fruits, citrus zests, or even a dusting of powdered sugar for an elegant finish. This cake is naturally sweetened, and its flavor can be further improved by incorporating various spices or nuts.
Whether enjoyed plain or with a side of whipped cream, this cake is a wonderful treat that celebrates the essence of Greek cuisine.
Ingredients (Serves 4-6):
- 1 cup extra virgin olive oil
- 1 cup granulated sugar
- 3 large eggs
- 1 cup plain Greek yogurt
- 1 teaspoon vanilla extract
- 1 ½ cups all-purpose flour
- 2 teaspoons baking powder
- ½ teaspoon baking soda
- ½ teaspoon salt
- Zest of 1 lemon or orange (optional)
- Powdered sugar for dusting (optional)
Cooking Instructions:
- Preheat the Oven: Start by preheating your oven to 350°F (175°C). This guarantees that the cake bakes evenly and rises properly.
- Prepare the Baking Pan: Grease a 9-inch round cake pan with olive oil or butter, and then line the bottom with parchment paper. This will prevent the cake from sticking to the pan.
- Mix Wet Ingredients: In a large mixing bowl, combine the olive oil and granulated sugar. Whisk them together until well blended. Add the eggs one at a time, whisking thoroughly after each addition. Then, mix in the Greek yogurt and vanilla extract until the mixture is smooth and creamy.
- Combine Dry Ingredients: In a separate bowl, whisk together the flour, baking powder, baking soda, and salt. If you’re using citrus zest, mix it in with the dry ingredients to distribute the flavor evenly.
- Combine Wet and Dry Mixtures: Gradually add the dry mixture to the wet mixture, stirring gently until just combined. Be careful not to overmix, as this can lead to a dense cake.
- Pour Batter into Pan: Pour the batter into the prepared cake pan and spread it evenly. Tap the pan lightly on the counter to remove any air bubbles.
- Bake the Cake: Place the cake in the preheated oven and bake for about 30-35 minutes, or until a toothpick inserted into the center comes out clean. Keep an eye on it towards the end to avoid overbaking.
- Cool the Cake: Once baked, remove the cake from the oven and allow it to cool in the pan for about 10 minutes. Then, carefully turn it out onto a wire rack to cool completely.
- Serve: Once the cake is completely cool, dust it with powdered sugar if desired, slice it, and serve. This cake is delightful on its own or paired with fresh fruits or whipped cream.
Extra Tips:
For the best flavor, always use high-quality extra virgin olive oil, as it will greatly enhance the taste of the cake. You can also experiment by adding different spices like cinnamon or nutmeg for a warm twist or incorporating chopped nuts for added texture.
If you prefer a sweeter cake, feel free to adjust the sugar to your taste. This cake stores well, so you can make it ahead of time and keep it in an airtight container for up to 3 days. Enjoy the rich and aromatic experience of homemade Olive Oil Cake!