

Indulging in Greek pastries is like a sweet escape to a world of flavor. From the nutty layers of baklava to the creamy galaktoboureko, each bite is a delicious experience. If you’re on the hunt for your next baking adventure, these 12 recipes might become your new favorites. Perfect for a special celebration or just because, they bring a touch of tradition to your kitchen. Let’s explore these tempting delights together.
Baklava
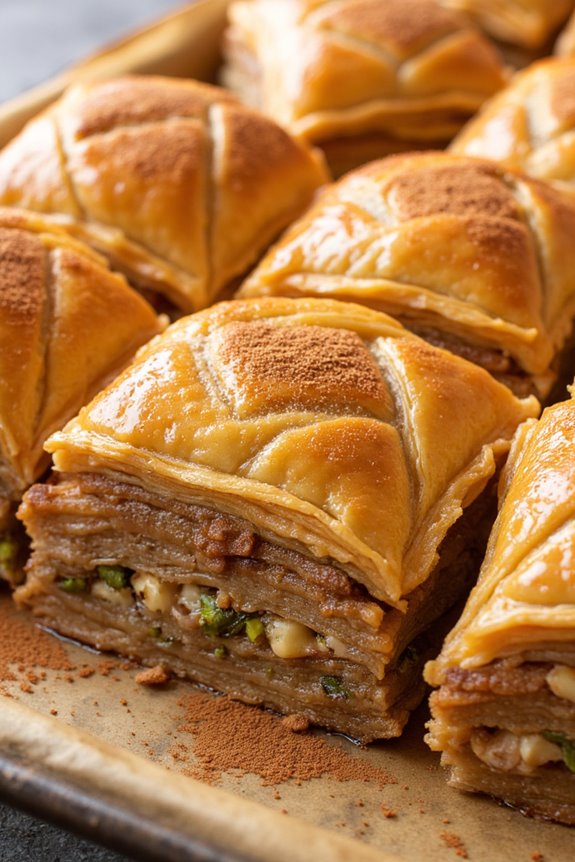
Baklava is a rich, sweet pastry that has its roots in the Middle Eastern and Mediterranean cuisines, particularly celebrated in Greek culture. This delightful dessert is made by layering sheets of phyllo dough with a mixture of chopped nuts and spices, then drenching the entire dish in a honey syrup after baking. The combination of flaky pastry, crunchy nuts, and aromatic sweetness creates an irresistible treat perfect for special occasions or simply to indulge your sweet tooth.
Making baklava may seem like an intimidating task due to the number of layers involved, but it’s actually quite straightforward once you get the hang of it. The key to a successful baklava lies in the quality of the ingredients, particularly the nuts and honey. Freshly chopped nuts combined with fragrant spices and a buttery, crisp exterior will yield a baklava that’s sure to impress family and friends.
Whether enjoyed on its own or paired with a cup of coffee or tea, this pastry is a delightful addition to any dessert table.
Ingredients (Serves 4-6):
- 1 package (16 oz) phyllo dough, thawed
- 1 cup unsalted butter, melted
- 2 cups walnuts or pistachios, finely chopped
- 1 cup granulated sugar
- 1 teaspoon ground cinnamon
- 1 cup water
- 1 cup honey
- 1 teaspoon vanilla extract
Cooking Instructions:
1. Prepare the Phyllo Dough:
Begin by thawing the phyllo dough in the refrigerator overnight. Once ready, carefully unroll it and cover it with a damp kitchen towel to prevent it from drying out. Preheat your oven to 350°F (175°C).
2. Mix the Nut Filling:
In a large bowl, combine the finely chopped walnuts or pistachios, granulated sugar, and ground cinnamon. Mix them well to guarantee the sugar and spice are evenly distributed throughout the nuts.
3. Layer the Phyllo Dough:
Take a 9×13 inch baking dish and brush the bottom with some of the melted butter. Place one sheet of phyllo dough in the dish and brush it with melted butter. Repeat this process, layering about 8 sheets, brushing each one with butter.
4. Add the Nut Mixture:
Once you have 8 layers of phyllo, sprinkle a thin, even layer of the nut mixture over the dough. Continue layering more phyllo sheets, brushing each with melted butter, for another 4-5 sheets. Repeat adding the nut mixture and layering phyllo sheets until all nuts are used, finishing with at least 8 layers of phyllo on top.
5. Cut the Baklava:
Before baking, use a sharp knife to cut the baklava into diamond or square shapes. This will help the syrup to soak in better later.
6. Bake:
Place the baklava in the preheated oven and bake for about 45-50 minutes, or until the top is golden brown and crisp.
7. Prepare the Syrup:
While the baklava is baking, combine the water and honey in a saucepan over medium heat. Stir until the honey dissolves, then bring the mixture to a gentle boil. Allow to boil for about 10 minutes, then remove from heat and stir in the vanilla extract. Let it cool.
8. Soak the Baklava:
Once the baklava is done baking, remove it from the oven and immediately pour the cooled honey syrup over the hot baklava. Make sure to cover it evenly. Allow the baklava to cool completely before serving.
Extra Tips:
When making baklava, it’s essential to keep the phyllo dough covered to prevent it from drying out, as it can become brittle and difficult to work with.
Feel free to experiment with different types of nuts or even add a bit of orange or lemon zest to the syrup for a revitalizing twist. Baklava can be stored in an airtight container at room temperature for several days, allowing the flavors to meld and deepen over time.
Enjoy this delectable treat with family and friends, and watch as it disappears quickly!
Kataifi
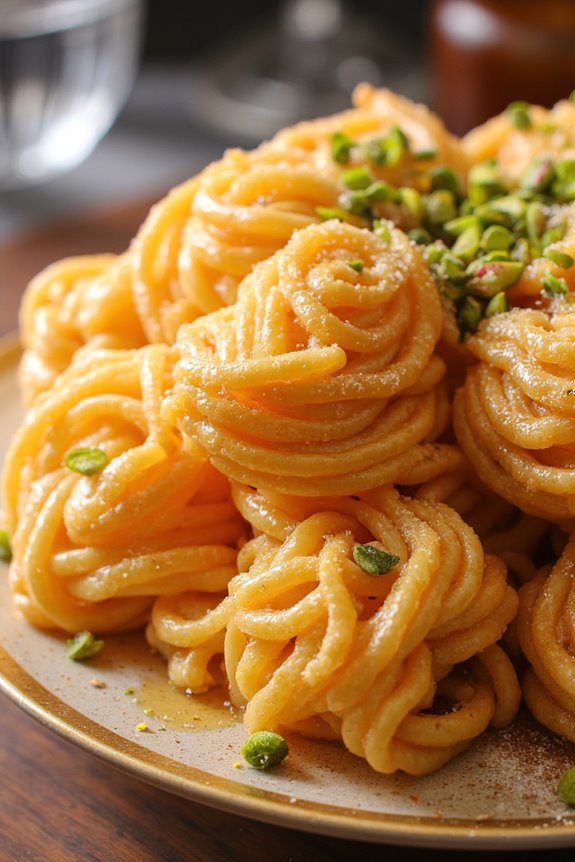
Kataifi is a traditional Greek pastry made with finely shredded phyllo dough, often filled with a sweet mixture of nuts and spices, and soaked in syrup. This delightful dessert has a unique texture that’s both crispy and tender, making it a favorite during festive occasions and family gatherings.
The dish is typically served warm and is drizzled with a fragrant syrup made from sugar and honey, which seeps into the layers of pastry, creating a sweet and indulgent treat.
Preparing kataifi may seem intimidating at first, but with a little patience and practice, you can master this delectable dessert. The key to a successful kataifi is guaranteeing that the dough is evenly distributed and baked to a perfect golden brown, providing a satisfying crunch with every bite. This recipe serves 4-6 people, making it an excellent option for sharing with friends and family.
Ingredients
- 1 pound kataifi dough
- 1 cup walnuts, finely chopped
- 1 cup almonds, finely chopped
- 1 teaspoon ground cinnamon
- ½ cup unsalted butter, melted
- 1 cup sugar
- 1 cup water
- ½ cup honey
- 1 teaspoon vanilla extract
- ½ cup pistachios, chopped (for garnish)
Cooking Instructions
- Prepare the Nut Filling: In a mixing bowl, combine the chopped walnuts, almonds, and ground cinnamon. Mix well and set aside. This nut filling will provide a rich flavor to the kataifi.
- Preheat the Oven: Preheat your oven to 350°F (175°C). This guarantees that the kataifi will bake evenly and achieve a crispy texture.
- Prepare the Kataifi Dough: Gently loosen the kataifi dough with your fingers to separate the strands. If it’s frozen, let it thaw for about 30 minutes before handling.
- Layer the Dough: Take a portion of the kataifi dough (about a handful) and spread it out on a clean surface. Brush it with melted butter, then place a tablespoon of the nut filling in the center. Roll the dough tightly around the filling to form a small log. Repeat this process until all the dough and filling are used.
- Arrange in Baking Dish: Place the rolled kataifi logs in a buttered baking dish, arranging them in a single layer. Make sure they’re close together but not overcrowded.
- Bake the Kataifi: Brush the tops of the kataifi logs with remaining melted butter. Bake in the preheated oven for 30-40 minutes or until the tops are golden brown and crispy. Keep an eye on them to prevent burning.
- Make the Syrup: While the kataifi is baking, combine the sugar, water, honey, and vanilla extract in a saucepan over medium heat. Stir until the sugar has dissolved, then bring to a boil. Reduce the heat and let it simmer for about 10 minutes until it thickens slightly. Remove from heat and let it cool.
- Soak the Kataifi: Once the kataifi is done baking, remove it from the oven and immediately pour the cooled syrup over the hot pastry. Let it sit for at least 30 minutes to allow the syrup to soak in.
- Serve: Garnish with chopped pistachios before serving. Cut the kataifi into pieces and enjoy warm or at room temperature.
Extra Tips
When making kataifi, guarantee that the dough remains moist while you work with it to avoid it drying out. You can cover the unused dough with a damp towel.
Additionally, feel free to experiment with different nuts or spices in the filling to personalize your kataifi. For an extra touch of flavor, consider adding a splash of orange blossom water to the syrup for a fragrant twist.
Enjoy your homemade kataifi, a delightful taste of Greek tradition!
Galaktoboureko
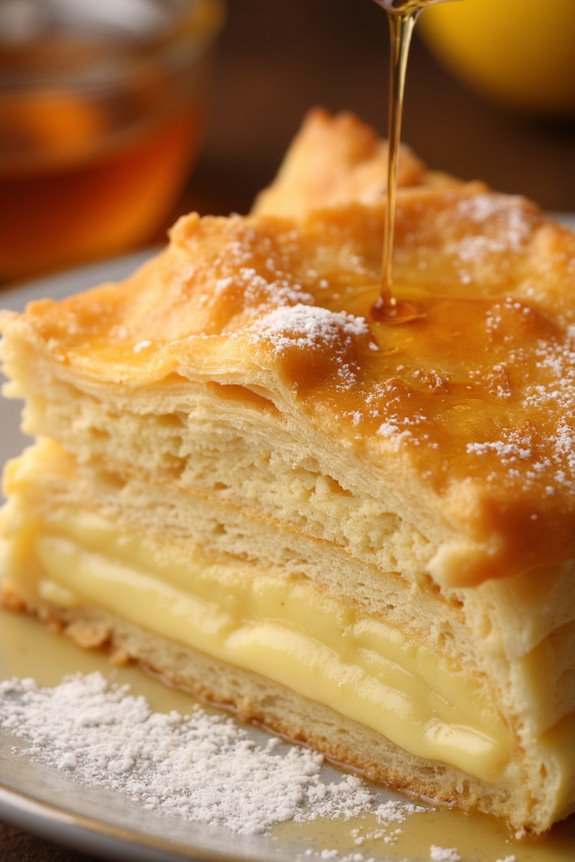
Galaktoboureko is a traditional Greek dessert that combines flaky phyllo pastry with a rich, creamy custard filling, all drenched in a sweet syrup. This exquisite pastry is known for its delicate layers and luscious texture, making it a beloved treat among many. The name “Galaktoboureko” translates to “milk pie,” reflecting the dessert’s main ingredient – a creamy custard made with milk, eggs, and semolina.
It’s often served at festive occasions and family gatherings, showcasing the warmth and richness of Greek culinary traditions.
Making Galaktoboureko may seem intimidating at first due to the phyllo pastry, but with a little patience and practice, anyone can master this delightful dish. The flaky layers of pastry paired with the velvety custard create a symphony of flavors and textures that will leave your guests wanting more.
Once baked, the dessert is soaked in a honey and lemon syrup, adding an aromatic sweetness that perfectly complements the creamy filling. This recipe yields about 4-6 servings, making it a perfect choice for sharing with friends and family.
Ingredients for Galaktoboureko (Serves 4-6)
- 1 package (16 oz) phyllo pastry, thawed
- 1 cup unsalted butter, melted
- 1 cup semolina
- 1 cup granulated sugar
- 4 cups whole milk
- 4 large eggs
- 1 teaspoon vanilla extract
- Zest of 1 lemon
- 1/2 teaspoon salt
- 1 cup water
- 1 cup granulated sugar (for syrup)
- 1/2 cup honey
- 1 teaspoon lemon juice
Cooking Instructions
1. Prepare the Syrup: In a saucepan, combine 1 cup of water, 1 cup of granulated sugar, 1/2 cup of honey, and 1 teaspoon of lemon juice. Bring the mixture to a boil over medium heat, stirring until the sugar is fully dissolved. Allow it to simmer for about 5 minutes, then remove from heat and let it cool completely.
2. Make the Custard Filling: In a separate saucepan, heat 4 cups of whole milk over medium heat until it’s warm but not boiling. In a bowl, whisk together 4 large eggs, 1 cup of granulated sugar, 1 cup of semolina, 1 teaspoon of vanilla extract, lemon zest, and 1/2 teaspoon of salt until smooth.
Gradually pour the warm milk into the egg mixture while whisking continuously to temper the eggs. Return the mixture to the saucepan and cook over medium heat, stirring constantly, until it thickens (about 10-15 minutes). Once thickened, remove from heat and let it cool slightly.
3. Assemble the Pastry: Preheat your oven to 350°F (175°C). Brush a 9×13 inch baking dish with some of the melted butter. Lay down a sheet of phyllo pastry in the dish and brush it lightly with melted butter. Repeat this process, layering about 8 sheets of phyllo, brushing each with butter.
Pour the custard filling over the layered phyllo, spreading it evenly.
4. Layer the Top: Continue layering the remaining phyllo sheets on top of the custard, brushing each sheet with butter. Aim for about 8 more layers. Once all the phyllo is layered, trim any excess edges and score the top layers into diamond or square shapes to facilitate cutting after baking.
5. Bake the Galaktoboureko: Place the baking dish in the preheated oven and bake for about 45-50 minutes, or until the top is golden brown and crisp. Remove from the oven and immediately pour the cooled syrup evenly over the hot pastry, allowing it to soak in.
6. Cool and Serve: Let the Galaktoboureko cool at room temperature for at least a couple of hours before cutting along the scored lines. This allows the syrup to fully absorb into the pastry and custard. Serve at room temperature or slightly chilled and enjoy!
Extra Tips
When making Galaktoboureko, working with phyllo pastry can be tricky, so it’s important to keep the sheets covered with a damp cloth while you work to prevent them from drying out.
If you want to add a twist to the flavor, consider incorporating ground cinnamon or nutmeg into the custard filling. Additionally, for an even richer syrup, you can infuse it with a cinnamon stick or a few cloves while it simmers.
This dessert stores well in the refrigerator, and the flavors continue to develop, making it a great make-ahead option for gatherings.
Loukoum
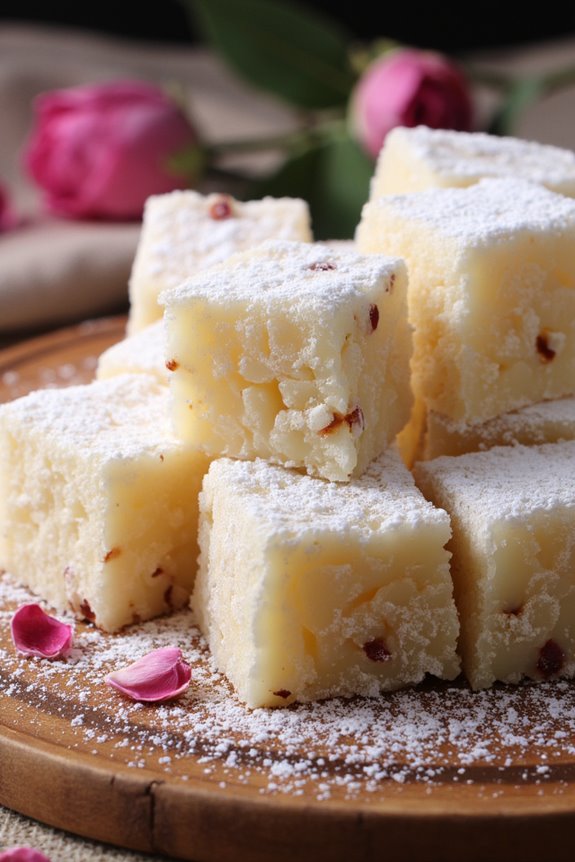
Loukoum, often referred to as Turkish Delight, is a traditional sweet treat that has delighted taste buds for centuries. Originating in the Ottoman Empire, this chewy confectionery is known for its soft texture and fragrant flavors, often enhanced with rosewater, citrus, or nuts.
It’s commonly enjoyed as a dessert or snack, especially during special occasions and holidays. The preparation of Loukoum may seem intimidating at first, but with the right ingredients and a little patience, you can create a delicious batch to share with family and friends.
This recipe yields approximately 4-6 servings of Loukoum, making it perfect for gatherings or as a delightful treat to enjoy at home. The process involves cooking sugar and cornstarch to achieve the characteristic chewy consistency, followed by flavoring and dusting with powdered sugar to prevent sticking. With each bite, you’ll savor the delightful balance of sweetness and the unique aromatic essence that makes Loukoum a beloved classic.
Ingredients:
- 2 cups granulated sugar
- 1 cup water
- 1/2 cup cornstarch
- 1/2 cup cold water (for cornstarch mixture)
- 1 tablespoon lemon juice
- 1 tablespoon rosewater (or flavoring of your choice)
- 1/4 cup chopped nuts (optional, such as pistachios or walnuts)
- Powdered sugar (for dusting)
- Cornstarch (for dusting)
Cooking Instructions:
- Prepare the Cornstarch Mixture: In a small bowl, combine the 1/2 cup of cornstarch with 1/2 cup of cold water. Stir until the mixture is smooth and free of lumps. This will serve as a thickening agent for the Loukoum.
- Cook the Sugar Syrup: In a medium saucepan, combine the granulated sugar and 1 cup of water. Heat over medium heat, stirring until the sugar dissolves completely. Once dissolved, add the lemon juice and bring the mixture to a boil. Allow it to boil for about 10 minutes without stirring, until it reaches a soft-ball stage (around 240°F or 115°C).
- Combine the Mixtures: Once the sugar syrup reaches the desired temperature, reduce the heat to low. Gradually pour the cornstarch mixture into the syrup while continuously stirring. This will prevent lumps from forming. Keep stirring for about 15-20 minutes until the mixture thickens and becomes translucent.
- Add Flavoring: Remove the saucepan from heat and stir in the rosewater and any optional chopped nuts. Mix thoroughly to guarantee the flavor is evenly distributed throughout the mixture.
- Set the Loukoum: Grease a square or rectangular baking dish with a little oil or line it with parchment paper. Pour the mixture into the prepared dish, spreading it out evenly. Allow it to cool at room temperature for several hours or until fully set and firm.
- Cut and Dust: Once set, dust a clean surface with powdered sugar and cornstarch mixture. Carefully remove the Loukoum from the dish and cut it into small cubes. Roll each piece in a mixture of powdered sugar and cornstarch to prevent sticking.
Extra Tips:
When making Loukoum, patience is key. Make sure to keep stirring the mixture to achieve that perfect chewy consistency and avoid burning on the bottom.
Additionally, feel free to experiment with different flavorings such as orange blossom water or even extracts like vanilla or almond. For a fun twist, you can also incorporate dried fruits or different nuts into the mixture.
Store any leftovers in an airtight container, layered with parchment paper to prevent them from sticking together. Enjoy your homemade Loukoum!
Kourabiedes
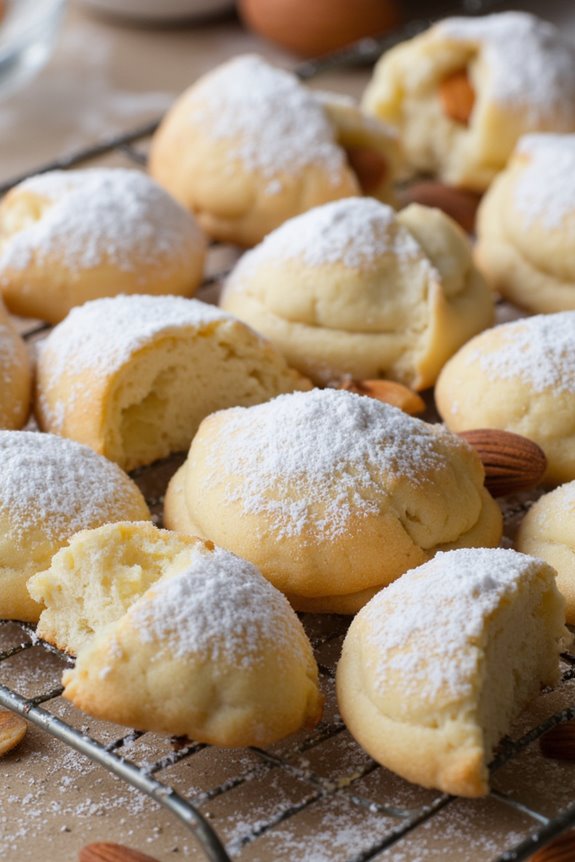
Kourabiedes are traditional Greek almond shortbread cookies, often enjoyed during festive occasions such as Christmas and weddings. These delightful pastries are characterized by their crumbly texture, rich buttery flavor, and a generous dusting of powdered sugar. The combination of toasted almonds and aromatic vanilla creates a comforting experience that makes these cookies a beloved treat in many Greek households.
Making Kourabiedes is a labor of love, but the results are well worth the effort, as they fill your home with a warm, inviting aroma. The key to perfect Kourabiedes lies in the quality of your ingredients and the technique used in preparing the dough. It’s important to properly cream the butter and sugar to create a light and airy texture.
Forming the cookies into the traditional crescent shape adds to their charm, and dusting them with powdered sugar before serving gives them an elegant finish. Whether enjoyed with a cup of coffee or served at a celebration, Kourabiedes are sure to impress and delight everyone who tastes them.
Ingredients (for 4-6 servings):
- 1 cup unsalted butter, softened
- 1/2 cup powdered sugar, plus extra for dusting
- 1 teaspoon vanilla extract
- 2 cups all-purpose flour
- 1 cup ground almonds (or finely chopped almonds)
- 1/4 teaspoon salt
- 1/4 teaspoon baking powder
- Whole almonds (for garnish, optional)
Cooking Instructions:
- Preheat the Oven: Begin by preheating your oven to 350°F (175°C). This guarantees that your cookies will bake evenly and achieve that perfect golden color.
- Cream the Butter and Sugar: In a large mixing bowl, combine the softened butter and 1/2 cup of powdered sugar. Using an electric mixer, cream them together on medium speed until the mixture is light and fluffy, about 3-4 minutes. This step is essential for achieving a tender cookie texture.
- Add Vanilla and Mix: Once the butter and sugar are well combined, mix in the vanilla extract. This adds a lovely flavor to the cookies and enhances their aroma.
- Combine Dry Ingredients: In a separate bowl, whisk together the all-purpose flour, ground almonds, salt, and baking powder. This guarantees that the dry ingredients are evenly distributed before incorporating them into the wet mixture.
- Mix Wet and Dry Ingredients: Gradually add the dry mixture to the creamed butter and sugar, mixing on low speed until just combined. Be careful not to overmix, as this can lead to tough cookies.
- Shape the Cookies: Scoop out small portions of the dough (about 1 tablespoon each) and roll them into crescent shapes. Place them on a parchment-lined baking sheet, leaving space between each cookie to allow for spreading.
- Bake the Cookies: Bake the cookies in the preheated oven for about 20-25 minutes or until they’re lightly golden on the bottom but still pale on top. Keep an eye on them to avoid over-baking.
- Cool and Dust with Powdered Sugar: Once baked, remove the cookies from the oven and let them cool on the baking sheet for about 10 minutes. Then, transfer them to a wire rack to cool completely. Once cool, generously dust the cookies with powdered sugar.
- Garnish (Optional): If desired, place a whole almond on top of each cookie for an elegant presentation before serving.
Extra Tips:
For the best flavor, consider toasting the ground almonds lightly in a dry skillet before adding them to the dough. This enhances their nuttiness and adds depth to the cookies.
Additionally, you can experiment with different flavors by adding a splash of orange blossom water or a hint of cinnamon to the mixture. Always verify that your butter is at room temperature for a smoother blend, and don’t rush the cooling process, as Kourabiedes taste best when allowed to rest and absorb the powdered sugar coating.
Enjoy every crumb and share with friends and family for a true Greek experience!
Melomakarona

Melomakarona are traditional Greek Christmas cookies that are rich, aromatic, and deliciously sweet. These delightful pastries are made from a blend of flour, olive oil, and orange juice, creating a moist and tender texture. The cookies are traditionally shaped into small oval forms and soaked in a fragrant syrup made from honey, sugar, and spices, which gives them their signature sweetness and sticky finish.
Once they’re coated in syrup, they’re generously sprinkled with finely chopped walnuts, adding a delightful crunch that complements the soft cookie.
These cookies aren’t only enjoyed during the festive season but are also a beloved treat throughout the year in Greece. The combination of flavors—citrus, honey, and spices—creates a delightful dessert that’s perfect for sharing with family and friends. With their unique taste and texture, Melomakarona are sure to impress anyone who tries them. Now, let’s plunge into the recipe to create these scrumptious Greek pastries.
Ingredients (serving size: 4-6 people)
- 1 cup olive oil
- 1/2 cup sugar
- 1/2 cup orange juice
- 1 tablespoon grated orange zest
- 1 teaspoon baking powder
- 1 teaspoon baking soda
- 1 teaspoon ground cinnamon
- 1/2 teaspoon ground clove
- 1/2 teaspoon salt
- 3-4 cups all-purpose flour (as needed)
- 1 cup honey
- 1/2 cup water
- 1/2 cup sugar (for syrup)
- 1 cup finely chopped walnuts (for topping)
Cooking Instructions
- Prepare the Dough: In a large mixing bowl, combine the olive oil and sugar. Mix them together until well blended. Add the orange juice, grated orange zest, baking powder, baking soda, ground cinnamon, ground clove, and salt. Stir until the mixture is smooth and then gradually add the all-purpose flour, one cup at a time. Mix until a soft dough forms. The dough should be pliable but not sticky.
- Shape the Cookies: Preheat your oven to 350°F (175°C). Take a small amount of dough (about the size of a walnut) and roll it into an oval shape, pressing gently to flatten it slightly. Place the shaped cookies on a baking sheet lined with parchment paper, leaving some space between each cookie.
- Bake the Cookies: Bake the cookies in the preheated oven for about 25-30 minutes or until they’re lightly golden on top. Keep an eye on them to avoid over-baking. Once baked, remove them from the oven and let them cool on a wire rack.
- Prepare the Syrup: While the cookies are cooling, prepare the syrup. In a saucepan, combine the honey, water, and sugar. Bring the mixture to a boil over medium heat, stirring until the sugar is dissolved. Allow it to simmer for about 5 minutes, then remove it from heat and let it cool slightly.
- Soak the Cookies: Once the cookies have cooled, dip each one into the warm syrup for a few seconds, making sure they’re well-coated. Allow any excess syrup to drip off before placing them on a serving plate.
- Add the Topping: While the cookies are still sticky from the syrup, sprinkle the finely chopped walnuts generously over the top of each cookie. This adds texture and flavor to the Melomakarona.
Extra Tips
When making Melomakarona, it’s essential to confirm that the syrup is warm when you dip the cookies; this allows the cookies to absorb the syrup better, resulting in a more flavorful treat.
Additionally, you can experiment with the spices according to your preference—some people like to add a dash of nutmeg or even a hint of vanilla for a unique twist.
Finally, store the cookies in an airtight container; they’ll become even more flavorful after a day or two as they soak up the syrup. Enjoy your baking!
Revani
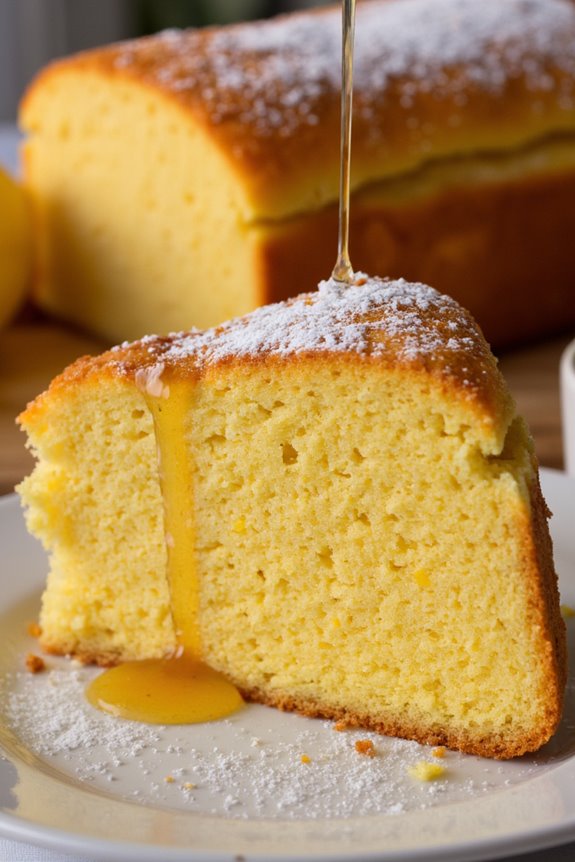
Revani is a delightful Greek semolina cake that boasts a moist texture and a hint of citrus, making it a perfect dessert for any occasion. This traditional pastry is often soaked in a sweet syrup infused with lemon or orange, which elevates its flavor profile and enhances its sweetness.
Originating from the Mediterranean region, Revani isn’t only popular in Greece but also in many other cultures, where it’s served as a celebratory dish during festivals and family gatherings.
Making Revani is a straightforward process that results in a deliciously rejuvenating cake. The use of semolina gives the cake its unique texture while the syrup adds a luscious sweetness that keeps it moist and flavorful.
Whether you’re serving it at a dinner party or enjoying it as an afternoon snack with tea, Revani is sure to impress your guests and family alike. Let’s plunge into this simple yet satisfying recipe!
Ingredients (Serves 4-6):
- 1 cup fine semolina
- 1 cup all-purpose flour
- 1 cup granulated sugar
- 1 cup plain yogurt
- 1/2 cup vegetable oil
- 3 large eggs
- 1 teaspoon baking powder
- 1/2 teaspoon baking soda
- Zest of 1 lemon
- 1 teaspoon vanilla extract
- 1 cup water (for syrup)
- 1 cup granulated sugar (for syrup)
- Juice of 1 lemon (for syrup)
Cooking Instructions:
- Preheat the Oven: Begin by preheating your oven to 350°F (175°C). This guarantees that your Revani cooks evenly throughout when placed in the oven.
- Prepare the Baking Dish: Grease a 9×13 inch baking dish with butter or cooking spray to prevent the cake from sticking. You can also line the bottom with parchment paper for easier removal later.
- Mix Dry Ingredients: In a bowl, whisk together the semolina, flour, baking powder, and baking soda. This helps to evenly distribute the leavening agents throughout the dry ingredients.
- Combine Wet Ingredients: In another large mixing bowl, beat the eggs and sugar until light and fluffy. Then, add the yogurt, vegetable oil, lemon zest, and vanilla extract. Mix until well combined.
- Combine Wet and Dry Mixtures: Gradually add the dry mixture to the wet mixture, stirring gently until just combined. Be careful not to overmix as this can lead to a denser cake.
- Bake the Cake: Pour the batter into the prepared baking dish and smooth the top with a spatula. Bake in the preheated oven for about 30-35 minutes or until the top is golden brown and a toothpick inserted into the center comes out clean.
- Prepare the Syrup: While the cake is baking, make the syrup. In a saucepan, combine 1 cup of water, 1 cup of sugar, and the lemon juice. Bring to a boil, then reduce the heat and let it simmer for about 10 minutes. Remove from heat and allow it to cool.
- Soak the Cake: Once the cake is done baking, remove it from the oven and immediately pour the cooled syrup over the hot cake. Let it absorb the syrup for at least 30 minutes before slicing.
- Serve and Enjoy: Cut the Revani into squares or diamonds and serve it at room temperature. It can be garnished with slivered almonds or a sprinkle of powdered sugar if desired.
Extra Tips:
To enhance the flavor of your Revani, consider adding a splash of orange blossom water to the syrup for a floral note.
Always allow the cake to soak in the syrup for a sufficient amount of time to ascertain it’s moist and flavorful. If you prefer a more intense flavor, you can double the syrup recipe, allowing you to drizzle extra syrup over the slices when serving.
Enjoy this delightful treat with a cup of Greek coffee or tea for the perfect pairing!
Karpatka
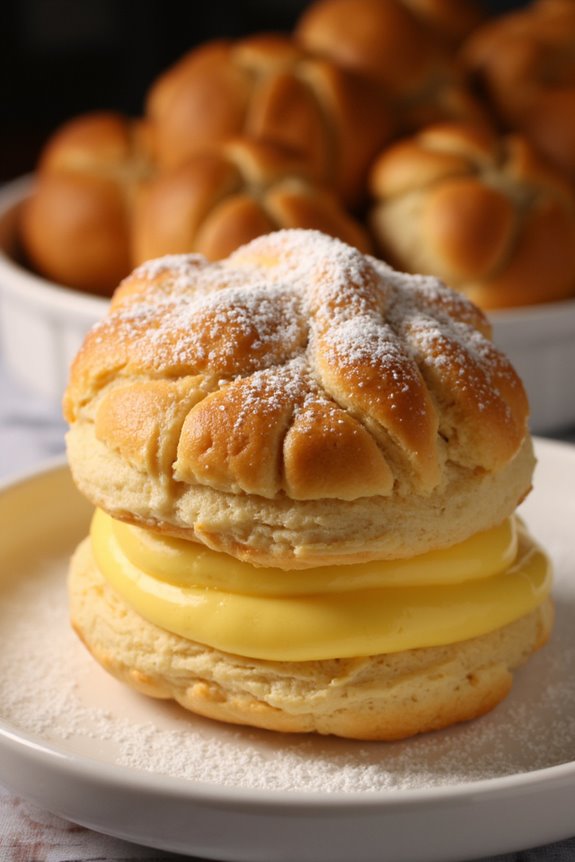
Karpatka is a delightful Polish pastry that has become popular in various regions, including Greece, where it’s embraced for its rich flavors and creamy texture. This dessert features two layers of choux pastry filled with a luscious custard cream, making it a perfect treat for special occasions or as a sweet indulgence after dinner. The name “Karpatka” translates to “Carpathian,” inspired by the Carpathian Mountains, which adds to its charm and character.
The preparation of Karpatka may seem intimidating at first, but with the right approach, it can be a rewarding experience. The combination of the airy pastry and the smooth custard creates a dessert that’s both light and satisfying. Whether you’re celebrating a holiday or simply treating yourself, Karpatka is sure to impress family and friends alike.
Ingredients (serving size: 4-6 people):
- 1 cup water
- 1/2 cup unsalted butter
- 1 cup all-purpose flour
- 4 large eggs
- 1/4 teaspoon salt
- 2 cups whole milk
- 1 cup granulated sugar
- 1/4 cup cornstarch
- 4 large egg yolks
- 1 teaspoon vanilla extract
- 1/4 cup unsalted butter (for custard)
- Powdered sugar (for dusting)
Cooking Instructions:
- Prepare the Choux Pastry: In a medium saucepan, combine 1 cup of water and 1/2 cup of unsalted butter. Heat over medium heat until the butter melts and the mixture starts to boil. Add 1 cup of all-purpose flour and 1/4 teaspoon of salt all at once, stirring vigorously with a wooden spoon. Keep stirring until the dough forms a ball and pulls away from the sides of the pan, about 2-3 minutes. Remove from heat and let it cool for about 5 minutes.
- Incorporate Eggs: Once the dough has cooled slightly, add the 4 large eggs one at a time, mixing well after each addition. The dough should be smooth and glossy. Preheat your oven to 400°F (200°C) while preparing the next steps.
- Bake the Pastry Layers: Line two baking sheets with parchment paper. Divide the choux pastry in half and spread each half into a rectangle about 1/2 inch thick on the prepared sheets. Bake in the preheated oven for about 25-30 minutes, or until the pastry is golden brown and puffed. Once done, remove from the oven and let cool completely on a wire rack.
- Make the Custard Cream: In a medium saucepan, whisk together 2 cups of whole milk, 1 cup of granulated sugar, 1/4 cup of cornstarch, and 4 egg yolks. Cook over medium heat, stirring constantly, until the mixture thickens and starts to bubble. Remove from heat and stir in 1 teaspoon of vanilla extract and 1/4 cup of unsalted butter until smooth. Allow the custard to cool.
- Assemble the Karpatka: Once both the pastry layers and custard cream are cool, place one layer of the choux pastry on a serving plate. Spread the custard cream evenly over it, then top with the second layer of choux pastry. Finish by dusting the top with powdered sugar.
Extra Tips:
When making Karpatka, it’s crucial to verify that the choux pastry is baked until golden brown to achieve the right texture. Avoid opening the oven door during baking, as this can cause the pastry to collapse.
If you want to add a twist to your Karpatka, consider infusing the custard with lemon zest or cocoa powder for a unique flavor. Additionally, serving it chilled can enhance the creaminess of the custard, making it even more enjoyable.
Bougatsa

Bougatsa is a traditional Greek pastry that can be enjoyed in various forms, often filled with sweet or savory ingredients. Originating from the regions of Macedonia and Thrace, this delightful pastry is typically made with thin layers of phyllo dough, which encase delicious fillings such as custard, cheese, or minced meat. The combination of flaky pastry and rich filling creates a mouthwatering experience that has made Bougatsa a beloved treat throughout Greece and beyond.
Making Bougatsa may seem intimidating due to the intricate layers of phyllo, but with a bit of patience and practice, you can master this delicious dish at home. Whether you choose to prepare the sweet custard version dusted with powdered sugar or the savory cheese version, Bougatsa is sure to impress your guests and elevate any meal. This recipe serves 4 to 6 people, making it a perfect option for gatherings or family dinners.
Ingredients
- 1 package of phyllo dough (about 16 oz)
- 1 cup of ricotta cheese (or feta cheese for savory option)
- 1/2 cup of sugar (for sweet version)
- 2 large eggs
- 1/2 cup of milk
- 1 teaspoon of vanilla extract (for sweet version)
- 1/4 cup of unsalted butter, melted
- Powdered sugar (for dusting, optional)
- 1/2 teaspoon of salt (for savory version)
- 1/4 teaspoon of black pepper (for savory version)
Cooking Instructions
- Prepare the Filling: In a mixing bowl, combine the ricotta cheese, sugar (if making the sweet version), eggs, and milk. For the sweet Bougatsa, add vanilla extract. For the savory version, mix in salt and black pepper instead. Whisk until smooth and well combined.
- Preheat the Oven: Preheat your oven to 375°F (190°C). This guarantees that the Bougatsa will bake evenly and become golden brown and crispy.
- Prepare the Phyllo Dough: Unroll the phyllo dough and cover it with a damp cloth to prevent it from drying out. Take one sheet of phyllo and brush it lightly with melted butter. Place another sheet on top and brush it again. Repeat this process for about 4-5 layers, depending on how thick you want the bottom crust.
- Add the Filling: Once you have layered your phyllo, spoon the filling along one edge of the dough, leaving some space at the sides. Carefully fold the sides of the dough over the filling and then roll it up tightly into a log shape. Place the rolled Bougatsa seam side down on a baking sheet lined with parchment paper.
- Brush and Bake: Brush the top of the Bougatsa with more melted butter for a golden finish. Bake in the preheated oven for about 30-40 minutes or until the pastry is golden brown and crispy.
- Cool and Serve: Once baked, remove from the oven and allow it to cool for a few minutes. If you made the sweet version, dust with powdered sugar before serving. Cut into slices and enjoy warm!
Extra Tips
When working with phyllo dough, always keep it covered with a damp cloth to prevent it from drying out, as it can become brittle and difficult to work with.
Don’t hesitate to add your personal twist to the filling; you can experiment with different cheeses or add herbs for a savory version. If you’re new to handling phyllo, take your time, and practice makes perfect.
Bougatsa is best enjoyed fresh out of the oven, but it can also be reheated; just pop it back in the oven for a few minutes to restore its crispiness.
Sfinaka
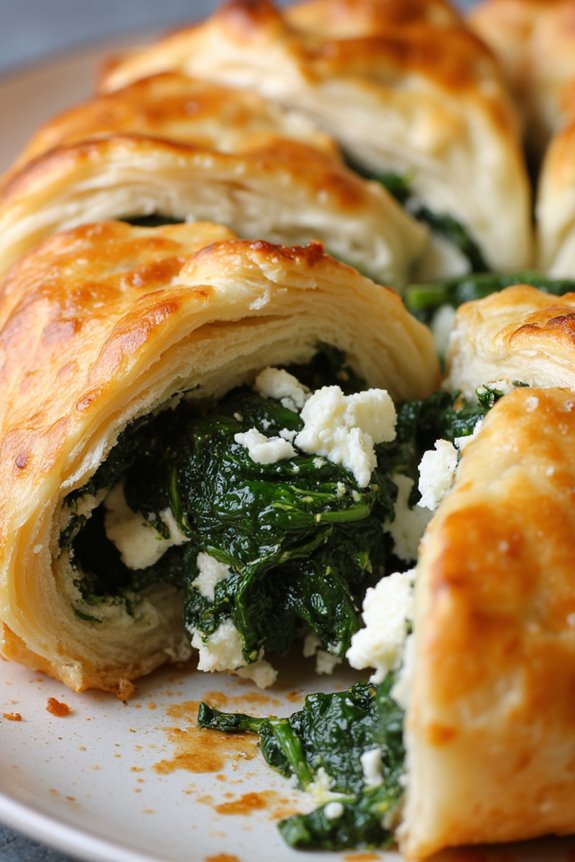
Sfinaka, a traditional Greek pastry, is a delightful spinach pie that boasts a rich blend of flavors and textures. This dish combines fresh spinach, aromatic herbs, and creamy feta cheese all wrapped in crispy phyllo pastry. Originating from the Mediterranean region, Sfinaka isn’t only a staple in Greek households but also a favorite among food enthusiasts worldwide. This dish can be served as an appetizer, a side dish, or even a light main course, making it versatile and appealing to many.
Preparing Sfinaka is a rewarding experience, and while it may seem intricate, the steps are straightforward and manageable. The key to a perfect Sfinaka lies in the quality of ingredients and the careful layering of phyllo sheets. Once baked, the pastry becomes golden and flaky, encasing a delicious filling that’s sure to tantalize your taste buds. This recipe serves 4-6 people, making it ideal for family gatherings or casual dinners.
Ingredients:
- 1 pound fresh spinach, washed and chopped
- 1 medium onion, finely chopped
- 2-3 green onions, chopped
- 1 cup feta cheese, crumbled
- 1/2 cup fresh dill, chopped
- 1/2 cup fresh parsley, chopped
- 3 large eggs
- 1 package of phyllo pastry (about 12 sheets)
- 1/2 cup olive oil (for brushing)
- Salt and pepper to taste
- Zest of 1 lemon (optional)
Cooking Instructions:
- Preheat the Oven: Begin by preheating your oven to 375°F (190°C). A hot oven is essential for achieving a crispy and golden crust.
- Prepare the Filling: In a large skillet, heat a tablespoon of olive oil over medium heat. Add the chopped onions and sauté until they’re translucent. Then, add the chopped spinach and cook until wilted. Season with salt, pepper, and optional lemon zest. Remove from heat and let it cool slightly.
- Mix the Ingredients: In a large bowl, combine the sautéed spinach and onions with crumbled feta cheese, chopped dill, parsley, and eggs. Mix until well incorporated, ensuring that the cheese and herbs are evenly distributed throughout the spinach.
- Prepare the Phyllo Pastry: Unroll the phyllo pastry and cover it with a damp cloth to prevent it from drying out. Take one sheet of phyllo, place it on a clean surface, and brush lightly with olive oil. Layer another sheet on top and brush again with oil. Repeat this process for 4-5 sheets.
- Fill the Pastry: Place the spinach filling along one edge of the layered phyllo, forming a log shape. Carefully roll the phyllo over the filling to form a tight cylinder. Place the rolled pastry seam-side down on a greased baking sheet. Repeat the process with the remaining phyllo sheets and filling.
- Brush and Score: Once all the Sfinaka are rolled and arranged on the baking sheet, brush the tops with olive oil. Using a sharp knife, score the tops lightly to create diamond shapes; this will allow steam to escape during baking.
- Bake the Sfinaka: Place the baking sheet in the preheated oven and bake for 30-35 minutes or until the pastry is golden brown and crispy. Keep an eye on it to prevent burning.
- Serve: Once baked, remove the Sfinaka from the oven and let it cool for a few minutes before slicing. Serve warm or at room temperature.
Extra Tips: When working with phyllo pastry, it’s essential to keep it covered to prevent it from drying out. If you have any leftover filling, consider using it as a stuffing for other dishes or even making mini pies. For added flavor, you can experiment by incorporating other cheeses or herbs based on your preferences. Enjoy your Sfinaka with a side of Greek yogurt or a fresh salad for a complete meal!
Halva

Halva is a traditional Greek dessert that’s both rich and comforting, made primarily from semolina, sugar, and a variety of flavorings. This sweet treat has a grainy texture, often enhanced with nuts, spices, and sometimes even chocolate, making it a versatile dish that can be enjoyed on many occasions.
Halva isn’t only popular in Greece but also found across many cultures, each with its own unique twist on the recipe. This dish is often served as a sweet ending to a meal or enjoyed as a snack at any time of the day.
Making Halva is relatively straightforward, requiring only a few basic ingredients and some patience. The key to a perfect Halva lies in the careful preparation of the semolina and the sugar syrup, which come together to create the signature texture and flavor of this delightful dessert.
Once prepared, it can be sliced into pieces and garnished with nuts or dried fruits for an appealing presentation. Whether you’re serving it at a family gathering or enjoying it on your own, this Greek pastry is sure to satisfy your sweet tooth.
Ingredients (Serves 4-6):
- 1 cup semolina
- 1 cup sugar
- 2 cups water
- 1/2 cup vegetable oil or unsalted butter
- 1 teaspoon vanilla extract
- 1/4 teaspoon ground cinnamon
- 1/2 cup chopped nuts (such as almonds or walnuts, optional)
- Pinch of salt
Cooking Instructions:
- Prepare the Syrup: In a medium saucepan, combine the water and sugar. Place over medium heat and stir until the sugar dissolves completely. Bring it to a boil, then reduce the heat and let it simmer for about 5 minutes. Remove from heat and add vanilla extract, stirring well. Set aside to cool slightly.
- Toast the Semolina: In a large skillet or saucepan, heat the vegetable oil or butter over medium heat. Once hot, add the semolina and stir continuously for about 5-7 minutes, or until it turns a golden brown color. This toasting process is crucial for developing the nutty flavor of the Halva.
- Combine the Mixtures: Carefully pour the warm syrup into the toasted semolina while stirring continuously to prevent lumps from forming. Be cautious as the mixture may bubble up. Stir until the semolina is fully absorbed and the mixture thickens, which should take about 2-3 minutes.
- Add Flavorings: Once the mixture has thickened, add the ground cinnamon and a pinch of salt. If you’re using chopped nuts, fold them into the mixture at this stage. Stir well to make sure everything is evenly distributed.
- Mold the Halva: Remove the mixture from heat and transfer it into a greased rectangular or square dish. Spread it evenly and press down gently to compact it. Allow it to cool at room temperature for about 1-2 hours, or until it firms up.
- Serve: Once set, cut the Halva into squares or diamond shapes. You can garnish it with additional nuts or a sprinkle of cinnamon if desired. Serve at room temperature.
Extra Tips:
When making Halva, it’s important to keep a close eye on the semolina as it toasts to avoid burning. Stir continuously and adjust the heat as necessary to achieve the perfect golden color.
Additionally, you can experiment with different flavorings such as cocoa powder for a chocolate version or adding orange zest for a citrus twist. Halva can be stored in an airtight container at room temperature for several days, making it a great make-ahead dessert for gatherings.
Tsoureki
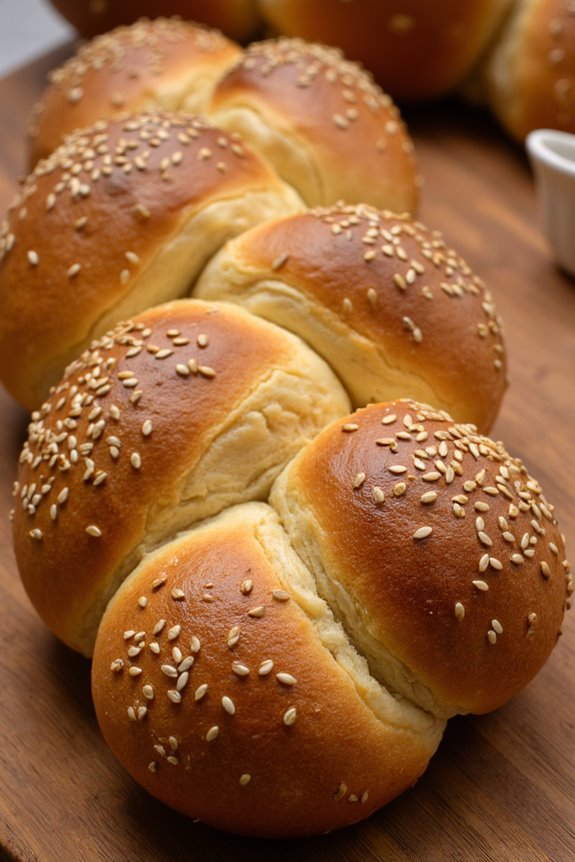
Tsoureki is a traditional Greek sweet bread, especially popular during Easter celebrations. This delightful pastry is known for its rich, aromatic flavor and soft, fluffy texture, often enhanced with spices like mahleb and mastic. The bread is braided into a beautiful shape, making it a stunning centerpiece for festive gatherings.
Tsoureki isn’t just a treat for the taste buds; it’s also a symbol of joy and abundance, often enjoyed with family and friends during special occasions.
Making Tsoureki is a rewarding experience that fills your kitchen with a warm, inviting aroma. The dough is enriched with eggs, milk, and butter, which contributes to its decadent quality. With a little patience and care, you can create this delicious bread that embodies the spirit of Greek culinary traditions.
Whether you serve it plain, with a spread of butter, or alongside your favorite jam, Tsoureki is sure to impress your guests and become a cherished recipe in your home.
Ingredients (Serves 4-6):
- 4 cups all-purpose flour
- 1 cup milk, warmed
- 1/2 cup sugar
- 1/2 cup unsalted butter, softened
- 3 large eggs
- 1 packet (2 1/4 tsp) active dry yeast
- 1/2 teaspoon salt
- 1 teaspoon ground mahleb (optional)
- 1/2 teaspoon mastic, ground (optional)
- 1 egg, for egg wash
- Sesame seeds, for topping (optional)
Cooking Instructions:
- Activate the Yeast: In a small bowl, combine the warmed milk, sugar, and active dry yeast. Stir gently and let it sit for about 5-10 minutes until it becomes frothy. This step guarantees that the yeast is alive and will help the dough rise.
- Mix the Wet Ingredients: In a large mixing bowl, combine the softened butter, eggs, and the frothy yeast mixture. Whisk together until well combined. The warmth of the milk will help to melt the butter, creating a smooth mixture.
- Combine Dry Ingredients: In another bowl, sift together the flour, salt, mahleb, and mastic (if using). Gradually add this dry mixture into the wet ingredients, stirring with a wooden spoon until a shaggy dough forms.
- Knead the Dough: Transfer the dough onto a floured surface and knead for about 10-15 minutes until it becomes smooth and elastic. If the dough is too sticky, you can add a little more flour as needed, but be careful not to overdo it.
- First Rise: Place the kneaded dough in a greased bowl, cover it with a clean kitchen towel, and let it rise in a warm place for about 1-2 hours or until it has doubled in size.
- Shape the Dough: Once the dough has risen, punch it down to release the air. Divide it into three equal pieces and roll each piece into long ropes. Braid the three ropes together, pinching the ends to seal them.
- Second Rise: Place the braided Tsoureki onto a greased baking sheet or a lined baking tray. Cover it again with a towel and let it rise for another 30-45 minutes until it has puffed up.
- Prepare for Baking: Preheat your oven to 350°F (175°C). Once the dough has risen, beat the additional egg and brush it over the surface of the braid for a shiny finish. Sprinkle sesame seeds on top if desired.
- Bake the Tsoureki: Bake in the preheated oven for 25-30 minutes or until the bread is golden brown and sounds hollow when tapped on the bottom.
- Cool and Serve: Remove the Tsoureki from the oven and let it cool on a wire rack. Once cooled, slice and serve. Enjoy the sweet, aromatic flavors of this traditional Greek bread!
Extra Tips:
When making Tsoureki, it’s important to verify that all your ingredients are at room temperature, as this helps with the yeast activation and dough rise.
If you’re using mastic and mahleb, be sure to grind them finely for even distribution of flavor. Additionally, for added richness, you can substitute some of the milk with yogurt.
Finally, experiment with different fillings or toppings, such as chocolate chips or nuts, to personalize your Tsoureki to your taste.