

When it comes to hosting a gathering, Greek dips are always a hit. They’re simple to prepare and packed with Mediterranean flavors that everyone enjoys. From refreshing Tzatziki to deliciously creamy Feta and Spinach Dip, there’s something to please every taste bud. Let’s explore some delightful recipes that will elevate your snack game. Your guests will surely be coming back for seconds.
Tzatziki Dip
Tzatziki is a revitalizing Greek dip that combines creamy yogurt with the crispness of cucumbers and the zing of garlic. This delightful dip is often served alongside grilled meats, pita bread, or fresh vegetables, making it a versatile addition to any meal or gathering.
Its cool and tangy flavor profile makes it particularly popular during the warm summer months, but it can be enjoyed year-round.
To make a truly authentic Tzatziki, it’s important to use good quality ingredients. Greek yogurt is the star of this dish, providing a rich and creamy base. Fresh cucumbers add crunch and moisture, while garlic and dill contribute aromatic flavors that elevate the dip to new heights.
This easy-to-make recipe will surely impress your guests and keep them coming back for more!
Ingredients (Serves 4-6)
- 1 cup Greek yogurt
- 1 medium cucumber, grated and excess water squeezed out
- 2 cloves garlic, minced
- 1 tablespoon fresh dill, chopped (or 1 teaspoon dried dill)
- 1 tablespoon olive oil
- 1 tablespoon white wine vinegar (or lemon juice)
- Salt and black pepper to taste
Cooking Instructions
- Prepare the Cucumber: Start by washing the cucumber thoroughly. Grate it using a box grater or a food processor. Once grated, place the cucumber in a clean kitchen towel or paper towel and squeeze out as much excess moisture as possible. This step is essential to prevent your tzatziki from becoming watery.
- Combine the Ingredients: In a medium-sized mixing bowl, add the Greek yogurt. Then, add the grated cucumber, minced garlic, fresh dill, olive oil, and white wine vinegar (or lemon juice).
- Mix Well: Using a spatula or a whisk, gently mix all the ingredients together until well combined. Make sure there are no clumps of yogurt or cucumber, and the mixture is smooth.
- Season to Taste: Add salt and black pepper to taste. Start with a pinch of salt and a few grinds of black pepper, then adjust according to your preference. Stir again to guarantee the seasoning is evenly distributed.
- Chill and Serve: Cover the bowl with plastic wrap or a lid and refrigerate for at least 30 minutes before serving. This resting period allows the flavors to meld together beautifully.
Extra Tips
For an extra burst of flavor, feel free to experiment with additional ingredients like a squeeze of fresh lemon juice or a sprinkle of smoked paprika.
If you prefer a thicker dip, you can use strained Greek yogurt or let the dip sit in the refrigerator for a longer period to allow excess moisture to escape. Tzatziki can also be made a day in advance, which allows the flavors to develop even further.
Just remember to give it a good stir before serving!
Feta and Spinach Dip
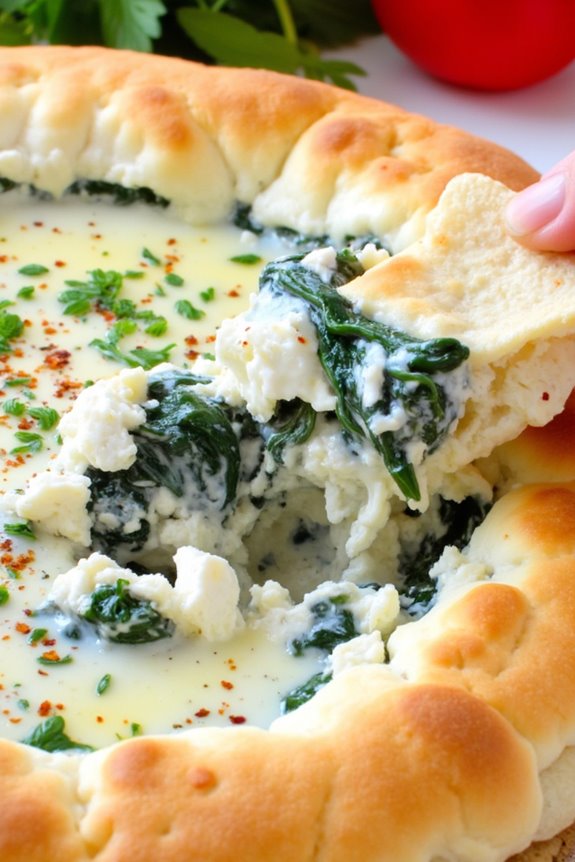
Feta and Spinach Dip is a delightful, creamy appetizer that brings a taste of the Mediterranean straight to your table. This dip isn’t only delicious but also easy to prepare, making it an ideal choice for gatherings, parties, or a cozy night in.
With its rich flavors and nutritious ingredients, it pairs wonderfully with pita chips, fresh veggies, or toasted bread, allowing you to enjoy a healthy yet indulgent snack. The combination of tangy feta cheese and fresh spinach creates a vibrant dip that’s both satisfying and packed with flavor.
Whether you serve it warm or cold, this dip is sure to impress your guests and leave them coming back for more. Plus, it’s a great way to incorporate more greens into your diet without sacrificing taste!
Ingredients (Serves 4-6):
- 1 cup fresh spinach, chopped
- 1 cup feta cheese, crumbled
- 1 cup cream cheese, softened
- ½ cup sour cream
- ¼ cup mayonnaise
- 2 cloves garlic, minced
- 1 tablespoon lemon juice
- ¼ teaspoon black pepper
- ¼ teaspoon salt
- ½ teaspoon dried oregano
- ½ teaspoon crushed red pepper flakes (optional)
- Fresh herbs (e.g., parsley or dill) for garnish
Cooking Instructions:
- Preheat the Oven: Begin by preheating your oven to 350°F (175°C). This guarantees that the dip will be perfectly warmed and bubbly when it’s ready to serve.
- Prepare the Spinach: In a medium skillet over medium heat, add a splash of olive oil. Once heated, add the chopped spinach and sauté for about 2-3 minutes, or until the spinach is wilted. Remove from heat and set aside to cool slightly.
- Mix the Base: In a large mixing bowl, combine the softened cream cheese, sour cream, and mayonnaise. Use a hand mixer or a spatula to blend these ingredients until smooth and creamy.
- Add Flavorings: To the cream mixture, add the crumbled feta cheese, minced garlic, lemon juice, black pepper, salt, oregano, and crushed red pepper flakes (if using). Stir until all ingredients are well combined.
- Incorporate Spinach: Gently fold the sautéed spinach into the cheese mixture. Make sure it’s evenly distributed throughout the dip, letting every bite be flavorful.
- Transfer to Baking Dish: Pour the mixture into a baking dish, spreading it out evenly. You can use an 8-inch square dish or a similar-sized oven-safe dish.
- Bake the Dip: Place the baking dish in the preheated oven and bake for about 20-25 minutes, or until the dip is hot and bubbly on the edges.
- Garnish and Serve: Once baked, remove the dip from the oven and let it cool for a few minutes. Garnish with fresh herbs before serving. Enjoy warm with your choice of dipping options!
Extra Tips:
For an extra layer of flavor, consider adding some sautéed onions or artichoke hearts to the mix. You can also experiment with different herbs, such as basil or thyme, to customize the dip to your taste.
If you’re making this dip ahead of time, you can prepare it up to the baking step and store it in the refrigerator. Just pop it in the oven when you’re ready to serve, and you’ll have a warm, delicious appetizer ready in no time!
Greek Yogurt Hummus
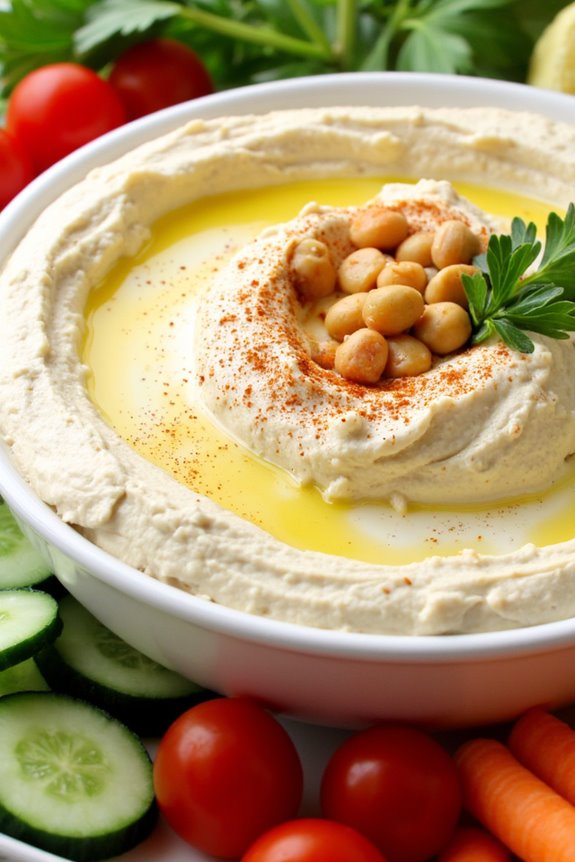
Greek Yogurt Hummus is a delicious, creamy dip that blends the classic flavors of traditional hummus with the added richness of Greek yogurt. This twist not only enhances the texture but also boosts the protein content, making it a healthier alternative to standard hummus.
It’s perfect for serving at parties, as a snack with fresh veggies, or as a spread on sandwiches and wraps. With its vibrant flavors and smooth consistency, this dip is sure to impress your guests and become a staple in your culinary repertoire.
Making Greek Yogurt Hummus is a simple process that requires minimal preparation. By using canned chickpeas, you can save time, while fresh ingredients like garlic, lemon juice, and tahini contribute to the dip’s authentic Mediterranean taste.
This recipe yields enough for 4-6 servings, making it ideal for gatherings or meal prep throughout the week. So, gather your ingredients and get ready to whip up this deliciously healthy dip!
Ingredients (Serves 4-6):
- 1 can (15 oz) chickpeas, drained and rinsed
- 1 cup plain Greek yogurt
- 1/4 cup tahini
- 2 tablespoons olive oil
- 2 tablespoons fresh lemon juice
- 1-2 cloves garlic, minced
- 1/2 teaspoon ground cumin
- Salt, to taste
- Fresh parsley, for garnish (optional)
- Paprika, for garnish (optional)
Cooking Instructions:
1. Prepare the Chickpeas: Start by draining and rinsing the canned chickpeas under cold water. This helps remove excess sodium and makes them easier to blend smoothly. Set aside a few chickpeas for garnish later if desired.
2. Blend the Base Ingredients: In a food processor, combine the rinsed chickpeas, Greek yogurt, tahini, olive oil, lemon juice, minced garlic, and ground cumin. This combination forms the base of your hummus, providing a creamy texture and robust flavor.
3. Process Until Smooth: Secure the lid on the food processor and pulse the mixture until it’s fully blended and smooth. You may need to stop and scrape down the sides of the bowl to guarantee everything is evenly incorporated.
If the mixture is too thick, add a tablespoon of water at a time until you reach your desired consistency.
4. Season to Taste: Once the hummus is smooth, taste it and add salt as needed. This step is essential for balancing the flavors, so adjust to your preference. If you like a stronger garlic flavor, feel free to add more minced garlic at this stage.
5. Serve and Garnish: Transfer the hummus to a serving bowl. For an extra touch, drizzle a little olive oil on top and sprinkle with paprika and chopped parsley. You can also add the reserved chickpeas as a garnish.
Extra Tips:
To enhance the flavors of your Greek Yogurt Hummus, consider adding other spices such as smoked paprika or a pinch of cayenne pepper for a bit of heat.
You can also customize the dip by incorporating roasted red peppers, sun-dried tomatoes, or even fresh herbs like basil or dill. For a creamier texture, allow the hummus to chill in the refrigerator for at least an hour before serving; this will allow the flavors to meld together beautifully.
Enjoy with pita bread, fresh vegetables, or as a spread in your favorite sandwiches!
Roasted Red Pepper and Feta Dip
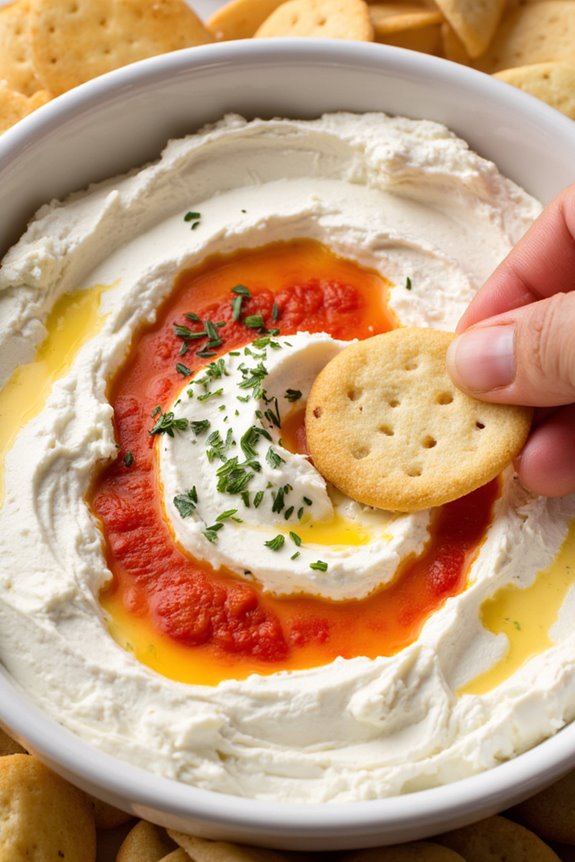
If you’re searching for a vibrant and flavorful dip that will impress your guests at your next gathering, you need to seek no further than Roasted Red Pepper and Feta Dip. This creamy and tangy dip combines the sweetness of roasted red peppers with the salty richness of feta cheese, creating a deliciously addictive blend.
Perfect for serving with pita chips, fresh vegetables, or even as a spread on sandwiches, this dip is a versatile addition to any appetizer spread.
Making Roasted Red Pepper and Feta Dip isn’t only simple but also quick, allowing you to whip it up in no time at all. With just a few ingredients and a food processor, you can create a delightful dip that’s sure to become a new favorite.
Whether it’s for a casual get-together, a holiday party, or a simple family dinner, this dip is bound to be a hit!
Ingredients (Serves 4-6):
- 1 cup roasted red peppers (jarred or homemade)
- 1 cup crumbled feta cheese
- 1/4 cup cream cheese, softened
- 2 tablespoons olive oil
- 1 tablespoon lemon juice
- 1 clove garlic, minced
- Salt and pepper to taste
- Fresh herbs for garnish (optional, such as parsley or dill)
Cooking Instructions:
- Prepare the Ingredients: If you’re using jarred roasted red peppers, drain them well. If you prefer homemade roasted peppers, roast them in the oven until the skins are charred, then peel and deseed. Make certain all your ingredients are ready for blending.
- Combine the Ingredients: In a food processor, add the roasted red peppers, crumbled feta cheese, softened cream cheese, olive oil, lemon juice, and minced garlic. These ingredients will create the base of your dip.
- Blend Until Smooth: Pulse the mixture in the food processor until it reaches a smooth and creamy consistency. You may need to scrape down the sides of the bowl a couple of times to make sure everything is well blended.
- Season to Taste: After blending, taste the dip and add salt and pepper as needed. Keep in mind that feta cheese is already salty, so start with a small amount and adjust according to your preference.
- Chill Before Serving: For the best flavor, transfer the dip to a serving bowl and refrigerate for at least 30 minutes before serving. This allows the flavors to meld together beautifully.
- Garnish and Serve: Before serving, garnish the dip with fresh herbs if desired. Serve it with pita chips, vegetable sticks, or spread it on crusty bread for a delightful appetizer.
Extra Tips:
When preparing Roasted Red Pepper and Feta Dip, feel free to get creative by adding other ingredients such as chopped olives, sun-dried tomatoes, or even a pinch of red pepper flakes for a bit of heat.
Adjust the consistency of the dip by adding more olive oil if you prefer it thinner, or more cream cheese for a thicker texture. This dip can also be stored in an airtight container in the refrigerator for up to a week, making it a great make-ahead option for busy schedules.
Enjoy your delicious creation!
Olive Tapenade
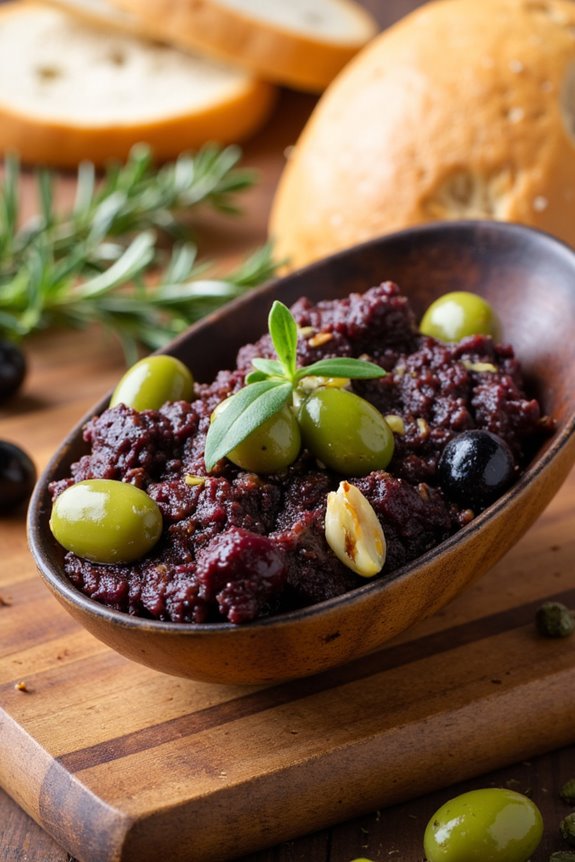
Olive tapenade is a classic Mediterranean dish that showcases the bold flavors of olives, capers, and herbs. This versatile spread can be served as an appetizer or as part of a mezze platter, making it an ideal choice for entertaining guests or simply enjoying with a glass of wine on a quiet evening.
The combination of salty olives and tangy capers creates a savory blend that pairs beautifully with crusty bread, crackers, or fresh vegetables.
Making olive tapenade isn’t only simple but also allows for customization based on your taste preferences. Whether you prefer a chunky texture or a smooth paste, this recipe can be adjusted to suit your liking. With just a few ingredients, you can whip up a delicious tapenade that will transport your taste buds to the sunny shores of Greece.
Ingredients (serves 4-6 people):
- 1 cup pitted Kalamata olives
- 1 cup pitted green olives (such as Castelvetrano)
- 2 tablespoons capers, drained
- 2 cloves garlic, minced
- 2 tablespoons fresh lemon juice
- 1/4 cup extra virgin olive oil
- 1 tablespoon fresh thyme leaves (or 1 teaspoon dried thyme)
- Freshly ground black pepper, to taste
Cooking Instructions:
- Prepare the Olives: Start by rinsing the olives under cold water to remove excess brine. This step helps to mellow the saltiness. Drain them well and pat dry with a towel before adding them to the food processor.
- Combine Ingredients: In a food processor, combine the Kalamata olives, green olives, capers, minced garlic, and fresh lemon juice. The lemon juice adds brightness and balances the flavors of the olives and capers.
- Blend the Mixture: Pulse the ingredients in the food processor until they’re coarsely chopped. Scrape down the sides as necessary. Depending on your texture preference, you can blend until smooth or leave it a bit chunky for more texture.
- Add Olive Oil and Herbs: With the food processor running, slowly drizzle in the extra virgin olive oil. This will help emulsify the mixture and create a creamy consistency. Add the fresh thyme leaves and blend briefly to combine.
- Season to Taste: Taste your tapenade and season with freshly ground black pepper. Adjust the seasoning if necessary, considering that olives and capers already bring a lot of saltiness.
- Serve or Store: Transfer the olive tapenade to a serving bowl. It can be served immediately but tastes even better after chilling in the refrigerator for at least 30 minutes to allow the flavors to meld.
Extra Tips:
When making olive tapenade, feel free to experiment with additional ingredients to enhance the flavor. Adding a splash of balsamic vinegar can introduce a different dimension, while crushed red pepper flakes can provide a hint of heat.
For a unique twist, consider incorporating sun-dried tomatoes or roasted red peppers for added sweetness and complexity. Remember to allow your tapenade to rest in the fridge for a while, as this will deepen the flavors and make it even more delicious when served.
Enjoy your homemade olive tapenade with a side of fresh pita bread or vegetable sticks for a delightful taste of Greece!
Spicy Feta Cheese Spread
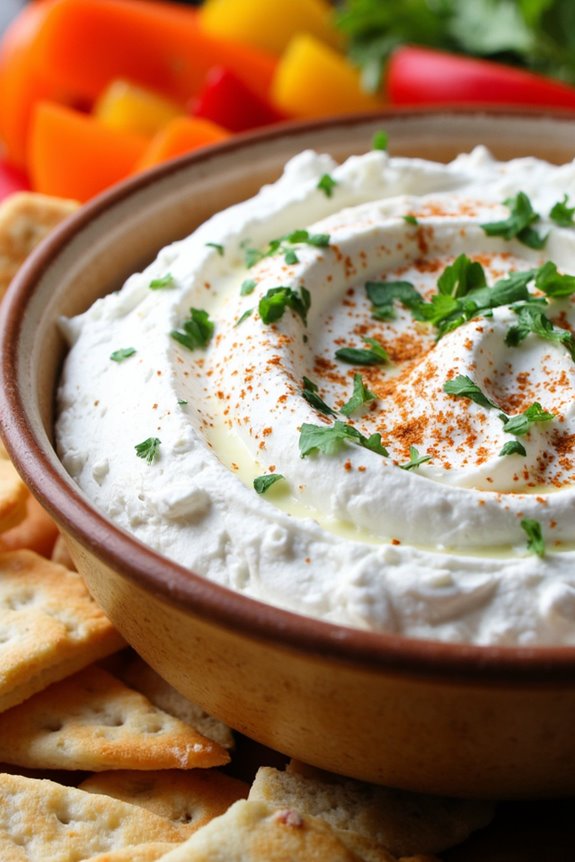
If you’re looking for a delicious and zesty dip that will elevate your party platter or serve as a delightful appetizer, the Spicy Feta Cheese Spread is the perfect choice. This creamy and flavorful spread combines the tangy taste of feta cheese with a hint of heat, making it an irresistible option for gatherings or a cozy night in.
Pair it with fresh vegetables, pita bread, or crackers, and watch it disappear in no time!
This easy-to-make dip isn’t only quick to prepare but also packed with flavor, thanks to the addition of red pepper flakes and herbs. The Spicy Feta Cheese Spread can be made ahead of time, allowing the flavors to meld together beautifully.
Serve it chilled or at room temperature for the best experience and enjoy the delightful fusion of Greek-inspired ingredients.
Ingredients (Serves 4-6)
- 8 oz crumbled feta cheese
- 2 oz cream cheese, softened
- 2 tablespoons olive oil
- 1-2 teaspoons red pepper flakes (adjust for spice preference)
- 1 tablespoon fresh lemon juice
- 1 clove garlic, minced
- 1 teaspoon dried oregano
- Fresh parsley, for garnish (optional)
- Pita bread, crackers, or fresh vegetables, for serving
Cooking Instructions
1. Prepare the Ingredients: Gather all your ingredients. Make sure the cream cheese is softened to room temperature for easier mixing. It’s also advisable to crumble the feta cheese if it’s not already crumbled. This will help in achieving a smooth consistency in the spread.
2. Combine Feta and Cream Cheese: In a mixing bowl, add the crumbled feta cheese and softened cream cheese. Using a fork or a hand mixer, blend the two cheeses together until they’re well combined and creamy. This forms the base of your dip.
3. Add Flavorings: To the cheese mixture, add the olive oil, red pepper flakes, fresh lemon juice, minced garlic, and dried oregano. Mix thoroughly until all the ingredients are evenly incorporated.
Taste the mixture and adjust the seasoning if needed, adding more red pepper flakes for extra heat.
4. Chill the Dip: Once the mixture is well combined, cover the bowl with plastic wrap or transfer it to an airtight container. Refrigerate the dip for at least 30 minutes to allow the flavors to meld together.
This chilling step enhances the overall taste and texture of the spread.
5. Serve and Garnish: After chilling, remove the dip from the refrigerator. Give it a good stir and transfer it to a serving dish. If desired, garnish with freshly chopped parsley for a pop of color.
Serve with pita bread, crackers, or fresh vegetables for dipping.
Extra Tips
When making Spicy Feta Cheese Spread, feel free to experiment with additional herbs or spices according to your taste preferences. For a more robust flavor, consider adding sun-dried tomatoes or olives into the mix.
This spread can also be stored in the refrigerator for up to a week, making it a great make-ahead option for parties. Just remember to let it sit at room temperature for a few minutes before serving to soften slightly and enhance its creamy texture.
Enjoy your culinary creation!
White Bean and Rosemary Dip
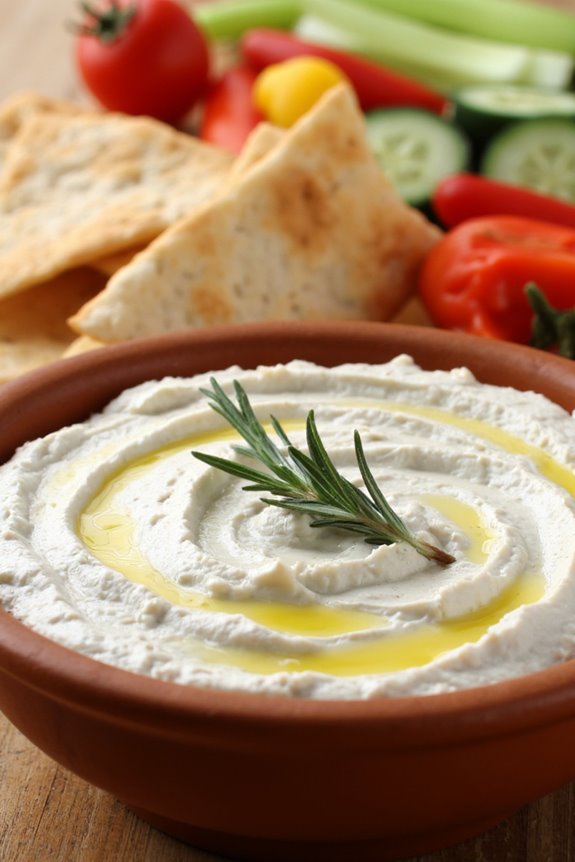
White Bean and Rosemary Dip is a delightful and creamy spread that captures the essence of Mediterranean flavors. This dip isn’t only simple to prepare but also packed with nutrients, making it a perfect appetizer for gatherings or a healthy snack option. The combination of white beans, fresh rosemary, garlic, and olive oil creates a rich texture and aromatic flavor profile that will leave your guests asking for seconds.
This dip can be served with an array of accompaniments such as pita chips, fresh veggies, or crusty bread, making it versatile for any occasion. Whether you’re hosting a party or simply enjoying a quiet night in, this White Bean and Rosemary Dip is bound to impress. The blend of fresh ingredients and the ease of preparation will make this dish a staple in your recipe collection.
Ingredients (serves 4-6):
- 1 can (15 oz) of white beans (such as cannellini or great northern), drained and rinsed
- 2 tablespoons fresh rosemary, chopped
- 2 cloves garlic, minced
- 1/4 cup olive oil
- 1 tablespoon lemon juice
- Salt and black pepper, to taste
- Optional: additional rosemary sprigs for garnish
Instructions:
- Prepare the Beans: Start by draining and rinsing the white beans thoroughly under cold water. This step removes excess sodium and any preservatives that may be present in canned beans. Once rinsed, let them sit in a colander to drain fully.
- Mix the Ingredients: In a food processor, combine the rinsed white beans, chopped fresh rosemary, minced garlic, olive oil, lemon juice, salt, and black pepper. The olive oil not only adds richness but also helps to create a creamy texture in the dip.
- Blend Until Smooth: Pulse the mixture in the food processor until it reaches a smooth and creamy consistency. You may need to stop and scrape down the sides of the bowl with a spatula a couple of times to guarantee all ingredients are well incorporated. If the dip is too thick, add a little more olive oil or a splash of water to reach your desired consistency.
- Taste and Adjust: After blending, taste the dip and adjust the seasoning if necessary. You might want to add more salt, pepper, or lemon juice to enhance the flavors.
- Serve: Transfer the White Bean and Rosemary Dip to a serving bowl. For an elegant presentation, drizzle a little extra olive oil on top and garnish with a sprig of fresh rosemary. Serve immediately with your choice of dipping items, or refrigerate for later use.
Extra Tips:
To elevate your White Bean and Rosemary Dip, consider adding a pinch of red pepper flakes for a hint of heat or a tablespoon of tahini for a nutty flavor. This dip can also be made a day in advance, allowing the flavors to meld beautifully in the refrigerator.
When serving, allow the dip to come to room temperature for the best flavor and texture. Enjoy this delightful spread with a variety of dippers for a crowd-pleasing treat!
Eggplant Baba Ganoush
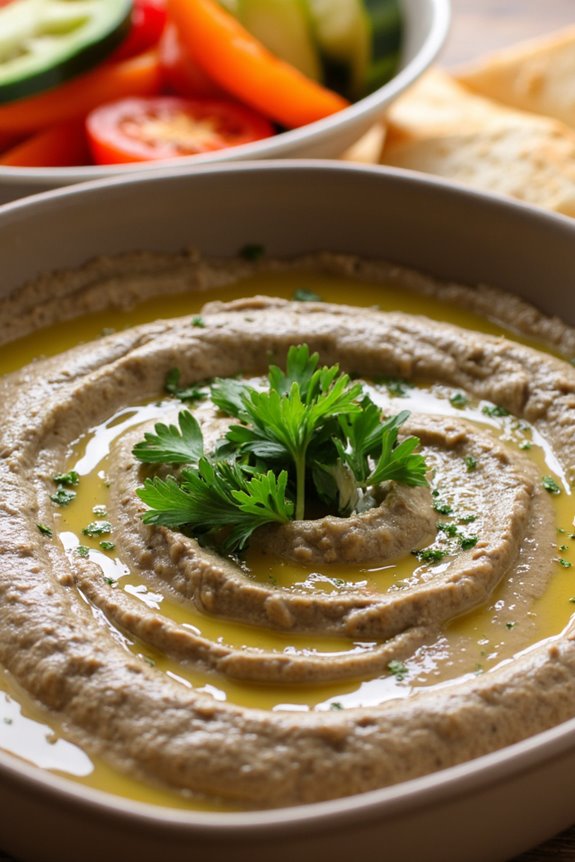
Eggplant Baba Ganoush is a classic Mediterranean dip that’s both delicious and nutritious. This smoky and creamy spread is made from roasted eggplant, tahini, garlic, lemon juice, and olive oil, creating a perfect balance of flavors that can be enjoyed with pita bread, crackers, or fresh vegetables.
Originating from the Middle Eastern region, Baba Ganoush has become a favorite in Greek cuisine as well, making it a staple at gatherings, parties, or simply as an enjoyable appetizer at home.
Making Eggplant Baba Ganoush is a simple process that highlights the natural flavors of the eggplant. By roasting the eggplants, you enhance their smokiness, which gives the dip its unique character. Once blended with tahini and other ingredients, the result is a silky smooth dip that’s both satisfying and healthy. This recipe serves 4-6 people, making it perfect for sharing with friends and family.
Ingredients:
- 2 medium-sized eggplants
- 1/4 cup tahini
- 2 tablespoons olive oil, plus extra for drizzling
- 2 cloves garlic, minced
- 2 tablespoons lemon juice
- Salt and pepper to taste
- Fresh parsley, chopped (for garnish)
- Pita bread, crackers, or fresh vegetables (for serving)
Instructions:
- Roast the Eggplants: Preheat your oven to 400°F (200°C). Prick the eggplants several times with a fork to allow steam to escape during roasting. Place them on a baking sheet and roast for about 30-40 minutes, or until the skin is charred and the flesh is soft. You can also roast them over an open flame for a more intense smoky flavor.
- Cool and Scoop: Once the eggplants are roasted, remove them from the oven and allow them to cool for about 10-15 minutes. When they’re cool enough to handle, cut them in half lengthwise and scoop out the flesh with a spoon, discarding the skin. Place the flesh in a mixing bowl.
- Combine Ingredients: In the bowl with the eggplant flesh, add the tahini, olive oil, minced garlic, lemon juice, and a pinch of salt and pepper. Use a fork or a food processor to mash or blend the mixture until it reaches your desired consistency. For a creamier texture, use a food processor.
- Adjust Seasoning: Taste the Baba Ganoush and adjust the seasoning as necessary. Add more salt, pepper, or lemon juice according to your preference. If you want it to be a bit creamier, you can also add a little more olive oil or tahini.
- Serve and Garnish: Transfer the Baba Ganoush to a serving bowl, drizzle with a little extra olive oil, and sprinkle with chopped parsley for garnish. Serve with pita bread, crackers, or fresh vegetables for dipping.
Extra Tips:
For an added layer of flavor, consider incorporating smoked paprika or cumin into the mixture. Additionally, you can experiment with garnishes such as pomegranate seeds or a sprinkle of chili flakes for a bit of heat.
If you’re looking for a more intense smoky flavor, roasting the eggplants over an open flame on a grill or stovetop can enhance the dish considerably. Enjoy your homemade Eggplant Baba Ganoush!
Creamy Avocado Tzatziki
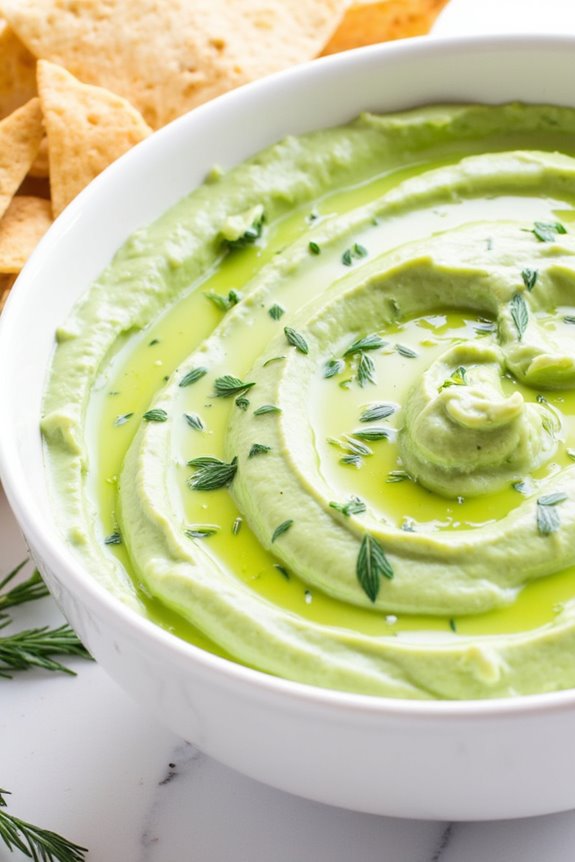
Creamy Avocado Tzatziki is a delightful twist on the classic Greek dip that combines the fresh, cooling flavors of traditional tzatziki with the rich creaminess of ripe avocados. This vibrant dip not only adds a beautiful green hue to your table but also offers a nutritious boost, making it perfect for gatherings or as a revitalizing accompaniment to grilled meats, pita bread, or fresh veggies.
With its combination of Greek yogurt, avocado, and classic tzatziki ingredients, it promises to be a hit with family and friends alike.
Preparing this dip is simple and quick, allowing you to whip it up in no time. The creamy texture and zesty flavor profile make it a versatile dish that can be served as an appetizer, snack, or even a spread on sandwiches.
Whether you’re hosting a summer barbecue or enjoying a quiet night in, Creamy Avocado Tzatziki is sure to impress with its unique taste and health benefits.
Ingredients (Serves 4-6):
- 1 ripe avocado
- 1 cup Greek yogurt (plain)
- 1 medium cucumber, grated and squeezed to remove excess water
- 2 garlic cloves, minced
- 2 tablespoons fresh lemon juice
- 1 tablespoon olive oil
- 1 tablespoon fresh dill, chopped (or 1 teaspoon dried dill)
- Salt and pepper to taste
Cooking Instructions:
- Prepare the Avocado: Start by cutting the ripe avocado in half and removing the pit. Using a spoon, scoop the flesh into a mixing bowl. Mash the avocado with a fork until it reaches a creamy consistency, but still has some small chunks for texture.
- Mix in the Yogurt: Add the Greek yogurt to the mashed avocado. Stir well to combine both ingredients evenly, creating a smooth base for your dip.
- Add the Cucumber: Grate the cucumber and confirm you’ve squeezed out as much excess water as possible to prevent the dip from becoming watery. Fold the grated cucumber into the avocado-yogurt mixture.
- Incorporate Flavors: Add the minced garlic, fresh lemon juice, olive oil, and chopped dill into the bowl. Stir gently to combine all the flavors, making sure that the garlic and dill are distributed evenly throughout the dip.
- Season to Taste: Finally, season the dip with salt and pepper according to your preference. Mix well and taste to adjust any seasoning if necessary.
- Chill and Serve: For the best flavor, cover the dip and let it chill in the refrigerator for at least 30 minutes before serving. This allows the flavors to meld together beautifully. Serve with pita chips, fresh vegetables, or as a topping for grilled meats.
Extra Tips:
For an added twist, consider incorporating other herbs like mint or parsley for a fresh burst of flavor. If you prefer a spicier kick, you can mix in a pinch of cayenne pepper or some finely chopped jalapeños.
Additionally, be sure to use a ripe avocado for the creamiest texture, and serve the dip fresh for the best taste. This dip can also be stored in an airtight container in the refrigerator for up to 2 days, but it’s best enjoyed fresh!
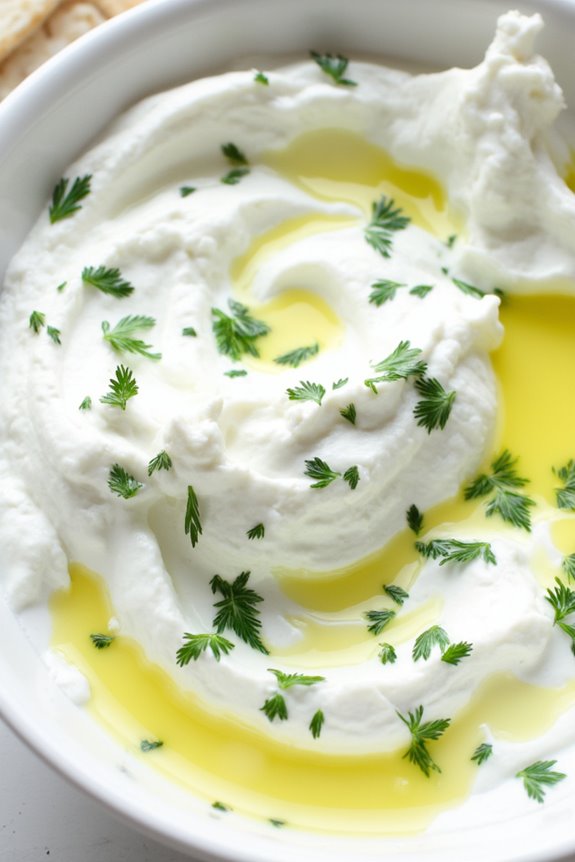
Herbed Labneh Dip
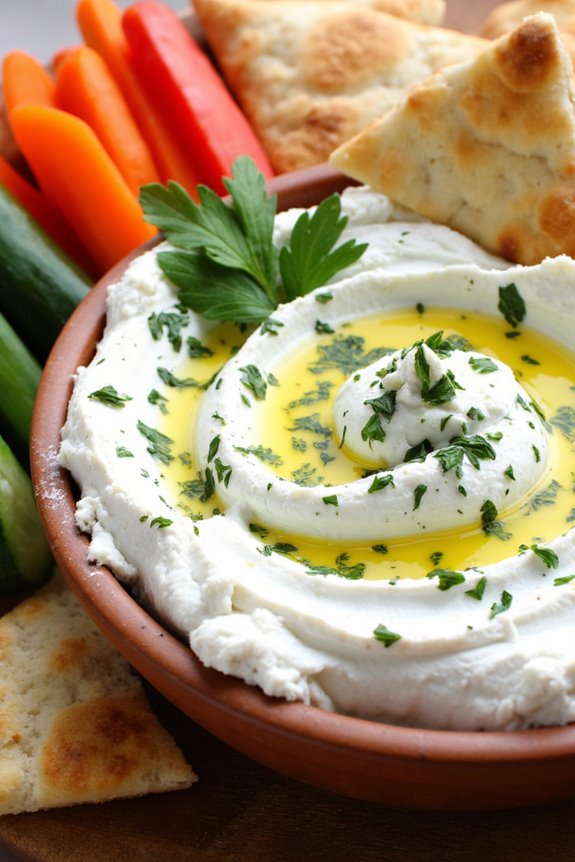
Herbed Labneh Dip is a creamy and tangy Middle Eastern-inspired dip that’s perfect for sharing. Made from strained yogurt, labneh is thick and rich in flavor, making it an excellent base for a variety of herbs and spices. This dip not only serves as a delightful appetizer but can also be paired with fresh vegetables, pita bread, or used as a spread in sandwiches. Its vibrant and zesty flavor makes it a crowd-pleaser at any gathering, bringing a taste of the Mediterranean to your table.
The magic of Herbed Labneh Dip lies in its versatility. You can customize it with different herbs or adjust the seasoning to suit your taste. Typically, fresh herbs like dill, parsley, and mint are used, but feel free to experiment with your favorites. With the perfect balance of creaminess and herbaceous liveliness, this dip isn’t only delicious but also healthy, making it an ideal choice for any occasion.
Ingredients (Serves 4-6)
- 2 cups plain Greek yogurt
- 1 teaspoon salt
- 1 tablespoon olive oil
- 1 tablespoon fresh dill, chopped
- 1 tablespoon fresh parsley, chopped
- 1 tablespoon fresh mint, chopped
- 1 clove garlic, minced
- Zest of 1 lemon
- Juice of 1 lemon
- Freshly cracked black pepper, to taste
Cooking Instructions
- Strain the Yogurt: Begin by straining the Greek yogurt to achieve a thicker consistency, which is characteristic of labneh. Place a fine mesh strainer over a bowl and line it with cheesecloth or a clean kitchen towel. Pour the yogurt into the strainer and let it sit in the refrigerator for at least 2-4 hours, or overnight if you want it extra thick.
- Combine Ingredients: Once the yogurt is adequately strained, transfer it to a mixing bowl. Add in the salt, olive oil, chopped dill, parsley, mint, minced garlic, lemon zest, and lemon juice. These ingredients will enhance the dip’s flavor profile, making it aromatic and invigorating.
- Mix Thoroughly: Using a spatula or a spoon, mix all the ingredients together until they’re well combined. Confirm that the herbs and garlic are evenly distributed throughout the labneh. Taste the mixture and adjust the seasoning with additional salt or lemon juice if necessary.
- Chill and Serve: Cover the bowl with plastic wrap or a lid and refrigerate the Herbed Labneh Dip for at least 30 minutes before serving. This chilling time allows the flavors to meld together beautifully.
- Garnish and Enjoy: When ready to serve, give the dip a gentle stir. Transfer it to a serving dish and drizzle a little extra olive oil on top. You can also sprinkle some freshly cracked black pepper for an extra touch. Serve with pita bread, vegetable sticks, or your favorite dippers.
Extra Tips
For an added depth of flavor, consider incorporating toasted nuts like walnuts or pine nuts into your Herbed Labneh Dip. You can also experiment with different spices, such as smoked paprika or cumin, to create a unique twist on this classic recipe.
If you find your labneh too thick for your liking, you can thin it out with a little water or additional olive oil until you reach your desired consistency. Enjoy this dip as part of a mezze platter for an authentic Mediterranean experience!
Greek Salsa
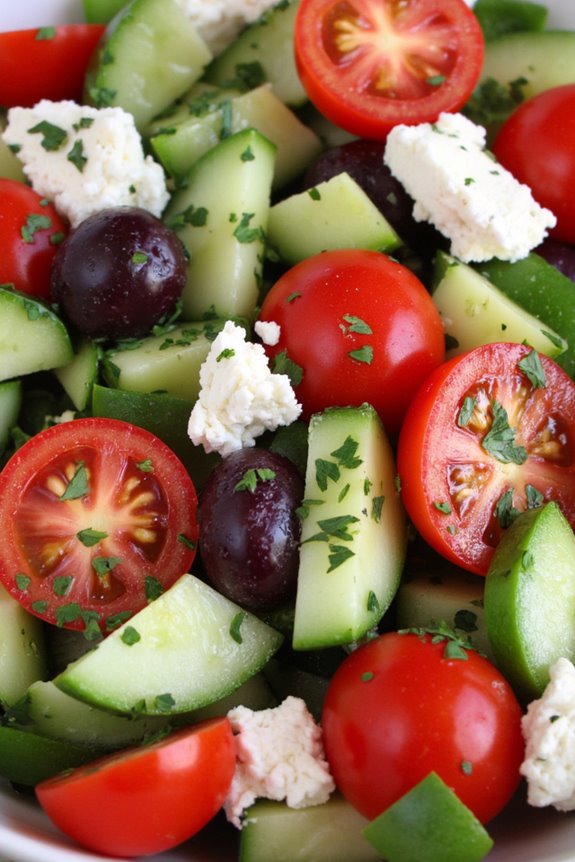
Greek Salsa is a vibrant and invigorating twist on traditional salsa, infused with the rich flavors of the Mediterranean. This dish combines fresh vegetables, herbs, and a hint of tangy feta cheese, making it an ideal accompaniment for grilled meats, pita chips, or as a topping for your favorite Greek dishes.
The bright colors and bold flavors will make this Greek Salsa a hit at any gathering, whether it’s a casual family dinner or a festive celebration.
The preparation of Greek Salsa is simple and quick, allowing you to enjoy the fresh taste of summer any time of the year. The combination of tomatoes, cucumbers, red onion, and herbs creates a zesty and crunchy texture, while the feta adds creaminess and depth.
Serve it chilled for an invigorating appetizer or snack that will surely impress your guests and tantalize their taste buds.
Ingredients (Serves 4-6):
- 2 cups cherry tomatoes, halved
- 1 cup cucumber, diced
- 1/2 cup red onion, finely chopped
- 1/2 cup bell pepper (any color), diced
- 1/4 cup Kalamata olives, pitted and sliced
- 1/4 cup feta cheese, crumbled
- 2 tablespoons fresh parsley, chopped
- 1 tablespoon fresh dill, chopped
- 2 tablespoons olive oil
- 1 tablespoon red wine vinegar
- Salt and pepper to taste
Cooking Instructions:
1. Prepare the Vegetables: Start by washing all your vegetables thoroughly. Halve the cherry tomatoes, dice the cucumber, finely chop the red onion, and dice the bell pepper. Make sure to remove any seeds from the cucumber for a cleaner texture in your salsa.
Place all the prepared vegetables into a large mixing bowl.
2. Add the Olives and Cheese: Once your vegetables are prepared, add the sliced Kalamata olives and crumbled feta cheese to the bowl. The olives will provide a briny flavor, while the feta adds creaminess and a salty kick, enhancing the overall taste of the salsa.
3. Incorporate Fresh Herbs: Chop the fresh parsley and dill, and sprinkle them over the mixture. These herbs will add freshness and aroma to the salsa, balancing the richness of the feta and olives.
Gently toss the ingredients together until they’re evenly distributed.
4. Dress the Salsa: In a small bowl, whisk together the olive oil, red wine vinegar, salt, and pepper. Drizzle this dressing over the vegetable mixture and gently fold everything together.
This step is essential as it helps to meld all the flavors, making each bite delicious.
5. Chill and Serve: Cover the bowl with plastic wrap and place the Greek Salsa in the refrigerator for at least 30 minutes. Chilling allows the flavors to develop and intensify.
Serve the salsa cold with pita chips, on top of grilled meats, or as an invigorating side dish.
Extra Tips:
For an extra burst of flavor, consider adding a squeeze of fresh lemon juice or a pinch of oregano to the salsa just before serving. This will enhance the Mediterranean taste and give it a bright finish.
Additionally, feel free to customize the ingredients based on your preferences; adding diced avocados or substituting different types of olives can create a unique twist on this classic Greek dish. Enjoy your culinary creation!