

When time is tight and you’re yearning for something tasty, quick Greek dinner recipes can be a lifesaver. They’re simple to make and bursting with vibrant flavors. From juicy Chicken Souvlaki to refreshing Greek Salad with Grilled Halloumi, there’s something for everyone. Here are some of my go-to dishes that turn hectic evenings into delicious experiences. These flavorful options are not to be missed.
Chicken Souvlaki With Tzatziki Sauce
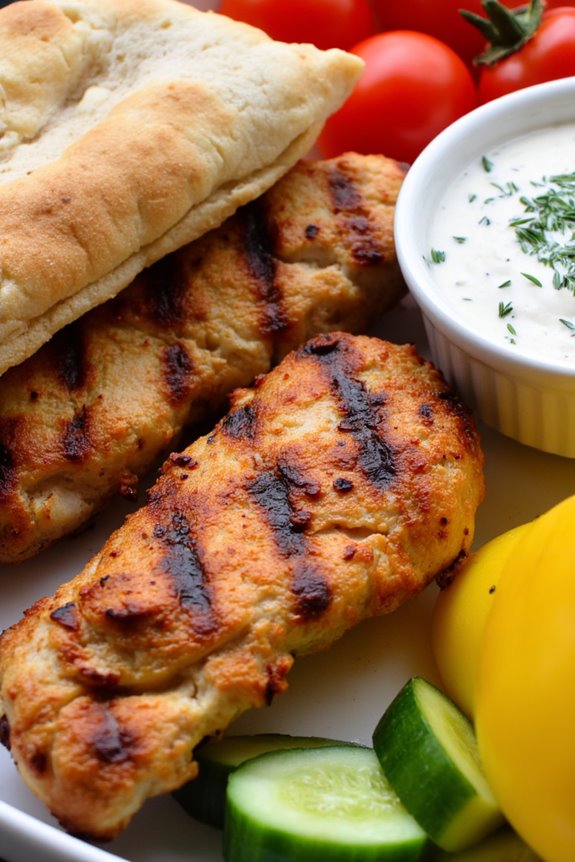
Chicken Souvlaki is a quintessential Greek dish that tantalizes the taste buds with its marinated chicken, grilled to perfection and served with a cool tzatziki sauce. This dish isn’t only flavorful but also easy to prepare, making it a popular choice for family dinners or entertaining guests.
The combination of aromatic spices, tender chicken, and creamy yogurt sauce creates an unforgettable dining experience that transports you straight to the sun-kissed shores of Greece.
To serve this traditional dish, skewered chicken is often accompanied by warm pita bread, a crisp salad, and an assortment of fresh vegetables. The tzatziki sauce, made from yogurt, cucumber, and garlic, adds a cool contrast to the savory grilled chicken.
Whether you’re grilling outdoors or using an indoor grill or skillet, this Chicken Souvlaki with Tzatziki Sauce will surely impress and satisfy.
Ingredients (Serves 4-6 people)
- 1.5 pounds boneless, skinless chicken thighs or breasts, cut into 1-inch cubes
- 1/4 cup olive oil
- 2 tablespoons lemon juice
- 3 cloves garlic, minced
- 1 tablespoon dried oregano
- 1 teaspoon salt
- 1/2 teaspoon black pepper
- 1/2 teaspoon paprika
- 1/2 teaspoon cumin
- Wooden or metal skewers (if using wooden, soak in water for 30 minutes)
For the Tzatziki Sauce:
- 1 cup Greek yogurt
- 1 medium cucumber, grated and excess water squeezed out
- 2 cloves garlic, minced
- 1 tablespoon olive oil
- 1 tablespoon lemon juice
- 1 tablespoon fresh dill, chopped (or 1 teaspoon dried dill)
- Salt and pepper to taste
Cooking Instructions
- Marinate the Chicken: In a large mixing bowl, combine the olive oil, lemon juice, minced garlic, oregano, salt, black pepper, paprika, and cumin. Add the chicken pieces and toss until they’re evenly coated in the marinade. Cover the bowl with plastic wrap and refrigerate for at least 1 hour, or up to 4 hours for maximum flavor.
- Prepare the Tzatziki Sauce: In a separate bowl, mix the Greek yogurt, grated cucumber, minced garlic, olive oil, lemon juice, and dill. Season with salt and pepper to taste. Stir well to combine and refrigerate for at least 30 minutes to allow the flavors to meld.
- Preheat the Grill: If using a grill, preheat it to medium-high heat. If using an indoor grill or skillet, heat over medium-high heat and lightly oil the surface to prevent sticking.
- Assemble the Skewers: Thread the marinated chicken pieces onto the skewers, leaving a little space between each piece for even cooking.
- Grill the Chicken: Place the skewers on the grill and cook for 10-15 minutes, turning occasionally until the chicken is cooked through and has nice grill marks. The internal temperature should reach 165°F (75°C).
- Serve: Remove the chicken from the skewers and serve it hot with the tzatziki sauce on the side. Pair with warm pita bread and fresh vegetables for a complete meal.
Extra Tips
When cooking Chicken Souvlaki, feel free to customize the marinade by incorporating your favorite spices or herbs. For a little heat, add red pepper flakes to the marinade.
If you prefer grilled vegetables, consider skewering bell peppers, onions, or zucchini alongside the chicken for a colorful and nutritious addition. Additionally, serve the tzatziki sauce in a small bowl for dipping, and don’t hesitate to make extra sauce—it pairs wonderfully with many dishes beyond just chicken!
One-Pan Greek Lemon Chicken and Rice

One-Pan Greek Lemon Chicken and Rice is a delightful dish that brings the bright and zesty flavors of Greece right to your dinner table. This comforting meal features succulent chicken thighs marinated in a tangy lemon-garlic sauce, paired with fluffy rice cooked to perfection in the same pan, absorbing all the delicious juices.
It’s an ideal recipe for busy weeknights or special gatherings, as it requires minimal cleanup while still delivering a flavorful, hearty meal that’s sure to impress.
This one-pan wonder not only simplifies your cooking process but also allows the ingredients to meld beautifully, creating a harmonious blend of flavors. The chicken is tender and juicy, while the rice is infused with garlic and lemon, making each bite an explosion of taste.
Plus, you can easily adapt this recipe with your favorite vegetables or herbs to personalize it to your liking!
Ingredients (Serves 4-6):
- 4-6 bone-in, skin-on chicken thighs
- 2 tablespoons olive oil
- 1 lemon (zested and juiced)
- 4 cloves garlic (minced)
- 1 teaspoon dried oregano
- 1 teaspoon dried thyme
- Salt and pepper (to taste)
- 1 cup long-grain rice (such as basmati or jasmine)
- 2 cups chicken broth
- 1 cup cherry tomatoes (halved)
- Fresh parsley (for garnish)
Cooking Instructions:
- Marinate the Chicken: In a bowl, combine the olive oil, lemon zest, lemon juice, minced garlic, dried oregano, dried thyme, salt, and pepper. Add the chicken thighs to the marinade, ensuring they’re well-coated. Cover and let it marinate for at least 30 minutes, or up to 2 hours in the refrigerator for maximum flavor.
- Sear the Chicken: In a large, deep skillet or a Dutch oven, heat a tablespoon of olive oil over medium-high heat. Once hot, place the marinated chicken thighs skin-side down in the pan. Sear for about 5-7 minutes until the skin is golden and crispy, then flip and cook for another 5 minutes. Remove the chicken from the pan and set aside.
- Prepare the Rice: In the same pan, add the rice and toast it for about 2 minutes, stirring frequently until it becomes slightly translucent. This step enhances the flavor of the rice.
- Add Liquid and Vegetables: Pour in the chicken broth and bring to a gentle simmer. Add the halved cherry tomatoes and stir to combine. Once simmering, return the seared chicken thighs to the pan, placing them on top of the rice mixture.
- Cook the Dish: Cover the skillet with a lid and reduce the heat to low. Let it cook for about 20-25 minutes, or until the rice is tender and has absorbed all the liquid, and the chicken is cooked through (internal temperature should reach 165°F).
- Rest and Serve: Once cooked, remove the pan from the heat and let it rest covered for 5 minutes. Garnish with chopped fresh parsley before serving.
Extra Tips:
For extra flavor, consider adding sliced olives or capers during the cooking process. You can also switch up the vegetables by adding bell peppers or spinach for a colorful twist.
Don’t forget to taste and adjust seasoning as needed, especially with salt, since the chicken broth can vary in sodium levels. Finally, serve with a side of Greek salad or tzatziki sauce for a complete Mediterranean experience!
Quick Shrimp Saganaki
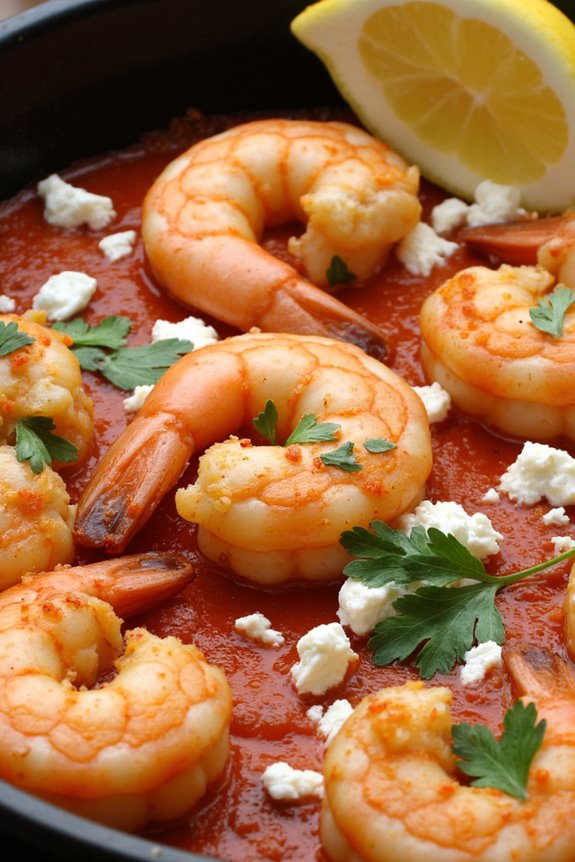
Shrimp Saganaki is a delightful Greek dish that showcases the rich flavors of the Mediterranean with its combination of succulent shrimp, tangy feta cheese, and vibrant tomatoes. This dish is both quick to prepare and delicious, making it a perfect choice for a weeknight dinner or a special occasion.
The shrimp are cooked in a zesty tomato sauce and topped with feta cheese, which melts beautifully to create a creamy texture that complements the dish perfectly. Serving this dish with crusty bread or over a bed of rice enhances the experience, allowing you to soak up all the flavorful sauce.
Quick Shrimp Saganaki isn’t only a feast for the taste buds but also a visual delight, with its vibrant colors and inviting aroma. In just a few simple steps, you can bring a taste of Greece into your home.
Ingredients (serves 4-6):
- 1 pound large shrimp (peeled and deveined)
- 2 tablespoons olive oil
- 1 medium onion (finely chopped)
- 3 cloves garlic (minced)
- 1 can (14 ounces) diced tomatoes (with juices)
- 1 teaspoon dried oregano
- 1/2 teaspoon red pepper flakes (optional)
- Salt and pepper (to taste)
- 1 cup feta cheese (crumbled)
- Fresh parsley (chopped, for garnish)
- Lemon wedges (for serving)
Cooking Instructions:
1. Sauté the Aromatics: In a large skillet, heat the olive oil over medium heat. Add the finely chopped onion and sauté for about 5 minutes until it becomes translucent.
Then, add the minced garlic and cook for another minute until fragrant, being careful not to let it burn.
2. Prepare the Tomato Sauce: Pour in the canned diced tomatoes along with their juices. Stir in the dried oregano, red pepper flakes (if using), and season with salt and pepper.
Allow the sauce to simmer for about 5-7 minutes, letting the flavors meld together and the sauce slightly thicken.
3. Cook the Shrimp: Add the peeled and deveined shrimp to the skillet, stirring gently to coat them in the tomato sauce.
Cook for about 3-4 minutes, or until the shrimp are pink and opaque, indicating they’re fully cooked.
4. Add the Feta Cheese: Once the shrimp are cooked, sprinkle the crumbled feta cheese over the top of the shrimp and sauce.
Reduce the heat to low, cover the skillet, and let it cook for an additional 2-3 minutes, allowing the feta to soften and slightly melt.
5. Garnish and Serve: Once the feta has melted, remove the skillet from the heat. Garnish the dish with freshly chopped parsley and serve immediately with lemon wedges on the side.
Pair it with crusty bread or over rice for a complete meal.
Extra Tips: When cooking Quick Shrimp Saganaki, make sure not to overcook the shrimp as they can become tough and rubbery. A good indication that they’re done is when they turn a vibrant pink color.
Additionally, feel free to customize the dish by adding other ingredients like bell peppers or olives for extra flavor. If you prefer less salt, you can reduce the amount of feta cheese, or use a lighter version. Enjoy your culinary journey to Greece!
Greek Salad With Grilled Halloumi
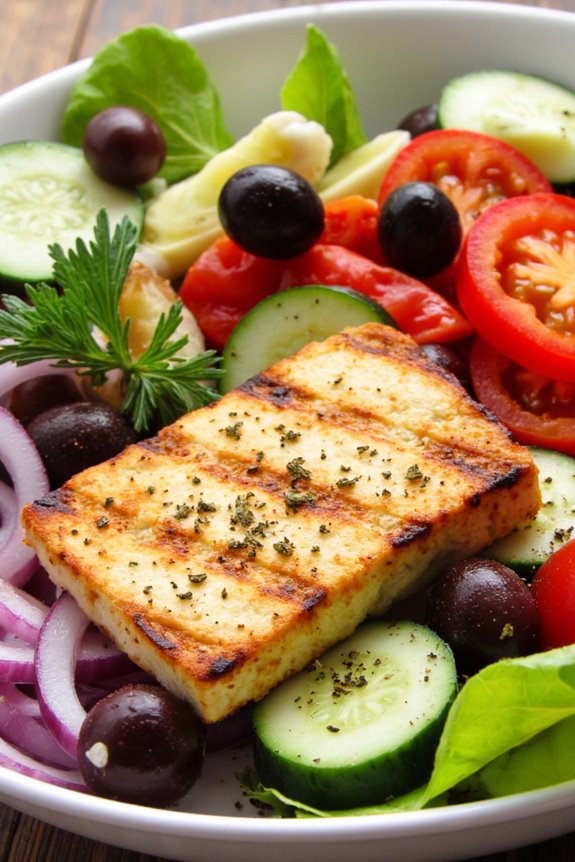
Greek Salad With Grilled Halloumi is a delightful twist on the classic Greek salad, adding a savory, smoky flavor through the grilling of halloumi cheese. This dish is perfect for a summer meal or as a vibrant side dish at any dinner gathering. The combination of fresh vegetables, aromatic herbs, and the rich texture of grilled halloumi makes it not only delicious but also visually appealing.
The beauty of this salad lies in its simplicity and the freshness of its ingredients. Crisp cucumbers, ripe tomatoes, and crunchy bell peppers are tossed together with a zesty dressing, while the halloumi adds a satisfying protein component. Whether served as an appetizer or a main course, this Greek salad is sure to impress your guests and elevate your dining experience.
Ingredients (serving size: 4-6 people)
- 250g halloumi cheese
- 4 medium-sized ripe tomatoes, chopped
- 1 large cucumber, diced
- 1 bell pepper (any color), sliced
- 1 small red onion, thinly sliced
- 10-15 kalamata olives, pitted and halved
- 3 tablespoons extra-virgin olive oil
- 1 tablespoon red wine vinegar
- 1 teaspoon dried oregano
- Salt and freshly ground black pepper to taste
- Fresh parsley or mint for garnish (optional)
Cooking Instructions
- Prepare the Vegetables: Start by washing all your vegetables thoroughly. Chop the tomatoes into bite-sized pieces, dice the cucumber, and slice the bell pepper. Thinly slice the red onion. Place all the prepared vegetables into a large mixing bowl along with the halved kalamata olives.
- Make the Dressing: In a small bowl, whisk together the extra-virgin olive oil, red wine vinegar, dried oregano, salt, and pepper. This dressing will enhance the flavors of the fresh vegetables and bring the salad together.
- Grill the Halloumi: Preheat a grill or grill pan over medium heat. While it’s heating, slice the halloumi cheese into about 1/2 inch thick slices. Once the grill is hot, lightly oil the grill grates and place the halloumi slices on the grill. Cook for about 2-3 minutes on each side, or until golden brown and grill marks appear. Remove from the grill and set aside.
- Combine the Salad: Pour the dressing over the mixed vegetables in the bowl. Toss gently to combine, ensuring that all the vegetables are coated with the dressing. Be careful not to mash the tomatoes or cucumbers.
- Serve: To serve, place the dressed salad onto a large platter or individual serving plates. Top with the grilled halloumi slices. Garnish with fresh parsley or mint, if desired.
Extra Tips
When grilling halloumi, be sure to watch it closely as it can burn quickly on high heat. For a different flavor profile, consider marinating the halloumi in olive oil, lemon juice, and herbs before grilling.
Additionally, feel free to personalize your Greek salad by adding other ingredients like avocado, artichokes, or even grilled chicken for a heartier meal. Enjoy the vibrant flavors of this Mediterranean-inspired dish!
Fast Moussaka With Ground Beef
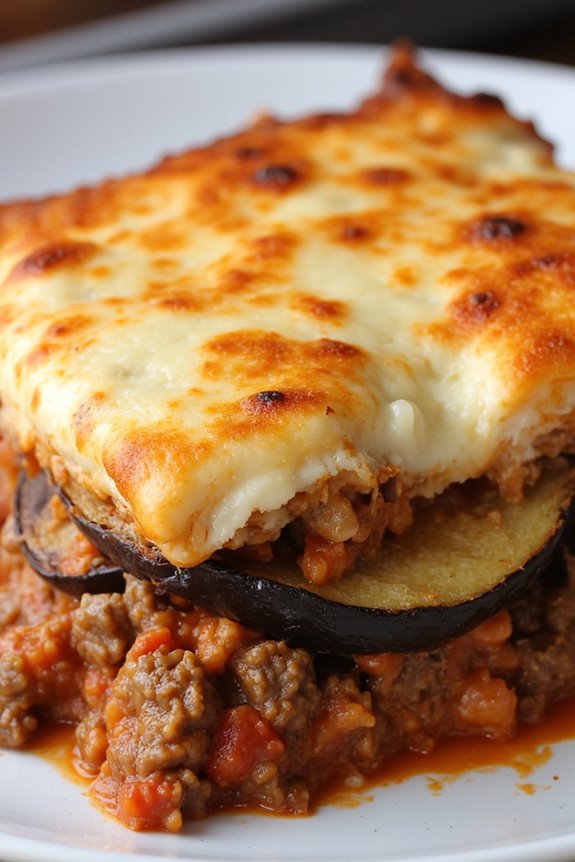
Moussaka is a classic Greek dish that layers eggplant, ground meat, and creamy béchamel sauce, resulting in a hearty and flavorful meal. Traditionally, moussaka can take hours to prepare, but this fast version with ground beef makes it accessible for busy weeknights without sacrificing the authentic flavors that define this beloved recipe.
The combination of savory beef, tender eggplant, and a rich, creamy topping creates a comforting dish that’s certain to please the whole family.
This fast moussaka recipe isn’t only quicker to prepare but also simplifies the cooking process while still delivering the traditional taste you crave. By using everyday ingredients and straightforward techniques, you can present a delicious Greek dinner without the fuss. Serve it with a simple Greek salad and crusty bread for a complete meal that transports you straight to the Mediterranean.
Ingredients (Serves 4-6):
- 2 medium eggplants, sliced into ½-inch rounds
- 1 pound ground beef
- 1 onion, diced
- 2 cloves garlic, minced
- 1 can (14 oz) crushed tomatoes
- 1 tablespoon tomato paste
- 1 teaspoon dried oregano
- 1 teaspoon salt
- ½ teaspoon black pepper
- ½ teaspoon cinnamon
- 1 cup grated cheese (such as Parmesan or Kefalotyri)
- 2 cups milk
- 2 tablespoons butter
- 2 tablespoons all-purpose flour
- 2 large eggs, beaten
- Olive oil for frying
Cooking Instructions:
- Prepare the Eggplant: Begin by salting the eggplant slices to draw out moisture and bitterness. Lay the slices in a colander, sprinkle them with salt, and let them sit for about 30 minutes. Rinse off the salt and pat the slices dry with paper towels.
- Cook the Ground Beef: In a large skillet, heat a tablespoon of olive oil over medium heat. Add the diced onion and garlic, sautéing until the onion is translucent. Then, add the ground beef, breaking it apart with a spoon. Cook until the beef is browned and cooked through, about 5-7 minutes.
- Add the Sauce Ingredients: Stir in the crushed tomatoes, tomato paste, oregano, salt, pepper, and cinnamon into the beef mixture. Reduce the heat to low and let it simmer for about 10 minutes, allowing the flavors to meld together.
- Fry the Eggplant: In a separate skillet, heat a few tablespoons of olive oil over medium heat. Working in batches, fry the eggplant slices until golden brown on both sides. Remove and place them on paper towels to absorb excess oil.
- Prepare the Béchamel Sauce: In a saucepan, melt the butter over medium heat. Whisk in the flour and cook for about 1 minute until it forms a roux. Gradually add the milk while whisking continuously to avoid lumps. Cook until the sauce thickens. Remove from heat and stir in the beaten eggs and half of the grated cheese.
- Assemble the Moussaka: In a greased baking dish, layer half of the fried eggplant slices at the bottom. Spread the meat sauce evenly over the eggplant, followed by the remaining eggplant slices. Finally, pour the béchamel sauce over the top and sprinkle with the remaining cheese.
- Bake the Moussaka: Preheat your oven to 375°F (190°C). Bake the assembled moussaka for about 30-35 minutes or until the top is golden and bubbly. Allow it to cool for a few minutes before slicing and serving.
Extra Tips:
For an added depth of flavor, consider adding fresh herbs like parsley or mint to the meat sauce before layering it.
You can also substitute the ground beef with ground lamb for a more traditional taste. If you want to make this dish ahead of time, you can prepare the layers in advance and refrigerate them until ready to bake. Just make sure you allow it to come to room temperature before placing it in the oven.
Enjoy your homemade Fast Moussaka with a side of tzatziki sauce for an extra burst of flavor!
Spinach and Feta Stuffed Pitas
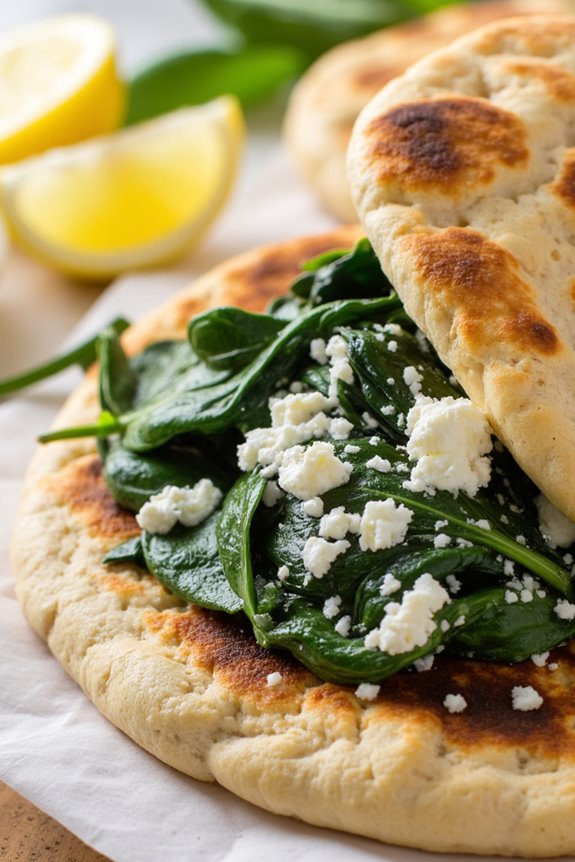
Spinach and Feta Stuffed Pitas are a delicious and nutritious option for a Greek-inspired dinner. This dish combines the rich flavors of feta cheese and fresh spinach, all wrapped in a warm, soft pita bread. Perfect for a light meal or as an appetizer, these stuffed pitas aren’t only easy to make but also a fantastic way to incorporate greens into your diet.
The blend of flavors is reminiscent of traditional Greek spanakopita, but with a convenient twist that makes it easy to serve at any gathering.
To prepare these stuffed pitas, you’ll need to gather your ingredients and set aside some time for assembly and cooking. The dish is best served warm, allowing the feta to melt slightly and the spinach to retain its vibrant color and flavor.
Whether you’re hosting a dinner party or enjoying a quiet evening at home, Spinach and Feta Stuffed Pitas are sure to impress anyone who takes a bite.
Ingredients (Serving Size: 4-6 people)
- 4 large whole wheat pita breads
- 2 cups fresh spinach, chopped
- 1 cup feta cheese, crumbled
- 1 cup ricotta cheese
- 1/2 cup onion, finely chopped
- 2 cloves garlic, minced
- 1 tablespoon olive oil
- 1 teaspoon dried oregano
- 1/2 teaspoon salt
- 1/4 teaspoon black pepper
- 1 egg, beaten (optional, for binding)
- Fresh lemon wedges (for serving)
Cooking Instructions
1. Prepare the Filling: In a large skillet, heat the olive oil over medium heat. Add the chopped onion and minced garlic, sautéing until the onion is translucent and fragrant, about 3-4 minutes.
Then, add the chopped spinach to the skillet and cook until wilted, about 2-3 minutes. Remove from heat and let cool slightly.
2. Mix the Cheese: In a large mixing bowl, combine the crumbled feta cheese, ricotta cheese, oregano, salt, and black pepper. If using, add the beaten egg to the mixture. Stir until all the ingredients are well incorporated.
3. Combine Ingredients: Once the spinach mixture has cooled, add it to the cheese mixture. Mix thoroughly to guarantee an even distribution of spinach and cheese throughout the filling.
4. Stuff the Pitas: Carefully open each pita bread to create a pocket. Spoon a generous amount of the spinach and feta filling into each pita, being careful not to overfill to prevent tearing.
5. Cook the Stuffed Pitas: Preheat a skillet or grill pan over medium heat. Place the stuffed pitas in the skillet and cook for about 3-4 minutes on each side, or until the pitas are golden brown and slightly crispy.
You can also wrap the pitas in aluminum foil and place them in a preheated oven at 350°F (175°C) for about 10 minutes if you prefer a softer texture.
6. Serve: Remove the stuffed pitas from the heat and let them cool for a minute. Serve warm with fresh lemon wedges on the side for an added zing.
Extra Tips
For an extra layer of flavor, consider adding a pinch of nutmeg to the cheese filling, which complements the spinach beautifully.
You can also customize the filling by adding other ingredients such as sun-dried tomatoes or olives for a Mediterranean twist. If you’re looking to make this dish ahead of time, prepare the filling and stuff the pitas, then store them in the refrigerator.
Just remember to cook them fresh before serving to maintain the best texture and flavor. Enjoy your delicious Greek dinner!
Greek-Style Quinoa Bowl

The Greek-Style Quinoa Bowl is a vibrant and nutritious dish that brings together the flavors of the Mediterranean in a single bowl. This recipe combines fluffy quinoa with fresh vegetables, tangy feta cheese, and a zesty lemon-olive oil dressing, making it a perfect option for a light lunch or dinner.
Not only is it filled with wholesome ingredients, but it’s also customizable, allowing you to add your favorite toppings or switch out vegetables based on the season. This dish isn’t only delicious but also packed with protein and fiber, making it a satisfying meal.
Quinoa serves as a gluten-free grain alternative, and pairing it with fresh vegetables like cucumbers, tomatoes, and bell peppers adds a crunch that complements the creamy feta. Serve this Greek-Style Quinoa Bowl warm or cold, and enjoy a taste of Greece right from your kitchen.
Ingredients (Serves 4-6)
- 1 cup quinoa
- 2 cups water or vegetable broth
- 1 cup cherry tomatoes, halved
- 1 cucumber, diced
- 1 bell pepper (red or yellow), diced
- 1/2 red onion, finely chopped
- 1 cup kalamata olives, pitted and halved
- 1 cup feta cheese, crumbled
- 1/4 cup fresh parsley, chopped
- 1/4 cup olive oil
- 2 tablespoons lemon juice
- 1 teaspoon dried oregano
- Salt and pepper to taste
Cooking Instructions
- Rinse the Quinoa: Begin by rinsing the quinoa under cold running water for about 1-2 minutes. This step removes the natural coating called saponin, which can make the quinoa taste bitter. Use a fine-mesh strainer to ascertain all grains are rinsed thoroughly.
- Cook the Quinoa: In a medium saucepan, combine the rinsed quinoa and water or vegetable broth. Bring it to a boil over medium-high heat. Once boiling, reduce the heat to low, cover with a lid, and simmer for about 15 minutes or until the quinoa has absorbed all the liquid. Fluff it with a fork once done and set aside to cool slightly.
- Prepare the Vegetables: While the quinoa is cooking, prepare your vegetables. Dice the cucumber, bell pepper, and finely chop the red onion. Halve the cherry tomatoes and set all the vegetables aside in a large mixing bowl.
- Make the Dressing: In a small bowl, whisk together the olive oil, lemon juice, dried oregano, salt, and pepper. This dressing will add a zesty flavor to the quinoa bowl, so make sure to mix it well.
- Combine Ingredients: Once the quinoa has cooled slightly, add it to the bowl with the prepared vegetables. Pour the dressing over the mixture, and toss everything together until well combined. Gently fold in the kalamata olives and crumbled feta cheese.
- Serve: Taste the quinoa bowl and adjust the seasoning if necessary. Serve the Greek-Style Quinoa Bowl immediately or refrigerate it for about 30 minutes for a chilled version. Garnish with fresh parsley before serving.
Extra Tips
For added flavor and nutrition, consider incorporating other Mediterranean ingredients such as roasted red peppers, artichoke hearts, or chickpeas. You can also customize the dressing by adding minced garlic or fresh herbs like dill or basil.
If you prefer a vegan version, simply omit the feta cheese or substitute it with a plant-based cheese alternative. This dish stores well in the refrigerator for a few days, making it perfect for meal prep or leftovers. Enjoy your healthy and colorful Greek-inspired meal!
Easy Mediterranean Pasta
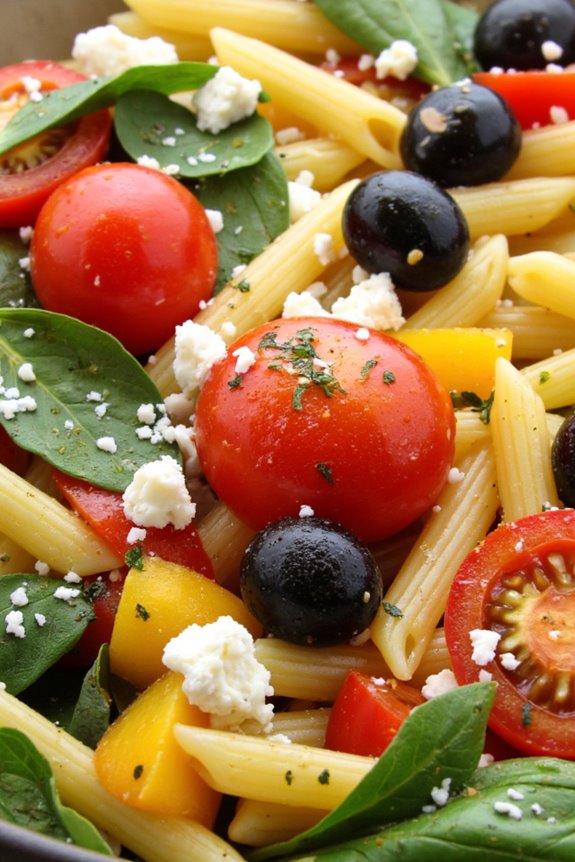
If you’re looking for a quick yet flavorful meal that captures the essence of Greek cuisine, Easy Mediterranean Pasta is the perfect choice. This dish combines al dente pasta with fresh vegetables, aromatic herbs, and a drizzle of olive oil, resulting in a light and satisfying dinner option that can be prepared in under 30 minutes.
With its vibrant colors and savory flavors, this pasta dish isn’t only a feast for the eyes but also a delightful way to bring the taste of the Mediterranean to your table.
The key to this recipe is using high-quality ingredients such as ripe tomatoes, crisp bell peppers, and fresh herbs. You can easily customize the dish by adding your favorite proteins or additional vegetables, making it a versatile option for any weeknight dinner or special occasion.
Serve it warm or at room temperature, and don’t forget to sprinkle some feta cheese on top for an authentic Greek touch!
Ingredients (Serves 4-6)
- 12 oz (340g) pasta (penne or fusilli work well)
- 1 cup cherry tomatoes, halved
- 1 bell pepper, diced (red or yellow)
- 1 small red onion, diced
- 1 cup black olives, pitted and sliced
- 1 cup fresh spinach, chopped
- 3 cloves garlic, minced
- 1/4 cup extra virgin olive oil
- 1 tablespoon red wine vinegar
- 1 teaspoon dried oregano
- Salt and pepper to taste
- 1/2 cup feta cheese, crumbled (optional)
- Fresh basil or parsley for garnish (optional)
Cooking Instructions
1. Cook the Pasta: Begin by boiling a large pot of salted water. Once the water is at a rolling boil, add the pasta and cook according to the package instructions until al dente. Stir occasionally to prevent sticking.
Once done, reserve 1 cup of pasta water, then drain the pasta and set it aside.
2. Sauté the Vegetables: In a large skillet, heat the extra virgin olive oil over medium heat. Add the diced red onion and sauté for about 3-4 minutes until it becomes translucent.
Next, add the minced garlic and cook for an additional 1 minute until fragrant, being careful not to burn it.
3. Add Remaining Ingredients: Stir in the diced bell pepper and cook for another 3 minutes. Then, add the halved cherry tomatoes, sliced olives, chopped spinach, dried oregano, salt, and pepper.
Cook for about 5-7 minutes, allowing the vegetables to soften and the flavors to meld.
4. Combine Pasta and Sauce: Add the drained pasta to the skillet with the sautéed vegetables. Pour in the red wine vinegar and toss everything together, ensuring that the pasta is well-coated.
If the mixture seems dry, gradually add reserved pasta water until you reach your desired consistency.
5. Finish and Serve: Remove the skillet from heat and stir in the crumbled feta cheese if using. Adjust seasoning with additional salt and pepper if necessary.
Serve hot or at room temperature, garnished with fresh basil or parsley for an extra touch.
Extra Tips
For a heartier dish, consider adding cooked chicken, shrimp, or chickpeas to the pasta mixture.
You can also play with the vegetables based on what’s in season or what you have on hand—zucchini, artichokes, or even sun-dried tomatoes make excellent additions.
If you prefer a little heat, a pinch of red pepper flakes can add a nice kick. This pasta dish is incredibly versatile, so feel free to experiment with flavors and ingredients to make it your own!
Lemon Garlic Roasted Vegetables
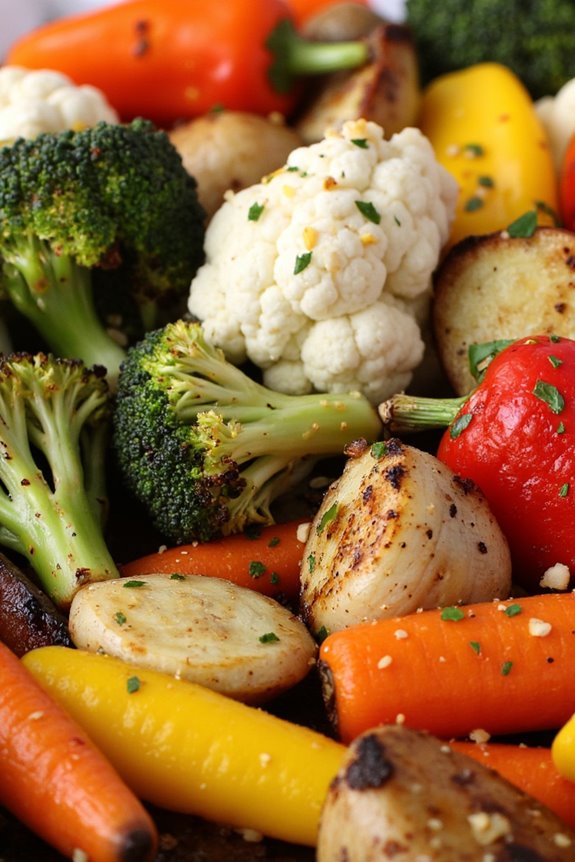
Lemon Garlic Roasted Vegetables are a vibrant and flavorful addition to any Greek dinner, making them a perfect accompaniment to grilled meats or fish. This dish showcases a medley of seasonal vegetables, enhanced with the zesty brightness of lemon and the aromatic depth of garlic.
Roasting the vegetables brings out their natural sweetness while creating a beautifully caramelized exterior, making them irresistibly delicious.
This recipe isn’t only simple to prepare but also offers incredible versatility. You can use a variety of vegetables based on what you have on hand or what’s in season, such as bell peppers, zucchini, carrots, and red onions.
The combination of fresh lemon juice and garlic elevates the dish, turning your roasted vegetables into a standout side that will leave your guests asking for seconds.
Ingredients (Serves 4-6)
- 2 cups broccoli florets
- 2 cups cauliflower florets
- 2 cups baby carrots
- 1 red bell pepper, chopped
- 1 yellow bell pepper, chopped
- 1 red onion, cut into wedges
- 4 cloves garlic, minced
- 1/4 cup olive oil
- Juice of 1 large lemon
- Zest of 1 lemon
- 1 teaspoon dried oregano
- Salt and pepper to taste
- Fresh parsley for garnish (optional)
Cooking Instructions
- Preheat the Oven: Begin by preheating your oven to 425°F (220°C). A hot oven will help to achieve that perfect roasted texture, guaranteeing that the vegetables caramelize beautifully.
- Prepare the Vegetables: Wash and chop all the vegetables into bite-sized pieces. It’s important to keep the pieces uniform in size to guarantee even cooking. Place them in a large mixing bowl.
- Make the Dressing: In a separate small bowl, combine the minced garlic, olive oil, lemon juice, lemon zest, dried oregano, salt, and pepper. Whisk the mixture together until it’s well combined. This dressing will infuse the vegetables with flavor.
- Toss the Vegetables: Pour the dressing over the chopped vegetables in the mixing bowl. Using your hands or a spatula, toss the vegetables until they’re evenly coated in the lemon-garlic mixture.
- Spread on Baking Sheet: Line a large baking sheet with parchment paper for easy cleanup. Spread the coated vegetables in a single layer on the baking sheet, guaranteeing there’s enough space between them for even roasting.
- Roast the Vegetables: Place the baking sheet in the preheated oven and roast for 25-30 minutes. Halfway through the cooking time, stir the vegetables to promote even browning. They should be tender and slightly caramelized when done.
- Garnish and Serve: Once roasted, remove the vegetables from the oven and let them cool slightly. Transfer them to a serving platter and garnish with fresh parsley if desired. Serve warm as a delightful side to your Greek dinner.
Extra Tips
For added depth of flavor, consider marinating the vegetables in the lemon-garlic dressing for about 30 minutes before roasting. This allows the flavors to penetrate deeper into the vegetables.
Additionally, feel free to experiment with different vegetable combinations based on your preferences or what you have available. If you’re looking for a bit of heat, a sprinkle of red pepper flakes can also be a nice addition.
Enjoy your Lemon Garlic Roasted Vegetables!
Quick Lamb Gyros With Pita
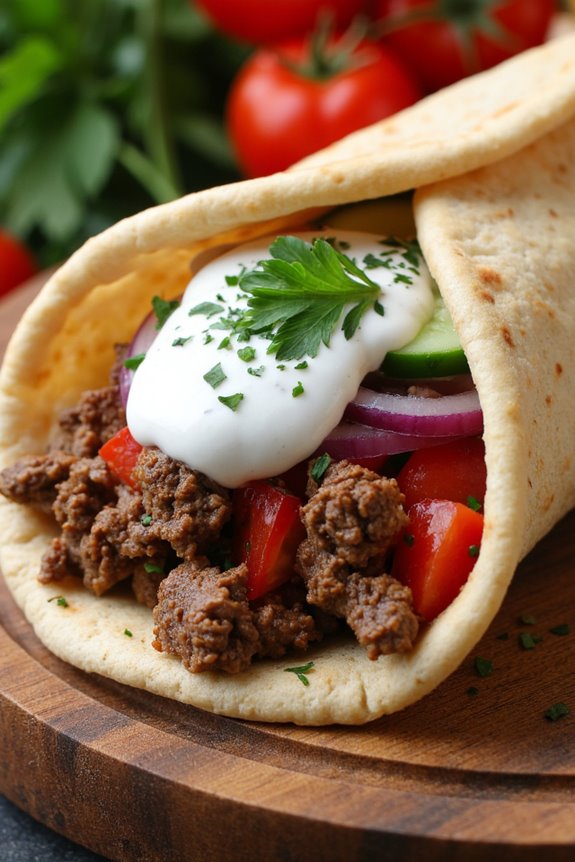
Gyros is a classic Greek dish that perfectly encapsulates the flavors of Mediterranean cuisine. Traditionally made with slow-cooked meats, this quick version allows you to enjoy the delicious taste of lamb gyros in a fraction of the time. It’s an ideal meal for busy weeknights or casual gatherings with friends and family.
The combination of seasoned lamb, fresh vegetables, and creamy tzatziki sauce wrapped in warm pita bread makes for a satisfying and flavorful experience.
This recipe is designed to serve 4-6 people, making it perfect for family dinners or entertaining guests. The preparation time is minimal, and the ingredients are easy to find, so you can whip up these delicious lamb gyros without any hassle. Follow the recipe below to create your own delicious Quick Lamb Gyros With Pita.
Ingredients
- 1 ½ pounds ground lamb
- 2 cloves garlic, minced
- 1 tablespoon dried oregano
- 1 teaspoon ground cumin
- 1 teaspoon paprika
- Salt and pepper, to taste
- 4-6 pita breads
- 1 cup diced tomatoes
- 1 cup diced cucumber
- ½ red onion, thinly sliced
- 1 cup tzatziki sauce
- Fresh parsley, for garnish (optional)
Cooking Instructions
- Prepare the Lamb Mixture: In a large mixing bowl, combine the ground lamb with minced garlic, dried oregano, ground cumin, paprika, salt, and pepper. Use your hands or a spatula to mix everything together until the spices are evenly distributed throughout the meat. This step is essential for ensuring that each bite of the gyro is flavorful.
- Cook the Lamb: Heat a large skillet over medium-high heat. Once hot, add the lamb mixture, breaking it apart with a spatula. Cook for about 8-10 minutes, stirring occasionally, until the lamb is browned and cooked through. Make sure to crumble the meat as it cooks to achieve that classic gyro texture.
- Warm the Pita: While the lamb is cooking, wrap the pita breads in aluminum foil and place them in a preheated oven at 350°F (175°C) for about 5-7 minutes, or until they’re warm and soft. Alternatively, you can warm them in a dry skillet for about 1 minute on each side.
- Assemble the Gyros: To assemble the gyros, take a warm pita and place a generous portion of the cooked lamb mixture in the center. Top with diced tomatoes, cucumber, and red onion. Drizzle with tzatziki sauce to add a revitalizing creaminess that complements the spices in the lamb.
- Garnish and Serve: If desired, sprinkle fresh parsley on top for added flavor and color. Fold the pita over the filling, and your delicious Quick Lamb Gyros are ready to be enjoyed! Serve immediately while warm.
Extra Tips
For an extra layer of flavor, you can marinate the ground lamb with the spices for a couple of hours or overnight in the refrigerator before cooking. This allows the spices to penetrate the meat better.
Additionally, feel free to add other toppings such as feta cheese, olives, or pickled vegetables to customize your gyros to your liking. Don’t hesitate to adjust the seasoning to your taste, ensuring that each bite reflects your personal preference!