

There’s something about the warm embrace of freshly baked Greek bread that just feels like home. From the rustic charm of Traditional Greek Village Bread to the delightful twist of Feta and Spinach Stuffed Bread, each recipe has its own story to tell. Whether you’re planning a gathering or just indulging in a cozy evening, these recipes will fill your home with irresistible scents and flavors. Ready to elevate your baking game with the first recipe? Let’s get started with these delicious Greek bread recipes!
Traditional Greek Village Bread

Traditional Greek Village Bread, or “Choriatiko Psomi,” is a rustic, hearty bread that embodies the flavors and simplicity of the Mediterranean lifestyle. It’s a staple in Greek households, often enjoyed with meals or used to soak up delicious sauces. This bread is characterized by its thick crust, soft and chewy interior, and a delightful aroma that fills the kitchen as it bakes.
Made with minimal ingredients, it brings people together, often made in large batches to share with friends and family. The process of making Traditional Greek Village Bread is straightforward and requires a bit of patience, as the dough needs time to rise and develop its flavors. The result is a wholesome, flavorful bread that pairs well with a variety of dishes, from grilled meats to fresh dips. Below is a recipe that serves 4-6 people, perfect for any gathering or family meal.
Ingredients:
- 4 cups all-purpose flour
- 1 ½ cups warm water (about 110°F)
- 1 tablespoon active dry yeast
- 2 teaspoons salt
- 1 tablespoon sugar
- 2 tablespoons olive oil
- Extra flour for dusting
Cooking Instructions:
- Activate the Yeast: In a small bowl, combine warm water, sugar, and yeast. Stir gently and let it sit for about 5-10 minutes until it becomes frothy. This step confirms that the yeast is alive and active, which is vital for the dough to rise properly.
- Prepare the Dough: In a large mixing bowl, combine the flour and salt. Make a well in the center and pour in the activated yeast mixture and olive oil. Using a wooden spoon, mix until the dough begins to come together. This initial mixing helps to incorporate all the ingredients.
- Knead the Dough: Transfer the dough onto a floured surface. Knead the dough for about 10 minutes until it becomes smooth and elastic. Kneading develops the gluten in the flour, which gives the bread its structure and chewy texture.
- First Rise: Place the kneaded dough in a greased bowl, cover it with a clean kitchen towel or plastic wrap, and let it rise in a warm place for about 1-2 hours or until it has doubled in size. This step allows the flavors to develop and the dough to expand.
- Shape the Bread: Once the dough has risen, punch it down to release the air. Turn it out onto a lightly floured surface and shape it into a round or oval loaf. Place it on a baking sheet lined with parchment paper. This shaping gives the bread its final form before baking.
- Second Rise: Cover the shaped loaf with a towel and allow it to rise again for about 30-45 minutes. This second rise helps to create a lighter texture in the finished bread.
- Preheat the Oven: While the dough is rising, preheat your oven to 425°F (220°C). A hot oven is necessary for achieving a good crust on the bread.
- Bake the Bread: Once the dough has risen, place the loaf in the oven and bake for 25-30 minutes or until the crust is golden brown and the bread sounds hollow when tapped on the bottom. This baking step is vital for developing the bread’s flavor and texture.
- Cool and Serve: Remove the bread from the oven and let it cool on a wire rack for at least 15 minutes before slicing. This cooling period allows the crumb to set properly, making it easier to cut.
Extra Tips:
For an extra layer of flavor, consider adding herbs like oregano or rosemary to the dough during the mixing stage. Additionally, for a crustier loaf, you can place a small pan of water in the oven while baking to create steam. This steam helps to achieve that desirable crunchy crust.
Always remember to adjust the baking time based on your oven’s performance, as different ovens can vary in temperature accuracy. Enjoy your Traditional Greek Village Bread fresh, with olive oil, or as part of a larger meal!
Greek Olive Bread

Greek Olive Bread, known for its robust flavor and chewy texture, is a staple in Mediterranean cuisine. It’s perfect for enjoying with meals or as a delightful snack on its own. This recipe brings together the rich taste of olives, fragrant herbs, and a simple bread dough that rises beautifully in the oven, creating a crusty exterior and a soft, flavorful interior. The combination of olives and olive oil not only enhances the flavor but also adds a touch of authenticity to this beloved Greek treat.
Making Greek Olive Bread is a straightforward process that allows you to explore the wonderful world of bread-making without requiring any specialized equipment. You’ll find that the aroma of freshly baked bread fills your kitchen, inviting everyone to gather around and enjoy a slice. This recipe serves 4-6 people, making it perfect for sharing with family and friends during gatherings or meals.
Ingredients (Serves 4-6)
- 3 cups all-purpose flour
- 1 packet (2 ¼ teaspoons) active dry yeast
- 1 teaspoon salt
- 1 tablespoon sugar
- 1 cup warm water (about 110°F/43°C)
- ¼ cup olive oil (plus extra for greasing)
- 1 cup pitted olives, chopped (black or green, or a mix)
- 1 tablespoon fresh rosemary, chopped (optional)
- 1 tablespoon dried oregano (optional)
- 1 teaspoon black pepper
Cooking Instructions
- Activate the Yeast: In a small bowl, combine the warm water and sugar. Sprinkle the active dry yeast on top and let it sit for about 5-10 minutes, until it becomes frothy. This step activates the yeast, guaranteeing that your bread will rise properly.
- Mix the Dry Ingredients: In a large mixing bowl, whisk together the flour, salt, black pepper, rosemary, and oregano. Mixing the dry ingredients first guarantees that the salt and spices are evenly distributed throughout the flour.
- Combine Wet and Dry Ingredients: Once the yeast mixture is frothy, add the olive oil to it. Pour this mixture into the bowl with the dry ingredients. Stir with a wooden spoon until a dough starts to form.
- Knead the Dough: Transfer the dough onto a lightly floured surface. Knead the dough for about 8-10 minutes, adding a little flour if necessary, until it’s smooth and elastic. Kneading develops the gluten, which gives the bread its structure.
- Incorporate the Olives: After kneading, flatten the dough slightly and spread the chopped olives over the surface. Fold the dough over the olives and knead gently until they’re evenly incorporated.
- First Rise: Lightly grease a large bowl with olive oil and place the dough inside, turning it to coat in oil. Cover with a damp cloth or plastic wrap and let it rise in a warm place for about 1-1.5 hours, or until it has doubled in size.
- Shape the Dough: Once the dough has risen, punch it down to release air. Shape it into a loaf or round shape, depending on your preference. Place it on a baking sheet lined with parchment paper.
- Second Rise: Cover the shaped dough with a clean cloth and let it rise again for about 30 minutes, or until it has puffed up.
- Preheat the Oven: While the dough is rising, preheat your oven to 375°F (190°C). This guarantees that the oven is hot enough to create a good crust when the bread is placed inside.
- Bake the Bread: Once the dough has risen, bake it in the preheated oven for 25-30 minutes, or until the crust is golden brown and the bread sounds hollow when tapped.
- Cool and Serve: Remove the bread from the oven and let it cool on a wire rack for at least 10 minutes before slicing. This resting period allows the steam to escape and prevents the bread from becoming gummy.
Extra Tips
For an added burst of flavor, consider using a variety of olives such as Kalamata, green, or Castelvetrano, each offering a distinct taste. You can also experiment with different herbs or even add garlic for an extra kick.
If you want a softer crust, cover the bread with a damp towel as it cools. Additionally, serving this bread with a drizzle of high-quality olive oil or balsamic vinegar can elevate the tasting experience. Enjoy your homemade Greek Olive Bread with cheese, spreads, or simply on its own!
Feta and Spinach Stuffed Bread
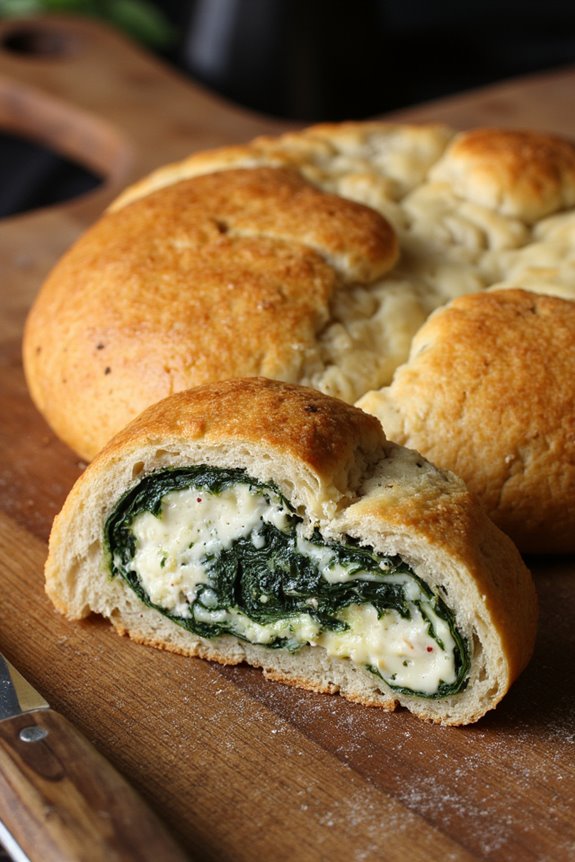
Feta and Spinach Stuffed Bread is a delightful Greek-inspired dish that brings together the rich flavors of creamy feta cheese and nutritious spinach, all encased in a warm, freshly baked bread. This dish is perfect for a family dinner, a gathering with friends, or simply as a hearty snack. The combination of textures and tastes makes it irresistible; the crispy crust contrasts beautifully with the savory filling.
Preparing this stuffed bread is easier than it may seem and is a great way to impress your guests with your culinary skills. With a few simple ingredients and a little bit of time, you can create a dish that not only looks stunning but also embodies the essence of Mediterranean cuisine. Serve it warm, and enjoy the gooey feta and spinach filling that will have everyone coming back for more.
Ingredients (Serves 4-6)
- 2 cups all-purpose flour
- 1 teaspoon salt
- 1 teaspoon sugar
- 1 packet (2 ¼ teaspoons) active dry yeast
- ¾ cup warm water (about 110°F/43°C)
- 2 tablespoons olive oil
- 1 cup fresh spinach, chopped
- 1 cup feta cheese, crumbled
- 1 small onion, finely chopped
- 2 cloves garlic, minced
- 1 teaspoon dried oregano
- 1 egg (for egg wash, optional)
Instructions
- Prepare the Dough: In a small bowl, dissolve the sugar in warm water and sprinkle the yeast over the top. Let it sit for about 5-10 minutes until it becomes frothy. In a large mixing bowl, combine the flour and salt. Make a well in the center and pour in the yeast mixture along with the olive oil. Mix until a dough forms.
- Knead the Dough: Transfer the dough onto a floured surface and knead for about 8-10 minutes until the dough is smooth and elastic. If the dough is sticky, add a little more flour. Once kneaded, form the dough into a ball and place it in a greased bowl, covering it with a clean cloth. Let it rise in a warm place for about 1 hour, or until it has doubled in size.
- Prepare the Filling: While the dough is rising, heat a tablespoon of olive oil in a skillet over medium heat. Add the chopped onion and garlic, and sauté until softened, about 3-4 minutes. Add the chopped spinach and cook until wilted. Remove from heat and let cool slightly before mixing in the crumbled feta and oregano.
- Assemble the Bread: Once the dough has risen, punch it down to release the air. On a floured surface, roll the dough out into a rectangle (about 12×16 inches). Spread the spinach and feta filling evenly over the dough, leaving about an inch border on all sides. Starting from one edge, roll the dough tightly into a log shape, pinching the edges to seal.
- Second Rise: Place the rolled bread seam-side down on a greased baking sheet. Cover it with a cloth and let it rise again for about 30 minutes. If desired, preheat the oven to 375°F (190°C) during this time.
- Bake the Bread: (Optional) Beat the egg and brush it over the top of the bread for a golden finish. Bake in the preheated oven for 25-30 minutes, or until the bread is golden brown and sounds hollow when tapped.
- Cool and Serve: Allow the bread to cool for about 10 minutes before slicing. Serve warm, and enjoy the delicious flavors of feta and spinach!
Extra Tips
For an added depth of flavor, consider incorporating herbs such as dill or parsley into the filling. You can also experiment with different cheeses, like ricotta or mozzarella, to create your unique variation.
If you’re short on time, using store-bought pizza dough can speed up the process considerably. Just remember to adjust the baking time as needed. Enjoy your culinary adventure with this delightful Greek bread!
Tsoureki: Greek Easter Bread
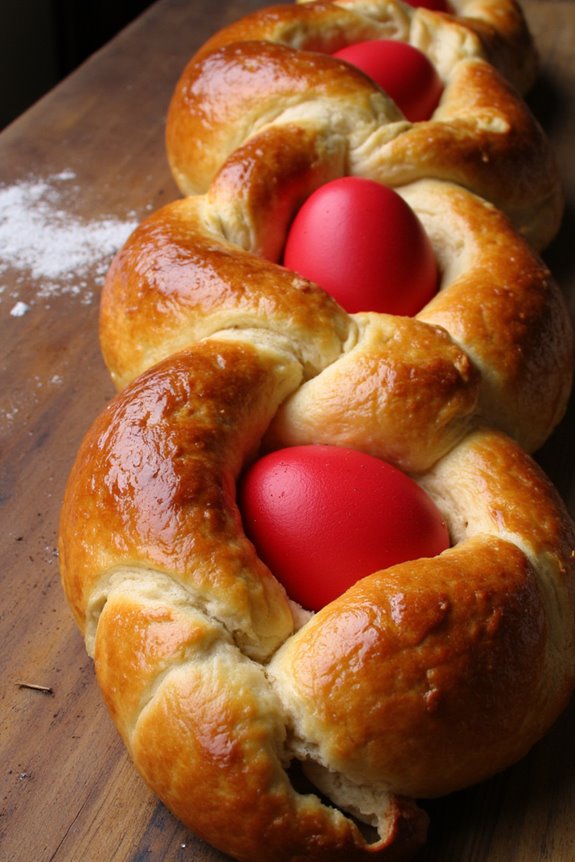
Tsoureki is a traditional Greek Easter bread that’s often braided and flavored with aromatic spices such as mahleb and mastic. This sweet, soft bread is a symbol of renewal and is typically enjoyed during the Easter festivities, but it can be made and relished year-round. The bread isn’t only delicious, but it also has a beautiful presentation, making it a wonderful centerpiece for any gathering.
Making Tsoureki requires some patience as the dough needs time to rise, but the result is well worth the effort. The bread is usually adorned with red-dyed eggs, which represent the blood of Christ, and its rich texture and sweet flavor make it a favorite for breakfast, snacks, or alongside a cup of coffee or tea.
Once you experience the delightful aroma that fills your kitchen while baking, you’ll understand why this recipe is a beloved Greek tradition.
Ingredients (Serves 4-6):
- 4 cups all-purpose flour
- 1 cup milk
- 2 large eggs
- 1/2 cup sugar
- 1/4 cup unsalted butter, softened
- 1 packet (2 1/4 teaspoons) active dry yeast
- 1/2 teaspoon salt
- 1/2 teaspoon mahleb (optional)
- 1/4 teaspoon mastic (optional)
- 1 egg, for egg wash
- Red-dyed eggs (optional, for decoration)
Cooking Instructions:
- Activate the Yeast: In a small bowl, combine the warm milk (about 110°F) with the active dry yeast and a tablespoon of sugar. Let it sit for about 5-10 minutes until it becomes frothy. This indicates that the yeast is active and ready to be used.
- Mix the Wet Ingredients: In a large mixing bowl, whisk together the eggs, softened butter, and the remaining sugar until well combined. Add the frothy yeast mixture and mix well to combine.
- Combine Dry Ingredients: In another bowl, sift the flour, salt, mahleb, and mastic (if using). Gradually add this dry mixture into the wet mixture, stirring with a wooden spoon until a sticky dough forms.
- Knead the Dough: Transfer the dough onto a lightly floured surface and knead it for about 10-15 minutes until it becomes smooth and elastic. If the dough is too sticky, add a little more flour as needed.
- First Rise: Shape the dough into a ball and place it in a greased bowl, covering it with a clean kitchen towel. Let it rise in a warm place for about 1-2 hours, or until it doubles in size.
- Shape the Bread: After the dough has risen, punch it down to release the air. Divide the dough into three equal portions. Roll each portion into long strands and braid them together. Tuck the ends under to secure the shape. If using, insert the red-dyed eggs into the braid.
- Second Rise: Place the braided loaf on a baking sheet lined with parchment paper. Cover it again with a towel and let it rise for another hour.
- Preheat the Oven: While the dough is rising, preheat your oven to 350°F (175°C).
- Egg Wash: Beat the additional egg in a small bowl and brush it over the surface of the braided bread to give it a beautiful golden color when baked.
- Bake: Place the bread in the preheated oven and bake for 30-35 minutes, or until it’s golden brown and sounds hollow when tapped on the bottom.
- Cool: Once baked, remove the bread from the oven and let it cool on a wire rack before slicing.
Extra Tips:
When making Tsoureki, be sure to knead the dough thoroughly to develop the gluten, which contributes to the bread’s soft texture.
If you want to enhance the flavor even more, you can experiment with adding a bit of orange or lemon zest to the dough. Additionally, for a more pronounced sweetness, consider serving it with a drizzle of honey or a dusting of powdered sugar on top once cooled.
Enjoy this delightful bread warm or toasted!
Pita Bread
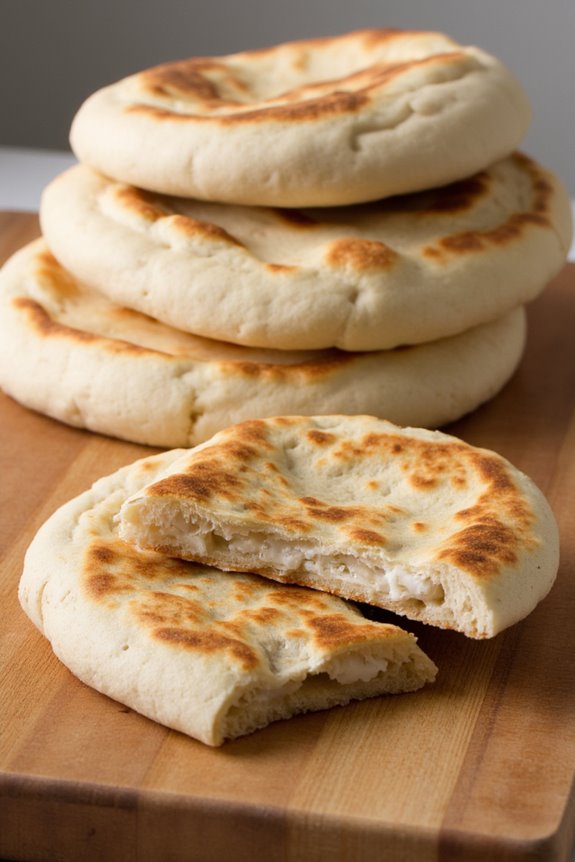
Pita bread, a staple of Greek cuisine, is a versatile flatbread that’s known for its pocket-like structure. This bread is perfect for dipping in hummus, stuffing with grilled meats, or serving alongside salads. With its soft, chewy texture and warm aroma, homemade pita bread is a delightful addition to any meal. The good news is that making pita bread from scratch is surprisingly simple and requires only a few basic ingredients.
To achieve the characteristic puffiness that makes pita perfect for stuffing, the dough needs to be rolled out evenly and baked at a high temperature. The steam created in the oven will cause the bread to puff up, creating a pocket. Once you master this process, you can experiment with different flavors and fillings, making pita bread a fun and creative cooking project.
Ingredients (Serving size: 4-6 people)
- 2 cups all-purpose flour
- 1 cup whole wheat flour
- 1 tablespoon active dry yeast
- 1 teaspoon salt
- 1 tablespoon sugar
- 1 tablespoon olive oil
- 1 ½ cups warm water (about 110°F or 45°C)
Cooking Instructions
- Activate the Yeast: In a small bowl, combine the warm water, sugar, and active dry yeast. Stir gently and let it sit for about 5-10 minutes until the mixture becomes frothy. This step guarantees that the yeast is activated and ready to help the dough rise.
- Mix the Dry Ingredients: In a large mixing bowl, combine the all-purpose flour, whole wheat flour, and salt. Stir the dry ingredients together until they’re evenly distributed.
- Combine Wet and Dry Ingredients: Once the yeast mixture is frothy, add the olive oil to it. Pour this mixture into the bowl with the dry ingredients. Using a wooden spoon or your hands, mix everything together until a shaggy dough starts to form.
- Knead the Dough: Transfer the dough onto a lightly floured surface. Knead the dough for about 8-10 minutes until it becomes smooth and elastic. If the dough is too sticky, sprinkle in a little more flour as needed.
- Let the Dough Rise: Place the kneaded dough in a lightly greased bowl, cover it with a clean kitchen towel or plastic wrap, and let it rise in a warm place for about 1-1.5 hours, or until it doubles in size.
- Preheat the Oven: About 20 minutes before the dough is ready, preheat your oven to 475°F (245°C). If you have a baking stone, place it in the oven to heat up; otherwise, a baking sheet will work fine.
- Shape the Pitas: Once the dough has risen, punch it down to release the air. Divide the dough into 8 equal pieces. Roll each piece into a ball and then flatten it into a disk about ¼ inch thick with a rolling pin.
- Bake the Pitas: Place the disks onto the hot baking stone or baking sheet, leaving enough space between them. Bake for 5-7 minutes, or until the pitas puff up and are lightly golden. Keep an eye on them, as baking time can vary.
- Cool and Serve: Remove the pita bread from the oven and let them cool on a wire rack. Serve warm or store in an airtight container for later use.
Extra Tips
When making pita bread, verify your oven is adequately preheated; this is essential for achieving that perfect puff. If you want to enhance the flavor, consider adding herbs or spices to the dough, such as garlic powder or dried oregano.
Additionally, for a softer pita, wrap the baked breads in a clean towel as they cool. Enjoy experimenting with different fillings and dips to complement your homemade pita bread!
Greek Flatbread With Herbs
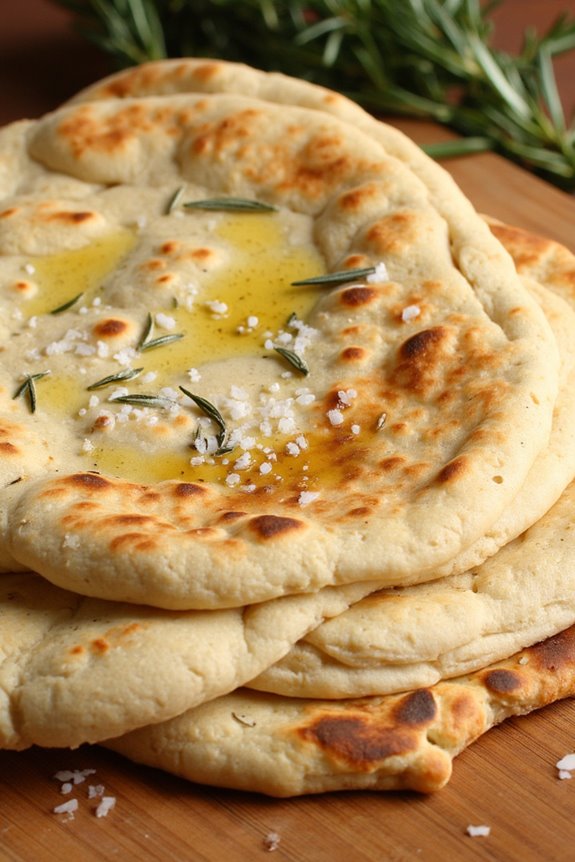
Greek Flatbread With Herbs is a delightful and aromatic bread that’s perfect for serving alongside a variety of Mediterranean dishes. This flatbread is soft and chewy, with the addition of fresh herbs that provide a burst of flavor. Whether you’re enjoying it with dips like tzatziki or using it to wrap around grilled meats, this flatbread is a versatile and crowd-pleasing addition to any meal.
The simplicity of the ingredients makes it an easy recipe to whip up, and it offers a warm, comforting touch to the dining experience. The recipe is designed to serve 4-6 people, making it an ideal choice for family gatherings or dinner parties. With just a handful of staple ingredients and a bit of time, you’ll create a delicious flatbread that fills your home with the enticing aroma of baked herbs.
This flatbread not only complements savory dishes but can also be enjoyed on its own, sprinkled with a little olive oil and sea salt.
Ingredients:
- 2 cups all-purpose flour
- 1 teaspoon salt
- 1 teaspoon baking powder
- 1 tablespoon dried oregano
- 1 tablespoon fresh rosemary, finely chopped
- 1 tablespoon fresh thyme, finely chopped
- 1 cup warm water
- 2 tablespoons olive oil, plus extra for brushing
Cooking Instructions:
- Prepare the Dough: In a large mixing bowl, combine the all-purpose flour, salt, baking powder, dried oregano, fresh rosemary, and fresh thyme. Mix the dry ingredients thoroughly to guarantee the herbs are evenly distributed throughout the flour.
- Mix Wet Ingredients: In a separate bowl, mix together the warm water and olive oil. The water should be warm to the touch, but not hot, as too much heat can kill the yeast if you decide to add it for a fluffier texture.
- Combine Ingredients: Gradually pour the wet mixture into the dry ingredients, stirring with a wooden spoon until a shaggy dough forms. Once it starts to come together, use your hands to knead the dough in the bowl for about 2-3 minutes until it’s smooth and elastic.
- Rest the Dough: Cover the bowl with a clean kitchen towel or plastic wrap, and let it rest for at least 30 minutes at room temperature. This resting period allows the gluten to relax, making it easier to roll out the dough later.
- Shape the Flatbreads: After resting, divide the dough into 4-6 equal portions, depending on your desired size for the flatbreads. On a lightly floured surface, roll each portion into a thin circle, approximately ¼ inch thick.
- Cook the Flatbreads: Heat a non-stick skillet or cast-iron pan over medium-high heat. Once hot, place one flatbread in the pan and cook for about 2-3 minutes on each side, until golden brown and slightly puffed. Repeat this process with the remaining pieces of dough.
- Finish and Serve: Once all the flatbreads are cooked, brush each one lightly with olive oil and sprinkle with a pinch of sea salt. Serve warm, either plain or with your favorite dips and spreads.
Extra Tips: For added flavor, feel free to experiment with different herbs or spices based on your preference. Fresh herbs can greatly enhance the taste of the flatbread, so don’t hesitate to use a mix of your favorites.
Additionally, these flatbreads can be made ahead of time and stored in an airtight container. To reheat, simply warm them in the oven or on a skillet for a few minutes before serving. Enjoy the process and feel free to get creative with toppings or fillings!
Honey and Walnut Bread

Honey and Walnut Bread is a delightful Greek treat that combines the natural sweetness of honey with the rich, nutty flavor of walnuts. This bread is perfect for breakfast, as a snack, or even as a dessert. Its unique flavor profile and texture make it a favorite for many, and it’s often enjoyed with a drizzle of honey or a spread of butter. Making this bread at home fills your kitchen with a warm, inviting aroma that will have everyone asking for a slice.
The process of making Honey and Walnut Bread is both simple and rewarding. You’ll be combining basic ingredients such as flour, yeast, and honey to create a soft, flavorful dough that’s studded with crunchy walnuts. The bread is then baked to a golden perfection, resulting in a crust that’s slightly crisp while the inside remains soft and airy. Whether you serve it fresh from the oven or toasted the next day, this bread is sure to please any crowd.
Ingredients (serving size: 4-6 people):
- 3 cups all-purpose flour
- 1 packet (2 ¼ teaspoons) active dry yeast
- 1 cup warm water (110°F)
- ¼ cup honey
- 1 teaspoon salt
- 1 cup walnuts, chopped
- 2 tablespoons olive oil
- 1 teaspoon cinnamon (optional)
- Extra honey for drizzling (optional)
Cooking Instructions:
- Prepare the Yeast: In a small bowl, combine the warm water and honey. Sprinkle the active dry yeast over the top and let it sit for about 5-10 minutes until it becomes frothy. This step is vital as it activates the yeast, allowing your bread to rise properly.
- Mix the Dry Ingredients: In a large mixing bowl, whisk together the flour, salt, and cinnamon (if using). Create a well in the center of the flour mixture, which will be used to combine the wet ingredients.
- Combine Wet Ingredients: Once the yeast mixture is frothy, pour it into the well you created in the flour mixture. Add the olive oil and mix with a spoon or your hands until a rough dough forms.
- Knead the Dough: Transfer the dough onto a floured surface and knead it for about 8-10 minutes until it becomes smooth and elastic. This process develops the gluten, which is essential for the bread’s structure.
- Incorporate the Walnuts: Once the dough is smooth, flatten it slightly and sprinkle the chopped walnuts over the top. Fold the dough over the walnuts and knead for an additional 2-3 minutes until the walnuts are evenly distributed throughout the dough.
- Let it Rise: Shape the dough into a ball and place it in a greased bowl, covering it with a clean kitchen towel. Allow it to rise in a warm place for about 1-1.5 hours, or until it has doubled in size.
- Shape the Bread: After the dough has risen, punch it down to release the air. Transfer it to a floured surface and shape it into a loaf or divide it into smaller portions for rolls. Place the shaped dough onto a baking sheet lined with parchment paper.
- Second Rise: Cover the dough again with the kitchen towel and let it rise for another 30-45 minutes until it puffs up.
- Preheat the Oven: While the dough is rising, preheat your oven to 375°F (190°C).
- Bake the Bread: Once the second rise is complete, place the baking sheet in the preheated oven and bake for 25-30 minutes, or until the bread is golden brown and sounds hollow when tapped on the bottom.
- Cool and Serve: Remove the bread from the oven and let it cool on a wire rack. Serve warm, drizzled with extra honey if desired.
Extra Tips: To enhance the flavor of your Honey and Walnut Bread, consider toasting the walnuts lightly in a dry skillet before adding them to the dough. This brings out their natural oils and deepens their flavor. Additionally, if you prefer a slightly sweeter bread, you can increase the amount of honey in the dough, or serve it with a honey butter spread. Enjoy experimenting with this recipe, and don’t hesitate to add your personal touch!
Greek Sweet Bread Rolls
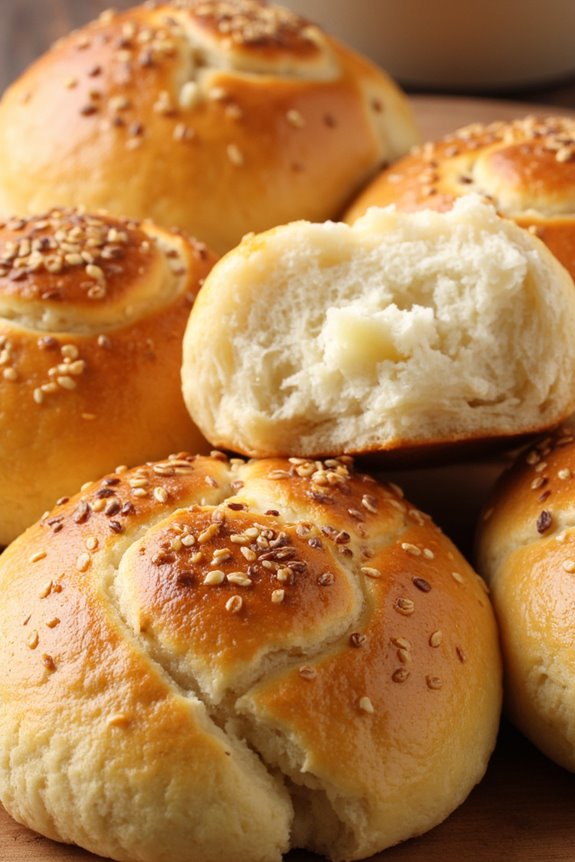
Greek Sweet Bread Rolls, also known as “Chalvas,” are a delightful treat that embodies the rich traditions of Greek baking. These soft, fluffy rolls are perfect for breakfast or as a sweet snack, often enjoyed with a cup of coffee or tea. Their slightly sweet flavor is complemented by a hint of citrus and spices, making them a beloved choice for family gatherings and special occasions. The simple ingredients and straightforward preparation make them accessible to bakers of all skill levels.
The history of these rolls dates back to ancient Greece, where bread-making was considered an art form. Today, Greek Sweet Bread Rolls continue to be a staple in Greek households. With a golden-brown crust and a tender crumb, these rolls are sure to impress your family and friends. Whether enjoyed fresh from the oven or toasted with butter, they’re a delicious way to bring a taste of Greece to your table.
Ingredients (Serves 4-6):
- 3 ½ cups all-purpose flour
- 1 packet (2 ¼ teaspoons) active dry yeast
- ½ cup granulated sugar
- ½ teaspoon salt
- 1 teaspoon ground cinnamon
- Zest of 1 lemon
- 1 cup whole milk, warmed
- 2 large eggs
- ¼ cup unsalted butter, melted
- 1 teaspoon vanilla extract
- 1 egg (for egg wash)
- Sesame seeds or chopped nuts (for topping, optional)
Cooking Instructions:
- Prepare the Yeast Mixture: In a small bowl, combine the warm milk and active dry yeast. Let it sit for about 5-10 minutes until it becomes frothy. This step activates the yeast, which is essential for the rolls to rise properly.
- Mix Dry Ingredients: In a large mixing bowl, whisk together the all-purpose flour, sugar, salt, ground cinnamon, and lemon zest. This guarantees that all the dry ingredients are evenly distributed, which is important for consistent flavor throughout the rolls.
- Combine Wet Ingredients: In a separate bowl, beat the eggs and then mix in the melted butter and vanilla extract. Once the yeast mixture is frothy, add it to this bowl. Stir until combined to create a wet mixture that will be added to the dry ingredients.
- Form the Dough: Gradually add the wet mixture to the dry ingredients, stirring with a wooden spoon until a rough dough forms. When the dough starts to come together, switch to using your hands to knead it in the bowl until it’s smooth and elastic, about 5-7 minutes.
- First Rise: Place the dough in a lightly greased bowl, cover it with a clean kitchen towel or plastic wrap, and let it rise in a warm place for about 1-2 hours, or until it has doubled in size. This is the critical step that allows the dough to develop flavor and texture.
- Shape the Rolls: Once the dough has risen, punch it down to release the air. Divide it into 12 equal pieces and shape each piece into a ball. Place the balls on a greased baking sheet, spacing them about 1 inch apart.
- Second Rise: Cover the shaped rolls with a cloth and let them rise again for about 30-45 minutes until they’ve puffed up and are touching each other. This final rise enhances the softness of the rolls.
- Preheat and Prepare for Baking: Preheat your oven to 350°F (175°C). In a small bowl, whisk the remaining egg and brush it over the tops of the rolls. If desired, sprinkle sesame seeds or chopped nuts on top for added texture and flavor.
- Bake the Rolls: Bake the rolls in the preheated oven for 20-25 minutes, or until they’re golden brown on top. Keep an eye on them to confirm they don’t over-bake, as this can lead to dryness.
- Cool and Serve: Remove the rolls from the oven and let them cool slightly on a wire rack. Serve them warm or at room temperature, and enjoy the delightful flavors of Greece!
Extra Tips:
When making Greek Sweet Bread Rolls, verify that your milk is warm but not hot, as excessive heat can kill the yeast. Additionally, if you have time, consider allowing the rolls to rise in the refrigerator overnight for a richer flavor.
For added sweetness, you can drizzle a simple syrup over the rolls after baking or serve them with honey and butter for dipping. Enjoy your baking experience and the delightful aroma that fills your kitchen!
Lavash Bread
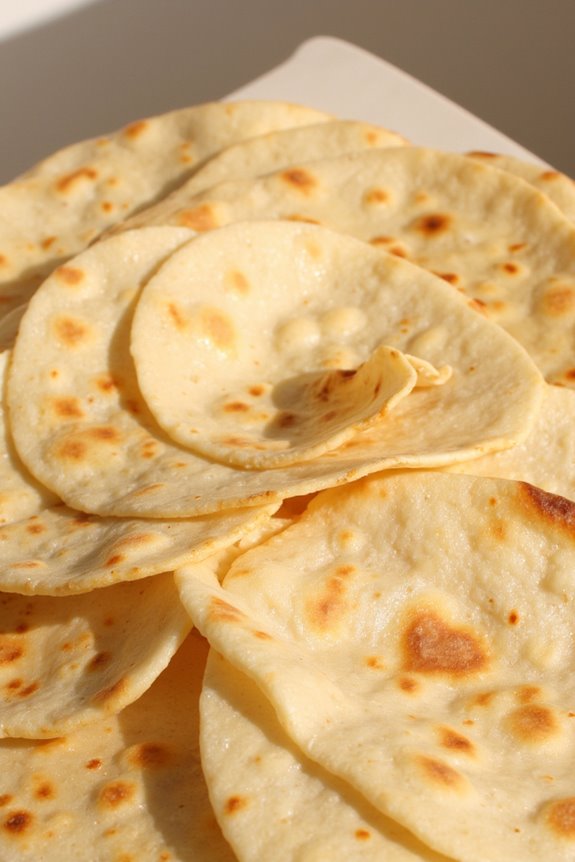
Lavash bread is a traditional soft flatbread that hails from the regions of Armenia and Turkey, and it’s widely enjoyed throughout Greece and the Middle East. This versatile bread is known for its thin, flexible texture, making it perfect for wrapping around meats, vegetables, or even as a base for dips.
Making lavash bread at home is a rewarding experience, allowing you to enjoy the aroma of freshly baked bread wafting through your kitchen. The process of preparing lavash is simple, yet it requires a bit of technique to achieve that perfect thinness and texture. The dough consists of just a few basic ingredients, meaning you can whip up a batch with minimal fuss.
Once made, lavash can be served warm or stored for later use, making it a fantastic addition to any meal. Whether you’re planning a Mediterranean feast or simply looking to elevate your everyday sandwiches, lavash bread is a delightful choice.
Ingredients:
- 3 cups all-purpose flour
- 1 teaspoon salt
- 1 teaspoon sugar
- 1 packet (2 ¼ teaspoons) active dry yeast
- 1 cup warm water (110°F/43°C)
- 2 tablespoons olive oil
- Extra flour for dusting
Cooking Instructions:
- Activate the Yeast: In a small bowl, combine the warm water, sugar, and active dry yeast. Stir gently to mix and let it sit for about 5-10 minutes until it becomes frothy. This indicates that the yeast is active and ready to be used.
- Prepare the Dough: In a large mixing bowl, combine the all-purpose flour and salt. Create a well in the center and pour in the activated yeast mixture along with the olive oil. Using a wooden spoon or your hands, mix the ingredients until they start to come together to form a dough.
- Knead the Dough: Transfer the dough onto a lightly floured surface. Knead the dough for about 8-10 minutes until it becomes smooth and elastic. If the dough is sticky, add a little extra flour as needed.
- Let it Rise: Place the kneaded dough into a lightly greased bowl, cover it with a clean kitchen towel, and let it rise in a warm place for about 1-1.5 hours or until it has doubled in size.
- Shape the Lavash: Once the dough has risen, punch it down to release the air. Divide the dough into 4-6 equal pieces, depending on the size of lavash you prefer. Roll each piece into a ball and let them rest for about 10 minutes.
- Roll Out the Dough: On a lightly floured surface, take a ball of dough and use a rolling pin to roll it out into a thin, oval shape (about 1/8 inch thick). Repeat this process with the remaining pieces of dough.
- Cook the Lavash: Preheat a non-stick skillet or griddle over medium-high heat. Carefully place one rolled-out dough on the hot skillet and cook for about 1-2 minutes, or until bubbles form on the surface. Flip it over and cook for another 1-2 minutes until it’s lightly browned and cooked through. Remove from heat and keep warm in a clean towel. Repeat with the remaining dough.
- Serve: Your homemade lavash bread is now ready to be enjoyed! Serve it warm with your favorite dips, wraps, or as part of a Mediterranean platter.
Extra Tips: When rolling out the dough, aim to get it as thin as possible without tearing, as this will yield a more authentic lavash texture. If you’re not using the lavash immediately, you can store it in an airtight container or wrap it in plastic wrap to keep it fresh.
Additionally, feel free to experiment by adding herbs or spices to the dough for extra flavor!
Whole Wheat Greek Bread
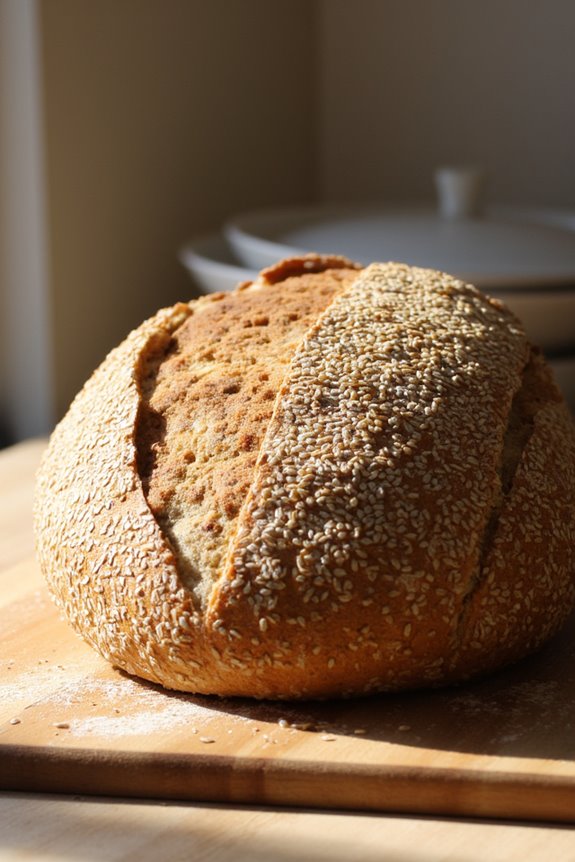
Whole Wheat Greek Bread, also known as “Horiatiko Psomi,” is a rustic and hearty bread that’s a staple in many Greek households. Made with wholesome whole wheat flour, this bread captures the essence of traditional Greek baking, delivering a nutty flavor and a dense texture that pairs beautifully with a variety of dishes.
Whether served alongside a fresh Greek salad, a bowl of hearty soup, or simply with olive oil for dipping, this bread is guaranteed to be a hit at your dining table.
This recipe is perfect for those who appreciate the health benefits of whole grains while still wanting to enjoy the authentic taste of Greek cuisine. The preparation is straightforward, and the result is a beautifully crusty loaf that will fill your kitchen with a delightful aroma.
Gather your ingredients and get ready to enjoy the satisfaction of baking your own Whole Wheat Greek Bread.
Ingredients (Serves 4-6):
- 3 cups whole wheat flour
- 1 cup all-purpose flour
- 1 ½ teaspoons salt
- 1 teaspoon sugar
- 2 teaspoons active dry yeast
- 1 ¼ cups warm water (about 110°F)
- 2 tablespoons olive oil
- 1 tablespoon sesame seeds (optional, for topping)
Instructions:
- Activate the Yeast: In a small bowl, combine the warm water and sugar, then sprinkle the active dry yeast on top. Let it sit for about 5-10 minutes, or until it becomes frothy. This step guarantees that the yeast is active and ready to help the bread rise.
- Mix the Dough: In a large mixing bowl, combine the whole wheat flour, all-purpose flour, and salt. Make a well in the center and pour in the activated yeast mixture and olive oil. Using a wooden spoon, mix the ingredients until a shaggy dough forms.
- Knead the Dough: Turn the dough out onto a floured surface and knead it for about 8-10 minutes, or until it becomes smooth and elastic. This step develops the gluten, which gives the bread its structure.
- First Rise: Place the kneaded dough into a lightly oiled bowl, cover it with a damp cloth, and let it rise in a warm place for about 1-2 hours, or until it has doubled in size.
- Shape the Loaf: After the dough has risen, punch it down to release any air bubbles. Turn it out onto a lightly floured surface and shape it into a round or oval loaf, depending on your preference.
- Second Rise: Place the formed loaf on a baking sheet lined with parchment paper. Cover it with a cloth again and let it rise for another 30-45 minutes, or until it has puffed up slightly.
- Preheat the Oven: While the dough is rising for the second time, preheat your oven to 375°F (190°C).
- Bake the Bread: If desired, sprinkle sesame seeds on top of the loaf before placing it in the oven. Bake for 30-35 minutes or until the bread is golden brown and sounds hollow when tapped on the bottom.
- Cool the Bread: Once baked, remove the bread from the oven and let it cool on a wire rack before slicing. This cooling process allows the texture to set properly.
Extra Tips:
To guarantee the best results, make sure your ingredients, especially the water, are at the right temperature for activating the yeast.
If you live in a humid environment, you may need to adjust the flour quantity slightly as whole wheat flour can absorb more moisture.
For an extra flavor boost, consider adding herbs like rosemary or thyme into the dough during mixing.
Additionally, storing the bread in an airtight container will keep it fresh for several days, or you can freeze it for longer storage.
Enjoy your homemade Whole Wheat Greek Bread!
Cheese and Herb Bread Sticks
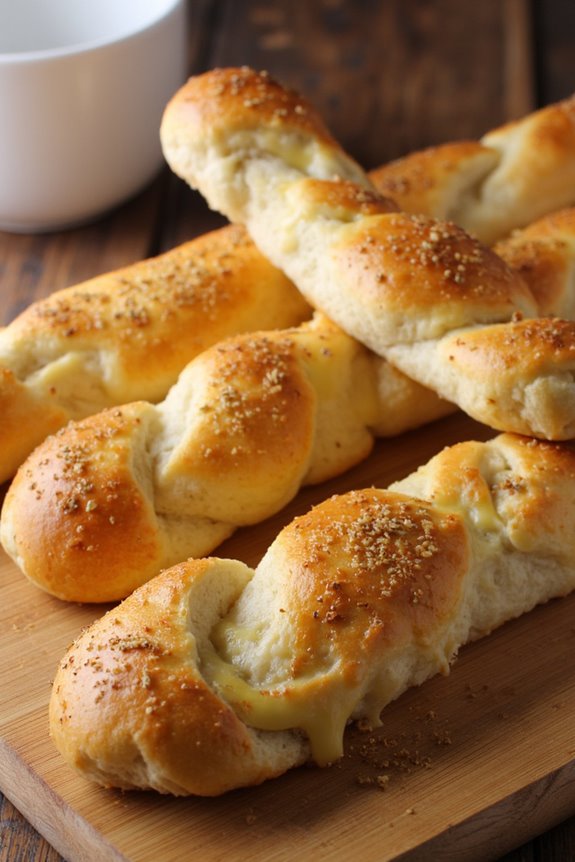
Cheese and Herb Bread Sticks are a delightful and versatile addition to any meal, offering a crispy exterior with a soft, cheesy inside. These savory breadsticks are perfect as an appetizer, snack, or even as a side dish to accompany soups and salads. Infused with aromatic herbs and rich cheese, they bring a touch of Mediterranean flavor to your table, making them a favorite among family and friends.
Making Cheese and Herb Bread Sticks is a straightforward process that can be both fun and rewarding. With just a handful of ingredients and a little bit of time, you can create these deliciously cheesy treats that will impress your guests. The best part is that they can be customized with your choice of herbs or additional toppings, allowing you to make them uniquely yours.
Ingredients (serving size: 4-6 people)
- 2 cups all-purpose flour
- 1 tablespoon baking powder
- 1 teaspoon salt
- 1 teaspoon dried oregano
- 1 teaspoon dried thyme
- ½ teaspoon red pepper flakes (optional)
- 1 cup shredded mozzarella cheese
- ½ cup grated Parmesan cheese
- ¼ cup olive oil
- ¾ cup milk
- 1 egg (for egg wash)
- Extra herbs or cheese for topping (optional)
Cooking Instructions
- Preheat the Oven: Begin by preheating your oven to 400°F (200°C). This guarantees that the breadsticks bake evenly and develop a nice golden color.
- Mix Dry Ingredients: In a large mixing bowl, combine the all-purpose flour, baking powder, salt, oregano, thyme, and red pepper flakes (if using). Whisk these ingredients together until they’re well blended.
- Add Cheese: Next, add the shredded mozzarella and grated Parmesan cheese to the dry mixture. Stir well to guarantee the cheese is evenly distributed throughout the flour mixture.
- Combine Wet Ingredients: In a separate bowl, mix together the olive oil and milk until well combined. Pour this mixture into the dry ingredients and stir until a dough forms. Be careful not to overmix, as this can make the breadsticks tough.
- Knead the Dough: Lightly flour a clean surface and transfer the dough onto it. Knead the dough gently for about 1-2 minutes until it becomes smooth. If the dough is sticky, sprinkle a little more flour as needed.
- Shape the Sticks: Roll the dough out to a thickness of about ½ inch. Use a sharp knife or pizza cutter to cut the dough into strips, approximately 1 inch wide. You can shape the strips into twists or keep them straight for a classic look.
- Prepare for Baking: Place the cut breadsticks on a baking sheet lined with parchment paper. Beat the egg in a small bowl and brush it over the tops of the breadsticks for a beautiful finish. If desired, sprinkle extra herbs or cheese on top.
- Bake: Place the baking sheet in the preheated oven and bake for 15-20 minutes, or until the breadsticks are golden brown and crispy.
- Cool and Serve: Once baked, remove the breadsticks from the oven and allow them to cool slightly on a wire rack. Serve warm and enjoy!
Extra Tips
For an extra layer of flavor, you can experiment with different herbs such as basil or rosemary, or even add minced garlic to the dough.
If you want a richer flavor, try incorporating a blend of cheese, such as cheddar or feta.
These breadsticks also freeze well, so consider making a double batch and storing half for later use. Just reheat them in the oven for a quick snack or side dish!
Greek Zucchini Bread

Greek Zucchini Bread is a delightful and moist quick bread that captures the essence of Mediterranean flavors. This dish combines the natural sweetness of zucchini with traditional Greek ingredients such as olive oil, feta cheese, and aromatic herbs. Perfect for breakfast, a snack, or even as a side dish, this easy-to-make bread is bound to impress your family and friends with its savory taste and wonderful texture.
In addition to being delicious, Greek Zucchini Bread is a great way to use up excess zucchini, especially during the summer months when they’re plentiful. The bread is also versatile and can be customized to suit your taste by adding nuts, spices, or other vegetables. Enjoy it warm or at room temperature, and feel free to serve it with a dollop of Greek yogurt or tzatziki for an extra touch.
Ingredients (serving size: 4-6 people)
- 2 medium zucchinis, grated
- 1 cup all-purpose flour
- 1 cup whole wheat flour
- 1 teaspoon baking powder
- 1 teaspoon baking soda
- 1 teaspoon salt
- 1 teaspoon dried oregano
- 1/2 teaspoon black pepper
- 3 large eggs
- 1/2 cup olive oil
- 1/2 cup feta cheese, crumbled
- 1/4 cup fresh parsley, chopped
- Optional: 1/2 cup walnuts or pine nuts, chopped
Cooking Instructions
- Preheat the Oven: Begin by preheating your oven to 350°F (175°C). This guarantees that the bread cooks evenly and rises properly as soon as it’s placed in the oven.
- Prepare the Zucchini: Grate the zucchinis using a box grater or food processor. After grating, place the zucchini in a clean kitchen towel or cheesecloth and squeeze out the excess moisture. This step is essential to prevent the bread from becoming soggy.
- Mix Dry Ingredients: In a large mixing bowl, combine the all-purpose flour, whole wheat flour, baking powder, baking soda, salt, dried oregano, and black pepper. Whisk these ingredients together until well blended.
- Combine Wet Ingredients: In another bowl, beat the eggs and then add the olive oil. Mix them together until you achieve a smooth consistency. Stir in the grated zucchini, crumbled feta cheese, and chopped parsley.
- Combine Wet and Dry Mixtures: Pour the wet ingredients into the bowl with the dry ingredients. Gently mix until just combined; be careful not to overmix, as this can lead to a denser bread.
- Add Nuts (Optional): If you’re using nuts, fold them into the batter at this stage. This adds a nice crunch and enhances the flavor profile of the bread.
- Transfer to Baking Pan: Grease a loaf pan with olive oil or line it with parchment paper. Pour the batter into the prepared loaf pan, smoothing the top with a spatula.
- Bake: Place the loaf pan in the preheated oven and bake for 50-60 minutes. The bread is done when a toothpick inserted into the center comes out clean and the top is golden brown.
- Cool and Serve: Once baked, remove the zucchini bread from the oven and let it cool in the pan for about 10 minutes. Then, transfer it to a wire rack to cool completely before slicing.
Extra Tips
When making Greek Zucchini Bread, feel free to experiment with various herbs and spices to cater to your taste. Basil and dill can provide different flavor profiles, while adding a pinch of garlic powder can enhance the savory aspect of the bread.
Additionally, this bread can be stored wrapped in plastic wrap or foil for a few days, or it can be frozen for longer storage. To serve, consider warming individual slices in the oven or microwave for a freshly baked taste. Enjoy your Greek Zucchini Bread with a spread of butter or a drizzle of honey for a delightful treat!