

Summer is on the horizon and with it comes the irresistible flavors of Greece. From the refreshing crunch of a Greek Village Salad to the delightful sweetness of Baklava, these recipes capture the essence of the season. Each dish is a nod to tradition and simplicity, making them perfect for sunny gatherings. Let’s explore these delicious creations that will enhance your summer meals. What could be a better way to celebrate the season?
Greek Village Salad (Horiatiki)
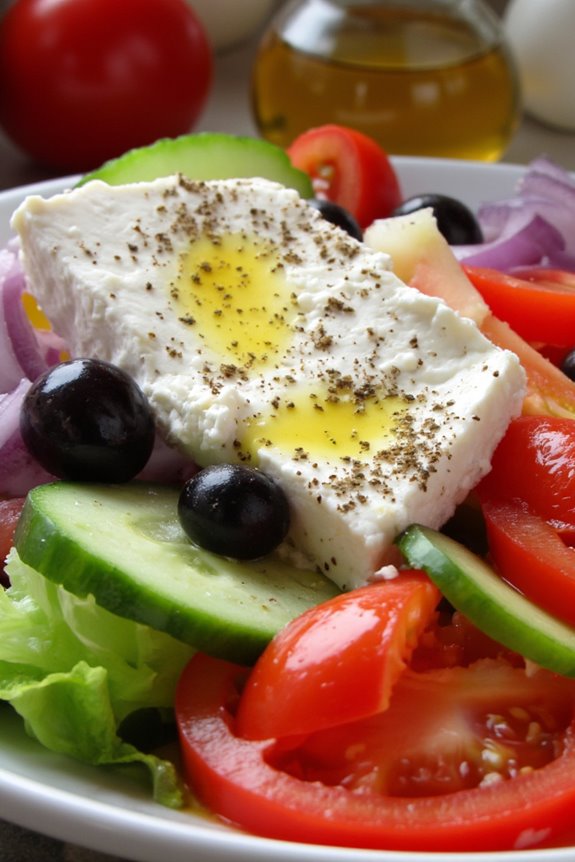
Greek Village Salad, known as Horiatiki, is a vibrant and revitalizing dish that embodies the flavors of the Mediterranean. This salad is a staple in Greek cuisine, characterized by its simplicity and use of fresh, high-quality ingredients. Traditionally enjoyed during the warm summer months, Horiatiki isn’t only nutritious but also incredibly easy to prepare, making it the perfect accompaniment to any meal or a light dish on its own.
The beauty of Horiatiki lies in its rustic presentation, featuring a mix of juicy tomatoes, crisp cucumbers, crunchy bell peppers, and briny olives, all topped with a generous chunk of feta cheese. Drizzled with extra virgin olive oil and sprinkled with oregano, this salad captures the essence of a Greek summer, providing a burst of color and flavor that’s sure to delight your taste buds. Whether served as a side dish or a main course, Greek Village Salad is a delicious way to celebrate the fresh produce of the season.
Ingredients (Serves 4-6)
- 4 ripe tomatoes, chopped
- 1 large cucumber, diced
- 1 bell pepper (red or green), sliced
- 1 small red onion, thinly sliced
- 1 cup Kalamata olives, pitted
- 200g feta cheese, crumbled or in large blocks
- 3 tablespoons extra virgin olive oil
- 1 tablespoon red wine vinegar (optional)
- Salt and black pepper to taste
- 1 teaspoon dried oregano
Cooking Instructions
- Prepare the Vegetables: Start by washing all your fresh produce under cold water. Chop the tomatoes into bite-sized pieces, ensuring to remove any excess seeds if you prefer a less watery salad. Dice the cucumber and slice the bell pepper and red onion thinly. The goal is to have a colorful array of vegetables that are easy to eat.
- Combine Ingredients: In a large mixing bowl, combine the chopped tomatoes, diced cucumber, sliced bell pepper, and red onion. Add the Kalamata olives to the bowl, ensuring they’re evenly distributed among the vegetables.
- Add the Feta Cheese: Depending on your preference, crumble the feta cheese over the salad or place large blocks of it on top. If crumbling, try to do so gently to maintain some larger chunks for texture.
- Dress the Salad: Drizzle the extra virgin olive oil over the salad. If you like a bit of tang, add the red wine vinegar as well. Season with salt and black pepper to taste, keeping in mind that the feta and olives can be quite salty.
- Sprinkle with Oregano: Finally, sprinkle the dried oregano over the salad. This herb is quintessential to Greek cuisine and adds an aromatic touch to the dish.
- Toss and Serve: Gently toss all the ingredients together to ensure everything is well coated in the olive oil and seasoning. Serve immediately, or let it sit for about 15 minutes to allow the flavors to meld together.
Extra Tips
When preparing Greek Village Salad, opt for the freshest, ripest vegetables available to truly capture the essence of summer. You can customize the salad by adding ingredients like capers or adjusting the amount of feta to suit your taste.
For a heartier version, consider adding chickpeas or grilled chicken. This dish is best enjoyed fresh, but you can store leftovers in the fridge for a day, allowing the flavors to develop even further. Enjoy this delicious salad with crusty bread and a glass of chilled white wine for an authentic Greek experience!
Tzatziki Sauce
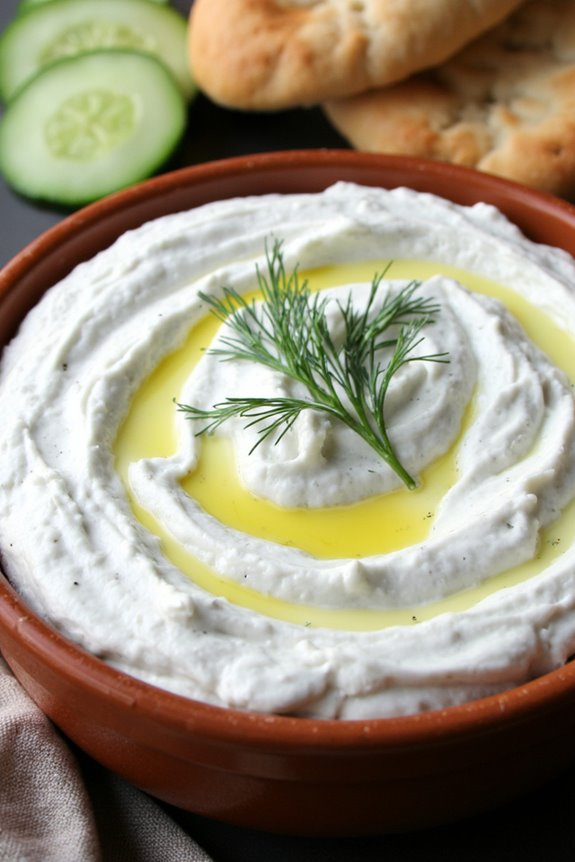
Tzatziki sauce is a traditional Greek dip that perfectly complements a variety of dishes, from grilled meats to fresh vegetables. Originating from the Mediterranean, this savory yogurt-based sauce is renowned for its revitalizing taste and creamy texture.
With its invigorating blend of yogurt, cucumbers, garlic, and herbs, tzatziki isn’t only a delightful addition to your summer meals but also a healthy option that can be whipped up in no time.
Making tzatziki sauce is an easy and rewarding experience, allowing you to bring the flavors of Greece right to your kitchen. Whether you’re hosting a summer barbecue or simply want to enjoy a light snack, tzatziki is versatile enough to enhance any occasion.
Serve it alongside pita bread, as a salad dressing, or as a side for grilled meats, and watch it become a favorite among family and friends.
Ingredients (Serves 4-6)
- 2 cups Greek yogurt
- 1 medium cucumber
- 2-3 cloves garlic (minced)
- 2 tablespoons olive oil
- 1 tablespoon red wine vinegar
- 1 tablespoon fresh dill (or 1 teaspoon dried dill)
- Salt and pepper to taste
Cooking Instructions
- Prepare the Cucumber: Start by washing the cucumber thoroughly. Using a grater or a food processor, grate the cucumber and then place it in a clean kitchen towel or cheesecloth. Squeeze out as much excess moisture as possible. This step is essential as it prevents the tzatziki from becoming watery.
- Combine the Ingredients: In a mixing bowl, add the Greek yogurt. Then, incorporate the grated cucumber, minced garlic, olive oil, and red wine vinegar. Use a spatula or a whisk to blend the ingredients until smooth and well combined.
- Add Flavorings: Next, stir in the fresh dill (or dried dill) into the yogurt mixture. Season with salt and pepper according to your taste preferences. It’s important to taste the tzatziki at this stage to adjust the seasoning as needed.
- Chill the Sauce: Once everything is mixed, cover the bowl with plastic wrap or a lid and refrigerate the tzatziki for at least one hour. This chilling time allows the flavors to meld beautifully, enhancing the overall taste of the sauce.
- Serve: After the chilling period, give the tzatziki a good stir before serving. Transfer it to a serving bowl and garnish with an additional drizzle of olive oil and a sprinkle of fresh dill if desired. Enjoy your homemade tzatziki with pita bread, vegetables, or as a sauce for grilled meats.
Extra Tips
For an even more authentic flavor, consider using fresh herbs like mint in addition to or instead of dill.
Also, if you prefer a spicier kick, a pinch of cayenne pepper or a splash of lemon juice can elevate the taste. Tzatziki sauce can be stored in an airtight container in the refrigerator for up to three days, making it a great make-ahead option for gatherings or meals throughout the week.
Grilled Vegetable Souvlaki
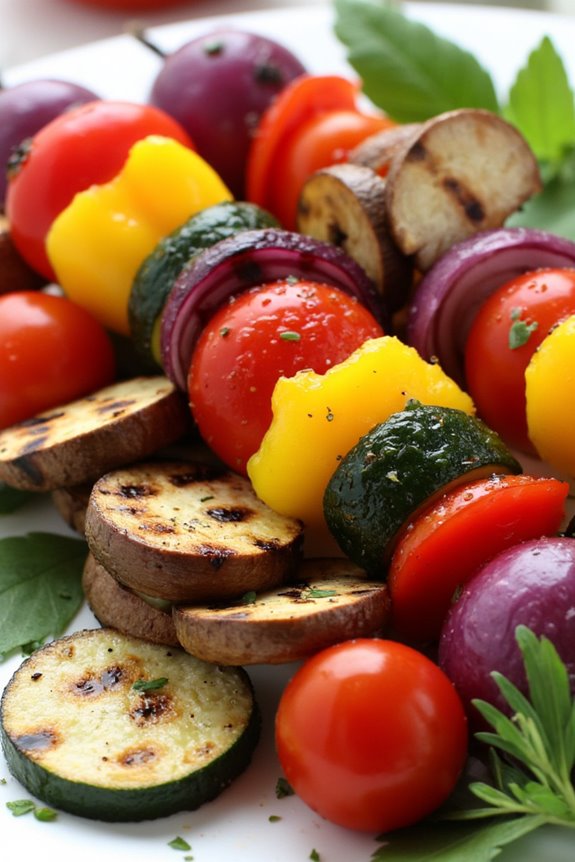
Grilled Vegetable Souvlaki is a delicious and vibrant dish that celebrates the bounty of summer vegetables, typical of Greek cuisine. This dish features skewered and grilled vegetables, marinated in a medley of olive oil, lemon juice, and aromatic herbs. It’s perfect for a light lunch or dinner and pairs well with pita bread and tzatziki sauce. The beauty of this dish lies in its versatility; you can use your favorite vegetables or whatever is fresh and in season.
Cooking Grilled Vegetable Souvlaki isn’t only simple but also a fun way to bring friends and family together for a summer cookout. The grilling process enhances the natural flavors of the vegetables, resulting in a smoky and savory treat. Serve these skewers as an appetizer or as the main course alongside a Greek salad for a complete meal.
Ingredients (serving size: 4-6 people):
- 1 zucchini, sliced into thick rounds
- 1 bell pepper (red or yellow), cut into 1-inch pieces
- 1 red onion, cut into wedges
- 1 cup cherry tomatoes
- 1 cup mushrooms, halved
- 1/4 cup olive oil
- 2 tablespoons lemon juice
- 2 cloves garlic, minced
- 1 teaspoon dried oregano
- 1 teaspoon dried thyme
- Salt and pepper, to taste
- Skewers (wooden or metal)
Cooking Instructions:
- Prepare the Skewers: If using wooden skewers, soak them in water for at least 30 minutes to prevent burning on the grill. This step is crucial to guarantee that the skewers can hold the vegetables without catching fire.
- Make the Marinade: In a large bowl, combine the olive oil, lemon juice, minced garlic, dried oregano, dried thyme, salt, and pepper. Whisk together until well blended. This marinade won’t only add flavor but also help to tenderize the vegetables.
- Marinate the Vegetables: Add the zucchini, bell pepper, red onion, cherry tomatoes, and mushrooms to the bowl with the marinade. Toss gently to coat all the vegetables evenly. Cover the bowl with plastic wrap and let it marinate in the refrigerator for at least 30 minutes to allow the flavors to meld.
- Assemble the Skewers: After marinating, take the vegetables out of the fridge. Begin threading the vegetables onto the skewers, alternating between different types for a colorful presentation. Aim for 4-5 pieces of each vegetable per skewer.
- Preheat the Grill: Preheat your grill to medium-high heat. A hot grill is essential for achieving a nice char on the vegetables and enhancing their flavors.
- Grill the Skewers: Place the assembled skewers on the grill. Cook for about 10-15 minutes, turning occasionally, until the vegetables are tender and have nice grill marks. Keep an eye on them to prevent burning, especially the cherry tomatoes.
- Serve: Once the vegetables are cooked, remove the skewers from the grill. Let them cool for a couple of minutes before serving. You can serve them as is or with a side of tzatziki sauce and warm pita bread.
Extra Tips: When grilling vegetable souvlaki, feel free to experiment with different vegetables based on your preferences or what you have on hand. Bell peppers, zucchini, and mushrooms are classic choices, but you can also try eggplant, asparagus, or even chunks of butternut squash.
To add an extra layer of flavor, consider topping the skewers with fresh herbs like parsley or dill just before serving. Enjoying this dish with a revitalizing salad or grilled meats will make for a delightful summer meal!
Spanakopita (Spinach Pie)
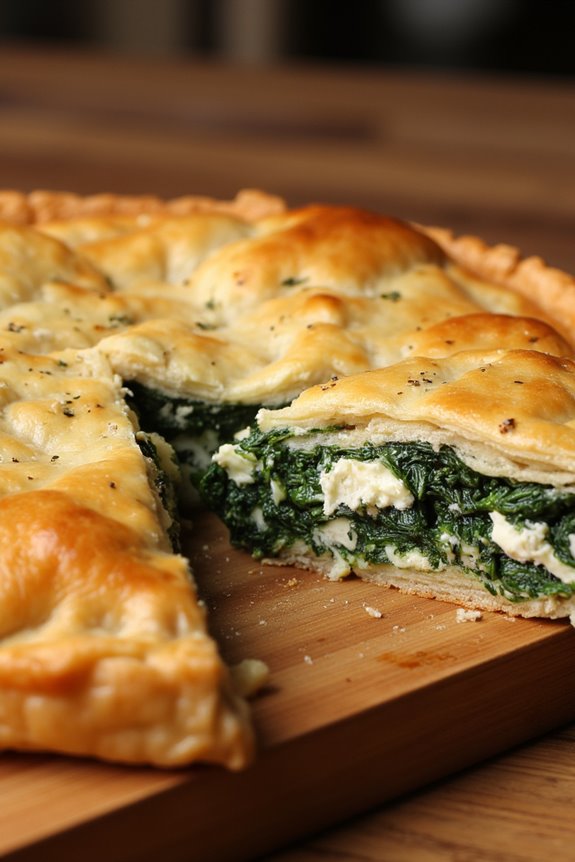
Spanakopita, a traditional Greek dish, is a delightful savory pie filled with spinach and feta cheese, encased in layers of flaky phyllo pastry. This dish isn’t only a staple in Greek cuisine but also a favorite for gatherings and celebrations. The combination of fresh herbs, creamy cheese, and tender greens creates a deliciously rich flavor that’s hard to resist.
Whether served as an appetizer, a main course, or a side dish, Spanakopita is sure to impress your family and guests alike.
Making Spanakopita at home may seem intimidating due to the use of phyllo pastry, but with a little patience and practice, you can create a masterpiece that rivals those from your favorite Greek tavern. The key to a successful Spanakopita lies in the balance of filling and the careful handling of the delicate pastry.
This recipe is designed to serve 4-6 people, making it perfect for a cozy family meal or a festive gathering.
Ingredients:
- 1 pound fresh spinach, washed and chopped
- 1 cup feta cheese, crumbled
- 1 cup ricotta cheese
- 1 small onion, finely chopped
- 2 cloves garlic, minced
- 1/4 cup fresh dill, chopped (or 1 tablespoon dried dill)
- 1/4 cup fresh parsley, chopped
- 3 tablespoons olive oil
- 1 package (16 oz) phyllo dough, thawed
- 1 large egg, beaten
- Salt and pepper to taste
Cooking Instructions:
1. Prepare the Filling: In a large skillet over medium heat, add 2 tablespoons of olive oil. Once hot, sauté the chopped onion and minced garlic until the onion is translucent. This should take about 5 minutes.
Next, add the chopped spinach to the skillet, cooking until wilted and most of the moisture has evaporated, roughly 3-4 minutes. Remove from heat and allow to cool slightly.
2. Mix the Cheese: In a large mixing bowl, combine the crumbled feta cheese, ricotta cheese, beaten egg, chopped dill, chopped parsley, salt, and pepper. Stir well to blend all the ingredients together.
Once the spinach mixture has cooled, add it to the cheese mixture and combine thoroughly.
3. Prepare the Phyllo Dough: Preheat your oven to 375°F (190°C). On a clean surface, lay out one sheet of phyllo dough and brush it lightly with the remaining olive oil. Layer another sheet on top and brush it again.
Repeat this process until you have about 6-8 layers of phyllo.
4. Assemble the Spanakopita: Spoon a portion of the spinach and cheese filling along the long edge of the phyllo, leaving some space at the sides. Carefully fold the sides over the filling and roll the phyllo dough away from you to create a log shape.
Place the rolled Spanakopita seam-side down on a baking sheet lined with parchment paper. Repeat with the remaining phyllo and filling.
5. Bake: Brush the tops of the assembled Spanakopita with any leftover olive oil and make a few slits in the top with a sharp knife to allow steam to escape.
Bake in the preheated oven for 25-30 minutes or until golden brown and crispy.
Extra Tips:
When working with phyllo dough, it’s essential to keep the sheets covered with a damp cloth to prevent them from drying out while you assemble the Spanakopita.
If you’re short on time, you can also use store-bought frozen spinach, just be sure to squeeze out excess moisture before adding it to the filling.
For a twist, consider adding sautéed mushrooms or artichokes to the filling for added flavor and texture. Enjoy your homemade Spanakopita warm, accompanied by a side of tzatziki or a fresh Greek salad!
Lemon-Oregano Roasted Chicken
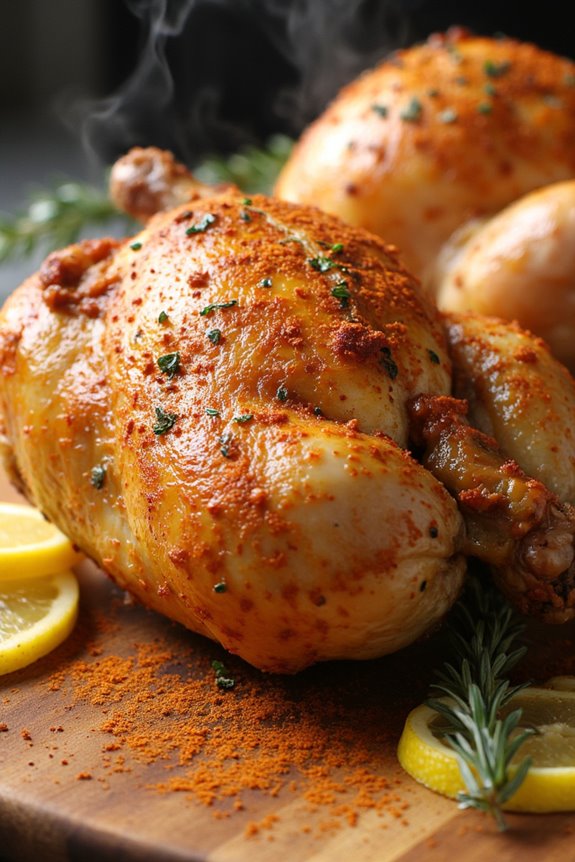
There’s nothing quite like the flavors of Greece to brighten up your summer dining experience, and Lemon-Oregano Roasted Chicken is a perfect example. This dish brings together succulent chicken pieces marinated in a zesty lemon and herb dressing, resulting in tender meat with a crispy, golden skin. The combination of fresh oregano and lemon creates a revitalizing taste that’s reminiscent of warm Mediterranean breezes, making it an ideal centerpiece for any summer gathering.
Preparing Lemon-Oregano Roasted Chicken is a straightforward process that will leave your kitchen filled with delightful aromas. Marinating the chicken allows the flavors to penetrate deeply, ensuring that every bite is bursting with taste. Pair this dish with a side of Greek salad or roasted vegetables for a complete meal that captures the essence of Greek cuisine. With just a few simple ingredients and steps, you can impress your family and friends with this delicious dish.
Ingredients (Serves 4-6):
- 1 whole chicken (about 4-5 pounds)
- 4 tablespoons olive oil
- 4 cloves garlic, minced
- Juice and zest of 2 large lemons
- 2 tablespoons fresh oregano, chopped (or 1 tablespoon dried oregano)
- 1 tablespoon salt
- 1 teaspoon black pepper
- 1 teaspoon paprika
- Fresh lemon slices and oregano sprigs for garnish (optional)
Cooking Instructions:
- Prepare the Marinade: In a bowl, mix together the olive oil, minced garlic, lemon juice, lemon zest, fresh oregano, salt, black pepper, and paprika until well combined. This marinade will infuse the chicken with flavor.
- Marinate the Chicken: Place the whole chicken in a large resealable bag or a dish. Pour the marinade over the chicken, making sure to coat it thoroughly. If using a bag, seal it tightly and massage the marinade into the chicken. Let it marinate in the refrigerator for at least 1 hour, or preferably overnight for maximum flavor.
- Preheat the Oven: About 30 minutes before you’re ready to cook, preheat your oven to 425°F (220°C). This high temperature will help achieve a crispy skin while keeping the meat juicy.
- Prepare for Roasting: Remove the marinated chicken from the refrigerator and let it sit at room temperature for about 15 minutes. Place the chicken in a roasting pan or oven-safe skillet, breast side up. If desired, tuck lemon slices and extra oregano sprigs around the chicken for added flavor and presentation.
- Roast the Chicken: Roast the chicken in the preheated oven for about 1 hour and 15 minutes, or until the internal temperature reaches 165°F (75°C) and the skin is golden brown. Baste the chicken with its juices halfway through cooking to keep it moist.
- Rest the Chicken: Once fully cooked, remove the chicken from the oven and let it rest for 10-15 minutes before carving. This resting period allows the juices to redistribute, making the meat more tender.
- Serve and Enjoy: Carve the chicken and serve it on a platter, garnished with fresh lemon slices and sprigs of oregano if desired. Pair it with your favorite sides and enjoy a taste of Greece!
Extra Tips: When preparing Lemon-Oregano Roasted Chicken, feel free to experiment with additional herbs and spices to suit your taste. Adding a splash of white wine or chicken broth to the roasting pan can create a deliciously flavored drippings for gravy.
If you have leftovers, the chicken can be shredded and used in salads, sandwiches, or wraps, making it a versatile dish for summer meals.
Feta and Watermelon Salad
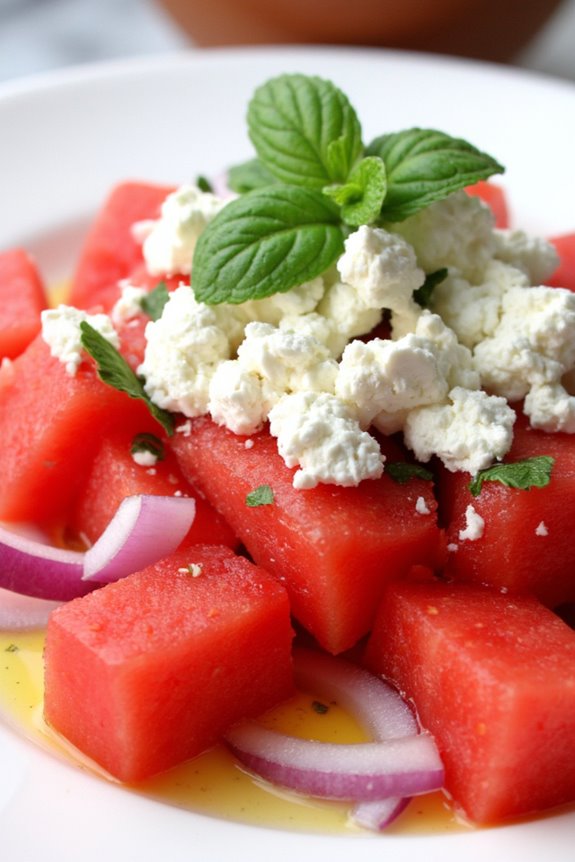
The Feta and Watermelon Salad is a revitalizing dish perfect for hot summer days, capturing the essence of Greek cuisine with its vibrant flavors and contrasting textures.
Combining the sweet juiciness of ripe watermelon with the briny creaminess of feta cheese, this salad not only pleases the palate but also offers a beautiful presentation that’s sure to impress guests.
Whether served as a light appetizer or a side dish during a summer barbecue, this salad is an ideal choice to beat the heat while enjoying seasonal produce.
To elevate the flavors, fresh mint and a drizzle of olive oil are added, enhancing the overall taste and aroma of the dish.
This salad is quick to prepare, making it a convenient option for busy summer days when you want to enjoy something delicious without spending hours in the kitchen.
Let’s plunge into how you can make this delightful Feta and Watermelon Salad for 4-6 people.
Ingredients
- 4 cups seedless watermelon, cubed
- 1 cup feta cheese, crumbled
- 1/2 cup fresh mint leaves, chopped
- 1/4 cup red onion, thinly sliced
- 2 tablespoons extra virgin olive oil
- 1 tablespoon balsamic vinegar
- Salt and pepper to taste
Cooking Instructions
- Prepare the Watermelon: Start by cutting the seedless watermelon into bite-sized cubes. Aim for uniform pieces to guarantee even distribution in the salad. Place the watermelon cubes in a large mixing bowl.
- Add Feta Cheese: Crumble the feta cheese over the watermelon. This will allow the saltiness of the cheese to complement the sweetness of the watermelon beautifully.
- Incorporate Fresh Ingredients: Add the chopped fresh mint leaves and thinly sliced red onion to the bowl. The mint adds a revitalizing note, while the onion provides a subtle crunch and flavor.
- Dress the Salad: In a small bowl, whisk together the extra virgin olive oil and balsamic vinegar. Drizzle this dressing over the salad ingredients in the mixing bowl. This will help to marry the flavors together.
- Season the Salad: Lightly season the salad with salt and pepper to taste. Be careful with the salt, as the feta is already salty. Toss all the ingredients gently to combine without mashing the watermelon.
- Serve: Transfer the salad to a serving platter or bowl. Garnish with additional mint leaves if desired. Serve immediately to enjoy the freshness of the ingredients.
Extra Tips
When making Feta and Watermelon Salad, opt for the ripest watermelon available, as this will guarantee the sweetest flavor.
If you want to add a twist, consider including some sliced cucumbers for additional crunch or a sprinkle of chili flakes for a hint of heat.
This salad is best enjoyed fresh, but if you need to prepare it ahead of time, keep the dressing separate until just before serving to maintain the textures and flavors.
Greek Pasta Salad
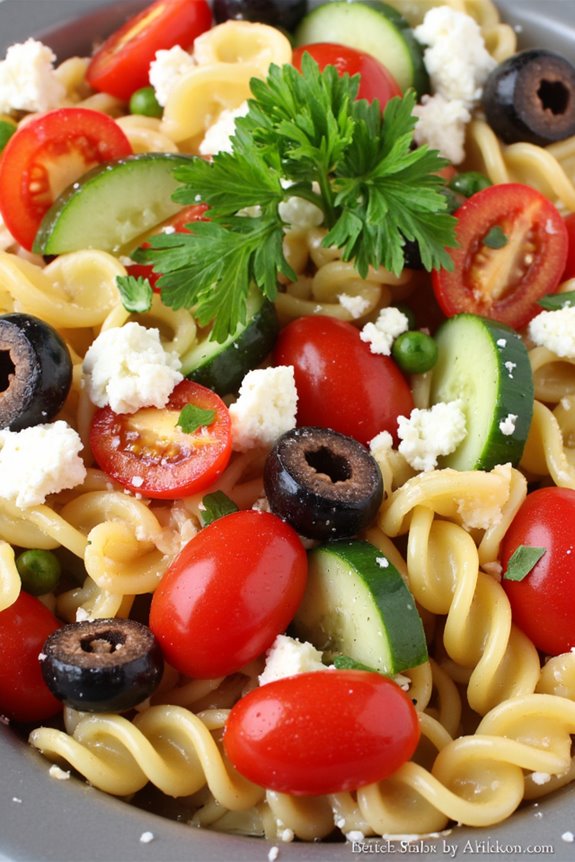
Greek Pasta Salad is a vibrant and invigorating dish that embodies the flavors of the Mediterranean. Perfect for summer gatherings, barbecues, or as a light meal, this salad combines al dente pasta with an array of colorful vegetables, briny olives, and tangy feta cheese, all tossed in a zesty dressing.
It’s a versatile dish that can be served cold or at room temperature, making it ideal for potlucks or picnics. This recipe serves 4-6 people, making it a great option for family dinners or casual get-togethers. The combination of fresh ingredients not only provides a burst of flavor but also adds a nutritional punch.
With the simplicity of preparation, you can whip up this delightful salad in no time, allowing you to enjoy the essence of Greek cuisine right in your kitchen.
Ingredients:
- 12 ounces of pasta (such as penne or rotini)
- 1 cup cherry tomatoes, halved
- 1 cucumber, diced
- 1 bell pepper (any color), diced
- 1/2 red onion, finely chopped
- 1 cup Kalamata olives, pitted and sliced
- 1 cup feta cheese, crumbled
- 1/4 cup fresh parsley, chopped
- 1/4 cup olive oil
- 2 tablespoons red wine vinegar
- 1 teaspoon dried oregano
- Salt and pepper to taste
Cooking Instructions:
- Cook the Pasta: Begin by bringing a large pot of salted water to a boil. Add the pasta and cook according to package instructions until al dente. Stir occasionally to prevent sticking. Once cooked, drain the pasta in a colander and rinse it with cold water to stop the cooking process and cool it down. Set aside.
- Prepare the Vegetables: While the pasta is cooking, wash and chop the vegetables. Halve the cherry tomatoes, dice the cucumber and bell pepper, and finely chop the red onion. Place all the chopped vegetables into a large mixing bowl.
- Combine Ingredients: Once the pasta is cooled, add it to the bowl with the vegetables. Then, add the sliced Kalamata olives, crumbled feta cheese, and chopped parsley. Gently toss all the ingredients together to combine evenly.
- Make the Dressing: In a small bowl or jar, whisk together the olive oil, red wine vinegar, dried oregano, and a pinch of salt and pepper. Taste and adjust seasoning as desired.
- Dress the Salad: Pour the dressing over the pasta and vegetable mixture. Toss gently to make sure that everything is coated evenly with the dressing.
- Chill and Serve: For best results, let the salad chill in the refrigerator for at least 30 minutes before serving. This allows the flavors to meld together beautifully. Serve cold or at room temperature.
Extra Tips:
To customize your Greek Pasta Salad, feel free to add in other ingredients such as artichoke hearts, sun-dried tomatoes, or even grilled chicken for added protein.
If you prefer a gluten-free option, swap out regular pasta for gluten-free pasta alternatives. Always taste and adjust the seasoning of the dressing to suit your preference, and consider adding a squeeze of fresh lemon juice for an extra zing. Enjoy your delicious Greek Pasta Salad!
Lamb Gyros
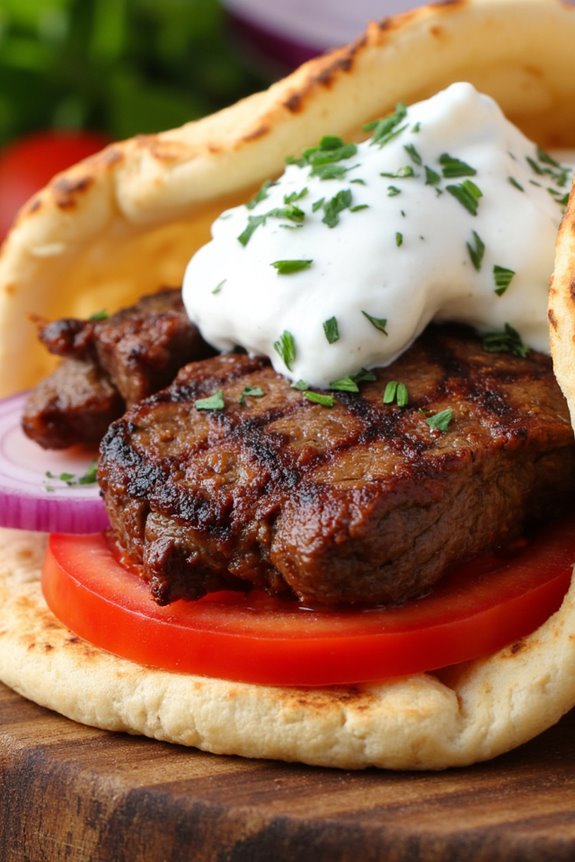
Lamb gyros is a classic Greek dish that brings together the rich flavors of marinated lamb, fresh vegetables, and a tangy tzatziki sauce, all wrapped in warm pita bread. The combination of spices and herbs used to marinate the lamb creates a mouthwatering experience that transports you straight to the sun-soaked streets of Greece.
Perfect for summer gatherings or a cozy dinner at home, lamb gyros isn’t only delicious but also fun to assemble and enjoy with friends and family.
To achieve the best results, use high-quality lamb shoulder or leg for tenderness and flavor. Marinating the meat allows it to absorb all the aromatic spices, guaranteeing every bite is packed with taste. Serve your gyros with a side of crispy fries or a revitalizing Greek salad for a complete meal that celebrates the essence of Greek cuisine.
Ingredients (Serves 4-6)
- 2 lbs lamb shoulder or leg, boneless
- 4 cloves garlic, minced
- 2 tablespoons fresh oregano, chopped (or 1 tablespoon dried)
- 1 tablespoon ground cumin
- 1 tablespoon ground coriander
- 1 teaspoon paprika
- Salt and pepper, to taste
- 1/4 cup olive oil
- 1/4 cup red wine vinegar
- 1 cup Greek yogurt
- 1 cucumber, grated and drained
- 1 tablespoon lemon juice
- 1 tablespoon fresh dill, chopped (or 1 teaspoon dried)
- 1 teaspoon garlic powder
- 4-6 pita breads
- 1 large tomato, sliced
- 1 red onion, thinly sliced
- Lettuce leaves (optional)
Cooking Instructions
- Prepare the Marinade: In a large mixing bowl, combine minced garlic, oregano, cumin, coriander, paprika, salt, pepper, olive oil, and red wine vinegar. Mix well to create a marinade.
- Marinate the Lamb: Cut the lamb into large chunks and add it to the marinade. Make sure each piece is thoroughly coated. Cover the bowl with plastic wrap and refrigerate for at least 2 hours, or overnight for maximum flavor.
- Make the Tzatziki Sauce: In a separate bowl, combine Greek yogurt, grated cucumber (make sure excess moisture is removed), lemon juice, dill, garlic powder, salt, and pepper. Stir until well combined and refrigerate until ready to serve.
- Cook the Lamb: Preheat your grill or oven to medium-high heat. If grilling, skewer the marinated lamb chunks and grill them for about 15-20 minutes, turning occasionally until they’re cooked to your liking. If using an oven, place the lamb on a baking sheet and roast for approximately 25-30 minutes, or until the internal temperature reaches 145°F (medium rare).
- Warm the Pita Bread: While the lamb is cooking, warm the pita bread on the grill for a minute on each side or wrap in aluminum foil and place in the oven for a few minutes until heated through.
- Assemble the Gyros: Once the lamb is cooked, let it rest for a few minutes before slicing it thinly. Place the sliced lamb on the warm pita, add slices of tomato, onion, and lettuce (if using), and generously drizzle with tzatziki sauce.
- Serve: Roll the pita around the filling and serve immediately with extra tzatziki sauce on the side.
Extra Tips
When making lamb gyros, don’t skip the marinating step; it’s essential for achieving the best flavor and tenderness.
You can also customize your toppings according to your preference, adding ingredients like feta cheese or olives for an extra Greek flair. If you don’t have access to a grill, broiling the lamb in the oven on high heat works well too.
Finally, consider making extra tzatziki sauce, as it pairs beautifully with many dishes and can be stored in the refrigerator for a few days. Enjoy your homemade lamb gyros!
Roasted Red Pepper Hummus

Roasted Red Pepper Hummus is a delightful Mediterranean dip that combines the smooth creaminess of chickpeas with the sweet, smoky flavor of roasted red peppers. This vibrant dish isn’t only nutritious but also incredibly versatile, making it an excellent addition to any summer gathering or a simple snack at home.
Whether served with pita bread, fresh vegetables, or as a spread for sandwiches, this hummus is sure to impress your guests and elevate your appetizer game.
Making Roasted Red Pepper Hummus is a straightforward process that comes together in no time. The key ingredients unite to create a rich, flavorful dip that’s both healthy and satisfying. The combination of tahini, garlic, and lemon juice adds depth, while the roasted red peppers bring a touch of sweetness and color.
Perfect for summer picnics or outdoor barbecues, this hummus is a crowd-pleaser that everyone will love.
Ingredients (Serves 4-6)
- 1 can (15 oz) chickpeas, drained and rinsed
- 1/2 cup roasted red peppers (jarred or homemade)
- 1/4 cup tahini
- 2 tablespoons olive oil
- 2 tablespoons lemon juice
- 2 cloves garlic, minced
- 1/2 teaspoon ground cumin
- Salt and pepper to taste
- Fresh parsley, for garnish (optional)
- Pita bread or fresh vegetables for serving
Cooking Instructions
- Prepare the Ingredients: Begin by gathering all your ingredients. Drain and rinse the chickpeas thoroughly under cold water. If using jarred roasted red peppers, make sure to drain them well to avoid excess liquid in your hummus. Mince the garlic cloves finely.
- Blend the Base: In a food processor, combine the drained chickpeas, roasted red peppers, tahini, olive oil, lemon juice, minced garlic, and ground cumin. This mixture will form the base of your hummus.
- Process Until Smooth: Secure the lid on the food processor and blend the mixture on high speed until it becomes smooth and creamy. This may take 1-2 minutes. If the hummus is too thick, you can add a tablespoon of water or more olive oil to reach your desired consistency.
- Season to Taste: Once the hummus is smooth, taste it and season with salt and pepper. Blend again to incorporate the seasoning. Adjust flavors as needed, adding more lemon juice or garlic if desired.
- Serve the Hummus: Transfer the hummus to a serving bowl. Drizzle a little olive oil on top and sprinkle with fresh parsley for garnish, if using. Serve with pita bread or an assortment of fresh vegetables for dipping.
Extra Tips
When making Roasted Red Pepper Hummus, feel free to customize it to your taste by adding spices like smoked paprika or cayenne pepper for a kick. You can also experiment with different types of beans, such as white beans or black beans, for a unique twist.
If you prefer a smokier flavor, consider roasting your own red peppers over an open flame or in the oven. Store any leftovers in an airtight container in the refrigerator for up to a week, and remember that the flavors will improve as they meld together. Enjoy your delicious homemade hummus!
Stuffed Grape Leaves (Dolmadakia)
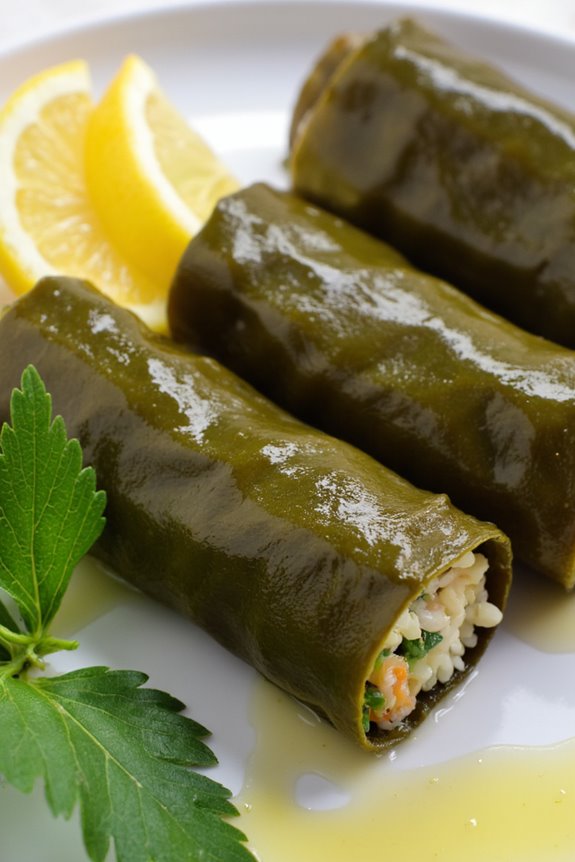
Stuffed Grape Leaves, known as Dolmadakia in Greek, are a beloved dish that showcases the rich culinary heritage of Greece. These delightful morsels are typically filled with a mixture of rice, herbs, and spices, then wrapped in tender grape leaves and cooked to perfection. They can be served warm or at room temperature, making them a versatile addition to any summer meal or picnic spread.
Often enjoyed as a meze (appetizer), Dolmadakia isn’t only flavorful but also a beautiful presentation of nature’s bounty.
Preparing Stuffed Grape Leaves can be a labor of love, but the end result is well worth the effort. The delicate balance of flavors from fresh herbs like dill and mint, combined with the tangy taste of the grape leaves, creates a revitalizing and satisfying dish.
Whether you’re hosting a gathering or simply indulging in a personal treat, these stuffed grape leaves will transport you to the sun-soaked shores of Greece, evoking the essence of summer.
Ingredients (Serves 4-6):
- 1 jar (16 oz) grape leaves in brine, rinsed and drained
- 1 cup long-grain rice, rinsed
- 1 medium onion, finely chopped
- 1/4 cup olive oil, plus extra for drizzling
- 1/4 cup fresh dill, chopped
- 1/4 cup fresh mint, chopped
- 1/2 teaspoon salt
- 1/4 teaspoon black pepper
- 1/2 teaspoon ground cinnamon
- Juice of 1 lemon, plus lemon wedges for serving
- 2 cups vegetable or chicken broth
Cooking Instructions:
- Prepare the Filling: In a large skillet, heat the olive oil over medium heat. Add the finely chopped onion and sauté until translucent, about 5 minutes. Stir in the rinsed rice, cooking for an additional 2-3 minutes until the rice is coated with oil.
- Combine Ingredients: Remove the skillet from heat and add the chopped dill, mint, salt, black pepper, and cinnamon to the rice mixture. Squeeze in the lemon juice and mix well to combine all ingredients. Allow the filling to cool slightly before proceeding to the next step.
- Stuff the Grape Leaves: Lay a grape leaf, vein side up, on a clean surface. Place about 1 tablespoon of the rice filling near the stem end of the leaf. Fold the sides over the filling and roll tightly from the stem end to the tip, making sure the filling is secure. Repeat this process with the remaining grape leaves and filling.
- Arrange the Dolmadakia: Line the bottom of a large pot with any torn grape leaves or a plate to prevent sticking. Carefully place the stuffed grape leaves seam side down in the pot, packing them snugly in a single layer. Drizzle a little olive oil over the top and add the broth.
- Cook the Dolmadakia: Cover the pot and bring the broth to a gentle simmer over medium heat. Once simmering, reduce the heat to low and let cook for about 40-45 minutes. Check occasionally to make sure there’s enough liquid, adding more broth or water if needed.
- Serve: Once cooked, allow the Dolmadakia to cool slightly before serving. Arrange them on a platter with lemon wedges on the side for squeezing over the top.
Extra Tips:
When preparing Stuffed Grape Leaves, verify that the grape leaves are well-rinsed to remove excess saltiness from the brine. If you prefer a milder flavor, you can blanch the leaves in boiling water for a minute before stuffing them.
Additionally, feel free to customize the filling by adding minced meat or other spices to suit your taste. Dolmadakia can be stored in the refrigerator for up to a week and taste even better the next day, making them perfect for meal prep or leftovers.
Chickpea Salad With Feta and Herbs
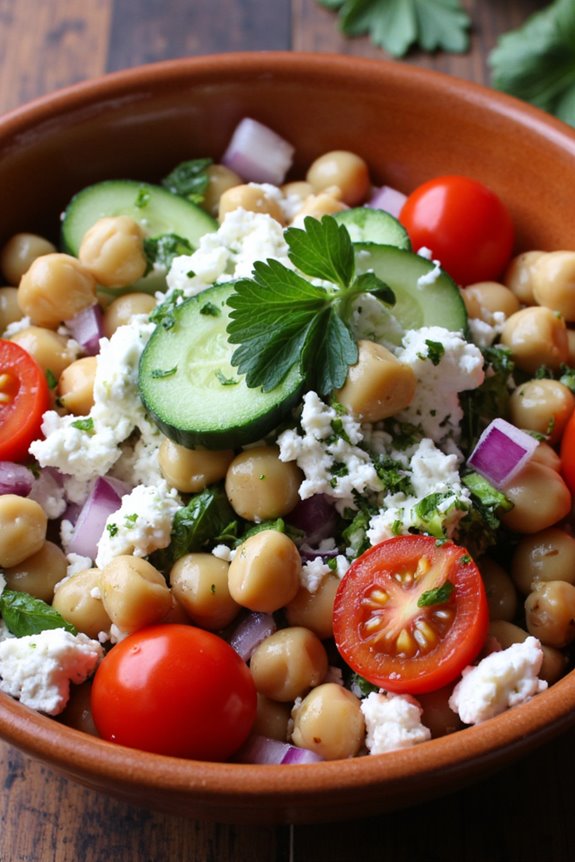
Chickpea Salad with Feta and Herbs is a invigorating and nutritious dish perfect for a Greek summer meal. This salad isn’t only easy to prepare but also packed with flavors and textures. The combination of protein-rich chickpeas, tangy feta cheese, and fresh herbs makes it a wholesome option for lunch or as a side dish at barbecues and picnics.
It’s a delightful way to enjoy the vibrant flavors of Mediterranean cuisine while remaining light and satisfying. This salad showcases the versatility of chickpeas, which can be enjoyed in various dishes. With the added crunch of cucumbers and the zing from red onion, every bite is a celebration of fresh ingredients.
Serve it chilled for the best experience, and feel free to customize it with your favorite herbs or vegetables.
Ingredients (Serves 4-6):
- 1 can (15 oz) chickpeas, drained and rinsed
- 1 cup cherry tomatoes, halved
- 1 cucumber, diced
- 1 small red onion, finely chopped
- 1 cup feta cheese, crumbled
- 1/4 cup fresh parsley, chopped
- 1/4 cup fresh mint, chopped
- 3 tablespoons olive oil
- 2 tablespoons red wine vinegar
- Salt and pepper to taste
Cooking Instructions:
- Prepare the Chickpeas: Start by draining and rinsing the chickpeas thoroughly under cold water. This helps remove excess sodium from canned chickpeas and gives them a fresh taste. Set them aside to drain well.
- Chop the Vegetables: While the chickpeas are draining, wash and chop the cherry tomatoes, cucumber, and red onion. Aim for bite-sized pieces to guarantee they mix well with the chickpeas. This step adds color and crunch to the salad.
- Mix the Ingredients: In a large mixing bowl, combine the drained chickpeas, chopped cherry tomatoes, cucumber, and red onion. Toss them gently to avoid breaking the chickpeas while making sure of an even distribution of ingredients.
- Add Feta and Herbs: Crumble the feta cheese over the salad mixture. Then, sprinkle the chopped parsley and mint. These herbs will add a burst of freshness and flavor, making the salad truly vibrant.
- Dress the Salad: In a small bowl, whisk together the olive oil, red wine vinegar, salt, and pepper. Pour this dressing over the salad and toss everything gently until well combined. This step is essential as it enhances the flavors and brings all the ingredients together.
- Chill and Serve: Cover the salad and refrigerate for at least 30 minutes before serving. This allows the flavors to meld together beautifully. Serve chilled as a side or a light main dish.
Extra Tips:
For added texture and flavor, consider incorporating additional ingredients like olives or bell peppers. If you prefer a more robust flavor, let the salad marinate for a couple of hours before serving.
This dish can be made ahead of time, making it an excellent choice for meal prep or gatherings. Adjust the amount of feta and herbs according to your preference, and feel free to explore different combinations to make this salad your own!
Baklava With Honey and Nuts

Baklava is a traditional Greek dessert that’s as rich in flavor as it’s in history. With its layers of flaky phyllo pastry, a luscious filling of chopped nuts, and a sweet honey syrup, this dish is a delightful treat that captures the essence of Mediterranean cuisine. It’s perfect for gatherings and special occasions, and once you master the technique, you’ll find it’s a satisfying dish to prepare.
The combination of textures and flavors in baklava is simply irresistible, making it a favorite among dessert lovers. Making baklava may seem intimidating at first, but with patience and attention to detail, anyone can create this indulgent dessert. The phyllo dough requires a gentle touch to prevent tearing, while the nut filling provides a satisfying crunch.
The key to a perfect baklava lies in the balance of sweetness from the honey syrup and the nuttiness of the filling. Once baked to golden perfection and drizzled with syrup, this dessert is sure to impress your family and friends.
Ingredients (Serves 4-6):
- 1 package (16 oz) phyllo dough, thawed
- 1 cup unsalted butter, melted
- 2 cups walnuts, finely chopped
- 1 cup almonds, finely chopped
- 1 teaspoon ground cinnamon
- 1 cup granulated sugar
- 1 cup water
- 1 cup honey
- 1 teaspoon vanilla extract
Cooking Instructions:
- Prepare the Nut Mixture: In a mixing bowl, combine the finely chopped walnuts and almonds with ground cinnamon. Stir until the nuts are evenly coated with the cinnamon, and set the mixture aside.
- Preheat the Oven: Preheat your oven to 350°F (175°C). This guarantees that the baklava will bake evenly and achieve a nice golden color.
- Prepare the Phyllo Dough: Unroll the phyllo dough and cover it with a damp kitchen towel to prevent it from drying out. Work quickly, as phyllo can become brittle if left exposed.
- Layer the Phyllo: Brush a 9×13 inch baking dish with melted butter. Place one sheet of phyllo dough in the dish and brush it lightly with melted butter. Repeat this process, layering and buttering about 8-10 sheets of phyllo.
- Add the Nut Filling: Sprinkle a thin layer of the nut mixture over the buttered phyllo. Continue layering phyllo sheets (buttering each layer) and adding the nut filling until you have used half of the nut mixture and about 15-20 sheets of phyllo.
- Continue Layering: Once you reach the halfway point, continue layering another 8-10 sheets of phyllo, buttering each one as you go. Finally, top with the remaining nut mixture and finish with another 8-10 layers of phyllo, buttering each sheet.
- Cut the Baklava: Before baking, use a sharp knife to cut the baklava into diamond or square shapes. This will help it cook evenly and allow the syrup to soak in later.
- Bake the Baklava: Place the baking dish in the preheated oven and bake for about 45-50 minutes, or until the baklava is golden brown and crisp.
- Prepare the Syrup: While the baklava is baking, combine sugar, water, honey, and vanilla extract in a saucepan over medium heat. Stir until the sugar is dissolved, then bring the mixture to a boil. Reduce the heat and let it simmer for about 10 minutes, then remove from heat and allow to cool slightly.
- Soak the Baklava: Once the baklava is done baking, remove it from the oven and immediately pour the warm syrup evenly over the hot baklava. Allow it to soak for at least 4 hours, or overnight for the best flavor.
Extra Tips:
When making baklava, it’s essential to keep the phyllo dough covered with a damp towel at all times to prevent it from drying out. Additionally, using a combination of nuts such as walnuts and almonds gives a richer flavor, but feel free to experiment with other nuts like pistachios.
For a twist, consider adding a splash of orange or lemon zest to the nut mixture for added freshness. Finally, remember that the longer the baklava sits after soaking in the syrup, the better the flavors will meld together, making it even more delightful when served.
Greek Yogurt Parfait With Fresh Fruit

Greek Yogurt Parfait With Fresh Fruit is a delightful and nutritious treat that captures the essence of summer. This dish combines the creamy texture of Greek yogurt with the vibrant flavors of seasonal fruits, making it a perfect breakfast, snack, or dessert option. The beauty of this parfait lies in its versatility; you can easily adjust the ingredients based on your preferences or what fruits are in season.
Layering Greek yogurt with a variety of fresh fruits not only creates a visually appealing dish but also enhances the flavor profile. Topped with crunchy granola and a drizzle of honey, this parfait becomes a satisfying and healthy option that the whole family will love. Whether served in a glass for a special occasion or in a bowl for a quick breakfast, this recipe is sure to impress.
Ingredients (Serves 4-6):
- 4 cups of Greek yogurt (plain or flavored)
- 2 cups of mixed fresh fruits (such as strawberries, blueberries, bananas, and peaches)
- 1 cup of granola
- 4 tablespoons of honey (optional)
- Fresh mint leaves for garnish (optional)
Cooking Instructions:
- Prepare the Fruits: Start by washing all the fresh fruits thoroughly. If using strawberries, remove the stems and slice them into thin pieces. Cut bananas into rounds and chop peaches into bite-sized pieces. Place all the prepared fruits in a large mixing bowl.
- Layer the Ingredients: Take four to six serving glasses or bowls. Begin by spooning a generous layer of Greek yogurt at the bottom of each glass. Aim for about 1 cup of yogurt per serving.
- Add Fruits: On top of the yogurt layer, add a layer of mixed fresh fruits. You can mix and match the fruits according to your taste. Fill the glass about halfway with the fruit layer.
- Incorporate Granola: Sprinkle a layer of granola on top of the fruit. This will add a delightful crunch to your parfait. Use approximately 2-3 tablespoons of granola per serving.
- Repeat Layers: Repeat the layering process by adding another layer of Greek yogurt, followed by more fresh fruit, and another sprinkle of granola. You can make as many layers as you like, but aim for at least two layers to create a visually appealing parfait.
- Finish with Honey: Drizzle a tablespoon of honey over the top of each parfait for added sweetness, if desired. This step can be adjusted based on how sweet your fruits are.
- Garnish: Finally, garnish your parfaits with fresh mint leaves for an extra touch of freshness and color.
Extra Tips:
When making Greek Yogurt Parfait With Fresh Fruit, feel free to experiment with different fruits based on what’s in season or your personal preferences. You can also substitute Greek yogurt with dairy-free alternatives if needed.
For added flavor, consider using flavored Greek yogurt or adding a dash of vanilla extract to plain yogurt. This dish can be made ahead of time; just assemble the parfaits without the granola and store them in the refrigerator. Add granola right before serving to maintain its crunchiness.
Enjoy your revitalizing and nutritious Greek yogurt parfait!