

Greek cuisine is synonymous with gatherings full of joy and the tantalizing scent of spices in the air. Iconic dishes like moussaka and spanakopita bring cherished memories of family meals to life. I’m thrilled to share 11 classic recipes that perfectly encapsulate the essence of Mediterranean flavor. These dishes are a pleasure to prepare and even more delightful to savor. You won’t want to miss the delicious secrets they hold.
Moussaka
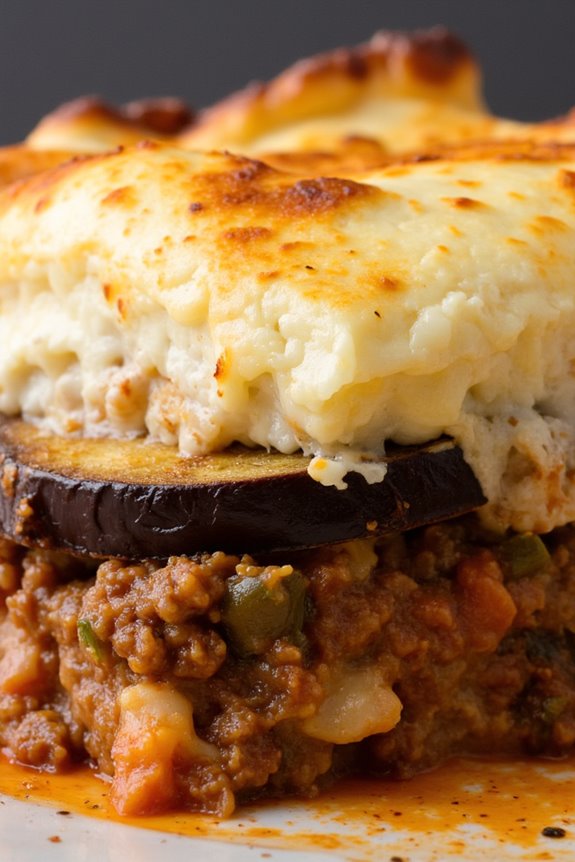
Moussaka is a classic dish that embodies the essence of Greek cuisine, featuring a delightful layering of flavors and textures. This baked casserole typically consists of layers of eggplant, spiced ground meat, and a creamy béchamel sauce, all baked to golden perfection. The origins of moussaka can be traced back to the Middle East, but the Greek version has become a beloved staple that showcases the rich culinary heritage of the region.
Preparing moussaka may require some time and effort, but the end result is well worth it. Each layer contributes to a harmonious combination of flavors, with the eggplant providing a tender base, the meat sauce offering a hearty touch, and the béchamel adding a luxurious creaminess. This dish not only serves as a filling meal but also brings a taste of tradition to your table, making it perfect for family gatherings or special occasions.
Ingredients (Serves 4-6)
- 2 large eggplants
- 1 lb (450g) ground beef or lamb
- 1 onion, finely chopped
- 2 cloves garlic, minced
- 1 can (15 oz) crushed tomatoes
- 2 tablespoons tomato paste
- 1 teaspoon ground cinnamon
- 1 teaspoon dried oregano
- 1/2 teaspoon salt
- 1/4 teaspoon black pepper
- 1/4 cup olive oil
- 2 cups milk
- 1/4 cup all-purpose flour
- 1/4 cup unsalted butter
- 2 large eggs
- 1/2 cup grated Parmesan cheese
- Fresh parsley, chopped (for garnish)
Cooking Instructions
- Prepare the Eggplants: Slice the eggplants into 1/2 inch thick rounds. Sprinkle salt on both sides of the slices and let them sit for about 30 minutes to draw out moisture and bitterness. Rinse and pat dry with paper towels.
- Cook the Eggplants: In a large skillet, heat olive oil over medium heat. Add the eggplant slices in batches and sauté until golden brown on both sides, about 3-4 minutes per side. Remove and set aside on paper towels to absorb excess oil.
- Make the Meat Sauce: In the same skillet, add the chopped onion and garlic and sauté until the onion becomes translucent. Add the ground meat and cook until browned. Stir in the crushed tomatoes, tomato paste, cinnamon, oregano, salt, and pepper. Simmer for about 15-20 minutes, allowing the flavors to meld, then set aside.
- Prepare the Béchamel Sauce: In a saucepan, melt the butter over medium heat. Add the flour and whisk continuously for about 2 minutes until it forms a roux. Gradually add the milk, whisking constantly until the sauce thickens, about 5-7 minutes. Remove from heat and let it cool slightly. In a separate bowl, beat the eggs and temper them with a little bit of the béchamel sauce before mixing it back into the saucepan. Stir in the grated Parmesan cheese.
- Assemble the Moussaka: Preheat the oven to 350°F (175°C). In a baking dish, layer half of the eggplant slices at the bottom. Spread half of the meat sauce over the eggplant. Repeat with the remaining eggplant and meat sauce. Finally, pour the béchamel sauce evenly over the top layer.
- Bake: Place the assembled moussaka in the oven and bake for about 45-50 minutes, or until the top is golden brown and bubbly. Remove from the oven and let it rest for 15-20 minutes before serving.
Extra Tips
When preparing moussaka, consider roasting the eggplant slices instead of frying them for a healthier option. You can also experiment with different spices in the meat sauce to suit your taste. For a richer flavor, try adding a splash of red wine while simmering the meat sauce.
Additionally, making the moussaka a day in advance allows the flavors to deepen, making it even more delicious when reheated.
Tzatziki

Tzatziki is a classic Greek sauce that embodies the essence of Mediterranean flavors. This invigorating dish, made primarily from yogurt, cucumbers, garlic, and herbs, serves as a perfect accompaniment to grilled meats, pita bread, or as a dip for fresh vegetables. With its creamy texture and zesty taste, tzatziki isn’t only a staple in Greek cuisine but also a favorite among food lovers around the world.
The simplicity of the ingredients allows for a quick and easy preparation, making it an ideal choice for gatherings or family meals. Traditionally, tzatziki is made with thick Greek yogurt, which adds a rich creaminess, while the grated cucumber brings a fresh crunch and moisture to the dish. The addition of garlic provides a punch of flavor, and the drizzle of olive oil enhances the overall taste and aroma.
This recipe will guide you through creating your own delicious tzatziki, perfect for serving 4-6 people.
Ingredients:
- 2 cups Greek yogurt
- 1 medium cucumber
- 2-3 cloves of garlic (minced)
- 2 tablespoons fresh dill (chopped)
- 1 tablespoon olive oil
- 1 tablespoon white wine vinegar or lemon juice
- Salt and pepper to taste
Cooking Instructions:
- Prepare the Cucumber: Start by washing the cucumber thoroughly. Peel the cucumber if you prefer a smoother texture, then cut it in half lengthwise. Use a spoon to scoop out the seeds, which can make the tzatziki watery. Grate the cucumber using a box grater or a food processor, and then place the grated cucumber in a clean kitchen towel or cheesecloth. Squeeze the towel to extract excess moisture from the cucumber. This step is essential to achieving the desired consistency in your tzatziki.
- Combine Ingredients: In a mixing bowl, add the Greek yogurt. Next, incorporate the drained grated cucumber, minced garlic, chopped fresh dill, olive oil, and white wine vinegar or lemon juice. Using a spatula, gently fold the ingredients together until they’re well combined. The yogurt should remain thick and creamy, with the cucumbers and herbs evenly distributed throughout.
- Season to Taste: After mixing, season the tzatziki with salt and pepper to your liking. Start with a small amount of salt and pepper, taste the mixture, and adjust as necessary. This step allows you to personalize the flavor to suit your palate.
- Chill and Serve: Once your tzatziki is well seasoned, cover the bowl with plastic wrap or a lid, and refrigerate for at least 30 minutes to allow the flavors to meld together. This resting period enhances the taste of the tzatziki. Serve chilled, garnished with a drizzle of olive oil or a sprinkle of fresh dill, alongside your favorite dishes.
Extra Tips:
For an even more flavorful tzatziki, consider letting it sit in the refrigerator for a few hours or overnight before serving. This allows the flavors to develop more fully.
Additionally, you can experiment with different herbs, such as mint or parsley, to create your own unique variation of this traditional recipe. Always use high-quality Greek yogurt for the best texture and taste, and remember that fresh ingredients will elevate the dish considerably. Enjoy your homemade tzatziki with a variety of dishes or simply as an invigorating dip!
Souvlaki
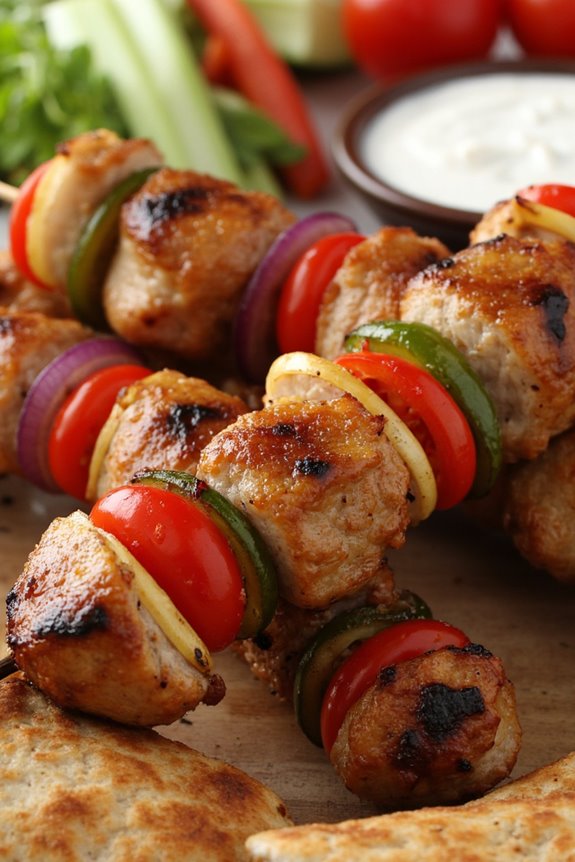
Souvlaki is a classic Greek dish that consists of small pieces of meat and sometimes vegetables grilled on a skewer. It’s a popular street food in Greece, often enjoyed with pita bread, fresh vegetables, and a drizzle of tzatziki sauce. The name “souvlaki” comes from the Greek word “souvla,” meaning skewer, and it embodies the essence of Greek cooking—simple, fresh flavors cooked with care.
Souvlaki can be made with various types of meat, including pork, chicken, or lamb, making it a versatile dish that can cater to different tastes. This dish isn’t only delicious but also a fun way to enjoy a meal outdoors, especially during the summer months. The marinated meat is juicy and flavorful, while the grilling process adds a delightful smokiness.
Whether served as a main course or as part of a meze platter, souvlaki is sure to impress your family and friends. With this recipe, you’ll be able to recreate this beloved Greek dish in the comfort of your own kitchen.
Ingredients (Serves 4-6):
- 1.5 lbs (700g) pork shoulder or chicken breast, cut into 1-inch cubes
- 1/4 cup olive oil
- 3 tablespoons red wine vinegar
- 3 cloves garlic, minced
- 1 tablespoon dried oregano
- 1 teaspoon salt
- 1/2 teaspoon black pepper
- Juice of 1 lemon
- Wooden or metal skewers (if using wooden skewers, soak in water for 30 minutes)
Cooking Instructions:
- Prepare the Marinade: In a large bowl, combine the olive oil, red wine vinegar, minced garlic, dried oregano, salt, black pepper, and lemon juice. Whisk together until well blended. This marinade will infuse the meat with flavor and help tenderize it.
- Marinate the Meat: Add the cubed pork or chicken to the bowl with the marinade. Use your hands or a spoon to mix well, ensuring that all the meat pieces are coated thoroughly. Cover the bowl with plastic wrap and refrigerate for at least 1 hour, or up to 4 hours for more flavor.
- Preheat the Grill: Before cooking, preheat your grill to medium-high heat. If using a charcoal grill, make sure the coals are glowing red and have a light coating of ash. A properly heated grill will give your souvlaki a nice char without overcooking the meat.
- Prepare the Skewers: If you’re using wooden skewers, drain the soaked skewers and thread the marinated meat onto the skewers, leaving a little space between each piece for even cooking. If you’re using metal skewers, simply thread the meat onto the skewers.
- Grill the Souvlaki: Place the skewers on the preheated grill. Grill the souvlaki for about 10-15 minutes, turning occasionally, until the meat is browned and cooked through. The internal temperature should reach 165°F (75°C) for chicken or 145°F (63°C) for pork.
- Serve: Once cooked, remove the skewers from the grill and let them rest for a few minutes. Serve the souvlaki warm with pita bread, fresh vegetables, and tzatziki sauce for dipping.
Extra Tips: For an authentic experience, you can add bell peppers, onions, or cherry tomatoes to your skewers for added flavor and color. Additionally, consider serving the souvlaki with a side of Greek salad or rice to complete your meal.
If you’re short on time, marinating the meat for even a short period can still yield delicious results, but longer marination will enhance the flavors. Enjoy your homemade souvlaki with family and friends!
Spanakopita
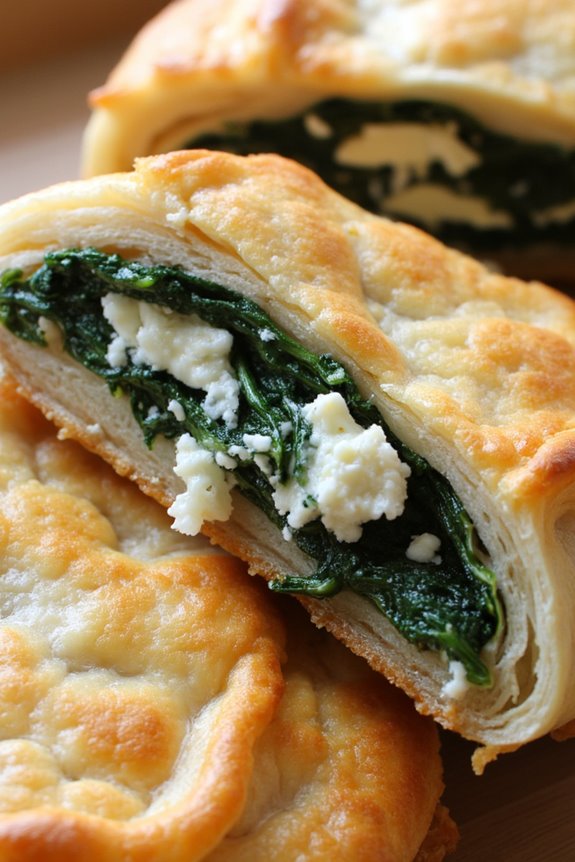
Spanakopita, a delightful Greek pastry, is a savory pie filled with spinach and feta cheese, encased in layers of crispy phyllo dough. This traditional dish isn’t only popular in Greece but has also become a staple in Mediterranean cuisine worldwide. The flaky texture of the phyllo, combined with the rich and flavorful filling, makes Spanakopita a perfect appetizer, main dish, or even a snack for gatherings and parties.
Making Spanakopita is a rewarding process that allows you to experience the heart of Greek cooking. The vibrant green spinach, combined with the creamy feta and aromatic herbs, creates a delicious filling that’s both nutritious and satisfying. While it may seem intimidating to work with phyllo dough, with a little patience and practice, you can create a stunning dish that will impress your family and friends.
Ingredients (serving size: 4-6 people)
- 1 pound fresh spinach, washed and chopped
- 1 cup feta cheese, crumbled
- 1 cup ricotta cheese
- 1/2 cup onions, finely chopped
- 1/4 cup fresh dill, chopped (or 1 tablespoon dried dill)
- 1/4 cup olive oil
- 1 package (16 oz) phyllo dough, thawed
- 2 large eggs, beaten
- Salt and pepper to taste
- Cooking spray or additional olive oil for brushing
Cooking Instructions
- Preheat the Oven: Begin by preheating your oven to 375°F (190°C). This guarantees that your Spanakopita will cook evenly and develop a golden, crispy crust.
- Prepare the Filling: In a large mixing bowl, combine the chopped spinach, crumbled feta cheese, ricotta cheese, and finely chopped onions. Stir in the chopped dill, beaten eggs, and season with salt and pepper to taste. Mix well until all ingredients are thoroughly combined.
- Prepare the Phyllo Dough: Unroll the thawed phyllo dough and lay it flat on a clean surface. Keep the phyllo covered with a damp kitchen towel to prevent it from drying out. Take one sheet of phyllo and brush it lightly with olive oil or cooking spray. Layer another sheet on top and brush it again. Repeat this process until you have about 6-8 layers stacked.
- Assemble the Spanakopita: Place a portion of the spinach filling along one edge of the layered phyllo, leaving a small border. Carefully fold the phyllo over the filling to create a log shape. Tuck in the ends and place the log seam-side down on a greased baking sheet. Repeat this process with the remaining phyllo and filling.
- Bake the Spanakopita: Once all the portions are assembled, brush the tops with olive oil or cooking spray for a golden finish. Bake in the preheated oven for 30-35 minutes or until the phyllo is crispy and golden brown.
- Serve: Remove from the oven and let the Spanakopita cool for a few minutes. Slice into pieces and serve warm or at room temperature.
Extra Tips
When preparing Spanakopita, make sure that the phyllo dough remains covered with a damp towel to prevent it from drying out and becoming brittle. You can also customize the filling by adding ingredients like sautéed mushrooms or artichokes for added flavor.
If you’re short on time, pre-made frozen Spanakopita can be a great alternative; just bake according to package instructions for a quick, delicious treat.
Dolmades
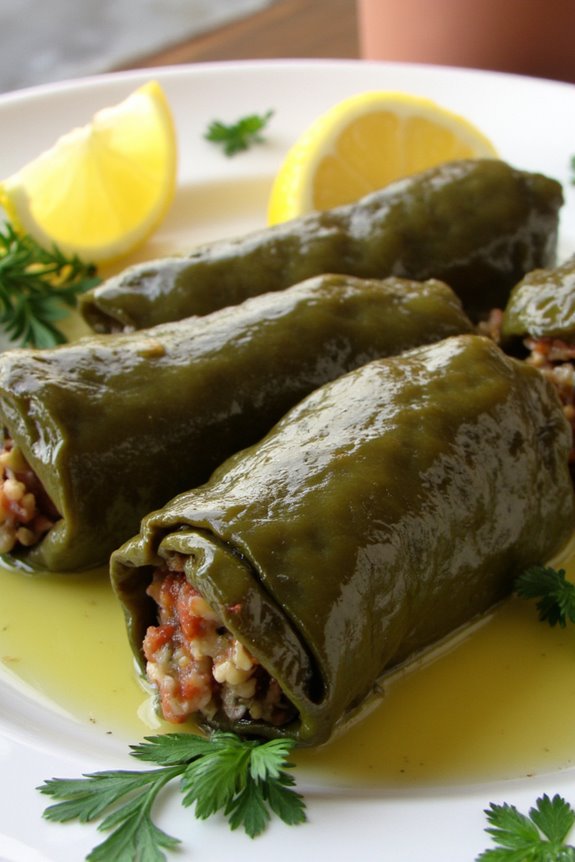
Dolmades, a classic Greek dish, are a delicious and versatile treat that can be served as appetizers or as part of a main meal. These stuffed grape leaves are typically filled with a mixture of rice, herbs, and sometimes minced meat, all wrapped up in tender grape leaves. The combination of flavors and textures creates a delightful culinary experience that transports you straight to the Mediterranean.
Traditionally, dolmades are served with a side of tzatziki sauce or a squeeze of fresh lemon juice for an extra layer of zest.
Making dolmades at home might seem intimidating, but with a little patience and practice, you can master this traditional recipe. The process involves preparing the filling, wrapping the grape leaves, and simmering the dolmades to perfection. Whether you’re serving them at a family gathering or enjoying a quiet dinner at home, these stuffed grape leaves are sure to impress your guests and satisfy your cravings for authentic Greek cuisine.
Ingredients (Serves 4-6):
- 1 jar (16 oz) grape leaves in brine, rinsed and drained
- 1 cup uncooked rice (preferably short-grain)
- 1 medium onion, finely chopped
- 1/4 cup fresh dill, chopped
- 1/4 cup fresh parsley, chopped
- 1/2 cup pine nuts (optional)
- 1/2 pound ground lamb or beef (optional for a meat version)
- 1/4 cup olive oil
- 1 lemon, juiced
- 2 cups vegetable or chicken broth
- Salt and pepper to taste
Cooking Instructions:
1. Prepare the Filling: In a large skillet, heat 2 tablespoons of olive oil over medium heat. Add the chopped onion and sauté for about 5 minutes until softened. If using meat, add it now and cook until browned.
Stir in the rice, dill, parsley, pine nuts (if using), lemon juice, salt, and pepper. Mix well and cook for an additional 2-3 minutes. Remove from heat and let the filling cool slightly.
2. Prepare the Grape Leaves: Lay a grape leaf flat on a clean surface with the stem end facing you. Place about 1 tablespoon of the filling near the stem end of the leaf. Fold the sides of the leaf over the filling, then roll the leaf away from you to form a tight cylinder.
Repeat this process with the remaining grape leaves and filling.
3. Arrange the Dolmades: In a large pot, drizzle the bottom with a bit of olive oil to prevent sticking. Layer some unused grape leaves or a plate on the bottom to protect the dolmades.
Place the rolled dolmades seam side down in the pot, packing them tightly.
4. Simmer the Dolmades: Pour the vegetable or chicken broth over the dolmades until they’re just covered. Place a heavy plate on top to keep them submerged.
Bring to a gentle simmer over medium heat, then reduce to low. Cover the pot and let them cook for about 40-45 minutes until the rice is tender and the flavors have melded.
5. Serve: Once cooked, remove the pot from heat and let the dolmades sit for about 10 minutes before serving.
Serve warm or at room temperature, drizzled with olive oil and accompanied by lemon wedges or tzatziki sauce.
Extra Tips:
When preparing dolmades, it’s important to use fresh grape leaves if possible, as they offer a tender texture and vibrant flavor. If using jarred grape leaves, make sure they’re well-rinsed to remove excess brine.
To enhance the flavor of the filling, feel free to experiment with herbs and spices such as mint, allspice, or cinnamon. Additionally, you can prepare dolmades ahead of time and store them in the refrigerator before cooking; this allows the flavors to develop even further.
Enjoy your homemade dolmades as a delightful way to celebrate Greek culinary traditions!
Greek Salad
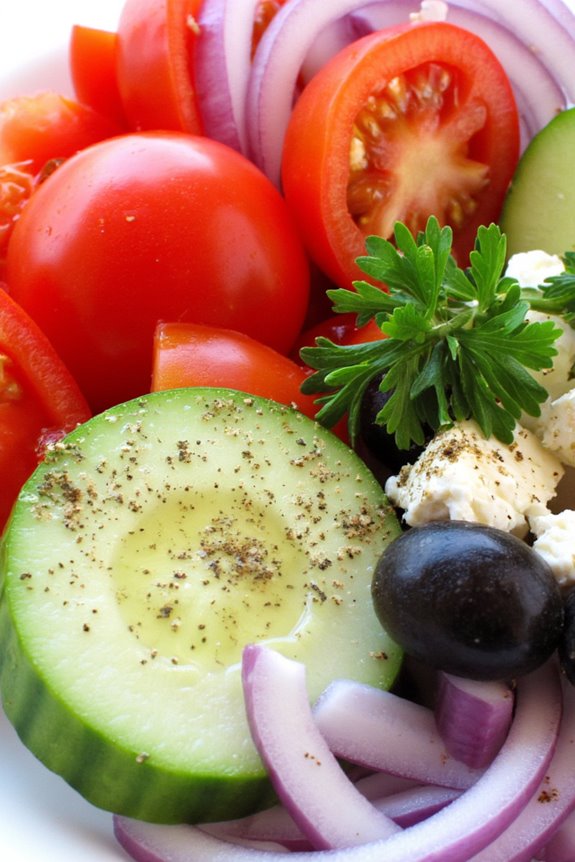
Greek Salad, known as “Horiatiki” in Greece, is a vibrant and invigorating dish that embodies the essence of Mediterranean cuisine. Traditionally made with simple, fresh ingredients, this salad isn’t only visually appealing but also bursting with flavor.
It’s a staple in Greek households and is often enjoyed as a side dish or a light meal during the warm months, making it an ideal choice for summer gatherings or family dinners.
The beauty of Greek Salad lies in its straightforward preparation and the quality of its ingredients. A colorful medley of ripe tomatoes, crisp cucumbers, tangy olives, and creamy feta cheese come together to create a harmonious balance of textures and tastes.
Drizzled with olive oil and sprinkled with oregano, this dish is a celebration of the Mediterranean lifestyle, promoting fresh produce and healthy fats.
Ingredients (Serves 4-6):
- 4 ripe tomatoes, diced
- 1 large cucumber, sliced
- 1 red onion, thinly sliced
- 1 bell pepper (green or red), chopped
- 200g feta cheese, cubed or crumbled
- 100g Kalamata olives, pitted
- 1/4 cup extra virgin olive oil
- 1 tablespoon red wine vinegar (optional)
- 1 teaspoon dried oregano
- Salt and pepper to taste
- Fresh parsley for garnish (optional)
Cooking Instructions:
1. Prepare the Vegetables: Start by washing the vegetables thoroughly. Dice the tomatoes into bite-sized pieces, slice the cucumber into rounds or half-moons, and thinly slice the red onion.
Chop the bell pepper into small pieces. This step guarantees that all the vegetables are fresh and ready to combine.
2. Combine the Veggies: In a large salad bowl, add the diced tomatoes, sliced cucumber, red onion, and bell pepper. Gently toss the vegetables together to mix them evenly, making sure that each ingredient is spread throughout the dish.
3. Add the Olives and Feta: Next, add the Kalamata olives to the bowl. If using cubed feta, gently place the cubes on top of the salad. If you prefer crumbled feta, sprinkle it evenly over the salad.
This layer adds creaminess and a salty flavor that complements the fresh vegetables.
4. Dress the Salad: Drizzle the extra virgin olive oil over the salad. If desired, add the red wine vinegar for a bit of acidity. Sprinkle the dried oregano, salt, and pepper to taste.
Using a large spoon, gently toss everything together to make sure the dressing coats all the ingredients without crushing the feta cheese.
5. Serve and Garnish: Once everything is combined, taste the salad and adjust seasoning if necessary. Garnish with fresh parsley if desired.
Serve immediately or allow it to sit for a few minutes at room temperature to let the flavors meld.
Extra Tips:
When making Greek Salad, the quality of ingredients is key. Use the ripest, freshest tomatoes and high-quality extra virgin olive oil for the best flavor.
You can also customize the salad by adding other ingredients like capers or avocado for added richness. If preparing ahead of time, consider keeping the dressing separate until serving to maintain the crispness of the vegetables.
Enjoy your Greek Salad as a perfect accompaniment to grilled meats or as a light meal on its own!
Baklava
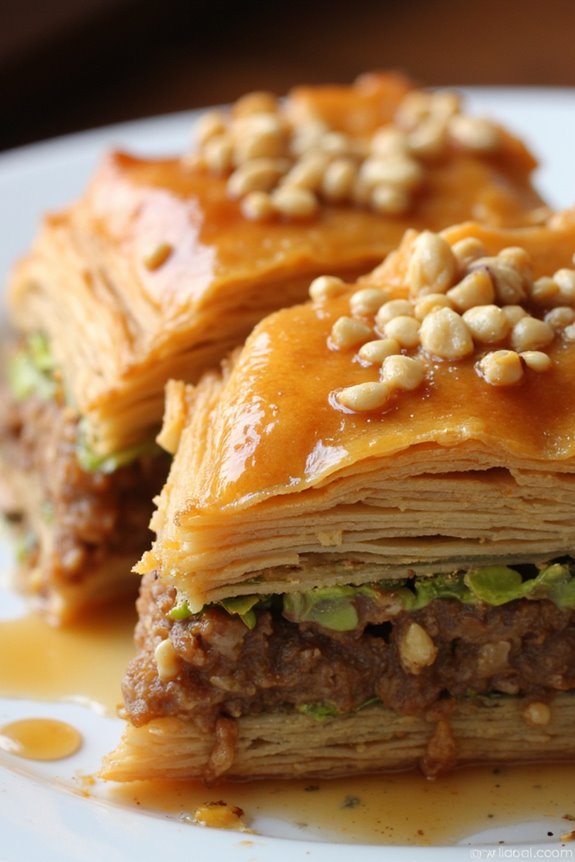
Baklava is a classic Greek dessert that embodies the rich and diverse flavors of the Mediterranean. This sweet pastry is made with layers of delicate phyllo dough, generously filled with chopped nuts and sweetened with a honey-syrup glaze. The origins of baklava are often debated, with influences from various cultures, but its popularity in Greece has made it a staple at celebrations and gatherings.
Each bite delivers a delightful crunch followed by a sweet, sticky finish that’s simply irresistible.
Preparing baklava may seem intimidating due to the layering process, but with a little patience, anyone can master this delightful dish. The combination of walnuts, pistachios, and cinnamon creates a fragrant filling that pairs perfectly with the buttery, flaky layers of phyllo.
Once baked and soaked in syrup, baklava can be enjoyed warm or at room temperature, making it a versatile dessert for any occasion.
Ingredients (Serves 4-6)
- 1 package of phyllo dough (16 oz), thawed
- 1 cup unsalted butter, melted
- 1 cup walnuts, finely chopped
- 1 cup pistachios, finely chopped
- 1 teaspoon ground cinnamon
- 1 cup granulated sugar
- 1 cup water
- 1 cup honey
- 1 teaspoon vanilla extract
Cooking Instructions
1. Preheat the Oven: Start by preheating your oven to 350°F (175°C). This will guarantee that your baklava bakes evenly and achieves a golden-brown color.
2. Prepare the Nut Filling**: In a mixing bowl, combine the finely chopped walnuts, pistachios, and ground cinnamon**. Mix well to evenly distribute the spices. This filling adds both flavor and texture to the baklava.
3. Layer the Phyllo Dough: Unroll the phyllo dough and cover it with a damp cloth to prevent it from drying out. Take one sheet of phyllo and place it in a greased 9×13 inch baking dish. Brush the sheet with melted butter.
Repeat this process, layering about 8 sheets of phyllo, brushing each with butter.
4. Add the Nut Filling: Once you have layered the phyllo, sprinkle a portion of the nut mixture (about one-third) evenly over the layered phyllo. This will be the first layer of your baklava filling.
5. Continue Layering: Add another 4 sheets of phyllo, each brushed with butter, on top of the nut filling. Follow this by adding another one-third of the nut mixture.
Repeat the layering process until all the nut filling is used, finishing with about 8 additional layers of phyllo brushed with butter.
6. Cut the Baklava: Before baking, use a sharp knife to cut the baklava into diamond or square shapes. This step is essential as it allows the syrup to penetrate the layers more effectively after baking.
7. Bake the Baklava: Place the prepared baklava in the preheated oven and bake for about 45-50 minutes, or until the pastry is golden and crisp.
8. Prepare the Syrup: While the baklava is baking, combine sugar, water, honey, and vanilla extract in a saucepan. Bring the mixture to a boil over medium heat, then reduce to a simmer for about 10 minutes.
Remove from heat and let cool slightly.
9. Soak the Baklava: Once the baklava is done baking, immediately pour the syrup evenly over the hot pastry. Allow it to soak for at least 4 hours, or overnight for the best flavor.
10. Serve: Once the baklava has cooled and soaked in the syrup, it’s ready to Serve. Enjoy it warm or at room temperature.
Extra Tips
When making baklava, be sure to work quickly with the phyllo dough, as it can dry out fast. Keeping the sheets covered with a damp cloth while you work will prevent this issue.
Additionally, feel free to experiment with different nuts or spices according to your taste preferences. For a touch of elegance, consider garnishing with crushed nuts or a sprinkle of cinnamon before serving.
Finally, baklava can be stored in an airtight container at room temperature for several days, making it a great make-ahead dessert!
Avgolemono Soup
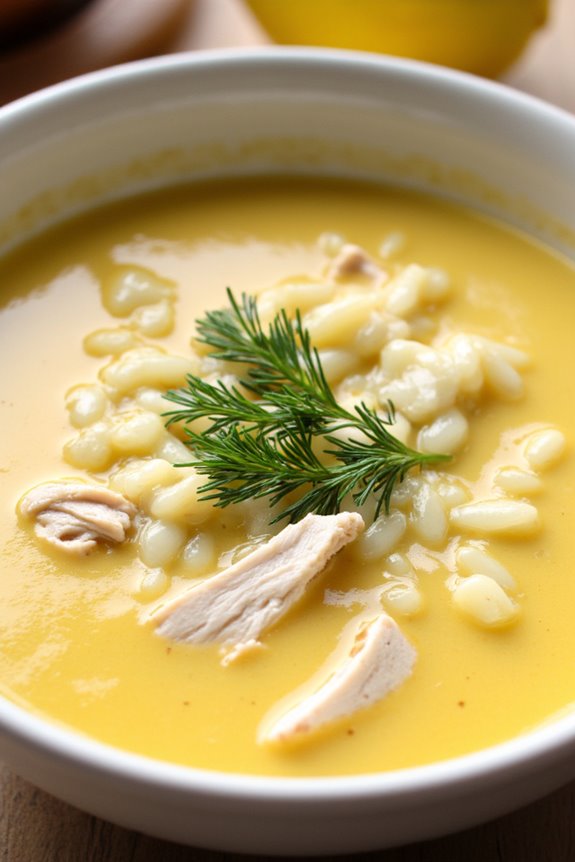
Avgolemono soup is a classic Greek dish that combines the comforting flavors of chicken, rice, and a creamy, tangy egg-lemon sauce. This traditional soup isn’t only a staple in Greek cuisine but also a beloved comfort food that warms the soul. The name “avgolemono” translates to “egg-lemon,” which beautifully describes the key components that make this soup so unique and delicious.
The velvety texture of the soup is achieved by tempering the eggs with the broth, creating a rich and satisfying dish that can be enjoyed year-round. Making Avgolemono soup is an art that requires a bit of technique, but once mastered, it becomes a delightful addition to any family meal.
The dish is often served as an appetizer or a main course, and it can be customized with various proteins and vegetables to suit your taste. With its bright flavors and creamy consistency, Avgolemono soup is sure to impress your family and friends, making it a perfect choice for gatherings or cozy dinners at home.
Ingredients (Serves 4-6):
- 1 whole chicken (about 3-4 pounds), cut into pieces
- 8 cups of water
- 1 medium onion, quartered
- 2 carrots, chopped
- 2 stalks of celery, chopped
- 1 cup of rice (preferably short-grain or orzo)
- 3 large eggs
- 1/4 cup of fresh lemon juice (about 2 lemons)
- Salt and pepper to taste
- Fresh dill or parsley for garnish (optional)
Cooking Instructions:
- Prepare the Chicken Broth: In a large pot, add the chicken pieces, water, quartered onion, chopped carrots, and celery. Bring the mixture to a boil over medium-high heat. Once boiling, reduce the heat to low and let it simmer for about 1 to 1.5 hours until the chicken is cooked through and tender. Skim off any foam that rises to the surface.
- Cook the Rice: Once the chicken is cooked, remove the pieces from the pot and set them aside to cool. Strain the broth to remove the vegetables, returning the clear broth to the pot. Bring the broth to a gentle boil, then add the rice. Cook according to the rice package instructions (usually about 15-20 minutes) until the rice is tender.
- Shred the Chicken: While the rice is cooking, carefully remove the chicken meat from the bones, discarding the skin and bones. Shred the meat into bite-sized pieces and set aside.
- Prepare the Avgolemono Mixture: In a medium bowl, whisk together the eggs and lemon juice until well combined. This will create a creamy base for the soup.
- Temper the Eggs: To avoid curdling the eggs, slowly ladle a cup of the hot broth into the egg-lemon mixture while whisking constantly. This process, known as tempering, warms the eggs without cooking them.
- Combine Everything: Once the egg mixture is tempered, pour it back into the pot with the remaining broth and rice, stirring gently to incorporate. Add the shredded chicken back into the pot. Season with salt and pepper to taste. Heat the soup gently over low heat, ensuring it doesn’t boil, for about 5 minutes to warm everything through.
- Serve: Ladle the Avgolemono soup into bowls and garnish with fresh dill or parsley if desired. Serve immediately and enjoy the delightful flavors!
Extra Tips:
When preparing Avgolemono soup, it’s important to avoid boiling the soup after adding the egg mixture, as this can cause the eggs to curdle. Make sure to keep the heat low and stir gently.
Additionally, if you prefer a thicker soup, you can reduce the amount of broth added to the egg mixture. For a twist on the classic recipe, consider adding vegetables like spinach or peas for extra nutrition and color. Enjoy your cooking and the wonderful aromas that will fill your kitchen!
Pastitsio
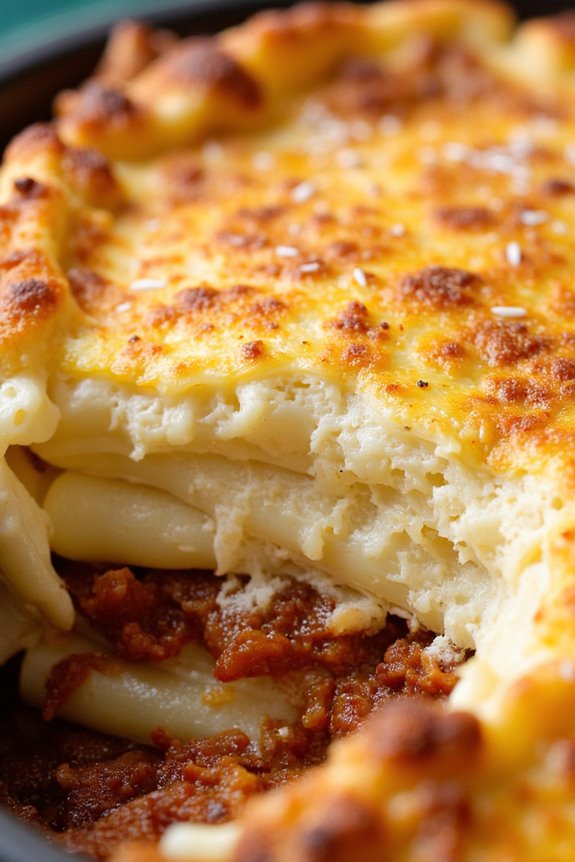
Pastitsio is a beloved Greek dish that combines layers of pasta, a rich meat sauce, and a creamy béchamel topping. Often referred to as Greek lasagna, this hearty casserole has its roots in both Italian and Greek cuisine, blending flavors and textures to create a satisfying meal that delights both the palate and the spirit.
Traditionally served during festive occasions and family gatherings, Pastitsio is a comforting dish that showcases the warmth of Greek hospitality.
Creating the perfect Pastitsio requires some attention to detail, but the end result is well worth the effort. The dish is characterized by its three main components: the pasta, the meat sauce, and the béchamel sauce. The pasta is typically a tubular shape, such as bucatini or ziti, which captures the delicious flavors of the meat sauce.
The creamy béchamel is made with milk, butter, and flour, creating a velvety topping that complements the heartiness of the dish beautifully.
Ingredients (serving size: 4-6 people)
- 500g (1 lb) pasta (bucatini or ziti)
- 500g (1 lb) ground beef or lamb
- 1 medium onion, finely chopped
- 2 cloves garlic, minced
- 400g (14 oz) canned crushed tomatoes
- 2 tablespoons tomato paste
- 1 teaspoon dried oregano
- 1 teaspoon ground cinnamon
- 1 teaspoon salt
- 1/2 teaspoon black pepper
- 3 tablespoons olive oil
- 2 cups milk
- 3 tablespoons butter
- 3 tablespoons all-purpose flour
- 1/2 cup grated Parmesan cheese
- 2 large eggs
- Nutmeg (for seasoning)
Cooking Instructions
- Cook the Pasta: Bring a large pot of salted water to a boil. Add the pasta and cook until al dente, usually about 7-9 minutes. Drain the pasta and set it aside to cool slightly. This will prevent it from becoming mushy when layered with the meat sauce and béchamel.
- Prepare the Meat Sauce: In a large skillet, heat the olive oil over medium heat. Add the chopped onion and sauté until translucent, about 5 minutes. Stir in the minced garlic and cook for an additional minute until fragrant. Add the ground beef or lamb, breaking it apart with a spoon, and cook until browned. Drain any excess fat.
- Add Tomatoes and Spices: Stir in the crushed tomatoes, tomato paste, oregano, cinnamon, salt, and black pepper. Bring the sauce to a simmer and reduce the heat. Let it cook for about 20 minutes, stirring occasionally, until thickened and flavors meld together.
- Make the Béchamel Sauce: In a saucepan, melt the butter over medium heat. Once melted, whisk in the flour to create a roux, cooking for about 2-3 minutes. Gradually add the milk while whisking continuously to avoid lumps. Cook until the sauce thickens, about 5-7 minutes. Remove from heat and whisk in the grated Parmesan cheese, eggs, and a pinch of nutmeg for flavor.
- Assemble the Pastitsio: Preheat your oven to 180°C (350°F). In a greased baking dish, layer half of the cooked pasta on the bottom. Spread the meat sauce evenly over the pasta, then add the remaining pasta on top. Pour the béchamel sauce over the final layer of pasta, smoothing it out with a spatula.
- Bake: Place the assembled Pastitsio in the preheated oven and bake for 45-50 minutes, or until the top is golden brown and bubbling. Remove from the oven and let it rest for about 15 minutes before slicing. This resting period allows the layers to set, making it easier to serve.
Extra Tips
When preparing Pastitsio, it’s crucial to verify that your meat sauce is well-seasoned, as this will greatly impact the overall flavor of the dish.
Feel free to experiment with the spices, adding elements such as bay leaves or fresh herbs for an extra depth of flavor. Additionally, for those who prefer a lighter béchamel, you can substitute whole milk with low-fat milk or even unsweetened almond milk.
Finally, consider serving your Pastitsio with a side of Greek salad or crusty bread to round out the meal beautifully. Enjoy your culinary journey through Greece!
Gigantes Plaki
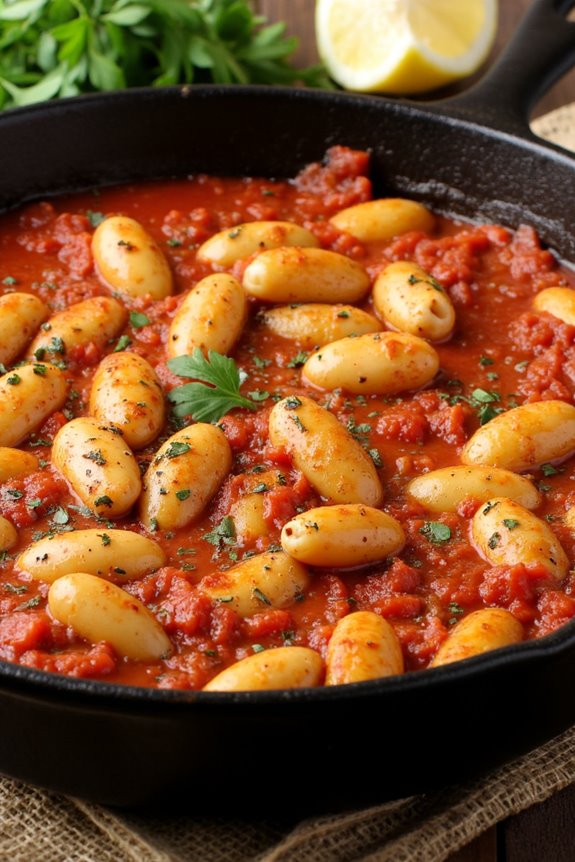
Gigantes Plaki, a classic Greek dish, showcases the rich flavors of baked giant white beans in a savory tomato sauce. This hearty dish isn’t only a staple in Greek cuisine but also reflects the essence of Mediterranean cooking, where simple ingredients come together to create a wholesome meal.
Traditionally served as a meze or main course, Gigantes Plaki is both comforting and nutritious, making it perfect for sharing with family and friends.
The preparation of Gigantes Plaki involves soaking the beans to achieve the ideal tenderness, followed by a slow baking process that allows the flavors to meld beautifully. The combination of tomatoes, herbs, and spices elevates the dish, making it a delightful experience for your palate.
Whether enjoyed warm or at room temperature, Gigantes Plaki is a dish that embodies the spirit of Greek hospitality and is sure to impress your guests.
Ingredients (Serves 4-6):
- 1 cup dried giant white beans (such as Gigantes or Butter beans)
- 1/4 cup olive oil
- 1 large onion, finely chopped
- 3 cloves of garlic, minced
- 1 can (400g) crushed tomatoes
- 1/4 cup tomato paste
- 2 cups vegetable broth
- 1 teaspoon dried oregano
- 1 teaspoon dried thyme
- Salt and pepper to taste
- Fresh parsley, chopped (for garnish)
- Lemon wedges (for serving)
Cooking Instructions:
- Soak the Beans: Begin by rinsing the dried giant white beans under cold water. Place them in a large bowl and cover with plenty of water. Soak the beans overnight or for at least 8 hours. This will help them soften and reduce cooking time.
- Cook the Beans: After soaking, drain the beans and transfer them to a pot filled with fresh water. Bring to a boil and then reduce to a simmer. Cook for about 60-90 minutes, or until the beans are tender but not falling apart. Drain and set aside.
- Prepare the Sauce: In a large skillet or saucepan, heat the olive oil over medium heat. Add the chopped onion and sauté until it becomes translucent, about 5 minutes. Then, add the minced garlic and cook for an additional minute, being careful not to burn it.
- Combine Ingredients: Stir in the crushed tomatoes, tomato paste, vegetable broth, dried oregano, and dried thyme. Mix well and let the sauce simmer for about 10 minutes to allow the flavors to develop.
- Mix Beans and Sauce: Gently fold the cooked giant beans into the tomato sauce, ensuring they’re well coated. Season with salt and pepper to taste.
- Bake the Dish: Preheat your oven to 180°C (350°F). Transfer the mixture to a baking dish and spread it evenly. Cover the dish with aluminum foil and bake for 30 minutes. Then, remove the foil and bake for an additional 15-20 minutes, until the top is slightly golden and bubbly.
- Garnish and Serve: Once baked, remove the dish from the oven and let it cool for a few minutes. Garnish with freshly chopped parsley and serve warm with lemon wedges on the side.
Extra Tips:
When making Gigantes Plaki, consider using fresh herbs for an even brighter flavor. Additionally, you can add a pinch of paprika or red pepper flakes for a bit of heat.
This dish pairs well with crusty bread or a fresh Greek salad, making it a versatile option for any meal. To make it in advance, prepare the dish up to the baking step, refrigerate, and then simply bake when ready to serve. Enjoy the authentic taste of Greece!
Kalamari

Kalamari, or fried calamari, is a beloved dish in Greek cuisine that showcases the fresh, vibrant flavors of the Mediterranean. This dish features tender squid that’s lightly breaded and fried to a golden crisp, making it a perfect appetizer or main course. The contrast of the crispy exterior with the soft, succulent interior is simply delightful, and when accompanied by a squeeze of fresh lemon and a side of tzatziki or marinara sauce, it becomes an irresistible treat.
Preparing kalamari requires fresh squid, which can often be found at local fish markets or grocery stores. While the process may seem intimidating for those new to cooking seafood, it’s quite simple once you get the hang of it. With just a few ingredients and some basic techniques, you can enjoy this classic dish right in your own kitchen. So gather your ingredients and get ready to impress your family and friends with this traditional Greek delicacy!
Ingredients (Serving Size: 4-6 People)
- 1 pound fresh calamari (squid), cleaned and cut into rings
- 1 cup all-purpose flour
- 1 teaspoon paprika
- 1 teaspoon salt
- ½ teaspoon black pepper
- ½ teaspoon garlic powder
- ½ teaspoon dried oregano
- Vegetable oil, for frying
- Lemon wedges, for serving
- Optional: Tzatziki sauce or marinara sauce, for dipping
Cooking Instructions
- Prepare the Calamari: Start by cleaning the calamari if it hasn’t been pre-cleaned. Rinse the squid under cold water and remove the head, beak, and innards. Cut the body into rings about 1/2 inch thick. Pat the calamari dry with paper towels to remove excess moisture, which helps achieve a crispy texture when frying.
- Make the Coating: In a large mixing bowl, combine the all-purpose flour, paprika, salt, black pepper, garlic powder, and dried oregano. Mix the dry ingredients well to guarantee an even distribution of flavors.
- Coat the Calamari: Take the prepared calamari rings and add them to the bowl with the flour mixture. Toss the rings gently until they’re evenly coated. Shake off any excess flour to prevent clumping during frying.
- Heat the Oil: In a deep frying pan or a heavy pot, heat about 2 inches of vegetable oil over medium-high heat. The oil should reach a temperature of around 350°F (175°C). To test if it’s ready, drop a small piece of the coated calamari into the oil; it should sizzle immediately.
- Fry the Calamari: Carefully add the calamari rings to the hot oil in batches, ensuring not to overcrowd the pan. Fry for about 1-2 minutes, or until the calamari turns golden brown and crispy. Use a slotted spoon to remove the fried calamari and place it on a plate lined with paper towels to absorb the excess oil.
- Serve: Once all the calamari is fried, transfer it to a serving platter. Serve immediately with lemon wedges on the side for squeezing over the top and optional dipping sauces like tzatziki or marinara.
Extra Tips
For the best results, make sure your oil is hot enough before adding the calamari, as this helps achieve that desirable crispy texture. Additionally, avoid frying too many calamari rings at once, as this can lower the oil temperature and result in soggy pieces.
If you’re looking to enhance the flavor, consider marinating the calamari in a bit of olive oil, lemon juice, and herbs before coating and frying. Enjoy your homemade kalamari with a side of friends and family for a true Mediterranean experience!