

Greek cuisine is such a delightful blend of colors and fresh ingredients. Each dish, whether a simple Greek salad or a hearty vegetable moussaka, has its own story to tell. The mix of flavors and textures creates meals that are both beautiful and nourishing. If you’re looking to bring these wonderful recipes to your table, I’ve gathered a variety for you to explore. There’s so much more to discover!
Greek Salad With Feta and Olives
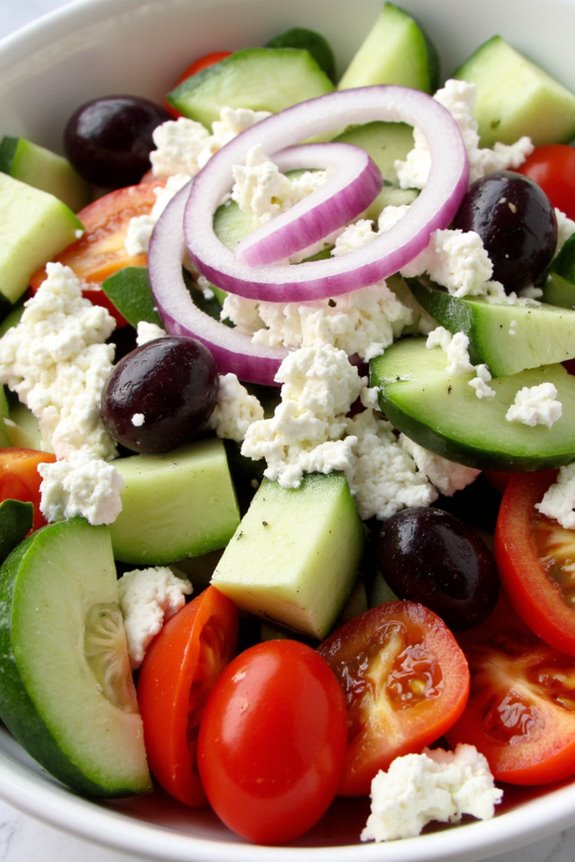
Greek Salad, known as Horiatiki in Greece, is a vibrant and invigorating dish that embodies the essence of Mediterranean cuisine. This salad is characterized by its simple yet flavorful ingredients, showcasing the best of seasonal vegetables. The combination of ripe tomatoes, crisp cucumbers, and tangy feta cheese, along with Kalamata olives, creates a delightful medley that isn’t only visually appealing but also bursting with taste.
Whether served as a side dish or a light main course, Greek Salad is perfect for any occasion, especially during the warmer months.
To prepare a traditional Greek Salad, it’s important to use the freshest ingredients available. The hallmark of this dish is the quality of the produce, particularly the tomatoes and cucumbers, which should be ripe and flavorful. The salad is typically dressed with olive oil, red wine vinegar, and a sprinkle of oregano, allowing the natural flavors of the vegetables to shine.
Served chilled, this salad makes for an invigorating complement to grilled meats, fish, or can be enjoyed on its own for a healthy, low-calorie meal.
Ingredients (Serving Size: 4-6 People)
- 4 medium ripe tomatoes, chopped
- 1 large cucumber, peeled and sliced
- 1 red onion, thinly sliced
- 1 green bell pepper, chopped
- 200g feta cheese, crumbled
- 100g Kalamata olives, pitted
- 1/4 cup extra virgin olive oil
- 2 tablespoons red wine vinegar
- 1 teaspoon dried oregano
- Salt and pepper to taste
Cooking Instructions
- Prepare the Vegetables: Begin by washing the tomatoes and cucumber thoroughly. Chop the tomatoes into bite-sized pieces, slice the cucumber into rounds or half-moons, and thinly slice the red onion. Also, chop the green bell pepper into small pieces. Place all chopped vegetables in a large mixing bowl.
- Add the Olives and Feta: Once the vegetables are in the bowl, add the Kalamata olives and crumbled feta cheese. The olives add a briny flavor while the feta contributes a creamy texture that complements the crunch of the vegetables.
- Make the Dressing: In a small bowl, mix together the extra virgin olive oil, red wine vinegar, dried oregano, salt, and pepper. Whisk the ingredients together until they’re well combined. This dressing enhances the freshness of the salad while adding a rich flavor profile.
- Combine Everything: Pour the dressing over the vegetable mixture in the large bowl. Gently toss all the ingredients together, ensuring that the dressing evenly coats the vegetables and cheese without breaking the feta into too small pieces.
- Chill and Serve: Allow the Greek Salad to sit for at least 10 minutes at room temperature or in the refrigerator. This resting time lets the flavors meld together beautifully. Serve the salad chilled or at room temperature, garnished with additional feta and olives if desired.
Extra Tips
For the best results, try to use fresh, high-quality ingredients. Opt for organic vegetables when possible, as they tend to have more robust flavors.
You can also add other ingredients such as capers, radishes, or even grilled chicken for a heartier meal. If you prefer a milder flavor, soak the sliced red onion in cold water for about 10 minutes before adding it to the salad. This will help reduce its sharpness.
Enjoy your Greek Salad with crusty bread or as a side dish to complement your main courses!
Spanakopita: Spinach and Feta Pie

Spanakopita, a classic Greek dish, is renowned for its flaky, crispy pastry and savory filling of spinach and feta cheese. This delightful pie isn’t only a staple in Greek cuisine but also a favorite among vegetarians and anyone who enjoys the rich flavors of fresh greens and creamy cheese.
Traditionally wrapped in layers of phyllo dough, spanakopita is perfect for serving as an appetizer, snack, or even a main course when paired with a rejuvenating salad.
Making spanakopita at home is easier than you might think, and the result is a deliciously satisfying dish that will impress family and friends alike. The combination of tender sautéed spinach, tangy feta cheese, and aromatic herbs wrapped in golden-brown phyllo is simply irresistible.
Whether you choose to prepare it for a special occasion or a casual dinner, this spinach and feta pie is sure to bring a taste of Greece to your table.
Ingredients (serving size: 4-6 people):
- 1 package (16 oz) phyllo dough, thawed
- 1 pound fresh spinach, washed and chopped
- 1 cup feta cheese, crumbled
- 1/2 cup ricotta cheese
- 1 medium onion, finely chopped
- 3 green onions, chopped
- 2 cloves garlic, minced
- 1/4 cup fresh dill, chopped (or 1 tablespoon dried dill)
- 1/4 cup fresh parsley, chopped
- 2 large eggs
- 1/2 cup olive oil (for brushing)
- Salt and pepper, to taste
Cooking Instructions:
- Prepare the Filling: In a large skillet, heat a tablespoon of olive oil over medium heat. Add the chopped onion and sauté until translucent, about 5 minutes.
- Add the minced garlic and cook for another minute until fragrant. Stir in the chopped spinach and cook until wilted, about 3-4 minutes. Remove from heat and let cool slightly.
- Combine Ingredients: In a large mixing bowl, combine the sautéed spinach mixture with the crumbled feta, ricotta, green onions, dill, parsley, and eggs. Season with salt and pepper to taste. Mix everything together until well combined.
- Prepare Phyllo Dough: Preheat your oven to 375°F (190°C). On a clean surface, lay out the phyllo dough sheets. Keep the unused sheets covered with a damp cloth to prevent them from drying out.
- Brush a large baking dish (9×13 inches) with olive oil.
- Layer the Phyllo: Place one sheet of phyllo dough in the baking dish, allowing the edges to hang over the sides. Brush the phyllo sheet lightly with olive oil.
- Repeat this step, layering 6-8 sheets of phyllo, brushing each sheet with oil.
- Add the Filling: Spread the spinach and feta mixture evenly over the layered phyllo in the baking dish. Fold the overhanging edges of phyllo dough over the filling to create a crust.
- Top Layer: Continue layering 6-8 more sheets of phyllo dough on top of the filling, brushing each sheet with olive oil. Tuck any overhanging edges inward to seal the pie.
- Cut and Bake: Using a sharp knife, cut the top layers of phyllo into squares or diamond shapes to allow steam to escape while baking.
- Bake in the preheated oven for 30-40 minutes or until the top is golden brown and crispy.
- Cool and Serve: Once baked, remove the spanakopita from the oven and allow it to cool for a few minutes before slicing along the pre-cut lines. Serve warm or at room temperature.
Extra Tips:
When working with phyllo dough, make sure to handle it gently and keep it covered with a damp cloth to prevent it from drying out.
If you prefer a richer filling, you can add a bit more feta or incorporate other cheeses. Additionally, feel free to experiment with herbs based on your taste preferences.
For a unique twist, consider adding some sun-dried tomatoes or olives to the filling for an extra burst of flavor. Enjoy your homemade spanakopita!
Roasted Eggplant With Garlic and Herbs

Roasted Eggplant With Garlic and Herbs is a delightful Greek-inspired dish that highlights the natural flavors of eggplant, enhanced by the aromatic qualities of garlic and fresh herbs. This dish isn’t only vegetarian but also offers a rich, savory taste that pairs well with a variety of mains or can be enjoyed on its own as a healthy snack.
The roasting process caramelizes the eggplant, making it tender and flavorful, while the garlic and herbs infuse it with a fragrant aroma that will have everyone at the table wanting more.
Creating this dish is simple and requires just a few ingredients, making it an ideal choice for both novice cooks and seasoned chefs. Whether you’re preparing a family dinner or hosting a gathering with friends, Roasted Eggplant With Garlic and Herbs is certain to impress and satisfy.
Serve it as a side dish, a part of a mezze platter, or as a topping on crusty bread for a delightful appetizer.
Ingredients (serving size: 4-6 people)
- 2 large eggplants
- 4 cloves of garlic, minced
- 1/4 cup olive oil
- 2 tablespoons fresh parsley, chopped
- 2 tablespoons fresh basil, chopped
- 1 tablespoon fresh thyme, chopped
- Salt, to taste
- Black pepper, to taste
- Lemon wedges, for serving (optional)
Cooking Instructions
- Preheat the Oven: Begin by preheating your oven to 400°F (200°C). This guarantees that your eggplants will roast evenly, achieving a perfect golden-brown color and tender texture.
- Prepare the Eggplants: Wash the eggplants thoroughly and cut them in half lengthwise. Score the flesh in a crisscross pattern, being careful not to cut through the skin. This scoring allows the flavors to penetrate the eggplant more effectively during roasting.
- Make the Herb Mixture: In a small bowl, combine the minced garlic, olive oil, chopped parsley, basil, thyme, salt, and black pepper. Mix well until all the ingredients are fully incorporated. This mixture will be used to enhance the eggplant’s flavor.
- Coat the Eggplants: Place the eggplant halves on a baking sheet, cut side up. Generously brush the garlic and herb mixture over the flesh of each eggplant half, ensuring an even coating.
- Roast the Eggplants: Place the baking sheet in the preheated oven and roast the eggplants for about 25-30 minutes, or until they’re tender and the tops are golden brown. You may want to flip them halfway through cooking to ensure they roast evenly.
- Serve: Once roasted, remove the eggplants from the oven and let them cool slightly. Serve warm, garnished with a sprinkle of fresh herbs if desired, and lemon wedges on the side for an added burst of flavor.
Extra Tips
For an even richer flavor, you can let the eggplant sit with a sprinkle of salt for about 30 minutes before cooking to draw out excess moisture. This step is particularly useful for larger eggplants.
Additionally, you can experiment with different herbs or add a sprinkle of feta cheese before serving for a more authentic Greek touch. Enjoy the versatility of this dish, as it can be served warm or at room temperature, making it perfect for any occasion.
Stuffed Peppers With Rice and Veggies

Stuffed Peppers With Rice and Veggies is a delightful Greek dish that perfectly showcases the vibrant flavors of Mediterranean cuisine. This recipe features bell peppers filled with a delicious mixture of rice, fresh vegetables, and aromatic herbs.
It’s not only a visually appealing dish but also a healthy option that’s packed with nutrients. Whether you’re looking for a hearty vegetarian meal or simply want to impress your guests with a colorful dish, these stuffed peppers are sure to please everyone at the table.
The beauty of this recipe is its versatility; you can customize the filling according to your preferences by adding different vegetables or spices. The combination of rice, tomatoes, zucchini, and herbs creates a delicious harmony that complements the sweetness of the roasted peppers.
Serve these stuffed peppers as a main dish or alongside a light salad for a complete meal.
Ingredients (Serves 4-6):
- 4-6 bell peppers (any color)
- 1 cup uncooked rice (preferably short-grain or jasmine)
- 2 cups vegetable broth or water
- 1 medium onion, finely chopped
- 2 cloves garlic, minced
- 1 medium zucchini, diced
- 1 medium carrot, diced
- 1 can (14 oz) diced tomatoes, drained
- 1 teaspoon dried oregano
- 1 teaspoon dried thyme
- Salt and pepper, to taste
- 2 tablespoons olive oil
- Fresh parsley, chopped (for garnish)
Cooking Instructions:
- Prepare the Peppers: Preheat your oven to 375°F (190°C). Cut the tops off the bell peppers and remove the seeds and membranes. If necessary, trim the bottoms slightly so they stand upright. Arrange the peppers in a baking dish.
- Cook the Rice: In a medium pot, combine the rice and vegetable broth (or water). Bring to a boil, then reduce the heat to low, cover, and simmer for about 15-20 minutes, or until the rice is cooked and the liquid is absorbed. Remove from heat and set aside.
- Sauté the Vegetables: In a large skillet, heat the olive oil over medium heat. Add the chopped onion and minced garlic, and sauté until the onion becomes translucent, about 3-4 minutes. Add the diced zucchini and carrot, cooking for another 5-7 minutes until they soften.
- Combine the Filling: In the skillet with the sautéed vegetables, add the cooked rice, drained diced tomatoes, oregano, thyme, salt, and pepper. Mix well to combine all the ingredients evenly. Taste and adjust seasoning as needed.
- Stuff the Peppers: Carefully spoon the rice and vegetable mixture into each bell pepper, filling them generously. Place the stuffed peppers upright in the baking dish.
- Bake: Cover the baking dish with aluminum foil and bake in the preheated oven for 30 minutes. After 30 minutes, remove the foil and bake for an additional 10-15 minutes to allow the tops to brown slightly.
- Serve: Once cooked, remove the stuffed peppers from the oven and let them cool for a few minutes. Garnish with freshly chopped parsley before serving.
Extra Tips: For added flavor, consider mixing in some crumbled feta cheese or olives into the rice mixture before stuffing the peppers. You can also top the stuffed peppers with shredded cheese during the last 10 minutes of baking for a cheesy finish.
If you have any leftover filling, you can bake it separately or use it as a delicious topping for salads or grain bowls.
Zucchini Fritters With Tzatziki Sauce

Zucchini fritters are a delightful way to incorporate vegetables into your meals, offering a crispy exterior and a tender, flavorful interior. These fritters aren’t only simple to prepare but also make for a fantastic appetizer or side dish. Paired with a revitalizing tzatziki sauce, they provide a perfect balance of flavors that will impress your family and friends. The mild taste of zucchini is complemented by herbs and spices, making each bite a delicious experience.
Making zucchini fritters is an excellent opportunity to use fresh garden produce, and they can be customized with additional ingredients like feta cheese or fresh herbs. The tzatziki sauce, made from yogurt, cucumber, and garlic, adds a cooling element that pairs beautifully with the warm fritters. Whether you’re hosting a gathering or just enjoying a quiet meal at home, these fritters are sure to be a hit.
Ingredients (Serves 4-6):
- 3 medium zucchinis, grated
- 1 teaspoon salt
- 1 cup all-purpose flour
- 2 large eggs
- 1/2 cup grated Parmesan cheese
- 1/4 cup chopped fresh dill
- 1/4 cup chopped green onions
- 1/2 teaspoon black pepper
- 1/2 teaspoon garlic powder
- Vegetable oil (for frying)
For Tzatziki Sauce:
- 1 cup plain Greek yogurt
- 1 medium cucumber, finely grated and drained
- 2 cloves garlic, minced
- 1 tablespoon olive oil
- 1 tablespoon lemon juice
- Salt and pepper to taste
Cooking Instructions:
1. Prepare the Zucchini: Start by washing and grating the zucchinis. Once grated, place them in a colander and sprinkle with salt. Let them sit for about 10-15 minutes to draw out excess moisture.
Afterward, use a clean kitchen towel to squeeze out as much liquid as possible. This step is essential as it prevents the fritters from becoming soggy.
2. Mix the Fritter Batter: In a large mixing bowl, combine the drained zucchini, flour, eggs, Parmesan cheese, dill, green onions, black pepper, and garlic powder. Stir until all the ingredients are evenly incorporated. The mixture should be thick enough to hold its shape when scooped.
3. Heat the Oil: In a large skillet, heat about 1/4 inch of vegetable oil over medium-high heat. To test if the oil is hot enough, drop a small amount of the batter into the oil; it should sizzle immediately.
4. Fry the Fritters: Using a tablespoon or small ice cream scoop, drop spoonfuls of the zucchini mixture into the hot oil, flattening them slightly to form patties. Avoid overcrowding the skillet; you may need to cook them in batches. Fry each fritter for about 3-4 minutes per side, or until they’re golden brown and crispy.
5. Drain and Keep Warm: Once cooked, transfer the fritters to a plate lined with paper towels to drain excess oil. Keep them warm in a low-temperature oven while you cook the remaining batches.
6. Prepare the Tzatziki Sauce: In a separate bowl, combine the Greek yogurt, grated and drained cucumber, minced garlic, olive oil, lemon juice, and season with salt and pepper to taste. Mix well until all ingredients are combined.
7. Serve: Serve the zucchini fritters warm with a generous dollop of tzatziki sauce on the side.
Extra Tips:
To enhance the flavor of your zucchini fritters, feel free to experiment with additional herbs such as parsley or mint, or incorporate some crumbled feta cheese for a tangy twist.
Make sure to drain the grated zucchini thoroughly to prevent moisture issues. These fritters can also be made ahead of time and reheated in the oven for a few minutes for a crispy finish, making them perfect for meal prep or entertaining. Enjoy your cooking!
Baked Tomatoes With Rice and Herbs

Baked Tomatoes With Rice and Herbs is a delightful Greek dish that celebrates the flavors of fresh produce and aromatic herbs. This dish combines juicy, ripe tomatoes with a savory rice filling, complemented by a mix of herbs that add depth and fragrance to the meal. It’s a wonderful way to showcase the bounty of summer vegetables while providing a hearty and satisfying option for both vegetarians and meat-lovers alike.
This dish isn’t only delicious but also visually appealing, making it perfect for gatherings and family dinners. The tomatoes become tender and flavorful as they bake, allowing the rice and herbs to infuse their essence into every bite. Whether served as a main course or a side dish, Baked Tomatoes With Rice and Herbs is sure to impress with its vibrant colors and delightful taste.
Ingredients (Serves 4-6):
- 6 large ripe tomatoes
- 1 cup uncooked rice (preferably short-grain)
- 1 medium onion, finely chopped
- 2 cloves garlic, minced
- 1/4 cup fresh parsley, chopped
- 1/4 cup fresh dill, chopped
- 1/4 cup olive oil
- 1 teaspoon salt
- 1/2 teaspoon black pepper
- 1 cup vegetable broth (or water)
- 1 tablespoon lemon juice
- Optional: feta cheese for topping
Cooking Instructions:
- Preheat the Oven: Begin by preheating your oven to 375°F (190°C). This guarantees that the tomatoes will bake evenly and develop a lovely roasted flavor.
- Prepare the Tomatoes: Wash and carefully cut the tops off each tomato, creating a small lid. Use a spoon to scoop out the insides of the tomatoes, being careful not to puncture the skin. Chop the tomato flesh and set it aside for later use.
- Cook the Rice: In a medium pot, heat 2 tablespoons of olive oil over medium heat. Add the chopped onion and garlic, sautéing until the onion is translucent. Stir in the rice, allowing it to toast slightly for about 2 minutes. This adds a nutty flavor to the rice.
- Combine Ingredients: Add the chopped tomato flesh, parsley, dill, salt, pepper, lemon juice, and vegetable broth to the pot. Mix well and bring to a gentle simmer. Cover and cook for about 15 minutes, or until the rice is tender and has absorbed the liquid.
- Stuff the Tomatoes: Once the rice mixture is ready, remove it from the heat. Carefully spoon the rice filling into each hollowed tomato, packing it lightly. Place the stuffed tomatoes upright in a baking dish.
- Drizzle and Bake: Drizzle the remaining olive oil over the stuffed tomatoes and cover the baking dish with aluminum foil. Bake in the preheated oven for about 30-35 minutes. Remove the foil for the last 10 minutes of baking to allow the tops to brown slightly.
- Serve: Once the tomatoes are tender and the rice is fully cooked, remove the dish from the oven. Let it cool for a few minutes before serving. If desired, sprinkle with feta cheese before serving for an extra layer of flavor.
Extra Tips:
When preparing Baked Tomatoes With Rice and Herbs, opt for the ripest tomatoes you can find, as they’ll yield the best flavor and texture. You can also customize the herb mixture according to your preferences, adding ingredients like mint or oregano for a unique twist.
If you have leftover rice filling, it can be served as a delicious side dish or stuffed into other vegetables like bell peppers or zucchini. Enjoy this dish warm or at room temperature for a delightful meal any time of the year!
Greek Lemon Potatoes

Greek Lemon Potatoes are a delicious and zesty side dish that perfectly complements a variety of main courses. This dish features tender potatoes roasted to perfection with a tangy lemon and herb marinade, creating a burst of flavor in each bite. The simplicity of the ingredients combined with the aromatic herbs makes this dish not only easy to prepare but also a real crowd-pleaser.
Whether served alongside grilled meats or as part of a Mediterranean feast, Greek Lemon Potatoes will elevate any dining experience.
The key to achieving the perfect Greek Lemon Potatoes lies in the balance of acidity from the lemon juice and the richness of the olive oil. This recipe allows the potatoes to absorb all the wonderful flavors while achieving a crispy exterior and a fluffy interior.
With just a few ingredients and straightforward steps, you’ll have a side dish that’s both satisfying and memorable. Let’s explore the ingredients and cooking instructions.
Ingredients (Serves 4-6)
- 2 pounds of baby or Yukon gold potatoes
- 1/4 cup of olive oil
- 1/4 cup of fresh lemon juice (about 2 lemons)
- 1 tablespoon of lemon zest
- 4 cloves of garlic, minced
- 1 tablespoon of dried oregano
- Salt and pepper to taste
- 1/2 cup of vegetable or chicken broth (or water)
- Fresh parsley, chopped (for garnish)
Cooking Instructions
- Preheat the Oven: Start by preheating your oven to 400°F (200°C). A hot oven is essential for achieving that golden, crispy texture on the potatoes.
- Prepare the Potatoes: Wash and scrub the potatoes thoroughly. If using baby potatoes, you can leave them whole; for larger Yukon gold potatoes, cut them into quarters or sixths, making sure they’re all roughly the same size for even cooking.
- Make the Marinade: In a large mixing bowl, combine the olive oil, fresh lemon juice, lemon zest, minced garlic, dried oregano, salt, and pepper. Whisk together until well blended.
- Coat the Potatoes: Add the prepared potatoes to the bowl with the marinade. Toss them gently to coat each potato evenly with the mixture.
- Arrange in Baking Dish: Transfer the coated potatoes to a large baking dish or roasting pan. Make sure they’re spread out in a single layer for peak roasting.
- Add Broth: Pour the vegetable or chicken broth around the potatoes in the baking dish. This will help steam the potatoes and prevent them from drying out while roasting.
- Roast the Potatoes: Place the baking dish in the preheated oven and roast for about 45-55 minutes, or until the potatoes are fork-tender and golden brown. Halfway through the cooking time, give the potatoes a gentle toss to guarantee even roasting.
- Garnish and Serve: Once cooked, remove the potatoes from the oven and let them cool for a few minutes. Garnish with freshly chopped parsley before serving.
Extra Tips
For an extra layer of flavor, consider using a blend of herbs such as thyme or rosemary along with the oregano. Additionally, if you prefer a spicier kick, sprinkle some red pepper flakes into the marinade.
Letting the potatoes marinate for at least 30 minutes before roasting can deepen the flavor, but if you’re short on time, they can still be delicious with immediate cooking.
Finally, these potatoes make wonderful leftovers and can be easily reheated in the oven for a quick side dish during the week. Enjoy your cooking!
Grilled Vegetable Skewers
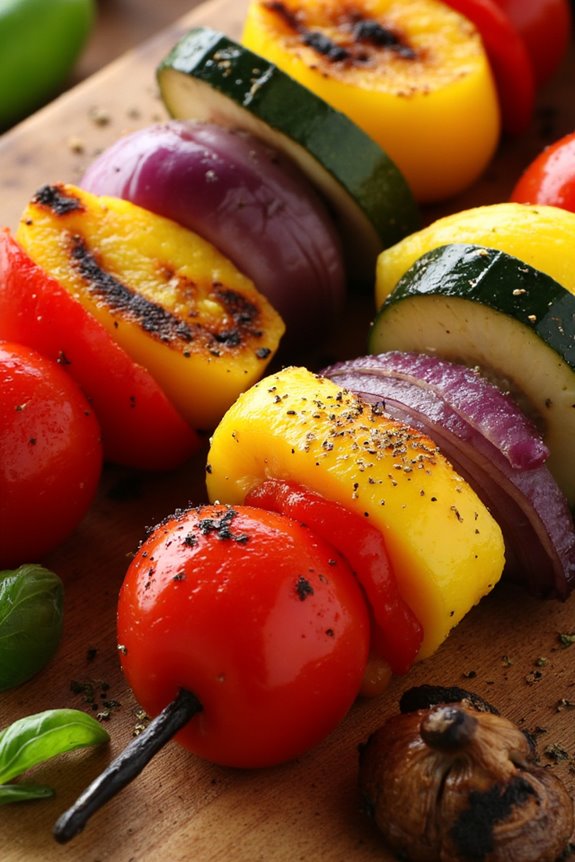
Grilled Vegetable Skewers are a vibrant and flavorful dish that perfectly showcases the fresh produce of the Mediterranean. This dish isn’t only visually appealing but also brings a delightful taste to any summer barbecue or family gathering. The combination of herbs and spices enhances the natural sweetness of the vegetables, providing a healthy and satisfying option for both vegetarians and meat lovers alike.
Whether served as an appetizer or a side dish, these skewers are incredibly versatile. Feel free to mix and match your favorite vegetables, and add a protein like halloumi or tofu for a heartier meal. The key to perfectly grilled vegetable skewers is to guarantee that all pieces are cut to a uniform size so that they cook evenly, allowing you to enjoy a deliciously charred exterior and tender interior.
Ingredients (serving size: 4-6 people)
- 1 red bell pepper, cut into 1-inch pieces
- 1 yellow bell pepper, cut into 1-inch pieces
- 1 zucchini, sliced into rounds
- 1 yellow squash, sliced into rounds
- 1 red onion, cut into wedges
- 8-10 cherry tomatoes
- 1 cup mushrooms, whole or halved if large
- 4 tablespoons olive oil
- 2 teaspoons dried oregano
- 1 teaspoon garlic powder
- Salt and pepper, to taste
- Skewers (wooden or metal)
Cooking Instructions
- Prepare the Skewers: If you’re using wooden skewers, soak them in water for at least 30 minutes prior to grilling to prevent them from burning. If using metal skewers, simply set them aside as they don’t require soaking.
- Chop the Vegetables: Cut all vegetables into uniform pieces to guarantee even cooking. Aim for pieces about 1 inch in size for the bell peppers, zucchini, and squash, and keep the cherry tomatoes and mushrooms whole or halved.
- Marinate the Vegetables: In a large mixing bowl, combine the olive oil, dried oregano, garlic powder, salt, and pepper. Add the chopped vegetables to the bowl and toss well to coat them evenly in the marinade. Let them marinate for at least 15-30 minutes to absorb the flavors.
- Assemble the Skewers: Once the vegetables are marinated, thread them onto the skewers, alternating between different types for visual appeal. Leave a little space between each piece to allow for even grilling.
- Preheat the Grill: Preheat your grill to medium-high heat. If using a grill pan, heat it over medium-high heat on the stove.
- Grill the Skewers: Place the assembled skewers on the grill. Cook for approximately 10-12 minutes, turning occasionally, until the vegetables are tender and have nice grill marks. Cooking time may vary depending on your grill and the thickness of the vegetables.
- Serve: Once cooked, carefully remove the skewers from the grill. Let them cool for a minute before serving. These skewers can be enjoyed hot or at room temperature, making them perfect for gatherings.
Extra Tips
For added flavor, consider sprinkling some fresh herbs like parsley or basil over the skewers just before serving. You can also experiment with different spices or marinades to suit your taste. If you want to add protein, feel free to incorporate halloumi cheese or marinated tofu cubes alongside the veggies.
Remember to monitor the skewers carefully while grilling, as different vegetables may cook at varying rates. Enjoy your delicious and colorful Grilled Vegetable Skewers!
Fava Bean Dip With Lemon and Olive Oil

Fava Bean Dip, a traditional Greek dish, is a delightful and nutritious appetizer that’s perfect for gatherings or a simple snack. Made with fava beans, which are rich in proteins and fibers, this dip isn’t only healthy but also bursting with flavor. The addition of fresh lemon juice and high-quality olive oil enhances the dish, bringing a revitalizing taste that beautifully complements the earthiness of the fava beans.
Served with pita bread or fresh vegetables, this dip is sure to be a crowd-pleaser. Preparing Fava Bean Dip is relatively straightforward, and with just a few ingredients, you can create a delicious dish that showcases the vibrant flavors of Greek cuisine.
Whether you’re hosting a dinner party or enjoying a quiet night at home, this dip is a great way to introduce a taste of Greece into your kitchen. Let’s explore the ingredients and cooking instructions for this delightful dish.
Ingredients (Serves 4-6)
- 1 cup dried fava beans, rinsed and sorted
- 4 cups water
- 1/4 cup extra virgin olive oil, plus more for drizzling
- 2 tablespoons fresh lemon juice
- 1 small garlic clove, minced
- 1 teaspoon salt
- Freshly ground black pepper, to taste
- Chopped fresh parsley, for garnish
- Pita bread or fresh vegetables, for serving
Cooking Instructions
- Prepare the Fava Beans: Start by rinsing the dried fava beans under cold water to remove any impurities. Place the beans in a large pot and cover them with 4 cups of water. Allow them to soak for at least 8 hours or overnight for better texture and faster cooking.
- Cook the Beans: After soaking, drain the beans and return them to the pot. Add fresh water to cover the beans by about an inch. Bring the water to a boil over medium-high heat, then reduce the heat to low and let the beans simmer for about 30-40 minutes, or until they’re tender. Skim off any foam that forms on the surface.
- Drain and Blend: Once the beans are cooked and soft, drain them and transfer them to a food processor. Add the extra virgin olive oil, fresh lemon juice, minced garlic, and salt to the food processor. Blend the mixture until it reaches a smooth consistency. If the dip is too thick, you can add a splash of water or more olive oil to achieve your desired texture.
- Season and Serve: Taste the dip and adjust the seasoning with freshly ground black pepper, and additional salt or lemon juice if needed. Transfer the fava bean dip to a serving bowl. Drizzle a little extra virgin olive oil on top and garnish with chopped fresh parsley.
- Enjoy: Serve the Fava Bean Dip with warm pita bread or an assortment of fresh vegetables for dipping. Enjoy the flavors and textures of this delightful Greek appetizer!
Extra Tips
When making Fava Bean Dip, consider using high-quality extra virgin olive oil, as it greatly enhances the flavor of the dish. You can also experiment with adding spices such as cumin or smoked paprika for an extra layer of flavor.
For a twist, try blending in roasted red peppers or sun-dried tomatoes for a unique take on this classic recipe. Always taste and adjust the seasoning to your liking, as the balance of flavors is key to a delicious dip!
Chilled Beetroot Salad With Yogurt
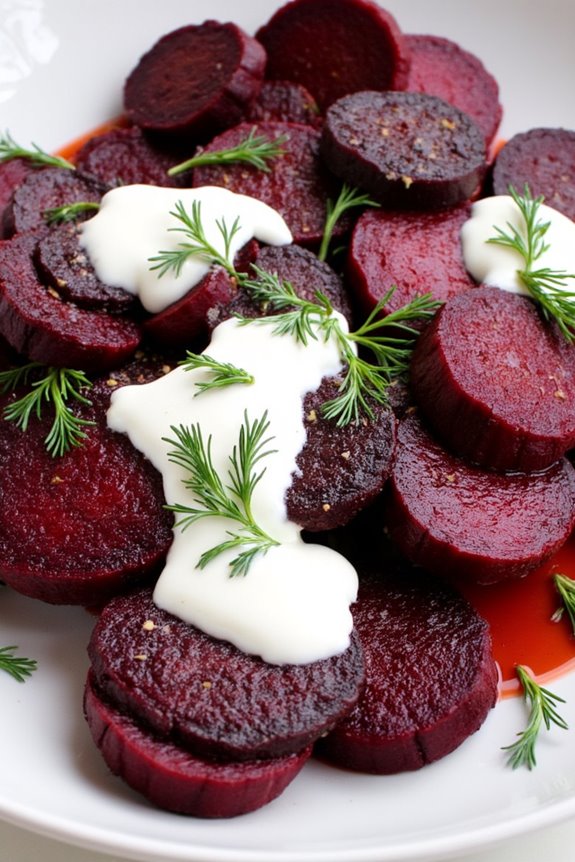
Chilled Beetroot Salad With Yogurt is a delightful and invigorating dish that perfectly embodies the essence of Greek cuisine. This vibrant salad showcases the earthy sweetness of beetroot paired with the creamy texture of yogurt, creating a harmonious blend of flavors that’s both nutritious and satisfying. The bright colors and invigorating taste make it an ideal side dish for warm weather gatherings or a light lunch option.
The preparation of this salad is simple, yet it allows the natural flavors of the ingredients to shine through. Roasting the beetroots enhances their sweetness, while the yogurt dressing adds a tangy creaminess that complements the beets beautifully. This dish isn’t only visually appealing but also packed with vitamins and minerals, making it a healthy addition to any meal. Whether served on its own or as a side dish, this salad is sure to impress your family and friends.
Ingredients (serving size: 4-6 people):
- 4 medium-sized beetroots
- 1 cup Greek yogurt
- 2 tablespoons olive oil
- 1 tablespoon red wine vinegar
- 1 clove garlic, minced
- Salt and pepper, to taste
- Fresh dill or parsley, for garnish
Cooking Instructions:
- Roast the Beetroots: Preheat your oven to 400°F (200°C). Wash the beetroots thoroughly and trim the tops, leaving the skins on. Wrap each beetroot in aluminum foil and place them on a baking sheet. Roast for 45-60 minutes or until they’re tender when pierced with a fork. Once done, let them cool for a few minutes, then peel off the skins using your hands or a paper towel.
- Prepare the Dressing: In a medium-sized bowl, combine the Greek yogurt, olive oil, red wine vinegar, and minced garlic. Mix well until the ingredients are fully incorporated. Season with salt and pepper to taste. Adjust the seasoning according to your preference.
- Slice the Beetroots: Once the roasted beetroots are cooled and peeled, slice them into thin rounds or wedges. Place the sliced beetroots in a large mixing bowl.
- Combine Salad Ingredients: Drizzle the yogurt dressing over the sliced beetroots. Gently toss to coat the beets evenly with the dressing, being careful not to break them apart.
- Chill the Salad: Transfer the beetroot salad to a serving dish or bowl. Cover it with plastic wrap or a lid, and refrigerate for at least 30 minutes to allow the flavors to meld and the salad to chill.
- Garnish and Serve: Before serving, give the salad a gentle stir and garnish with fresh dill or parsley for added color and flavor. Serve chilled as an invigorating side or light meal.
Extra Tips: For added texture and flavor, consider incorporating some chopped nuts, such as walnuts or pistachios, into the salad. You can also experiment with different herbs or add a sprinkle of feta cheese for an extra layer of flavor. This salad can be prepared a day in advance, making it a great option for meal prep or entertaining, as the flavors will continue to develop while it chills in the refrigerator.
Cucumber and Tomato Salad With Dill
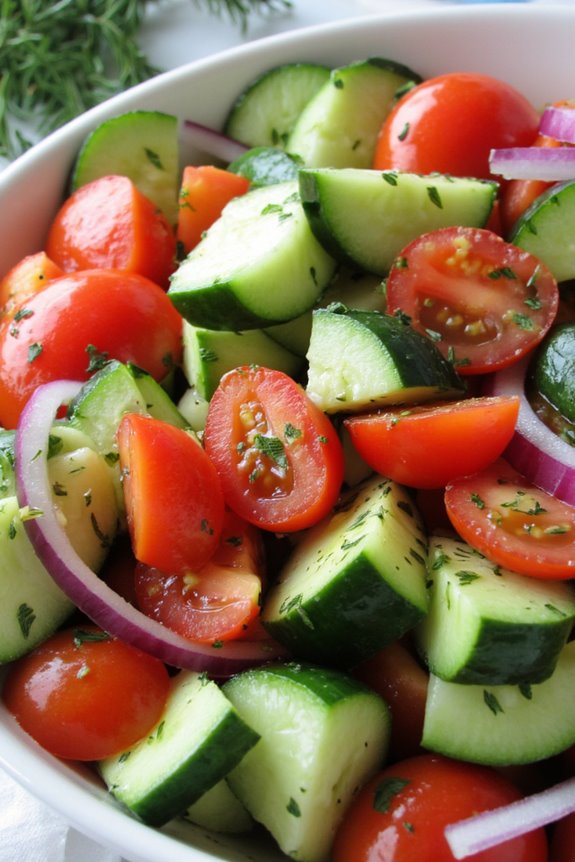
Cucumber and Tomato Salad With Dill is a revitalizing and vibrant dish that captures the essence of Greek cuisine. This salad isn’t only a feast for the eyes with its colorful ingredients, but it also offers a delightful blend of flavors. The crispness of the cucumbers paired with the juiciness of ripe tomatoes, all elevated by the aromatic notes of fresh dill, makes this salad a perfect accompaniment to any meal or a light dish on its own.
This salad is incredibly easy to prepare and can be made in just a few minutes, making it a fantastic choice for quick lunches, picnics, or summer barbecues. The simplicity of the ingredients allows each flavor to shine while remaining healthy and satisfying. Serve it chilled, and you have a delicious dish that embodies the Mediterranean spirit.
Ingredients (Serves 4-6)
- 3 medium cucumbers, diced
- 4 medium ripe tomatoes, chopped
- 1/2 red onion, thinly sliced
- 1/4 cup fresh dill, chopped
- 1/4 cup extra virgin olive oil
- 2 tablespoons red wine vinegar
- Salt and pepper to taste
Cooking Instructions
- Prepare the Vegetables: Begin by washing the cucumbers and tomatoes thoroughly under cold water. Dice the cucumbers into bite-sized pieces and chop the tomatoes into similar-sized chunks. Use a sharp knife to slice the red onion into thin strips. The goal is to guarantee that all the vegetables are roughly the same size for even distribution in the salad.
- Combine the Ingredients: In a large mixing bowl, combine the diced cucumbers, chopped tomatoes, and sliced red onion. Gently toss the vegetables together to mix them evenly without bruising the tomatoes.
- Add Fresh Dill: Sprinkle the freshly chopped dill over the vegetable mixture. Dill adds a unique flavor profile that elevates the salad, so be generous with the amount you use.
- Make the Dressing: In a small bowl or jar, whisk together the extra virgin olive oil, red wine vinegar, salt, and pepper. Adjust the seasoning to your taste, guaranteeing the dressing complements the freshness of the vegetables.
- Dress the Salad: Drizzle the dressing over the cucumber and tomato mixture. Use a large spoon or salad tongs to gently toss everything together, ensuring that the dressing coats all the ingredients evenly.
- Chill and Serve: For the best flavor, let the salad sit for about 10-15 minutes at room temperature or refrigerate it for a short while. This allows the flavors to meld together. Serve cold or at room temperature.
Extra Tips
For an added twist, consider incorporating feta cheese for a creamy texture and a salty flavor that pairs beautifully with the fresh ingredients. You can also experiment with adding olives or bell peppers to enhance the Mediterranean flair of the salad.
Always taste and adjust the seasoning before serving, as fresh produce can vary in flavor. Enjoy this salad as a side dish or as a light lunch, and relish the vibrant tastes of Greece!
Braised Artichokes With Lemon and Olive Oil

Braised Artichokes with Lemon and Olive Oil is a classic Greek dish that highlights the delicate flavors of artichokes, complemented by the bright acidity of lemon and the richness of olive oil. This recipe captures the essence of Mediterranean cooking, showcasing fresh, wholesome ingredients that are both simple and delicious.
Braising the artichokes allows them to absorb the flavors of the herbs and spices, resulting in a tender, succulent dish that can be served as a side or as a light main course. The preparation of this dish is straightforward, making it perfect for both seasoned cooks and beginners.
With just a few key ingredients, you can create a vibrant and flavorful dish that embodies the spirit of Greek cuisine. Whether enjoyed warm or at room temperature, Braised Artichokes with Lemon and Olive Oil is sure to impress at any gathering or family dinner.
Ingredients (serves 4-6 people):
- 6 medium artichokes
- 1/2 cup extra-virgin olive oil
- 2 lemons (juice and zest)
- 4 cloves garlic, minced
- 1 cup vegetable broth or water
- 1 teaspoon dried oregano
- Salt and pepper to taste
- Fresh parsley, chopped (for garnish)
Cooking Instructions:
- Prepare the Artichokes: Begin by trimming the artichokes. Remove the tough outer leaves and cut off the top third of each artichoke. Trim the stem and cut the artichokes in half lengthwise. Use a spoon to scoop out the fuzzy choke in the center of each half. Place the prepared artichokes in a bowl of water mixed with the juice of one lemon to prevent browning.
- Sauté Garlic: In a large, heavy-bottomed pot or Dutch oven, heat the olive oil over medium heat. Add the minced garlic and sauté for about 2 minutes, stirring constantly until it becomes fragrant and starts to turn golden, being careful not to burn it.
- Add Artichokes: Drain the artichokes and add them to the pot, cut side down. Sauté for 5-7 minutes until they’re lightly browned. This initial browning adds depth of flavor to the dish.
- Add Liquid and Seasonings: Pour in the vegetable broth or water, along with the juice and zest of the remaining lemon. Sprinkle in the dried oregano, and season with salt and pepper. Stir gently to combine all ingredients.
- Braise the Artichokes: Bring the mixture to a gentle boil, then reduce the heat to low. Cover the pot and let the artichokes braise for about 30-40 minutes, or until they’re tender and easily pierced with a fork. Check occasionally and add more liquid if necessary to prevent sticking.
- Finish and Serve: Once the artichokes are tender, remove the lid and increase the heat slightly to allow the liquid to reduce for a few minutes if desired. Taste and adjust seasoning if needed. Garnish with freshly chopped parsley before serving.
Extra Tips:
For the best results, choose fresh artichokes that are firm and tightly closed. When preparing them, work quickly to prevent browning, and don’t hesitate to adjust the seasoning to your taste.
This dish can be made ahead of time, as it tastes even better after the flavors have melded together. Serve it warm, at room temperature, or chilled as part of a mezze platter. Enjoy the vibrant flavors of Greece right at your table!
Vegetable Moussaka

Vegetable Moussaka is a traditional Greek dish that embodies the Mediterranean spirit with its layers of flavorful vegetables and creamy béchamel sauce. This hearty vegetarian version substitutes the typical meat with a delightful mix of eggplant, zucchini, and potatoes, creating a satisfying meal that’s perfect for any occasion.
The dish isn’t only comforting but also packed with nutrients, making it a favorite for both vegetarians and meat-lovers alike.
The preparation of Vegetable Moussaka may take some time, as it involves layering and baking. However, the end result is worth every minute spent in the kitchen. The combination of roasted vegetables, aromatic spices, and rich béchamel sauce creates a symphony of flavors that will leave your taste buds dancing.
Serve it with a simple Greek salad and some crusty bread for a complete meal that will impress your family and friends.
Ingredients (Serving Size: 4-6 people)
- 2 large eggplants, sliced into rounds
- 2 large zucchinis, sliced into rounds
- 3 medium potatoes, peeled and sliced into rounds
- 1 large onion, chopped
- 3 cloves garlic, minced
- 2 cups canned crushed tomatoes
- 1 teaspoon dried oregano
- 1 teaspoon ground cinnamon
- ½ teaspoon salt
- ½ teaspoon black pepper
- 1 cup grated parmesan cheese
- 1 tablespoon olive oil
- 3 tablespoons butter
- 3 tablespoons all-purpose flour
- 2 cups milk
- 2 large eggs
Instructions
1. Prepare the Vegetables: Begin by preheating your oven to 375°F (190°C). Slice the eggplants, zucchinis, and potatoes into rounds and sprinkle them lightly with salt. This will help draw out moisture from the eggplants and zucchinis, preventing them from becoming soggy when cooked.
Let them sit for about 20 minutes, then rinse and pat dry with a paper towel.
2. Cook the Potatoes: In a large pot, bring salted water to a boil. Add the potato slices and cook for about 5-7 minutes until they’re just tender but not fully cooked. Drain and set aside.
3. Sauté the Vegetables: In a large skillet, heat the olive oil over medium heat. Add the chopped onion and garlic, and sauté until they become translucent. Next, add the eggplant and zucchini slices, cooking them until they’re tender and slightly golden.
Stir in the crushed tomatoes, oregano, cinnamon, salt, and pepper. Simmer for about 10 minutes until the mixture thickens. Remove from heat and set aside.
4. Prepare the Béchamel Sauce: In a saucepan, melt the butter over medium heat. Whisk in the flour and cook for about 1-2 minutes until it turns a light golden color. Gradually whisk in the milk, ensuring there are no lumps.
Continue to cook, stirring frequently, until the sauce thickens and coats the back of a spoon. Take the saucepan off the heat and allow it to cool slightly before whisking in the eggs and half of the parmesan cheese.
5. Assemble the Moussaka: In a large baking dish, layer half of the potato slices at the bottom. Follow with half of the sautéed vegetable mixture, then add the remaining potato slices and top with the rest of the vegetable mixture.
Pour the béchamel sauce evenly over the top layer and sprinkle with the remaining parmesan cheese.
6. Bake the Moussaka: Place the baking dish in the preheated oven and bake for about 45-50 minutes, or until the top is golden brown and bubbling. Let it cool for about 15-20 minutes before slicing and serving.
Extra Tips
When preparing Vegetable Moussaka, you can enhance the flavors by using fresh herbs such as basil or parsley alongside the oregano. For a creamier béchamel, consider adding a bit of nutmeg to the sauce.
Additionally, you can prepare the dish a day in advance; it often tastes even better the next day as the flavors meld together. Just remember to reheat it thoroughly before serving!
Greek Roasted Cauliflower With Tahini Sauce

Greek Roasted Cauliflower with Tahini Sauce is a delightful and healthy dish that showcases the vibrant flavors of Greek cuisine. The star of this recipe is the cauliflower, which becomes tender and caramelized when roasted, bringing out its natural sweetness. Paired with a creamy tahini sauce, this dish offers a wonderful balance of textures and tastes that can serve as a satisfying side or a light main course.
This dish isn’t just about the delicious flavors; it also provides an array of nutritional benefits. Cauliflower is rich in vitamins and antioxidants, while tahini, made from ground sesame seeds, adds healthy fats and protein. Together, they create a wholesome meal that’s both filling and nutritious, perfect for family gatherings or a cozy dinner at home.
Ingredients (serving size: 4-6 people)
- 1 large head of cauliflower, cut into florets
- 3 tablespoons olive oil
- 1 teaspoon salt
- 1 teaspoon black pepper
- 1 teaspoon garlic powder
- 1 teaspoon smoked paprika
- 1/2 cup tahini
- 1/4 cup water (adjust for desired consistency)
- 2 tablespoons lemon juice
- 2 cloves garlic, minced
- Fresh parsley, chopped (for garnish)
- Lemon wedges (for serving)
Cooking Instructions
- Preheat the Oven: Begin by preheating your oven to 425°F (220°C). A hot oven is crucial for achieving that perfect roasted texture and flavor in the cauliflower.
- Prepare the Cauliflower: In a large mixing bowl, toss the cauliflower florets with olive oil, salt, black pepper, garlic powder, and smoked paprika. Make certain all pieces are well-coated, as this will help them roast evenly and develop a rich flavor.
- Roast the Cauliflower: Spread the seasoned cauliflower florets in a single layer on a baking sheet lined with parchment paper. Roast in the preheated oven for about 25-30 minutes, or until the cauliflower is golden brown and tender, stirring halfway through to promote even cooking.
- Make the Tahini Sauce: While the cauliflower is roasting, prepare the tahini sauce. In a bowl, whisk together the tahini, water, lemon juice, and minced garlic. Adjust the water to reach your desired sauce consistency—thicker for dipping or thinner for drizzling.
- Serve: Once the cauliflower is done roasting, remove it from the oven and transfer it to a serving platter. Drizzle the tahini sauce generously over the roasted cauliflower and garnish with chopped parsley. Serve with lemon wedges on the side for an extra zing.
Extra Tips
When preparing Greek Roasted Cauliflower with Tahini Sauce, feel free to experiment with additional spices or herbs based on your preference. For a bit of heat, you can sprinkle some red pepper flakes over the cauliflower before roasting.
Additionally, make sure to taste and adjust the tahini sauce to your liking; adding more lemon juice can brighten the flavors, while a little honey can balance the bitterness of the tahini. Enjoy this dish warm or at room temperature, making it a versatile option for any occasion.