

When life gets hectic, Greek cuisine is my go-to for quick and delicious veggie recipes. Each dish bursts with vibrant flavors and wholesome ingredients, perfect for those busy weeknights. From refreshing salads to comforting pies, whipping up something nourishing is a breeze. Let’s discover how to effortlessly bring a taste of the Mediterranean to your dinner table. These recipes are sure to become your weeknight favorites!
Greek Chickpea Salad
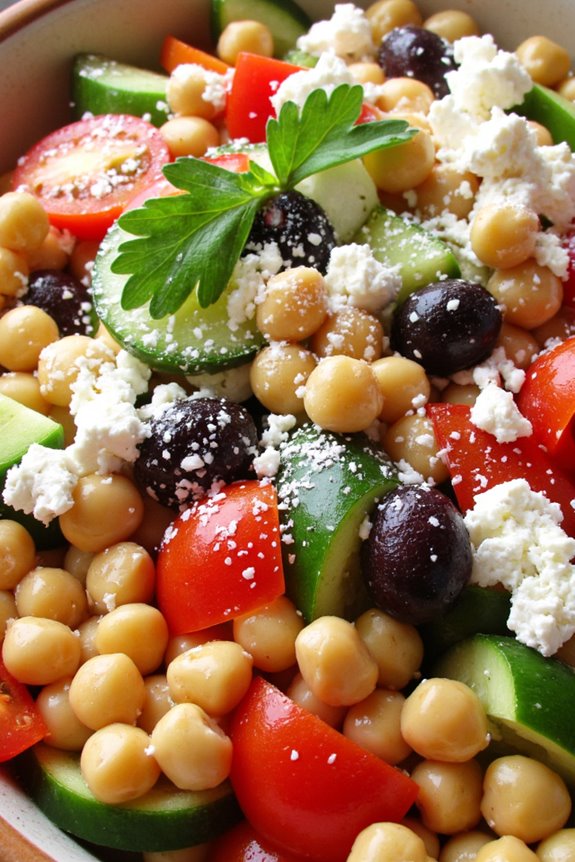
Greek Chickpea Salad is a revitalizing and nutritious dish that perfectly embodies the vibrant flavors of Mediterranean cuisine. Packed with protein-rich chickpeas, crisp vegetables, and a zesty dressing, this salad isn’t only delicious but also incredibly easy to prepare. It’s perfect for a light lunch, a side dish for dinner, or even as a healthy snack. The combination of fresh ingredients makes it a colorful and appetizing addition to any meal.
This salad is versatile and can be enjoyed year-round, making it a staple for anyone looking to eat healthy without sacrificing flavor. The traditional Greek flavors meld beautifully in this salad, thanks to the use of ingredients like feta cheese, olives, and fresh herbs. Whether you’re hosting a gathering or simply want a quick meal, Greek Chickpea Salad is sure to impress and satisfy.
Ingredients (Serves 4-6):
- 1 can (15 oz) chickpeas, drained and rinsed
- 1 cup cherry tomatoes, halved
- 1 cucumber, diced
- 1 bell pepper (any color), diced
- 1/2 red onion, finely chopped
- 1/2 cup Kalamata olives, pitted and sliced
- 1/2 cup feta cheese, crumbled
- 1/4 cup fresh parsley, chopped
- 1/4 cup fresh lemon juice
- 1/4 cup olive oil
- 1 teaspoon dried oregano
- Salt and pepper to taste
Cooking Instructions:
- Prepare the Vegetables: Begin by washing and preparing all the vegetables. Halve the cherry tomatoes, dice the cucumber and bell pepper, and finely chop the red onion. This guarantees that all the ingredients are ready to mix and will provide a nice texture to the salad.
- Combine Chickpeas and Vegetables: In a large mixing bowl, add the drained and rinsed chickpeas along with the prepared vegetables (cherry tomatoes, cucumber, bell pepper, and red onion). Gently toss them together to evenly distribute the ingredients.
- Add Olives and Feta: Next, add the sliced Kalamata olives and crumbled feta cheese to the bowl. These ingredients will introduce salty and tangy flavors that complement the freshness of the vegetables.
- Prepare the Dressing: In a separate small bowl, whisk together the lemon juice, olive oil, dried oregano, salt, and pepper. This dressing will bring all the flavors together and enhance the overall taste of the salad.
- Dress the Salad: Pour the dressing over the chickpea and vegetable mixture. Gently toss everything to guarantee that all ingredients are coated with the dressing. Be careful not to mash the chickpeas or feta.
- Add Fresh Herbs: Finally, sprinkle the chopped parsley over the salad and give it one last gentle toss. The parsley adds a fresh note and vibrant color to the dish.
- Chill and Serve: For the best flavors, allow the salad to chill in the refrigerator for at least 30 minutes before serving. This resting time allows the flavors to meld together beautifully.
Extra Tips:
For an added crunch, consider including some diced avocado or toasted nuts such as sunflower seeds or almonds. If you’re looking to make the salad heartier, you can serve it over a bed of greens or mix in some cooked quinoa or couscous.
This salad is also perfect for meal prep; it keeps well in the fridge for a few days, allowing you to enjoy it for lunches throughout the week. Feel free to adjust the ingredients based on your preferences and what you have on hand!
Spanakopita (Spinach Pie)

Spanakopita, a traditional Greek dish, is a savory pastry filled with a delightful mixture of spinach, feta cheese, and herbs, all wrapped in crisp layers of phyllo dough. This delicious pie isn’t only a staple in Greek cuisine but also a favorite among vegetarians and anyone who enjoys fresh and flavorful ingredients.
The combination of tender spinach with the salty, creamy feta creates a perfect balance, making Spanakopita an excellent appetizer, side dish, or a light meal on its own.
Making Spanakopita may seem intimidating due to the delicate nature of phyllo dough, but with the right technique, it can be a fun and rewarding experience. This recipe serves 4-6 people and is an excellent way to impress your family and friends with a taste of Greece right in your kitchen.
Pair it with a fresh salad or a dollop of yogurt for a complete and satisfying meal.
Ingredients:
- 1 pound fresh spinach (or 10 ounces frozen spinach, thawed and drained)
- 1 cup crumbled feta cheese
- 1/2 cup ricotta cheese
- 1 small onion, finely chopped
- 2 cloves garlic, minced
- 1/4 cup fresh dill, chopped (or 1 tablespoon dried dill)
- 1/4 cup fresh parsley, chopped
- 1/4 teaspoon black pepper
- 1/4 teaspoon nutmeg
- 1 package (16 ounces) phyllo dough, thawed
- 1/2 cup unsalted butter, melted
- 1 egg, beaten (optional, for egg wash)
Cooking Instructions:
1. Prepare the Filling****: In a large skillet, heat a drizzle of olive oil over medium heat. Add the chopped onion and sauté until translucent, about 5 minutes. Add the minced garlic and cook for an additional minute until fragrant.
Stir in the fresh spinach and cook until wilted (if using fresh) or heated through (if using frozen). Remove from heat and let it cool slightly.
2. Mix the Ingredients: In a large mixing bowl, combine the cooled spinach mixture with crumbled feta, ricotta cheese, dill, parsley, black pepper, and nutmeg. Mix until everything is well incorporated.
Taste and adjust seasoning if necessary.
3. Prepare the Phyllo Dough: Preheat your oven to 375°F (190°C). Unroll the phyllo dough and cover it with a damp kitchen towel to prevent it from drying out.
Take one sheet of phyllo dough and place it on a clean, flat surface. Brush it lightly with melted butter. Layer another sheet on top and brush it again. Repeat this process until you have about 5-6 layers.
4. Assemble the Spanakopita: Place about 1/3 cup of the spinach filling along one edge of the layered phyllo, leaving a small border. Fold in the sides and roll the phyllo over the filling to create a log shape.
Place the seam side down on a baking sheet lined with parchment paper. Brush the top with melted butter and, if desired, brush with a beaten egg for a golden finish. Repeat the process until all filling and phyllo are used.
5. Bake: Bake the Spanakopita in the preheated oven for 25-30 minutes, or until golden brown and crispy. Remove from the oven and let it cool for a few minutes before slicing into pieces.
Extra Tips:
When working with phyllo dough, make sure to keep it covered with a damp towel to maintain its moisture; otherwise, it can dry out quickly and become difficult to work with.
You can also customize the filling by adding other ingredients like sautéed mushrooms or artichokes for a unique twist. Spanakopita can be made ahead of time and frozen before baking; simply bake from frozen, adding a few extra minutes to the cooking time.
Enjoy this delicious dish warm, at room temperature, or even cold for a delightful snack!
Greek Stuffed Peppers
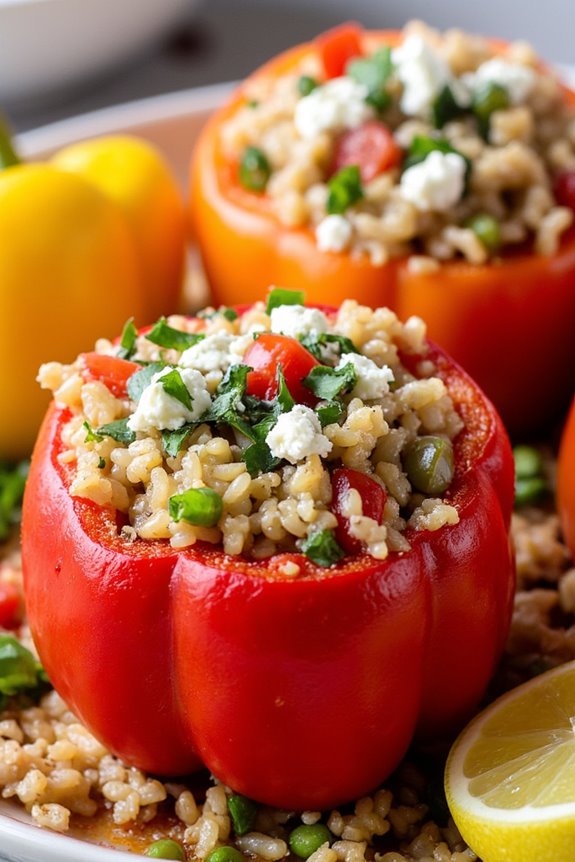
Greek Stuffed Peppers, also known as “Gemista,” is a delightful Mediterranean dish packed with vibrant flavors and wholesome ingredients. This recipe features bell peppers filled with a savory mixture of rice, herbs, and spices, making it a perfect vegetarian option for a healthy meal. The combination of fresh vegetables and aromatic spices captures the essence of Greek cuisine, allowing you to savor the taste of the Mediterranean right in your own kitchen.
The beauty of Greek Stuffed Peppers lies in their versatility. You can customize the filling with your favorite grains, proteins, or vegetables, guaranteeing that it suits your taste preferences. This dish is ideal for family gatherings or meal prep, as it can be made in advance and reheated. Serve these stuffed peppers with a side of Greek salad or yogurt for a complete meal that everyone will love.
Ingredients (Serves 4-6)
- 4 large bell peppers (any color)
- 1 cup uncooked rice (preferably short-grain or jasmine)
- 1 medium onion, finely chopped
- 2 cloves garlic, minced
- 1 medium tomato, diced
- 1/4 cup fresh parsley, chopped
- 1/4 cup fresh dill, chopped
- 1 teaspoon dried oregano
- 1/2 teaspoon salt
- 1/4 teaspoon black pepper
- 2 tablespoons olive oil
- 2 cups vegetable broth or water
- 1 cup feta cheese, crumbled (optional)
- Lemon wedges (for serving)
Cooking Instructions
- Prepare the Peppers: Preheat your oven to 375°F (190°C). Cut the tops off the bell peppers and remove the seeds and membranes. Place them upright in a baking dish and set aside.
- Cook the Rice: In a medium saucepan, heat 1 tablespoon of olive oil over medium heat. Add the uncooked rice and stir for about 2 minutes until slightly toasted. Then, add 2 cups of vegetable broth (or water) and bring to a boil. Once boiling, reduce the heat to low, cover, and simmer for about 15 minutes or until the rice is tender and the liquid is absorbed. Remove from heat and set aside.
- Prepare the Filling: In a large skillet, heat the remaining tablespoon of olive oil over medium heat. Add the chopped onion and garlic, sautéing until the onion is translucent (about 5 minutes). Stir in the diced tomato, parsley, dill, oregano, salt, and black pepper. Cook for another 3-4 minutes until the mixture is fragrant.
- Combine Ingredients: In a large bowl, combine the cooked rice with the sautéed vegetable mixture. If desired, fold in the crumbled feta cheese for added flavor. Mix everything well to guarantee the filling is evenly distributed.
- Stuff the Peppers: Using a spoon, fill each bell pepper with the rice mixture, pressing down gently to pack it in. Leave a little space at the top, as the filling may expand during cooking.
- Bake the Peppers: Pour a small amount of water into the bottom of the baking dish (about 1/4 cup) to help steam the peppers. Cover the dish with aluminum foil and bake in the preheated oven for 30 minutes. Remove the foil and bake for an additional 10-15 minutes, or until the peppers are tender.
- Serve: Remove the stuffed peppers from the oven and let them cool slightly before serving. Garnish with lemon wedges for a revitalizing zest and enjoy!
Extra Tips
To elevate the flavor of your Greek Stuffed Peppers, consider adding olives or capers to the filling for a briny kick. You can also experiment with different grains, such as quinoa or farro, for a unique twist.
For a heartier meal, feel free to add cooked chickpeas or lentils to the mixture. Leftovers can be stored in the refrigerator for up to three days and make for an excellent lunch option. Enjoy your culinary journey through Greece!
Roasted Vegetable Souvlaki
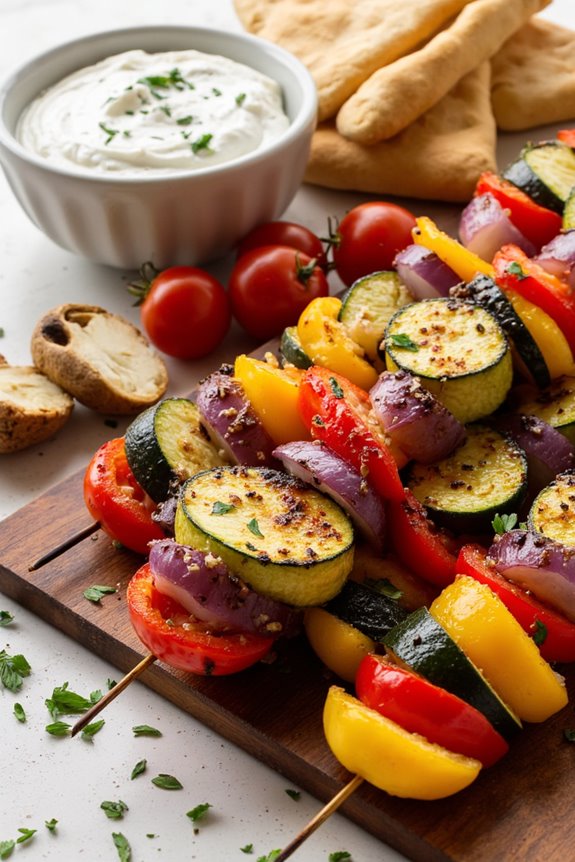
Roasted Vegetable Souvlaki is a delightful Greek dish that brings together a medley of colorful vegetables, marinated to perfection and then roasted until tender and slightly charred. This dish is perfect for a light meal or as a side dish for a family gathering. Not only is it full of flavor, but it also showcases the vibrant essence of Mediterranean cuisine.
The combination of fresh herbs and spices adds depth to the natural sweetness of the vegetables, making it a wholesome and satisfying choice for both vegetarians and meat-lovers alike.
The beauty of Roasted Vegetable Souvlaki lies in its versatility—feel free to swap out vegetables based on your preferences or seasonal availability. Serve it alongside warm pita bread, tzatziki sauce, or a revitalizing Greek salad for a complete meal.
Whether you’re hosting a summer barbecue or simply looking for a nutritious dinner option, this dish will surely impress your guests and family with its colorful presentation and delicious taste.
Ingredients (serving size: 4-6 people)
- 1 red bell pepper, cut into chunks
- 1 yellow bell pepper, cut into chunks
- 1 zucchini, sliced into rounds
- 1 red onion, cut into wedges
- 1 cup cherry tomatoes
- 1 cup mushrooms, halved
- 1/4 cup olive oil
- 2 tablespoons lemon juice
- 2 teaspoons dried oregano
- 2 teaspoons garlic powder
- Salt and pepper to taste
- Skewers (wooden or metal)
Cooking Instructions
- Prepare the Skewers: If you’re using wooden skewers, soak them in water for about 30 minutes to prevent burning during roasting. This step is essential for guaranteeing that your skewers hold up well while cooking.
- Chop the Vegetables: Prepare all the vegetables by cutting them into uniform sizes to guarantee even cooking. This includes cutting the bell peppers into chunks, slicing the zucchini, and cutting the red onion into wedges. Halve the mushrooms and leave the cherry tomatoes whole.
- Make the Marinade: In a large mixing bowl, combine the olive oil, lemon juice, dried oregano, garlic powder, salt, and pepper. Whisk the ingredients together until well blended. This marinade will infuse the vegetables with flavor and help them caramelize beautifully in the oven.
- Marinate the Vegetables: Add the chopped vegetables to the marinade and toss them gently to guarantee they’re evenly coated. Allow the vegetables to marinate for at least 30 minutes. If time permits, marinating for a few hours will enhance the flavor even more.
- Assemble the Skewers: After marinating, take the skewers and thread the vegetables onto them, alternating between different types for a colorful presentation. Leave a little space between each piece to allow for even roasting.
- Roast the Skewers: Preheat your oven to 400°F (200°C). Place the skewers on a baking sheet lined with parchment paper and roast them in the oven for about 20-25 minutes, turning them halfway through. Keep an eye on them to guarantee they don’t burn and are cooked to your desired tenderness.
- Serve: Once roasted, remove the skewers from the oven and let them cool for a minute. Serve the Roasted Vegetable Souvlaki warm, garnished with fresh herbs if desired, alongside pita bread and tzatziki sauce or a fresh salad.
Extra Tips
For added depth of flavor, consider incorporating fresh herbs like parsley or basil into your marinade. You can also experiment with different vegetables such as eggplant, asparagus, or even sweet potatoes to suit your taste.
If you want a smoky flavor, try grilling the skewers on a barbecue instead of roasting them in the oven. Additionally, serving your Roasted Vegetable Souvlaki with a drizzle of balsamic glaze can elevate the dish even further. Enjoy your culinary adventure in Greek cuisine!
Tzatziki Sauce With Pita and Veggies
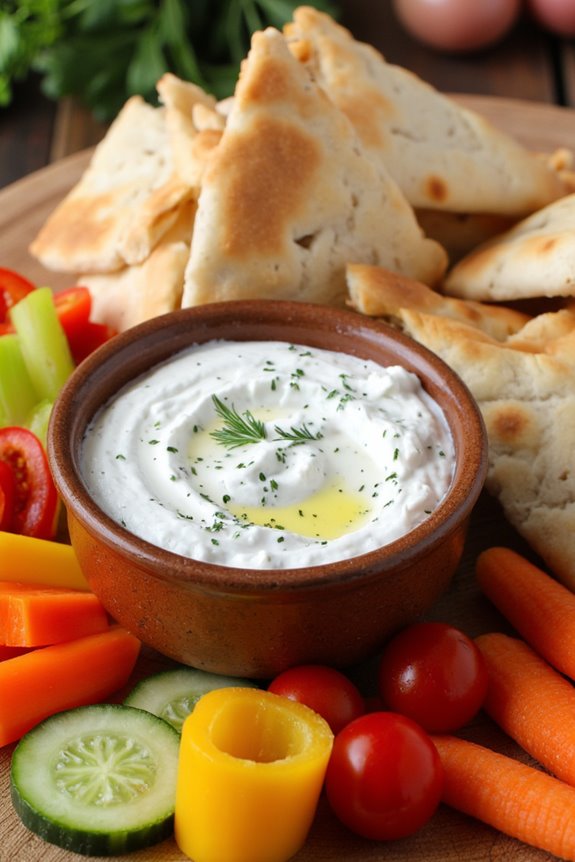
Tzatziki sauce is a classic Greek condiment that serves as a revitalizing dip perfect for pairing with pita bread and assorted vegetables. This creamy and tangy yogurt-based sauce is typically made with cucumbers, garlic, and a hint of dill, offering a delightful complement to the crunch of fresh veggies and the soft texture of warm pita.
It’s a versatile dish that can be enjoyed as an appetizer, a party snack, or even as a side dish for grilled meats. Making tzatziki is simple and requires minimal ingredients, making it an excellent choice for both novice cooks and seasoned chefs alike. The key to a great tzatziki lies in the quality of the yogurt and the freshness of the vegetables.
This recipe serves 4-6 people, making it perfect for a gathering or family meal. Pair it with colorful veggies like bell peppers, carrots, and cucumbers for a healthy and delicious treat.
Ingredients:
- 1 cup Greek yogurt
- 1 medium cucumber, grated and excess water squeezed out
- 2 cloves garlic, minced
- 1 tablespoon fresh dill, chopped (or 1 teaspoon dried dill)
- 1 tablespoon olive oil
- 1 tablespoon lemon juice
- Salt and pepper to taste
- 4-6 pita bread, cut into triangles
- Assorted fresh vegetables (carrots, bell peppers, cherry tomatoes, cucumber sticks)
Cooking Instructions:
- Prepare the Cucumber: Start by washing the cucumber thoroughly. Grate it using a box grater or a food processor. Once grated, place the cucumber in a clean kitchen towel or cheesecloth and twist it to squeeze out as much excess water as possible. This step is essential to prevent the tzatziki from becoming watery.
- Mix the Yogurt and Ingredients: In a medium-sized mixing bowl, combine the Greek yogurt, grated cucumber, minced garlic, chopped dill, olive oil, and lemon juice. Stir well until all the ingredients are evenly distributed. This will form the base of your tzatziki sauce.
- Season the Sauce: Taste the mixture and season it with salt and pepper according to your preference. Remember that the flavors will meld together as it sits, so don’t over-season it initially. Mix again to guarantee the seasoning is well incorporated.
- Chill the Tzatziki: Cover the bowl with plastic wrap or a lid and refrigerate the tzatziki sauce for at least 30 minutes. Chilling allows the flavors to develop and the sauce to thicken slightly.
- Prepare the Pita and Veggies: While the tzatziki is chilling, prepare your pita bread and fresh vegetables. Cut the pita bread into triangles and arrange them on a serving platter. Wash and slice your assorted vegetables into sticks or bite-sized pieces for easy dipping.
- Serve: Once the tzatziki has chilled, give it a quick stir, and transfer it to a serving bowl. Serve the tzatziki alongside the pita triangles and fresh vegetables for dipping.
Extra Tips:
When making tzatziki, feel free to experiment with the flavors by adding other herbs such as mint or parsley for a different twist. If you like a spicier kick, consider adding a pinch of red pepper flakes or a dash of hot sauce.
Tzatziki can be stored in an airtight container in the refrigerator for up to three days, making it a great make-ahead option for meals or gatherings. Enjoy this revitalizing dip on warm summer days or as a delightful addition to any Mediterranean-themed feast!
Greek Pasta Salad
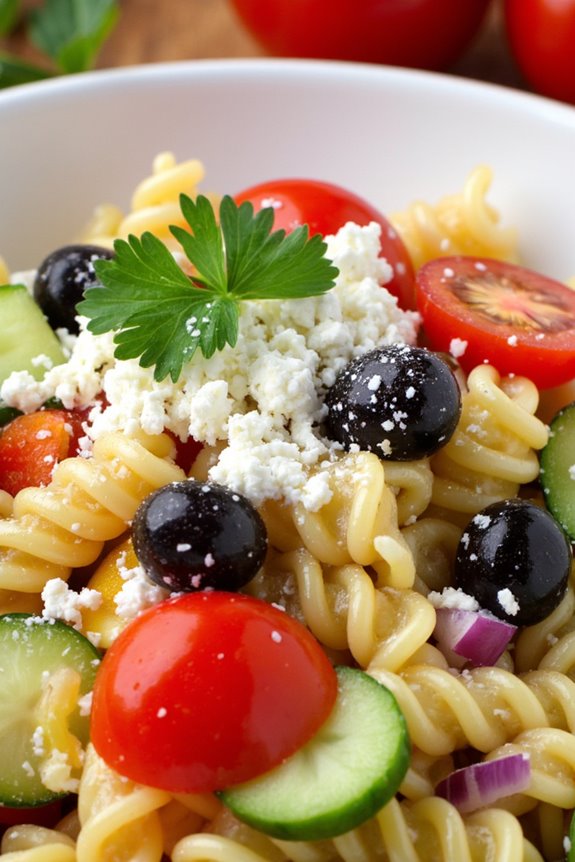
Greek Pasta Salad is a vibrant and invigorating dish that perfectly embodies the flavors of the Mediterranean. This salad isn’t only easy to prepare but also offers a delightful mix of textures and tastes, making it a perfect addition to any meal or a fantastic standalone dish for a light lunch.
With its colorful ingredients, including fresh vegetables, olives, and feta cheese, this salad is as visually appealing as it’s delicious. It can be served chilled or at room temperature, making it an ideal option for picnics and potlucks.
In addition to being delicious, Greek Pasta Salad is a versatile recipe that can easily be customized. You can add or substitute ingredients based on your personal preferences or what you have on hand.
Whether you choose to include grilled chicken or keep it vegetarian, this pasta salad can cater to various dietary needs. The combination of herbs, lemon juice, and olive oil dressing brings everything together, guaranteeing that each bite is packed with flavor.
Ingredients (Serves 4-6)
- 8 ounces of rotini or penne pasta
- 1 cup cherry tomatoes, halved
- 1 cucumber, diced
- 1 bell pepper (red or yellow), diced
- 1/2 red onion, finely chopped
- 1 cup Kalamata olives, pitted and sliced
- 1 cup feta cheese, crumbled
- 1/4 cup fresh parsley, chopped
- 1/4 cup extra virgin olive oil
- 2 tablespoons red wine vinegar
- 1 tablespoon lemon juice
- 1 teaspoon dried oregano
- Salt and pepper to taste
Cooking Instructions
1. Cook the Pasta: In a large pot, bring salted water to a boil. Add the pasta and cook according to package directions until al dente. This usually takes about 8-10 minutes.
Once cooked, drain the pasta and rinse it under cold water to stop the cooking process. This step guarantees the pasta doesn’t become mushy and helps it cool down for the salad.
2. Prepare the Vegetables: While the pasta is cooking, wash and chop the vegetables. Halve the cherry tomatoes, dice the cucumber and bell pepper, and finely chop the red onion.
This step is essential as it adds both flavor and texture to your salad.
3. Combine Ingredients: In a large mixing bowl, combine the cooked and cooled pasta, cherry tomatoes, cucumber, bell pepper, red onion, Kalamata olives, and crumbled feta cheese.
Toss everything gently to mix the ingredients evenly without breaking the pasta or cheese.
4. Make the Dressing: In a small bowl, whisk together the extra virgin olive oil, red wine vinegar, lemon juice, dried oregano, salt, and pepper.
This dressing adds a zesty flavor to the salad, enhancing the overall taste.
5. Dress the Salad: Pour the dressing over the pasta and vegetable mixture. Add the chopped parsley and toss everything together until well coated.
Make sure every ingredient is drenched in the flavorful dressing for maximum taste.
6. Chill and Serve: Cover the salad with plastic wrap or transfer it to an airtight container and refrigerate for at least 30 minutes before serving.
Chilling allows the flavors to meld together beautifully. Serve the salad cold or at room temperature, enjoying the fresh Mediterranean flavors.
Extra Tips
When making Greek Pasta Salad, feel free to experiment with the ingredients according to your taste preferences. You can add grilled chicken or shrimp for protein, or incorporate other vegetables like artichoke hearts or spinach for added nutrition.
Additionally, if you’re prepping the salad ahead of time, consider adding the dressing just before serving to keep the pasta from soaking up too much moisture. This will guarantee your salad remains fresh and vibrant!
Briam (Greek Ratatouille)

Briam, a traditional Greek dish, is a delightful vegetable medley that showcases the vibrant flavors of summer produce. This baked dish combines an array of vegetables like zucchini, eggplant, potatoes, and tomatoes, all seasoned with aromatic herbs and olive oil, creating a comforting and nutritious meal.
Often served as a side dish or a main vegetarian course, Briam is a staple in Greek cuisine and is perfect for family gatherings or weeknight dinners.
The beauty of Briam lies in its simplicity and versatility. You can adjust the ingredients based on what you have available, making this dish a great way to use up leftover vegetables in your fridge.
The slow-baking process allows the vegetables to caramelize and meld together, resulting in a dish that’s both hearty and full of flavor. Serve it warm or at room temperature, and don’t forget to drizzle a bit of extra virgin olive oil before serving for an extra touch of richness.
Ingredients (Serves 4-6):
- 2 medium zucchini, sliced
- 1 medium eggplant, diced
- 2 medium potatoes, sliced thinly
- 1 large onion, chopped
- 4 cloves garlic, minced
- 4 medium ripe tomatoes, chopped (or 1 can of diced tomatoes)
- 1/4 cup olive oil
- 1 teaspoon dried oregano
- 1 teaspoon salt
- 1/2 teaspoon black pepper
- Fresh parsley, chopped (for garnish)
Cooking Instructions:
- Preheat the Oven: Begin by preheating your oven to 375°F (190°C). This guarantees that your Briam will bake evenly and develop a beautiful, caramelized exterior.
- Prepare the Vegetables: In a large bowl, combine the sliced zucchini, diced eggplant, sliced potatoes, chopped onion, and minced garlic. This mix will form the base of your Briam. Confirm that all vegetables are cut into similar sizes for even cooking.
- Combine with Tomatoes and Seasonings: Add the chopped tomatoes (or canned diced tomatoes) to the vegetable mixture. Then, drizzle in the olive oil, and sprinkle the dried oregano, salt, and black pepper over the top. Toss everything together until the vegetables are well coated with the olive oil and seasonings.
- Arrange in a Baking Dish: Transfer the vegetable mixture to a large baking dish, spreading it out evenly. You can layer the vegetables neatly or simply mix them together, depending on your preference.
- Bake the Briam: Cover the baking dish with aluminum foil and place it in the preheated oven. Bake for about 45 minutes. After this time, remove the foil and bake for an additional 15-20 minutes, allowing the vegetables to brown slightly and the flavors to intensify.
- Check for Doneness: The Briam is done when the vegetables are tender and a bit caramelized around the edges. You can check by piercing the potatoes with a fork; they should be easily pierced.
- Serve and Garnish: Once out of the oven, let the Briam cool for a few minutes. Before serving, sprinkle freshly chopped parsley on top for a burst of color and freshness.
Extra Tips:
When making Briam, feel free to experiment with your favorite vegetables or herbs based on the season. Bell peppers, carrots, or even squash can be wonderful additions.
Additionally, for a richer flavor, consider adding a sprinkle of feta cheese on top just before serving or mixing in some olives for a Mediterranean twist.
Briam can also be made a day ahead to allow the flavors to deepen even further, making it a fantastic option for meal prep or entertaining. Enjoy this delightful dish warm, at room temperature, or even cold!
Feta and Olive Quinoa Bowl
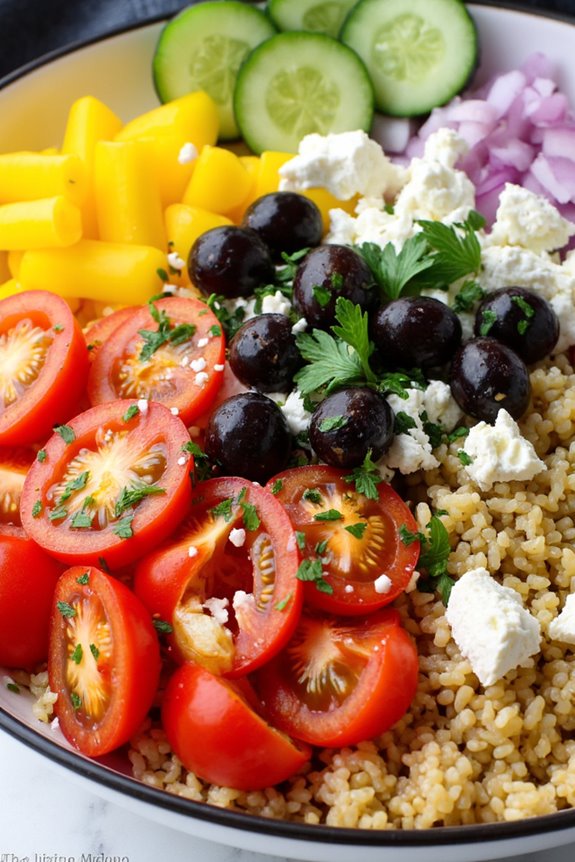
The Feta and Olive Quinoa Bowl is a delightful and nutritious dish that celebrates the vibrant flavors of Greek cuisine. This bowl isn’t only packed with protein and fiber from the quinoa but also bursting with the tangy richness of feta cheese and the briny depth of olives. Perfect as a light lunch or a fulfilling dinner, it combines fresh vegetables, zesty herbs, and a simple dressing that ties all the elements together beautifully.
This dish is versatile and can be easily adapted to suit your taste preferences. Whether you choose to add more vegetables, switch up the herbs, or even incorporate grilled chicken or chickpeas for added protein, the Feta and Olive Quinoa Bowl offers a canvas for creativity.
The combination of textures and flavors makes it a satisfying meal that’s healthy and easy to prepare, making it an ideal choice for busy weeknights or meal prep for the week ahead.
Ingredients (Serves 4-6)
- 1 cup quinoa, rinsed
- 2 cups water or vegetable broth
- 1 cup cherry tomatoes, halved
- 1 cucumber, diced
- 1 bell pepper, diced (any color)
- 1/2 red onion, finely chopped
- 1/2 cup Kalamata olives, pitted and sliced
- 1 cup feta cheese, crumbled
- 1/4 cup fresh parsley, chopped
- 1/4 cup olive oil
- 2 tablespoons red wine vinegar
- 1 teaspoon dried oregano
- Salt and pepper to taste
Cooking Instructions
- Cook the Quinoa: In a medium saucepan, combine the rinsed quinoa and water (or vegetable broth). Bring to a boil over medium-high heat. Once boiling, reduce the heat to low, cover, and simmer for about 15 minutes or until the quinoa has absorbed all the liquid. Remove from heat and let it sit covered for 5 minutes before fluffing with a fork.
- Prepare the Vegetables: While the quinoa is cooking, prepare the vegetables. Halve the cherry tomatoes, dice the cucumber and bell pepper, and finely chop the red onion. Place all the chopped vegetables in a large mixing bowl.
- Add the Olives and Feta: Once the vegetables are prepared, add the sliced Kalamata olives and crumbled feta cheese to the bowl. These ingredients add a delicious briny flavor and creaminess that complements the fresh vegetables.
- Make the Dressing: In a small bowl, whisk together the olive oil, red wine vinegar, dried oregano, and a pinch of salt and pepper. Adjust the seasoning to taste. This dressing will enhance the flavors of the bowl and bring all the ingredients together.
- Combine Everything: After the quinoa has cooled slightly, add it to the large bowl with the vegetables, olives, and feta. Pour the dressing over the mixture and gently toss everything together until well combined. Taste and adjust seasoning if necessary.
- Serve: The Feta and Olive Quinoa Bowl can be served immediately or chilled in the refrigerator for 30 minutes to let the flavors meld together. Serve as a main dish or a side, garnished with additional parsley if desired.
Extra Tips
For an extra layer of flavor, consider roasting the vegetables before adding them to the bowl. Simply toss them in a bit of olive oil, salt, and pepper, and roast at 400°F (200°C) for about 20 minutes. This will add a warm, caramelized touch that pairs beautifully with the feta and olives.
Also, feel free to experiment with seasonal vegetables or substitute the feta with a vegan cheese alternative if you’re looking for a dairy-free option.
Lemon and Herb Roasted Potatoes

Lemon and Herb Roasted Potatoes are a delightful and vibrant side dish that perfectly complements any Greek meal. With their crispy exterior and tender interior, these potatoes are infused with fresh lemon juice and fragrant herbs, making them a revitalizing addition to your dining table. The bright flavors of lemon and the aromatic herbs create a harmonious balance that elevates the humble potato to a culinary delight.
This dish isn’t only easy to prepare but also incredibly versatile. You can pair these roasted potatoes with grilled meats, seafood, or serve them alongside a fresh Greek salad. The simplicity of the ingredients allows the natural flavors to shine through, while the roasting process enhances their taste.
Whether you’re hosting a dinner party or enjoying a family meal, Lemon and Herb Roasted Potatoes will surely impress your guests and add a touch of Greek flair to your table.
Ingredients (serving size: 4-6 people):
- 2 pounds of baby potatoes, halved
- 1/4 cup olive oil
- Juice of 2 lemons
- Zest of 1 lemon
- 4 cloves garlic, minced
- 2 teaspoons dried oregano
- 1 teaspoon salt
- 1/2 teaspoon black pepper
- Fresh parsley, chopped (for garnish)
Cooking Instructions:
- Preheat the Oven: Begin by preheating your oven to 425°F (220°C). A hot oven is essential for achieving that desired crispy texture on the outside of the potatoes while keeping them soft and fluffy inside.
- Prepare the Potatoes: Rinse the baby potatoes under cold water and pat them dry. Halve each potato to guarantee they cook evenly and allow more surface area for crisping.
- Make the Marinade: In a large mixing bowl, combine the olive oil, lemon juice, lemon zest, minced garlic, dried oregano, salt, and black pepper. Whisk the ingredients together until well combined, creating a flavorful marinade.
- Coat the Potatoes: Add the halved potatoes to the bowl with the marinade. Toss them gently until they’re evenly coated with the mixture. This step guarantees that every potato is infused with the zesty flavors.
- Arrange on Baking Sheet: Spread the marinated potatoes in a single layer on a baking sheet. Make sure there’s enough space between them for proper roasting; overcrowding can lead to steaming rather than roasting.
- Roast in the Oven: Place the baking sheet in the preheated oven and roast the potatoes for about 35-40 minutes. Halfway through, give the potatoes a good stir to promote even browning. They should be golden and crispy when done.
- Garnish and Serve: Once the potatoes are roasted to perfection, remove them from the oven and let them cool for a couple of minutes. Transfer them to a serving platter and sprinkle with freshly chopped parsley for a pop of color and flavor.
Extra Tips:
For an added depth of flavor, consider using fresh herbs such as rosemary or thyme in place of dried oregano. Additionally, if you like a little heat, sprinkle some red pepper flakes into the marinade.
To make the dish even more vibrant, you can toss in some cherry tomatoes or bell peppers during the last 15 minutes of roasting. Enjoy your Lemon and Herb Roasted Potatoes as a delicious and easy-to-make Greek-inspired side dish!
Greek-Style Grilled Eggplant
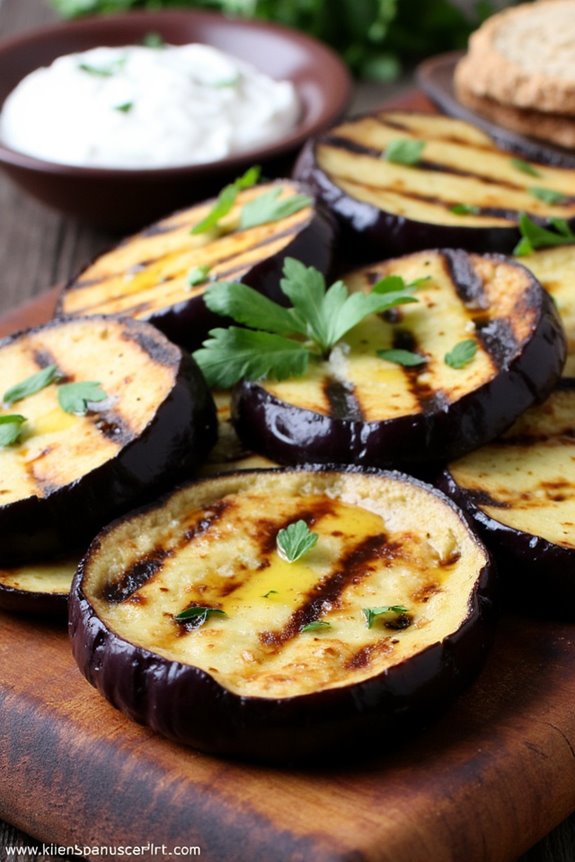
Greek-Style Grilled Eggplant is a delightful and healthy dish that captures the essence of Mediterranean cuisine. With its rich flavors, smoky undertones, and vibrant presentation, this recipe is perfect as a side dish or a vegetarian main course. The eggplant is marinated in a blend of olive oil, garlic, and herbs, then grilled to perfection, allowing the natural sweetness of the vegetable to shine through.
Whether served warm or at room temperature, this dish is sure to impress your family and friends.
Grilling eggplant can be a bit tricky, as it can easily become mushy if overcooked. To avoid this, make certain to slice the eggplant evenly and allow it to marinate properly to enhance the flavors. Pair this Greek-Style Grilled Eggplant with a revitalizing tzatziki sauce or serve it alongside your favorite grilled meats for a complete meal. Enjoy this dish on a sunny day or at your next gathering for a taste of Greece right in your own backyard.
Ingredients (serving size: 4-6 people):
- 2 medium eggplants
- 1/4 cup extra virgin olive oil
- 3 cloves garlic, minced
- 2 tablespoons fresh lemon juice
- 1 teaspoon dried oregano
- 1 teaspoon dried thyme
- Salt and pepper to taste
- Fresh parsley, chopped (for garnish)
Cooking Instructions:
- Prepare the Eggplants: Start by washing the eggplants thoroughly. Cut off the tops and bottoms, then slice them into 1/2-inch thick rounds. This thickness will help them hold their shape while grilling and guarantee they cook evenly.
- Create the Marinade: In a mixing bowl, combine the olive oil, minced garlic, lemon juice, oregano, thyme, salt, and pepper. Whisk the mixture until well combined. This marinade will infuse the eggplant with flavor while it grills.
- Marinate the Eggplants: Place the eggplant slices in a large bowl or a resealable plastic bag. Pour the marinade over the slices, making sure they’re evenly coated. Allow the eggplants to marinate for at least 30 minutes at room temperature or up to 2 hours in the refrigerator for more intense flavor.
- Preheat the Grill: While the eggplants are marinating, preheat your grill to medium-high heat. This guarantees a good sear on the eggplant and helps to develop those beautiful grill marks.
- Grill the Eggplants: Once the grill is hot, arrange the marinated eggplant slices on the grill grates. Grill for about 4-5 minutes on each side, or until they’re tender and have nice grill marks. Avoid moving them too much; let them sear to achieve the best texture.
- Serve: Once the eggplants are done grilling, remove them from the grill and place them on a serving platter. Allow them to rest for a few minutes before serving. Garnish with fresh chopped parsley for a pop of color and additional flavor.
Extra Tips: To enhance the flavors even further, consider adding a sprinkle of feta cheese on top before serving. You can also experiment with different herbs, like basil or mint, to give the dish a unique twist.
If you’re concerned about the eggplant absorbing too much oil, you can sprinkle them with salt before marinating to help draw out excess moisture. Just be sure to rinse and pat them dry afterward to prevent them from becoming too salty. Enjoy your Greek-Style Grilled Eggplant!