

Greek yogurt is more than just a tasty treat; it’s a protein-packed powerhouse that can elevate any dish. Whether you’re whipping up a refreshing parfait with juicy berries or crafting a savory dip to enjoy with your favorite veggies, the options are plentiful. Each recipe is designed to be both flavorful and mindful of your health. Are you ready to explore how this creamy delight can enhance your meals? Let’s take a look at some delicious possibilities together.
Greek Yogurt Parfait With Fresh Berries and Granola
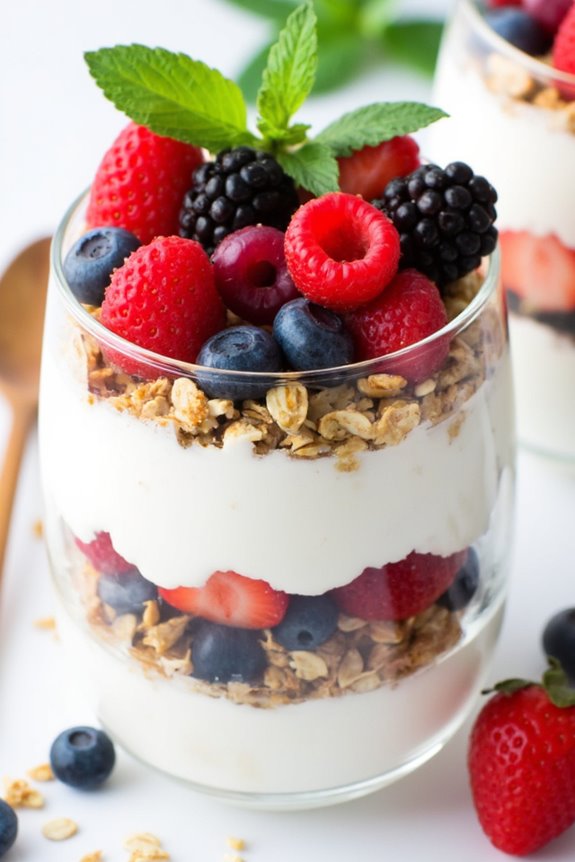
Greek Yogurt Parfait with Fresh Berries and Granola is a delightful and nutritious dish that makes for a perfect breakfast, snack, or dessert. This recipe combines layers of creamy, high-protein Greek yogurt with luscious fresh berries and crunchy granola, creating a harmonious blend of flavors and textures. Not only is it easy to prepare, but it also offers a great balance of protein, fiber, and antioxidants, guaranteeing that you start your day off right or enjoy a satisfying treat any time of the day.
Making this parfait is a simple and enjoyable process. You can customize it with your favorite fruits, nuts, or seeds, making it a versatile option that caters to various preferences and dietary needs. The presentation is visually appealing, making it an excellent choice for entertaining guests or for a healthy family treat. This recipe serves 4-6 people, making it suitable for families or small gatherings.
Ingredients:
- 4 cups of plain Greek yogurt
- 2 cups of mixed fresh berries (strawberries, blueberries, raspberries, blackberries)
- 1 cup of granola
- 2 tablespoons of honey (optional)
- 1 teaspoon of vanilla extract (optional)
- Fresh mint leaves for garnish (optional)
Instructions:
- Prepare the Ingredients: Start by washing the mixed berries thoroughly under cold water. If using strawberries, hull and slice them into smaller pieces. This guarantees that all the berries are ready to be layered in the parfait.
- Mix the Yogurt: In a large mixing bowl, combine the Greek yogurt with honey and vanilla extract, if desired. Stir well until the mixture is smooth and creamy. This step enhances the flavor of the yogurt, making it even more delicious.
- Layer the Parfait: Take clear glasses or bowls and begin layering the parfait. Start with a layer of the Greek yogurt mixture, using about 1/2 cup per serving. Then, add a layer of mixed berries on top of the yogurt, followed by a layer of granola. Repeat this process until the glasses are filled, ending with a layer of yogurt and a sprinkle of berries and granola on top for presentation.
- Garnish and Serve: If desired, garnish each parfait with fresh mint leaves for a pop of color and added freshness. Serve immediately, or cover and refrigerate for up to an hour if you prefer a chilled parfait.
- Enjoy: Dig into your delicious Greek Yogurt Parfait with Fresh Berries and Granola. Enjoy the layers of flavors and textures, and feel good about indulging in a healthy treat!
Extra Tips:
For an even more personalized touch, consider experimenting with different toppings such as nuts, seeds, or other fruits like banana slices or kiwi. You can also substitute the granola with crushed nuts or coconut flakes for a gluten-free option.
If you’re preparing this parfait in advance, assemble the yogurt and berries but add the granola just before serving to keep it crunchy. This dish isn’t only delicious but also a fantastic way to make use of seasonal fruits!
Savory Greek Yogurt Dip With Herbs and Spices
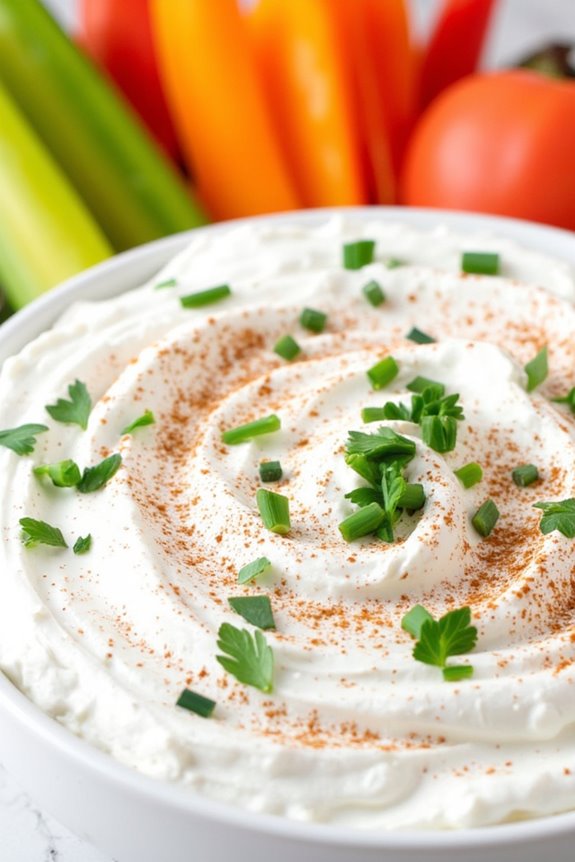
This Savory Greek Yogurt Dip with Herbs and Spices is a delightful addition to any gathering or a perfect treat for a cozy night in. Packed with flavor and a generous amount of protein, this dip not only satisfies your taste buds but also keeps you feeling full longer.
The creamy texture of Greek yogurt serves as an excellent base for a variety of fresh herbs and aromatic spices, making it a versatile accompaniment to veggies, crackers, or pita bread. Perfect for appetizers or snacking, this dip is incredibly easy to prepare and can be customized according to your taste preferences.
Whether you’re hosting a party or just enjoying a quiet evening at home, this dip is sure to impress your guests or simply add a nutritious touch to your personal snack time. With minimal ingredients and a quick preparation time, you’ll wonder why you haven’t made this dip sooner!
Ingredients (Serves 4-6 people):
- 2 cups plain Greek yogurt
- 1 tablespoon olive oil
- 1 teaspoon garlic powder
- 1 teaspoon onion powder
- 1 teaspoon dried dill
- 1 teaspoon dried oregano
- 1 teaspoon smoked paprika
- 1 teaspoon salt (adjust to taste)
- 1/2 teaspoon black pepper
- 1 tablespoon fresh lemon juice
- 2 tablespoons fresh parsley, finely chopped
- 2 tablespoons fresh chives, finely chopped
- Optional: Fresh vegetable sticks for serving
Cooking Instructions:
1. Prepare the Yogurt Base: In a mixing bowl, add the 2 cups of plain Greek yogurt. This will give your dip its creamy texture and high protein content, making it a healthier option compared to traditional dips.
2. Add the Olive Oil: Pour in 1 tablespoon of olive oil. The olive oil not only adds richness but also helps to meld the flavors together beautifully.
3. Incorporate the Spices: Sprinkle in the garlic powder, onion powder, dried dill, dried oregano, smoked paprika, salt, and black pepper. Use a spatula to gently fold the spices into the yogurt until everything is well combined.
These spices will provide the deep layers of flavor that make this dip irresistible.
4. Add Fresh Ingredients****: Squeeze in the fresh lemon juice and fold in the chopped parsley and chives. The lemon juice will brighten the flavors, while the herbs add a fresh and vibrant touch to the dip.
Mix until the herbs are evenly distributed.
5. Chill the Dip: Cover the bowl with plastic wrap or a lid and refrigerate for at least 30 minutes. Chilling allows the flavors to meld together, intensifying the overall taste.
6. Serve: Once chilled, give the dip a quick stir and transfer it to a serving dish. Serve alongside fresh vegetable sticks, crackers, or pita bread for dipping.
Extra Tips:
For an added kick, consider mixing in a pinch of red pepper flakes or a dash of hot sauce to the dip. If you prefer a creamier texture, feel free to add a splash of milk or a bit more olive oil.
This dip can also be made ahead of time; simply store it in the fridge for up to three days. The flavors will only get better as they sit!
Protein-Packed Smoothie With Greek Yogurt and Spinach
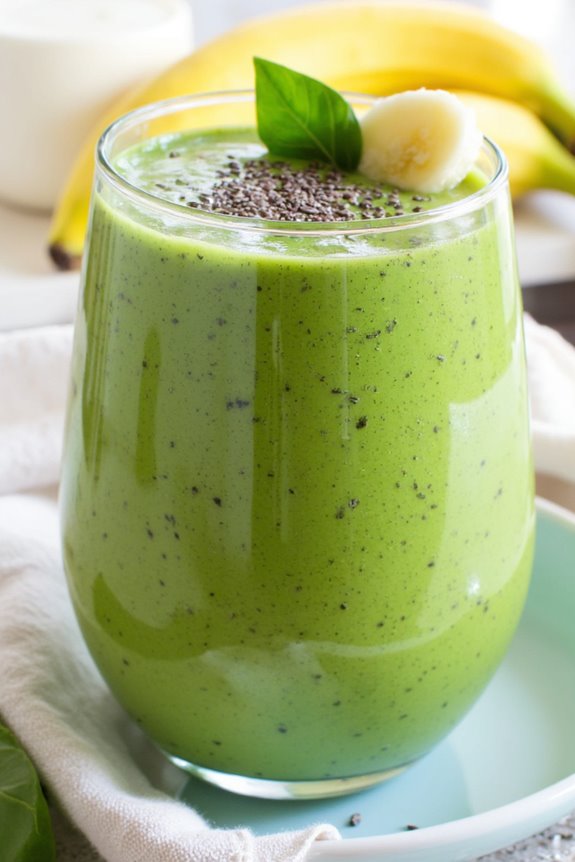
Looking to boost your protein intake while enjoying a delicious and revitalizing drink? This Protein-Packed Smoothie with Greek Yogurt and Spinach is the perfect solution. Packed with nutrients, this smoothie combines the creamy texture of Greek yogurt with the wholesome goodness of spinach, making it an excellent choice for breakfast or a post-workout snack.
The vibrant green color isn’t only enticing but also signifies the abundance of vitamins and minerals present in the ingredients. This smoothie is incredibly versatile and can easily be customized to suit your taste preferences. You can add other fruits like bananas or berries for added flavor, or even toss in a scoop of protein powder if you’re looking to ramp up the protein content.
It’s a guilt-free indulgence that feels like a treat but is loaded with healthy ingredients. Perfect for serving 4-6 people, this smoothie is great for sharing with family or friends.
Ingredients:
- 2 cups fresh spinach leaves
- 2 cups Greek yogurt (plain or flavored)
- 2 ripe bananas
- 1 cup almond milk (or any milk of your choice)
- 1 tablespoon honey (optional, for sweetness)
- 1 tablespoon chia seeds (optional, for extra nutrients)
- Ice cubes (optional, for a chilled smoothie)
Cooking Instructions:
- Prepare the Ingredients: Start by washing the spinach leaves thoroughly under cold water to remove any dirt or grit. Peel the bananas and set them aside. Measure out the Greek yogurt and almond milk, and gather any optional ingredients you wish to include.
- Blend the Spinach and Milk: In a blender, add the fresh spinach and pour in the almond milk. Blend on high until the spinach is fully incorporated and the mixture is smooth. This step guarantees that the spinach is well blended and not chunky in your smoothie.
- Add the Remaining Ingredients: Once the spinach and milk are blended, add the Greek yogurt, bananas, and any optional ingredients (like honey or chia seeds). Blend again until everything is well combined and the mixture is creamy.
- Adjust Consistency: If the smoothie is too thick for your liking, you can add a little more almond milk to thin it out. Blend again until you reach your desired consistency. For a colder smoothie, you can also add a handful of ice cubes and blend until smooth.
- Taste and Serve: Once blended, taste the smoothie and adjust sweetness if necessary by adding more honey. Pour the smoothie into glasses and serve immediately. You can also top it with a sprinkle of chia seeds or a slice of banana for presentation.
Extra Tips:
For the best flavor and consistency, use frozen bananas instead of fresh ones; they create a creamier texture and keep your smoothie cold. If you want to pack in even more nutrition, consider adding a scoop of your favorite protein powder or a handful of nuts or seeds for added crunch.
This smoothie can also be stored in the refrigerator for a short period, but it’s best enjoyed fresh to retain its vibrant color and nutritional benefits.
Greek Yogurt Pancakes With Honey and Banana

Greek yogurt pancakes are a delicious and nutritious twist on the classic breakfast favorite. By incorporating Greek yogurt into the batter, you not only boost the protein content but also achieve a fluffy and moist texture that makes these pancakes irresistible. Topped with sweet bananas and a drizzle of honey, this dish is perfect for a weekend brunch or a special breakfast treat.
Plus, it’s a fantastic way to start your day with a healthy dose of protein and natural sweetness!
These pancakes are incredibly easy to whip up and can be customized with your favorite toppings. Whether you enjoy them with fresh fruits, a sprinkle of nuts, or a dollop of nut butter, the options are endless. This recipe serves 4-6 people, making it ideal for a family gathering or a cozy breakfast with friends.
So, let’s gather our ingredients and get cooking!
Ingredients
- 1 cup all-purpose flour
- 1 cup Greek yogurt
- 2 large eggs
- 1/2 cup milk
- 2 tablespoons honey (plus extra for drizzling)
- 1 teaspoon baking powder
- 1/2 teaspoon baking soda
- 1/4 teaspoon salt
- 1 ripe banana, mashed
- Cooking spray or butter for the skillet
Cooking Instructions
- Prepare the Batter: In a large mixing bowl, combine the Greek yogurt, eggs, milk, and honey. Whisk these ingredients together until the mixture is smooth and well-blended. The Greek yogurt will add creaminess and protein, while the honey provides natural sweetness.
- Mix Dry Ingredients: In another bowl, whisk together the all-purpose flour, baking powder, baking soda, and salt. This guarantees that the leavening agents are evenly distributed throughout the flour, resulting in fluffy pancakes.
- Combine Wet and Dry Ingredients: Gradually add the dry ingredients to the wet mixture, stirring gently to combine. Be careful not to over-mix; it’s okay if there are a few lumps. Gently fold in the mashed banana to add flavor and moisture to the batter.
- Heat the Skillet: Preheat a non-stick skillet or griddle over medium heat. Lightly coat the surface with cooking spray or butter to prevent sticking.
- Cook the Pancakes: Pour about 1/4 cup of batter onto the skillet for each pancake. Cook for 2-3 minutes or until small bubbles form on the surface and the edges appear set. Flip the pancakes and cook for an additional 2-3 minutes on the other side until golden brown.
- Serve: Stack the pancakes on a plate and top with sliced bananas and a drizzle of honey. Feel free to add any additional toppings such as nuts, seeds, or a dollop of yogurt for extra protein.
Extra Tips
For an even fluffier pancake, let the batter rest for about 10 minutes before cooking; this allows the baking powder to activate fully.
You can also substitute the all-purpose flour with whole wheat flour for a healthier option. If you’d like to make these pancakes ahead of time, they can be stored in the refrigerator for a couple of days or frozen for future breakfasts. Just reheat them in the toaster or microwave when you’re ready to enjoy!
Creamy Greek Yogurt Chicken Salad

Creamy Greek Yogurt Chicken Salad is a delightful and healthy twist on the classic chicken salad. With the use of Greek yogurt instead of mayonnaise, this dish not only cuts down on calories but also packs a protein punch, making it an excellent choice for a light lunch or a picnic dish. The creamy texture combined with fresh vegetables and herbs creates a satisfying meal that’s both flavorful and nutritious.
This recipe is quick to prepare and can be made ahead of time, allowing the flavors to meld together beautifully. This chicken salad can be served in various ways—on a bed of greens, in a sandwich, or in lettuce wraps for a low-carb option. The versatility of this dish means it can easily accommodate any additional ingredients you might want to include, such as nuts for added crunch or different seasonings to suit your taste.
Perfect for meal prep or a quick dinner, this Creamy Greek Yogurt Chicken Salad will become a staple in your kitchen.
Ingredients (Serves 4-6):
- 2 cups cooked chicken, shredded or diced
- 1 cup plain Greek yogurt
- 1/4 cup celery, diced
- 1/4 cup red onion, finely chopped
- 1/4 cup bell pepper, diced (any color)
- 1/4 cup fresh dill, chopped (or 1 tablespoon dried dill)
- 1 tablespoon lemon juice
- 1 teaspoon garlic powder
- Salt and pepper to taste
Cooking Instructions:
- Prepare the Chicken: Start by cooking your chicken if you haven’t already. You can boil, bake, or grill the chicken breast until fully cooked (internal temperature should reach 165°F). Once cooked, let it cool down and then shred or dice it into bite-sized pieces.
- Combine the Base Ingredients: In a large mixing bowl, add the shredded chicken, plain Greek yogurt, and lemon juice. Mix these ingredients together until the chicken is well coated with the yogurt, creating a creamy base for your salad.
- Add Vegetables: Next, incorporate the diced celery, red onion, and bell pepper into the chicken and yogurt mixture. Stir gently to combine, ensuring that the vegetables are evenly distributed throughout the salad.
- Season the Salad: Sprinkle in the chopped fresh dill (or dried dill if using), garlic powder, salt, and pepper. Mix well to incorporate all the flavors. Taste the salad and adjust the seasoning if necessary—adding more salt, pepper, or lemon juice according to your preference.
- Chill and Serve: For the best flavor, cover the bowl with plastic wrap or transfer the salad to an airtight container and refrigerate for at least 30 minutes before serving. This allows the flavors to meld together. Serve chilled on a bed of greens, in a sandwich, or in lettuce wraps.
Extra Tips:
When preparing your Creamy Greek Yogurt Chicken Salad, consider using leftover rotisserie chicken for a quick and delicious shortcut. You can also customize the salad by adding ingredients such as chopped apples, grapes, or nuts like walnuts or almonds for added texture and flavor.
If you prefer a bit of crunch, you can also toss in some sunflower seeds or pumpkin seeds. Additionally, feel free to experiment with various herbs like parsley or chives to add a personal touch to the dish!
Overnight Oats With Greek Yogurt and Almonds
Overnight oats are a perfect breakfast option for those looking for a nutritious and convenient meal. By combining rolled oats with Greek yogurt, you not only increase the protein content but also create a creamy texture that makes for an indulgent dish. The addition of almonds adds a delightful crunch and flavor, making these overnight oats not just filling but also satisfying.
You can prepare this dish the night before, allowing the oats to soak up the flavors and soften, which means you can enjoy a quick and healthy breakfast even on the busiest mornings.
This recipe for Overnight Oats With Greek Yogurt and Almonds serves 4-6 people and can easily be customized to suit your taste preferences. Feel free to switch up the toppings or add in seasonal fruits for an extra burst of flavor. This dish isn’t only delicious but also packed with essential nutrients, perfect for fueling your day ahead.
Let’s explore the ingredients and preparation steps to create this delightful breakfast!
Ingredients:
- 2 cups rolled oats
- 2 cups Greek yogurt (plain, low-fat or full-fat)
- 2 cups milk (dairy or non-dairy)
- 1/4 cup honey or maple syrup (adjust sweetness to taste)
- 1 teaspoon vanilla extract
- 1/2 teaspoon cinnamon
- 1/2 cup sliced almonds
- Fresh fruits (e.g., berries, bananas) for topping (optional)
Cooking Instructions:
- Combine Dry Ingredients: In a large mixing bowl, add the rolled oats, cinnamon, and sliced almonds. Mix well to guarantee that the almonds are evenly distributed throughout the oats. This step is essential as it allows the oats to absorb the flavors and provides a nice crunch with each bite.
- Prepare Wet Ingredients: In another bowl, whisk together the Greek yogurt, milk, honey (or maple syrup), and vanilla extract until smooth. Make sure all the ingredients are well incorporated. This mixture acts as the creamy base for your overnight oats and adds a rich flavor profile.
- Mix Dry and Wet Ingredients: Pour the wet mixture over the dry oat mixture and stir gently until everything is well combined. Confirm that all the oats are coated in the yogurt mixture, which will help them soften overnight. This step is vital as it guarantees that the oats soak up the moisture and flavors, resulting in a creamy and tasty dish.
- Refrigerate: Divide the mixture evenly into 4-6 individual jars or containers with lids, or simply transfer it back to the mixing bowl if you prefer. Cover with lids or plastic wrap, and place in the refrigerator overnight (or for at least 4 hours). This soaking time allows the oats to absorb the liquid and flavors, making them soft and ready to eat in the morning.
- Serve: In the morning, give the oats a good stir to combine any settled ingredients. Add fresh fruits on top if desired, and enjoy your delicious Overnight Oats With Greek Yogurt and Almonds. You can also drizzle a bit more honey or maple syrup if you prefer extra sweetness.
Extra Tips: To enhance the flavor of your Overnight Oats With Greek Yogurt and Almonds, consider adding a pinch of salt to the mixture to balance the sweetness. You can also experiment with different toppings such as chia seeds, shredded coconut, or various fruits depending on what’s in season or what you have on hand.
If you’re looking for a more decadent version, add a dollop of nut butter or a sprinkle of dark chocolate chips on top just before serving. Enjoy the versatility of this dish by mixing and matching your favorite ingredients!
Greek Yogurt Tzatziki Sauce for Grilled Meats
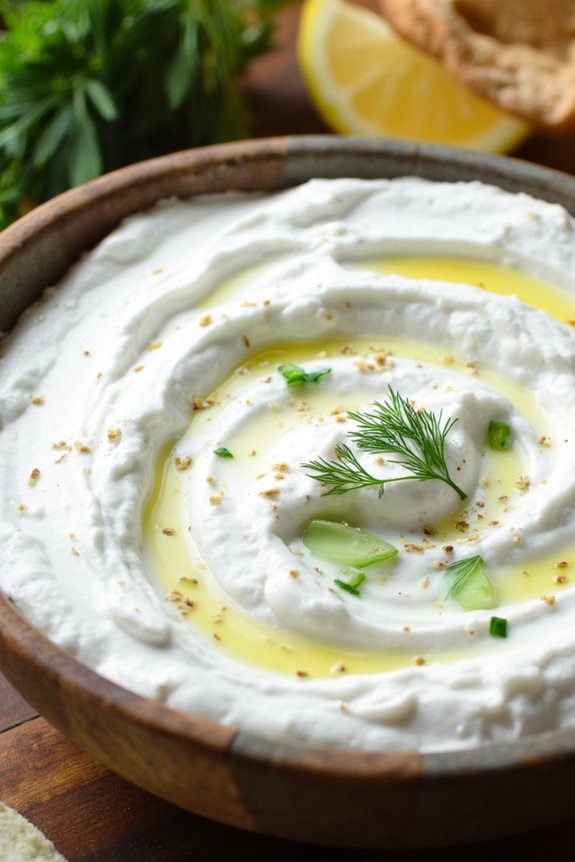
Greek Yogurt Tzatziki Sauce is a revitalizing and tangy condiment that pairs beautifully with grilled meats, making it an essential addition to your summer barbecues or weeknight dinners. This sauce isn’t only easy to prepare but also packed with flavor and nutrition.
The creamy texture of the Greek yogurt along with the crunch of cucumbers and the boldness of garlic creates a perfect balance that enhances the taste of any grilled dish, whether it’s chicken, lamb, or vegetables.
Making your own tzatziki sauce at home allows you to control the ingredients and customize the flavors to suit your preference. With just a handful of fresh ingredients, you can whip up this delightful sauce in no time.
Serve it as a dip with pita bread or alongside grilled meats for a delicious and healthy meal option. The high-protein content in Greek yogurt makes this sauce not only a great flavor enhancer but also a nutritious complement to your protein-rich meals.
Ingredients (serving size of 4-6 people):
- 2 cups plain Greek yogurt
- 1 medium cucumber, grated and drained
- 2 cloves garlic, minced
- 2 tablespoons olive oil
- 1 tablespoon white wine vinegar or lemon juice
- 1 tablespoon fresh dill, chopped (or 1 teaspoon dried dill)
- Salt and pepper to taste
Cooking Instructions:
- Prepare the Cucumber: Start by washing the cucumber thoroughly. Grate it using a box grater or food processor. Once grated, place the cucumber in a clean kitchen towel or cheesecloth and squeeze to remove excess moisture. This step is essential to avoid a watery tzatziki sauce.
- Combine the Ingredients: In a medium mixing bowl, add the 2 cups of plain Greek yogurt. Then, incorporate the drained cucumber, minced garlic, olive oil, and white wine vinegar (or lemon juice).
- Add Seasoning: Next, sprinkle in the chopped fresh dill, or dried dill if that’s what you have. Season the mixture with salt and pepper to taste. Stir everything together until well combined.
- Chill the Sauce: Cover the bowl with plastic wrap or a lid and refrigerate the tzatziki sauce for at least 30 minutes. This chilling time allows the flavors to meld together beautifully, enhancing the overall taste.
- Serve: Once chilled, give the tzatziki a final stir. Serve it in a small bowl alongside your grilled meats or as a dip with pita bread and vegetables. Enjoy!
Extra Tips:
For a more intense flavor, consider letting the tzatziki sauce sit in the refrigerator for a few hours or even overnight before serving. This will allow the garlic and dill flavors to infuse into the yogurt more deeply.
You can also experiment with additional herbs such as mint or parsley for a unique twist. If you prefer a thicker sauce, you can strain the yogurt beforehand using a fine mesh sieve or cheesecloth to achieve your desired consistency.
Baked Greek Yogurt Mac and Cheese

Baked Greek Yogurt Mac and Cheese is a creamy, indulgent twist on the classic comfort food that offers a high-protein alternative without sacrificing flavor. By incorporating Greek yogurt into the cheesy sauce, you achieve a velvety texture and a rich taste, while also boosting the protein content.
This dish is perfect for family dinners, potluck gatherings, or when you’re simply craving a warm bowl of mac and cheese with a healthy spin.
This recipe combines pasta with a delectable cheese sauce made with Greek yogurt, cheddar, and a hint of spices, all baked to perfection for a crispy, golden topping. You can easily customize this dish by adding your favorite vegetables or proteins, making it not just a meal but a versatile recipe that can adapt to your preferences.
Ingredients (Serves 4-6 People):
- 8 oz elbow macaroni
- 1 cup Greek yogurt
- 1 cup shredded sharp cheddar cheese
- 1 cup shredded mozzarella cheese
- 1/2 cup grated Parmesan cheese
- 1 cup milk (preferably low-fat)
- 2 tablespoons butter
- 2 tablespoons all-purpose flour
- 1 teaspoon garlic powder
- 1/2 teaspoon onion powder
- 1/2 teaspoon paprika
- Salt and pepper to taste
- 1/2 cup breadcrumbs (for topping)
- Fresh parsley (optional, for garnish)
Cooking Instructions:
- Cook the Pasta: Begin by boiling a large pot of salted water. Add the elbow macaroni and cook according to package instructions until al dente. Once cooked, drain the pasta and set aside.
- Prepare the Cheese Sauce: In a medium saucepan over medium heat, melt the butter. Once melted, whisk in the flour to create a roux, cooking for about 1-2 minutes until lightly golden. Gradually whisk in the milk, ensuring there are no lumps. Continue cooking until the sauce thickens, about 4-5 minutes.
- Add the Cheese and Spices: Remove the saucepan from the heat and stir in the Greek yogurt, cheddar cheese, mozzarella cheese, Parmesan cheese, garlic powder, onion powder, paprika, salt, and pepper. Mix until the cheeses are fully melted and the sauce is creamy.
- Combine Pasta and Sauce: In a large mixing bowl, combine the drained pasta with the cheese sauce, ensuring that the pasta is well-coated with the sauce.
- Prepare for Baking: Preheat your oven to 350°F (175°C). Transfer the mac and cheese mixture into a greased baking dish, spreading it evenly. Sprinkle breadcrumbs evenly over the top for a crunchy topping.
- Bake: Place the baking dish in the preheated oven and bake for 20-25 minutes, or until the top is golden brown and the sauce is bubbling.
- Serve: Once baked, remove the dish from the oven and allow it to cool for a few minutes. Garnish with fresh parsley if desired before serving.
Extra Tips:
For added flavor and nutrition, consider incorporating vegetables such as steamed broccoli or spinach into the mac and cheese before baking.
You could also experiment with different cheese blends to find your favorite combination or add cooked proteins like chicken or turkey for a heartier meal.
If you prefer a spicier kick, a dash of cayenne pepper or some diced jalapeños can elevate the flavor profile. Enjoy your high-protein, deliciously creamy Baked Greek Yogurt Mac and Cheese!
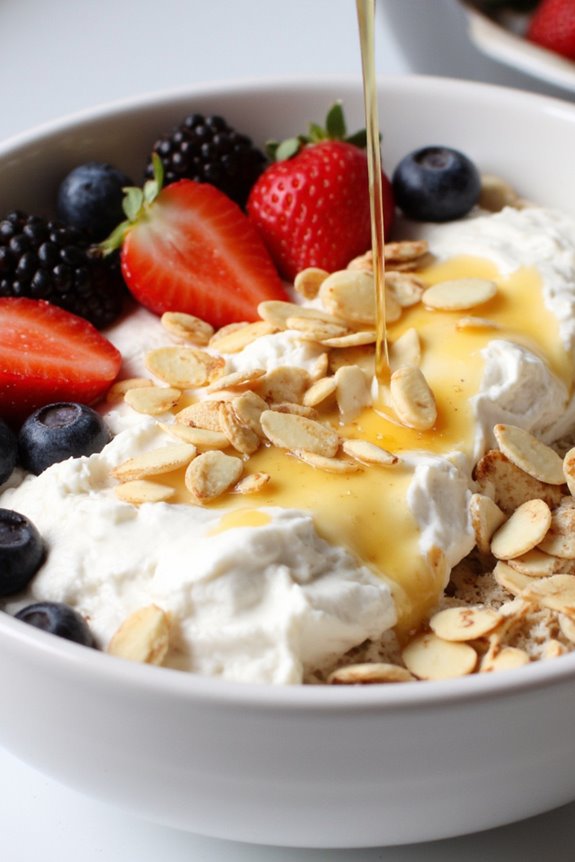
Greek Yogurt Fruit Bowl With Chia Seeds
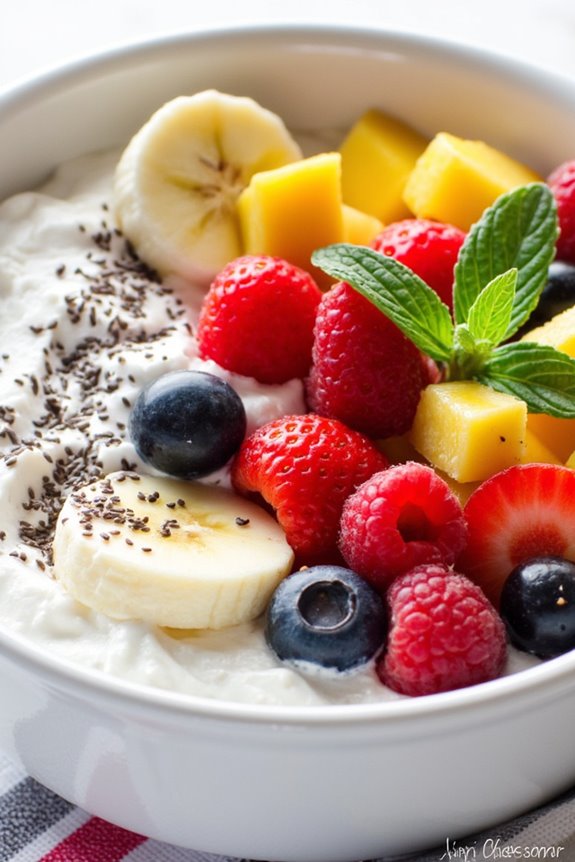
The Greek Yogurt Fruit Bowl with Chia Seeds is an invigorating and nutritious dish that’s perfect for breakfast, a snack, or even a light dessert. This colorful bowl combines the creamy texture of high-protein Greek yogurt with a variety of fresh fruits, topped with nutrient-packed chia seeds. The combination not only provides a delightful contrast in textures but also guarantees a wholesome balance of flavors, making it a favorite among health enthusiasts and food lovers alike.
Making this fruit bowl is incredibly easy and customizable based on your preferences and the seasons. You can experiment with different fruits, and you can even add your favorite nuts or seeds for an extra crunch. This recipe serves 4-6 people, making it ideal for family breakfasts or gatherings with friends. Enjoy this nutritious dish knowing that it’s both delicious and beneficial for your overall health.
Ingredients (serves 4-6 people):
- 4 cups of plain Greek yogurt
- 1 cup of mixed fresh berries (strawberries, blueberries, raspberries)
- 1 ripe banana, sliced
- 1 cup of diced mango
- 1/4 cup of chia seeds
- 1 tablespoon of honey or maple syrup (optional)
- 1 teaspoon of vanilla extract (optional)
- Mint leaves for garnish (optional)
Instructions:
- Prepare the Greek Yogurt: In a mixing bowl, combine the Greek yogurt, honey or maple syrup (if using), and vanilla extract (if using). Stir until the mixture is smooth and well-blended. This step adds a touch of sweetness and flavor to your yogurt, enhancing the overall taste of the dish.
- Chop the Fruits: Rinse and prepare your fruits by washing the berries, peeling and slicing the banana, and dicing the mango. Make sure to cut the fruits into bite-sized pieces for easy eating. This step allows you to have a colorful variety of fruits that won’t only look appealing but also provide a range of nutrients.
- Assemble the Fruit Bowl: In serving bowls, start by spooning a generous amount of the Greek yogurt mixture as the base. Layer the chopped fruits on top of the yogurt in an aesthetically pleasing manner, creating a vibrant display of colors. This step allows each person to see the variety of fruits they’ll enjoy, making the dish visually enticing.
- Sprinkle Chia Seeds: Evenly sprinkle the chia seeds over the fruits in each bowl. Chia seeds are a fantastic source of omega-3 fatty acids, fiber, and protein, which add to the health benefits of this dish. This step guarantees that every bite contains the added nutritional boost from the chia seeds.
- Garnish and Serve: If desired, add a few mint leaves on top for a fresh flavor and garnish. Serve immediately and enjoy! This step elevates the presentation and adds an invigorating element to the dish.
Extra Tips:
For a more indulgent treat, consider adding a handful of granola on top for added texture and crunch. You can also customize the fruits based on what’s in season or what you have on hand; peaches, kiwis, or apples would work wonderfully too.
To save time in the morning, you can prep the fruit the night before and store it in an airtight container in the fridge. Enjoy this versatile dish as a breakfast, snack, or dessert!
Spicy Greek Yogurt Hummus With Veggies
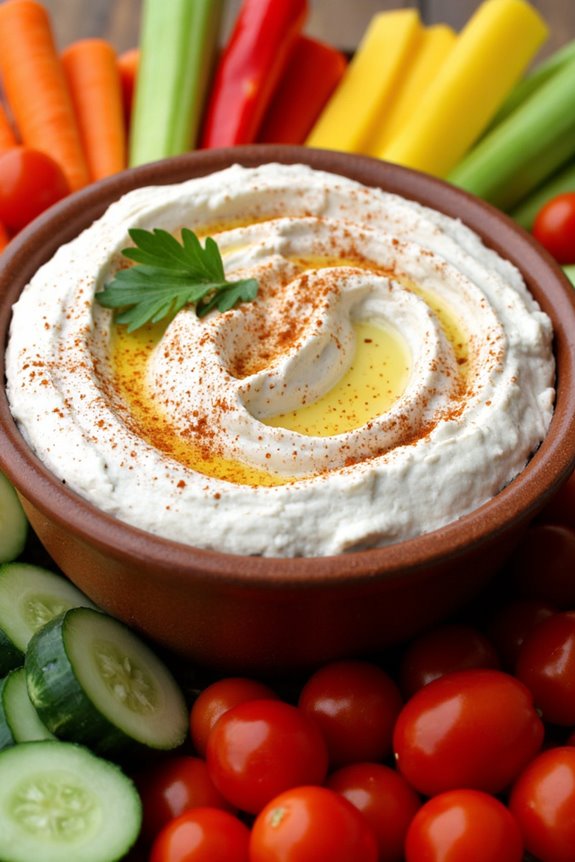
Looking to jazz up your snack time with a healthy yet flavorful option? Search no more than this Spicy Greek Yogurt Hummus with Veggies! This dish combines the creamy goodness of Greek yogurt with the classic flavors of hummus and a kick of spice. It’s perfect as a dip for fresh vegetables, pita chips, or even as a spread for sandwiches. Not only is it easy to prepare, but it also packs a protein punch, making it a great choice for a nutritious snack or appetizer.
This recipe is quick to whip up, requiring just a few simple ingredients that you might already have in your pantry. The result is a smooth and creamy hummus that isn’t only delicious but also highly versatile. Serve it at your next gathering, or simply keep it in the fridge for a healthy snack throughout the week. The combination of Greek yogurt and chickpeas provides an excellent source of protein, while the added spices give it a delightful kick that will leave your taste buds wanting more.
Ingredients (Serves 4-6):
- 1 cup canned chickpeas, drained and rinsed
- 1 cup plain Greek yogurt
- 2 tablespoons tahini
- 2 tablespoons olive oil
- 2 tablespoons fresh lemon juice
- 2 cloves garlic, minced
- 1 teaspoon ground cumin
- 1 teaspoon smoked paprika
- 1/2 teaspoon cayenne pepper (adjust to taste)
- Salt and pepper to taste
- Assorted fresh veggies (carrots, cucumbers, bell peppers, cherry tomatoes) for serving
Cooking Instructions:
- Prepare the Chickpeas: Begin by draining and rinsing the canned chickpeas under cold water. This will help remove any excess sodium and improve the flavor of the hummus. The chickpeas should be soft and ready to blend, making them a perfect base for the dip.
- Blend the Ingredients: In a food processor, combine the rinsed chickpeas, Greek yogurt, tahini, olive oil, lemon juice, minced garlic, ground cumin, smoked paprika, and cayenne pepper. This mixture will form the base of your hummus, so verify that all ingredients are properly added for a well-rounded flavor.
- Blend Until Smooth: Process the mixture until you achieve a smooth and creamy consistency. If the hummus seems too thick, you can add a tablespoon of water or additional olive oil to reach your desired texture. Scrape down the sides of the food processor as needed to confirm everything is well blended.
- Season to Taste: Once the hummus is blended, taste it and adjust the seasoning as necessary. Add salt and pepper to your liking, and if you prefer more heat, you can add a little more cayenne pepper. Blend again briefly to mix in the seasonings.
- Serve with Veggies: Transfer the spicy Greek yogurt hummus to a serving bowl. Arrange your assorted fresh veggies around the hummus for dipping. Feel free to drizzle a little olive oil on top of the hummus for presentation, and sprinkle some extra smoked paprika for color.
Extra Tips:
For an extra layer of flavor, consider adding fresh herbs such as parsley or cilantro to the hummus before blending. You can also experiment with different spices, such as chili powder or even a dash of hot sauce, to customize the heat level to your preference.
This Spicy Greek Yogurt Hummus can be stored in the fridge for up to five days, making it a convenient option for meal prep. Enjoy!
Greek Yogurt Muffins With Blueberries
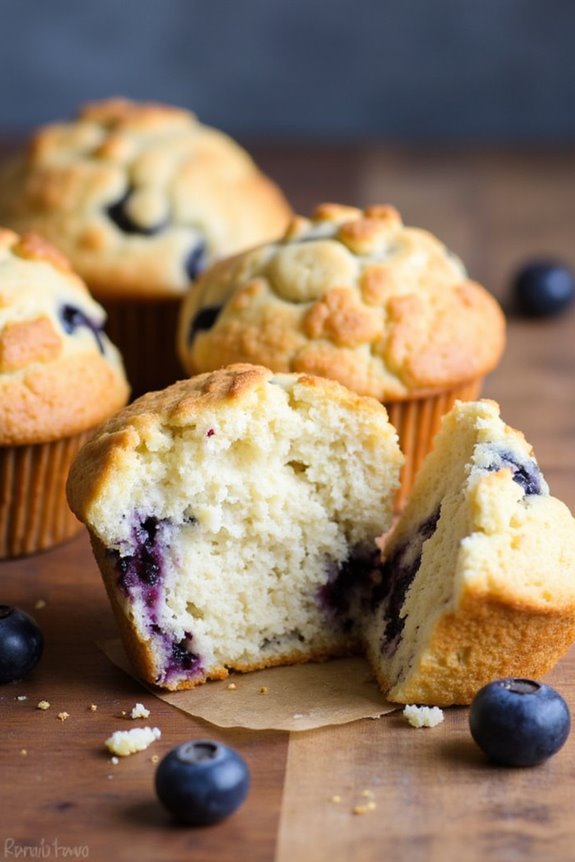
Greek Yogurt Muffins With Blueberries are a delicious and nutritious way to start your day or enjoy as a snack. Packed with protein from Greek yogurt and bursting with fresh blueberries, these muffins offer a delightful combination of flavors and textures. The Greek yogurt not only adds moisture but also contributes to a light and fluffy muffin that’s perfect for any occasion.
These muffins are easy to prepare and can be made in under 30 minutes, making them a fantastic option for busy mornings or meal prep. With the sweetness of blueberries and the tangy richness of Greek yogurt, you’ll find yourself reaching for these muffins time and again. They also freeze well, so you can always have a batch ready to go!
Ingredients (Serves 4-6 people):
- 1 cup all-purpose flour
- 1 cup whole wheat flour
- 1/2 cup granulated sugar
- 1 tablespoon baking powder
- 1/2 teaspoon baking soda
- 1/4 teaspoon salt
- 1 cup Greek yogurt (plain or vanilla)
- 1/2 cup milk
- 2 large eggs
- 1/4 cup vegetable oil or melted coconut oil
- 1 teaspoon vanilla extract
- 1 cup fresh blueberries (or frozen, if out of season)
Cooking Instructions:
- Preheat the Oven: Start by preheating your oven to 375°F (190°C). This guarantees that your muffins bake evenly and rise properly. Prepare a muffin tin by lining it with paper liners or greasing it with cooking spray.
- Mix Dry Ingredients: In a large mixing bowl, whisk together the all-purpose flour, whole wheat flour, granulated sugar, baking powder, baking soda, and salt. Make sure there are no lumps, and the ingredients are well combined. This step is essential for achieving an even texture in your muffins.
- Combine Wet Ingredients: In another bowl, mix the Greek yogurt, milk, eggs, vegetable oil, and vanilla extract until smooth. Whisking helps to break down the yogurt and incorporate air, which will contribute to a lighter muffin.
- Combine Wet and Dry Ingredients: Pour the wet ingredients into the dry ingredients. Gently stir with a spatula or wooden spoon until just combined. Be careful not to overmix; a few lumps are okay. Overmixing can lead to dense muffins.
- Fold in Blueberries: Gently fold in the blueberries, being mindful not to crush them, as this can color the batter. This step adds bursts of flavor and moisture to your muffins.
- Fill Muffin Tin: Spoon the batter into the prepared muffin tin, filling each cup about 2/3 full. This allows enough room for the muffins to rise without overflowing.
- Bake: Place the muffin tin in the preheated oven and bake for 18-20 minutes. To check for doneness, insert a toothpick into the center of a muffin; it should come out clean or with a few moist crumbs.
- Cool and Serve: Once baked, remove the muffins from the oven and let them cool in the tin for about 5 minutes before transferring them to a wire rack to cool completely. Enjoy your muffins warm or at room temperature!
Extra Tips:
For added flavor, consider mixing in a teaspoon of cinnamon or nutmeg into the dry ingredients. You can also substitute half of the blueberries with chopped nuts or chocolate chips for a different twist.
If you prefer a less sweet muffin, reduce the sugar slightly, or use a sugar substitute. These muffins can be stored in an airtight container for up to 3 days at room temperature or frozen for longer storage.
Greek Yogurt and Quinoa Salad With Feta and Veggies
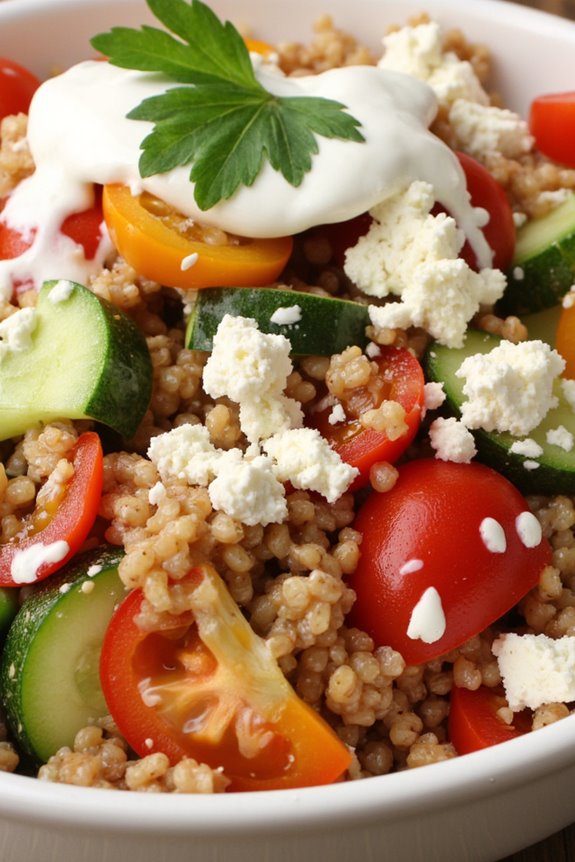
This Greek Yogurt and Quinoa Salad with Feta and Veggies is a revitalizing and nutritious dish that combines the wholesome goodness of quinoa with the creamy richness of Greek yogurt. Packed with protein, fiber, and a variety of colorful vegetables, this salad is perfect for a light lunch or as a side dish at dinner.
The tangy feta cheese adds an extra layer of flavor, making this salad both satisfying and delicious. Preparing this salad is simple and quick, making it an ideal choice for busy weeknights or meal prep for the week ahead. You can easily customize the ingredients based on your preferences or what you have on hand.
This dish serves 4-6 people, making it perfect for family gatherings or potluck events.
Ingredients
- 1 cup quinoa
- 2 cups water
- 1 cup diced cucumbers
- 1 cup cherry tomatoes, halved
- 1/2 cup red onion, finely chopped
- 1/2 cup bell peppers, diced (any color)
- 1 cup crumbled feta cheese
- 1 cup plain Greek yogurt
- 2 tablespoons olive oil
- 2 tablespoons lemon juice
- 1 teaspoon dried oregano
- Salt and pepper to taste
- Fresh parsley or mint for garnish (optional)
Cooking Instructions
1. Cook the Quinoa: Rinse the quinoa under cold water to remove any bitterness. In a medium saucepan, combine the rinsed quinoa and water. Bring to a boil over medium-high heat.
Once boiling, reduce the heat to low, cover, and simmer for about 15 minutes, or until the quinoa is fluffy and the water is absorbed. Remove from heat and let it cool.
2. Prepare the Vegetables: While the quinoa is cooking, chop the cucumbers, cherry tomatoes, red onion, and bell peppers. Make sure to dice them into small, uniform pieces for even distribution in the salad.
3. Make the Dressing****: In a small bowl, whisk together the Greek yogurt, olive oil, lemon juice, dried oregano, salt, and pepper. This creamy dressing will tie all the ingredients together and add a burst of flavor.
4. Combine Ingredients: In a large mixing bowl, combine the cooled quinoa, chopped vegetables, and crumbled feta cheese. Gently fold in the dressing until everything is well coated. Be careful not to mash the feta.
5. Garnish and Serve: Transfer the salad to a serving dish and garnish with fresh parsley or mint if desired. Serve immediately, or refrigerate for 30 minutes to let the flavors meld before serving.
Extra Tips
When preparing the Greek Yogurt and Quinoa Salad, feel free to customize it with your favorite vegetables or add-ins, such as olives or chickpeas, for extra texture and flavor.
You can also switch up the type of cheese if you prefer something different. For a more pronounced flavor, consider marinating the vegetables in a little olive oil and vinegar before adding them to the salad.
Leftovers can be stored in the refrigerator for up to three days, making this salad a fantastic option for meal prep.