

Hosting gatherings can feel effortless with the charm of Greek mezze. These vibrant dishes are a feast for the senses and create an inviting atmosphere. I’ve curated ten easy recipes that are perfect for sharing and savoring. From the creamy tang of tzatziki to the flaky goodness of spanakopita, there’s something for everyone. Let’s explore these flavors and see how they can elevate your next gathering.
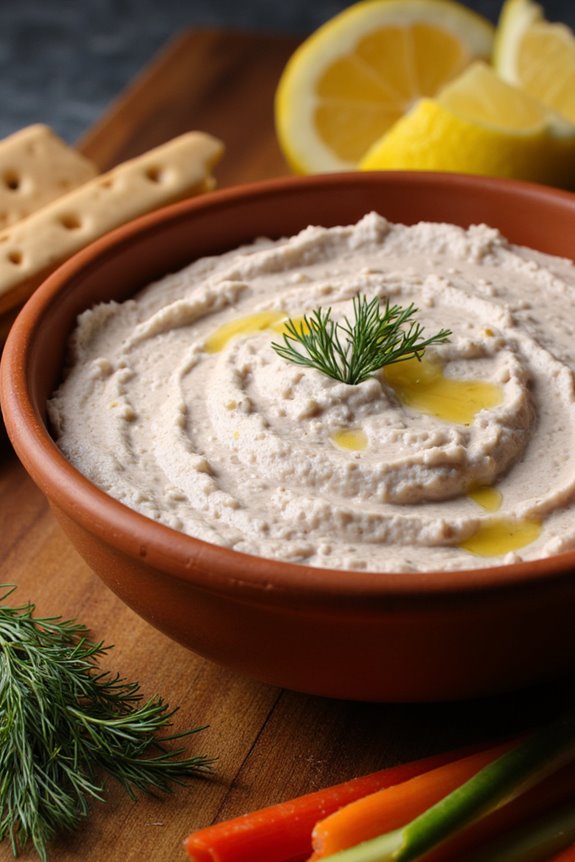
Tzatziki: A Refreshing Yogurt Dip
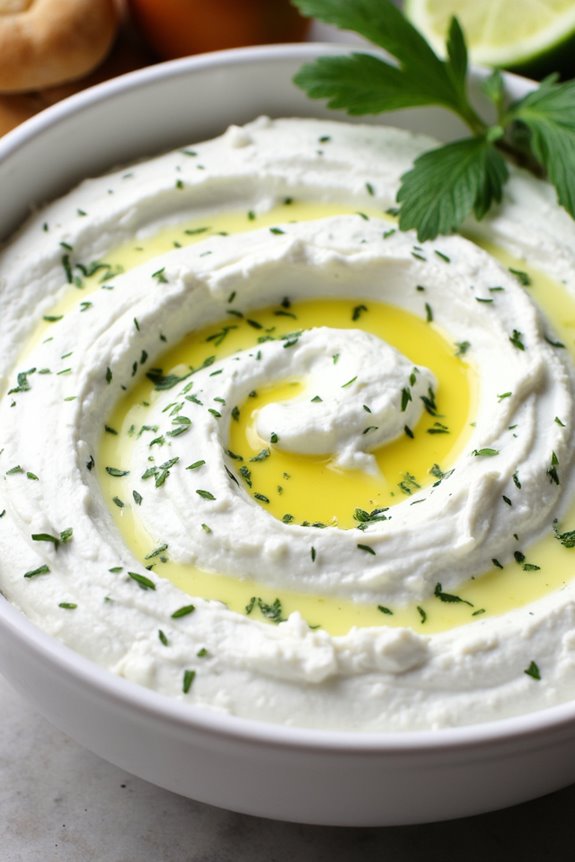
Tzatziki is a classic Greek dip that perfectly balances the tangy flavors of yogurt, cucumber, and garlic, making it a rejuvenating accompaniment to any mezze platter. It isn’t only simple to prepare but also incredibly versatile, enhancing everything from grilled meats to fresh vegetables and pita bread.
The creamy texture and zesty taste of tzatziki make it a favorite in Mediterranean cuisine, offering a burst of flavor that’s both cooling and satisfying. This delightful dip is made mainly with Greek yogurt, which provides a rich and creamy base, while grated cucumber adds a revitalizing crunch.
Fresh dill and garlic contribute to the distinct Mediterranean flavor profile, making tzatziki a must-have dip at gatherings or as a snack at home. Whether you serve it as a dip or a condiment, tzatziki is sure to impress your guests with its delicious taste and vibrant presentation.
Ingredients (Serves 4-6):
- 2 cups Greek yogurt
- 1 medium cucumber
- 2-3 cloves garlic, minced
- 2 tablespoons olive oil
- 1 tablespoon white wine vinegar or lemon juice
- 2 tablespoons fresh dill, chopped
- Salt and pepper to taste
Cooking Instructions:
- Prepare the Cucumber: Start by washing the cucumber thoroughly. Peel it if desired, then grate it using a box grater or food processor. After grating, place the cucumber in a clean kitchen towel or cheesecloth and squeeze out the excess moisture. This step is essential to avoid a watery tzatziki.
- Combine the Ingredients: In a mixing bowl, add the Greek yogurt as the base. Then, incorporate the grated cucumber, minced garlic, olive oil, white wine vinegar (or lemon juice), and chopped dill. This combination will create the flavorful base of your tzatziki.
- Season the Dip: Add salt and pepper to taste. Start with a small amount of each, as you can always adjust later based on your preference. Mix all the ingredients thoroughly until well combined. This guarantees that the flavors meld together nicely.
- Chill the Tzatziki: Cover the bowl with plastic wrap or transfer the tzatziki to an airtight container. Refrigerate for at least 30 minutes before serving. This chilling time allows the flavors to develop and intensify, making your tzatziki even more delicious.
- Serve and Enjoy: After chilling, give the tzatziki a good stir and taste once more to adjust seasoning if needed. Serve it in a small bowl, drizzled with a little extra olive oil on top, and garnish with additional dill if desired. Pair it with pita bread, fresh vegetables, or grilled meats for a delightful appetizer.
Extra Tips:
For an added depth of flavor, consider using strained yogurt or making your own by draining regular yogurt overnight in a fine mesh sieve. This will yield a thicker tzatziki.
Additionally, feel free to experiment with herbs such as mint or parsley for a different twist. Tzatziki can also be made a day ahead, allowing the flavors to develop even further, making it ideal for entertaining or meal prep.
Spanakopita: Spinach and Feta Pastry

Spanakopita is a traditional Greek dish that brings together the earthy flavors of spinach and the creaminess of feta cheese wrapped in flaky layers of phyllo pastry. It’s often served as a mezze, or small dish, perfect for sharing among friends and family.
This delightful pastry isn’t only delicious but also easy to prepare, making it an ideal choice for both novice cooks and experienced chefs alike. The combination of fresh herbs, nutty flavors, and the crisp texture of baked phyllo creates a dish that’s sure to impress at any gathering.
When preparing spanakopita, the key is to guarantee that the spinach is well-drained to prevent a soggy filling. Fresh spinach can be used, but frozen spinach is a convenient alternative that’s often just as flavorful. This recipe serves 4-6 people and can be enjoyed warm or at room temperature, making it a versatile option for any occasion.
Whether you’re hosting a dinner party or simply looking for a delicious snack, spanakopita is sure to satisfy your cravings.
Ingredients (Serves 4-6)
- 1 pound fresh spinach or 1 package (10 oz) frozen spinach, thawed and drained
- 1 cup feta cheese, crumbled
- 1/2 cup ricotta cheese (optional)
- 1/2 cup green onions, chopped
- 1/4 cup fresh dill, chopped (or 1 tablespoon dried dill)
- 1/4 cup fresh parsley, chopped
- 2 large eggs, beaten
- 1/2 teaspoon salt
- 1/4 teaspoon black pepper
- 1 package (16 oz) phyllo pastry, thawed
- 1/2 cup unsalted butter, melted
- 1 tablespoon olive oil
Cooking Instructions
- Preheat the Oven: Begin by preheating your oven to 375°F (190°C). This guarantees that the spanakopita bakes evenly and achieves that perfect golden-brown color.
- Prepare the Filling: In a large mixing bowl, combine the drained spinach, crumbled feta cheese, ricotta cheese (if using), chopped green onions, dill, parsley, beaten eggs, salt, and black pepper. Mix well until all ingredients are fully incorporated. The filling should be well-seasoned and creamy.
- Prepare the Phyllo Pastry: Unroll the phyllo pastry carefully on a clean surface, and cover it with a damp cloth to prevent it from drying out. Take one sheet of phyllo, brush it lightly with melted butter, and layer another sheet on top. Repeat this process for 4-5 sheets to create a sturdy base for your spanakopita.
- Add the Filling: Once you have your phyllo layers prepared, place a portion of the spinach filling along one edge of the phyllo rectangle. Be sure to leave space on the sides for folding.
- Fold and Seal: Fold the sides of the phyllo over the filling, then roll the pastry tightly to enclose the filling completely. Brush the top with more melted butter to help it crisp up while baking. Repeat this step until all the filling is used and all the phyllo is rolled.
- Bake the Spanakopita: Place the rolled spanakopita on a baking sheet lined with parchment paper. Bake in the preheated oven for about 25-30 minutes, or until the pastry is golden brown and crispy.
- Cool and Serve: Once baked, remove the spanakopita from the oven and allow it to cool for a few minutes before slicing it into triangles or squares. Serve warm or at room temperature.
Extra Tips
When making spanakopita, don’t hesitate to experiment with the filling by adding other ingredients such as sautéed mushrooms, sun-dried tomatoes, or even a pinch of nutmeg for added flavor.
If you’re using frozen spinach, make sure to squeeze out as much water as possible to avoid a soggy filling. Additionally, if you want an extra crispy pastry, consider layering more phyllo sheets or brushing the pastry with olive oil between layers.
Enjoy this delicious Greek dish at your next gathering!
Hummus: Creamy Chickpea Spread

Hummus is a delectable and creamy chickpea spread that has become a staple in Mediterranean cuisine. This versatile dish can be enjoyed as a dip, spread, or even as a side to various meals. Made primarily from chickpeas, tahini, olive oil, lemon juice, garlic, and spices, hummus isn’t only delicious but also packed with nutrients, making it a healthy option for any appetizer or snack table.
Its smooth texture and rich flavor make it a crowd-pleaser, whether you’re hosting a dinner party or enjoying a casual meal at home.
Making hummus at home is incredibly easy and allows you to customize the flavors according to your taste preferences. With just a few simple ingredients and minimal preparation, you can whip up this delightful spread in no time. Serve it with warm pita bread, fresh vegetables, or even use it as a filling in sandwiches and wraps. Let’s explore the recipe for making this creamy chickpea spread, perfect for 4-6 people.
Ingredients:
- 1 can (15 oz) of chickpeas, drained and rinsed
- 1/4 cup tahini
- 1/4 cup fresh lemon juice (about 1 large lemon)
- 1-2 garlic cloves, minced
- 2 tablespoons extra virgin olive oil, plus more for serving
- 1/2 teaspoon ground cumin
- Salt to taste
- Water, as needed for consistency
- Paprika or sumac for garnish (optional)
- Fresh parsley, chopped for garnish (optional)
Cooking Instructions:
- Prepare the Ingredients: Begin by draining and rinsing the canned chickpeas under cold water. This helps to remove excess sodium and any canning liquid that may affect the flavor of your hummus. If you prefer, you can also use dried chickpeas; however, they’ll need to be soaked and cooked beforehand.
- Combine Base Ingredients: In a food processor, add the drained chickpeas, tahini, fresh lemon juice, and minced garlic. Pulse the ingredients together until they form a thick paste. This initial blending helps to break down the chickpeas and mix in the tahini and garlic evenly.
- Add Olive Oil and Spices: With the food processor running, drizzle in the olive oil and add the ground cumin. Continue to blend until the mixture is smooth. The olive oil adds richness to the hummus, and the cumin gives it a warm, earthy flavor.
- Adjust Consistency: If the hummus appears too thick, add water, one tablespoon at a time, while continuing to blend until you reach your desired creamy consistency. This step guarantees that the hummus will be light and spreadable.
- Season to Taste: Taste the hummus and add salt as needed. Feel free to adjust the lemon juice or garlic based on your flavor preference. Blend briefly to incorporate any additional ingredients.
- Serve: Transfer the hummus to a serving bowl. Drizzle a little olive oil on top and sprinkle with paprika or sumac for a pop of color and flavor. Garnish with chopped parsley if desired.
Extra Tips:
For an extra layer of flavor, consider roasting the garlic before adding it to the hummus. Roasted garlic has a milder, sweeter taste that can enhance the overall dish.
Additionally, feel free to customize your hummus by adding ingredients such as roasted red peppers, olives, or herbs like basil or cilantro for a unique twist. Store any leftovers in an airtight container in the refrigerator for up to a week, and enjoy it as a tasty snack or light meal throughout the week!
Dolmades: Stuffed Grape Leaves
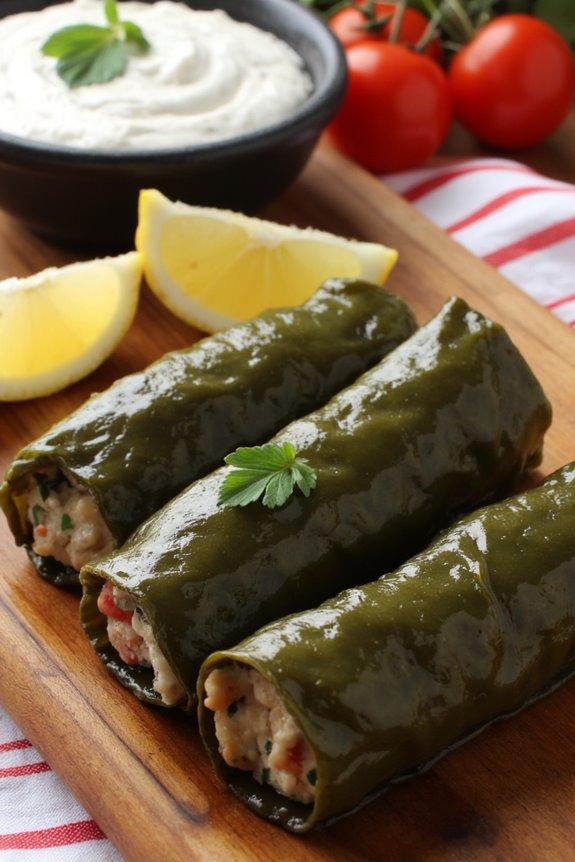
Dolmades are a classic Greek dish that embodies the vibrant flavors of Mediterranean cuisine. These delicious stuffed grape leaves are typically filled with a mixture of rice, herbs, and sometimes minced meat, all wrapped in tender vine leaves. Traditionally served as part of a mezze platter, dolmades can be enjoyed warm or at room temperature, making them a versatile addition to any meal.
They’re often accompanied by a side of tzatziki or a squeeze of lemon, which enhances their flavor profile and adds a revitalizing touch. Preparing dolmades might seem intimidating, but with a little patience and practice, you can master this delightful dish. The key to perfect dolmades is selecting fresh grape leaves and ensuring that the filling is well-seasoned.
This recipe yields about 4-6 servings, making it perfect for gatherings or family dinners, and it showcases the rich culinary heritage of Greece in every bite.
Ingredients (Serves 4-6)
- 1 jar (16 oz) grape leaves, drained and rinsed
- 1 cup long-grain rice
- 1 onion, finely chopped
- 2 cloves garlic, minced
- 1/4 cup fresh parsley, chopped
- 1/4 cup fresh dill, chopped
- 1/2 teaspoon salt
- 1/2 teaspoon pepper
- 1/2 teaspoon ground cinnamon
- 1/4 cup olive oil
- 1 lemon, juiced (plus lemon wedges for serving)
- 1 1/2 cups vegetable or chicken broth
Cooking Instructions
1. Prepare the Filling: In a large skillet, heat 2 tablespoons of olive oil over medium heat. Add the chopped onion and garlic, sautéing until softened and translucent, about 5 minutes. Stir in the rice and cook for another 2-3 minutes, allowing it to absorb the flavors.
Remove from heat and mix in the parsley, dill, salt, pepper, and cinnamon. Allow this mixture to cool slightly.
2. Prepare the Grape Leaves: If using jarred grape leaves, carefully separate them and rinse under cold water to remove excess brine. If using fresh leaves, blanch them in boiling water for about 2-3 minutes, then transfer to an ice bath.
Lay the leaves flat on a clean surface, vein side up, and trim any thick stems.
3. Stuff the Grape Leaves: Place about 1 tablespoon of the rice mixture at the base of each grape leaf. Fold in the sides and roll tightly from the base to the tip, creating a neat parcel.
Repeat this process with the remaining leaves and filling.
4. Arrange and Cook: In a large pot, drizzle the bottom with olive oil to prevent sticking. Layer the dolmades seam side down in the pot.
Pour the vegetable or chicken broth over the dolmades and drizzle with the remaining olive oil and lemon juice. Place a plate on top to keep them submerged and bring to a gentle simmer. Cover and cook for about 45 minutes to 1 hour, until the rice is tender and the leaves are soft.
5. Serve: Once cooked, remove from heat and let the dolmades cool slightly. Serve warm or at room temperature with lemon wedges and tzatziki on the side.
Extra Tips
When preparing dolmades, choose fresh grape leaves if possible, as they’ve a more vibrant flavor and texture. If you can’t find fresh leaves, the jarred variety works well, but make sure to rinse them thoroughly to reduce saltiness.
For added flavor, consider incorporating minced meat into the rice filling or adding spices like allspice or nutmeg. Finally, these dolmades freeze beautifully, so make a larger batch and store them for a quick meal later on!
Feta and Olive Platter: A Simple Assembly
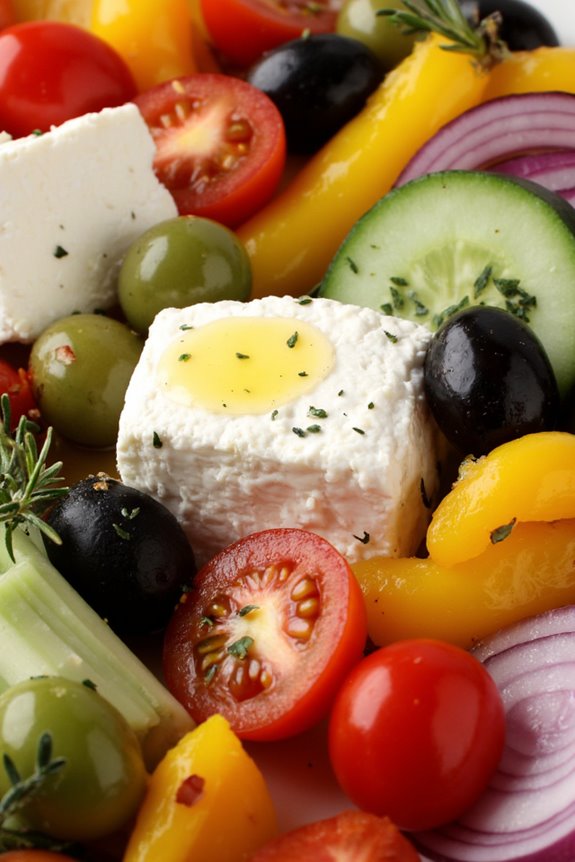
The Feta and Olive Platter is a vibrant and easy-to-prepare dish that embodies the essence of Greek mezze. This delightful appetizer combines the creamy richness of feta cheese with the briny, robust flavors of olives, creating a perfect balance that tantalizes the taste buds.
Served alongside fresh vegetables, crusty bread, and drizzled with olive oil, this platter isn’t only visually appealing but also provides a variety of textures and flavors that make it a great addition to any gathering or casual meal.
This dish is best enjoyed when assembled just before serving, allowing the ingredients to maintain their freshness. The simplicity of the Feta and Olive Platter makes it an excellent choice for those who are short on time but still want to impress their guests with a dish that feels both authentic and delicious.
Pair it with a glass of ouzo or a light white wine, and you have a perfect start to a Mediterranean-inspired meal.
Ingredients (Serves 4-6):
- 200g feta cheese, crumbled or cut into cubes
- 200g assorted olives (green, black, Kalamata)
- 1 cup cherry tomatoes, halved
- 1 cucumber, sliced
- 1 bell pepper, sliced (any color)
- 1 small red onion, thinly sliced
- ¼ cup extra virgin olive oil
- Fresh oregano leaves (for garnish)
- Pita bread or crusty bread (for serving)
Cooking Instructions:
- Prepare the Ingredients: Begin by washing the cherry tomatoes and cucumber. Cut the cherry tomatoes in half and the cucumber into slices. Slice the bell pepper and red onion thinly. This preparation guarantees that all vegetables are fresh and ready to be served.
- Assemble the Platter: On a large serving platter, arrange the feta cheese in the center. Surround it with the assorted olives, cherry tomatoes, cucumber slices, bell pepper strips, and red onion rings. This colorful arrangement will create an inviting presentation that showcases the vibrant colors of the ingredients.
- Drizzle with Olive Oil: Once the platter is arranged, take the extra virgin olive oil and drizzle it generously over the feta cheese and olives. This not only enhances the flavor but also adds a luscious sheen to the dish.
- Garnish: Finally, sprinkle fresh oregano leaves over the entire platter for an aromatic touch. This little addition elevates the dish and brings out the Mediterranean flavors.
- Serve with Bread: Place warm pita bread or slices of crusty bread on the side of the platter. This will allow guests to scoop up the feta, olives, and vegetables, making the experience interactive and enjoyable.
Extra Tips:
When preparing your Feta and Olive Platter, consider using a mix of marinated olives for added flavor complexity. You can also add other ingredients such as artichoke hearts or roasted red peppers to customize the platter to your taste.
For an even more authentic experience, serve with a selection of dips like tzatziki or hummus. If you’re preparing the platter in advance, keep the feta and olives separate from the vegetables until just before serving to maintain their freshness.
Souvlaki Skewers: Flavorful Meat Bites

Souvlaki skewers are a popular Greek dish that showcases bite-sized pieces of marinated meat, typically grilled to perfection and served with a variety of sides. This dish is perfect for gatherings or casual meals and offers a wonderful introduction to the vibrant flavors of Greek cuisine. The marination process not only infuses the meat with aromatic herbs and spices but also guarantees that it remains tender and juicy when cooked.
Traditionally made with pork, chicken, or lamb, these skewers can be customized to suit your taste preferences. Incorporating fresh ingredients like lemon, garlic, and oregano, Souvlaki skewers are incredibly versatile and can be served with pita bread, tzatziki sauce, and fresh vegetables.
Whether you’re hosting a summer barbecue or simply craving a taste of Greece, this dish is sure to impress. The best part is that they’re relatively easy to prepare, making them an excellent choice for both novice and experienced cooks alike.
Ingredients (Serves 4-6)
- 1.5 lbs of boneless meat (pork, chicken, or lamb), cut into 1-inch cubes
- 1/4 cup olive oil
- 2 tablespoons red wine vinegar
- 3 cloves garlic, minced
- 2 teaspoons dried oregano
- 1 teaspoon dried thyme
- 1 teaspoon paprika
- 1 teaspoon salt
- 1/2 teaspoon black pepper
- Juice of 1 lemon
- Wooden or metal skewers (if using wooden skewers, soak them in water for 30 minutes before using)
Cooking Instructions
- Prepare the Marinade: In a large mixing bowl, combine the olive oil, red wine vinegar, minced garlic, oregano, thyme, paprika, salt, black pepper, and lemon juice. Whisk together until well blended. This marinade won’t only add flavor but also tenderize the meat.
- Marinate the Meat: Add the cubed meat to the marinade, making sure each piece is well coated. Cover the bowl with plastic wrap or transfer the mixture to a resealable plastic bag. Allow the meat to marinate in the refrigerator for at least 1 hour, or up to overnight for maximum flavor.
- Preheat the Grill: If using a grill, preheat it to medium-high heat. If using a grill pan or broiler, preheat that as well. Confirming the cooking surface is hot will help achieve a nice sear on the meat.
- Skewer the Meat: Remove the marinated meat from the refrigerator and thread the cubes onto the skewers, leaving a little space between each piece for even cooking. If using vegetables (such as bell peppers or onions) for added flavor and color, alternate them between the meat on the skewers.
- Grill the Skewers: Place the skewers on the grill (or grill pan/broiler) and cook for about 10-15 minutes, turning occasionally, until the meat is cooked through and has nice grill marks. The internal temperature should reach 165°F (75°C) for chicken or 145°F (63°C) for pork and lamb.
- Serve: Once cooked, remove the skewers from the grill and let them rest for a few minutes. Serve with warm pita bread, tzatziki sauce, and a fresh Greek salad for a complete meal.
Extra Tips
When preparing Souvlaki skewers, don’t be afraid to get creative with the marinade; adding spices like cumin or coriander can give a unique twist to the flavor profile.
For an added boost of freshness, consider garnishing the skewers with chopped parsley or mint before serving. If grilling outdoors, keep an eye on the skewers to prevent flare-ups and confirm even cooking.
Finally, consider serving with a side of lemon wedges for an extra zesty kick!
Gigantes Plaki: Baked Giant Beans

Gigantes Plaki is a traditional Greek dish that features large, white beans baked in a savory tomato sauce flavored with herbs and spices. This comforting dish isn’t only hearty but also incredibly nutritious, making it a perfect addition to any mezze platter.
The combination of tender beans with rich tomato sauce creates a delightful medley of flavors that can be enjoyed warm or at room temperature. It’s often served as a side dish or as a main vegetarian option, and it pairs beautifully with crusty bread and a fresh salad.
Preparing Gigantes Plaki is a straightforward process that requires minimal ingredients and a little patience while the beans bake to perfection. The key to a great dish lies in the preparation of the sauce and the slow baking that allows the flavors to meld beautifully.
With the right balance of acidity from the tomatoes and the aromatic essence of herbs, this dish is a beloved staple in Greek cuisine that will surely impress your guests.
Ingredients (serving size: 4-6 people)
- 1 cup dried giant beans (such as gigante or lima beans)
- 1/4 cup olive oil
- 1 large onion, finely chopped
- 3 cloves garlic, minced
- 1 large carrot, grated
- 1 can (14 oz) crushed tomatoes
- 2 tablespoons tomato paste
- 1 teaspoon dried oregano
- 1 teaspoon dried thyme
- 1 bay leaf
- Salt and black pepper, to taste
- Fresh parsley, chopped (for garnish)
Cooking Instructions
- Soak the Beans: Begin by soaking the dried giant beans in a large bowl of water overnight. This will help to soften the beans and reduce the cooking time. If you’re short on time, you can use the quick soak method by boiling the beans for 2 minutes, then letting them sit for an hour in the hot water before draining.
- Cook the Beans: After soaking, drain the beans and place them in a large pot. Cover them with fresh water and bring to a boil. Reduce the heat and simmer for about 45 minutes, or until the beans are tender but not mushy. Drain the beans and set them aside.
- Prepare the Sauce: In a large skillet, heat the olive oil over medium heat. Add the chopped onion and sauté until translucent, about 5 minutes. Next, add the minced garlic and grated carrot, continuing to cook for another 3-4 minutes until fragrant.
- Combine Ingredients: Stir in the crushed tomatoes, tomato paste, dried oregano, thyme, bay leaf, salt, and black pepper. Allow the sauce to simmer for about 10 minutes, stirring occasionally, until it thickens slightly.
- Mix Beans and Sauce: Preheat your oven to 375°F (190°C). In a large baking dish, combine the cooked beans with the tomato sauce, ensuring the beans are well coated. Spread the mixture evenly in the dish.
- Bake: Cover the dish with aluminum foil and bake for 45 minutes. After 45 minutes, remove the foil and bake for an additional 15 minutes to allow the top to become slightly crispy.
- Serve: Once baked, remove from the oven and let it cool for a few minutes. Garnish with freshly chopped parsley before serving. Gigantes Plaki can be enjoyed warm or at room temperature and is best served with crusty bread.
Extra Tips
For a richer flavor, consider adding a splash of red wine to the sauce while it simmers, or toss in some crumbled feta cheese just before serving for a tangy twist.
You can also experiment with different herbs, such as basil or dill, to customize the flavor profile to your liking. This dish can be made in advance and stored in the refrigerator, making it a perfect option for meal prep or entertaining, as the flavors only get better with time.
Greek Salad: A Fresh Vegetable Medley
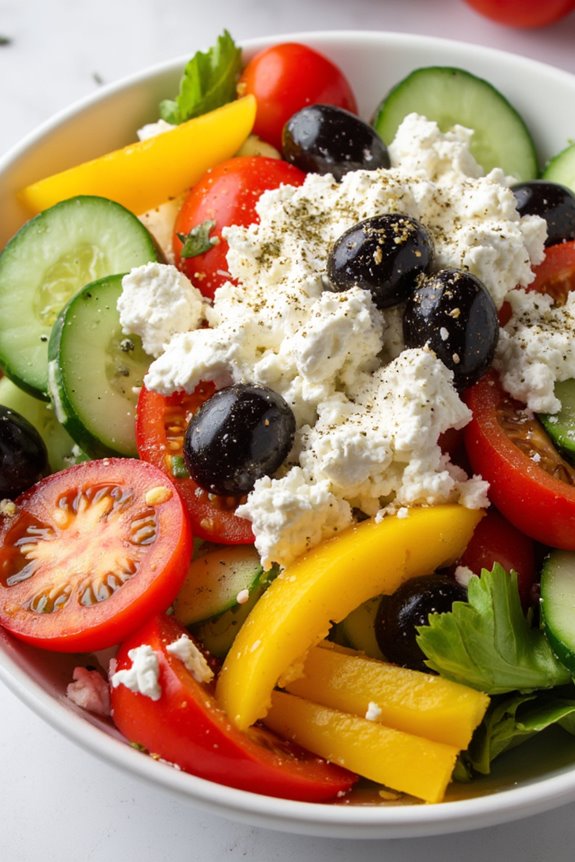
Greek salad, known as Horiatiki, is a quintessential dish that embodies the fresh flavors and vibrant colors of the Mediterranean. This salad is a delightful combination of crisp vegetables, tangy feta cheese, and zesty olives, making it a perfect accompaniment to any meal or a revitalizing standalone dish.
It’s often enjoyed during the hot summer months, when the vegetables are at their peak ripeness, but can be savored year-round for its wholesome, satisfying taste.
The beauty of Greek salad lies in its simplicity and the quality of its ingredients. The key is to use the freshest vegetables available, such as ripe tomatoes, crunchy cucumbers, and fragrant bell peppers. Tossed together with red onions, kalamata olives, and a generous sprinkle of feta cheese, this salad is dressed with olive oil, red wine vinegar, and a touch of oregano.
Not only is it a feast for the eyes, but it also provides a medley of flavors and textures that will leave your taste buds singing.
Ingredients (Serves 4-6):
- 4 medium ripe tomatoes, chopped
- 1 large cucumber, peeled and diced
- 1 bell pepper (red, green, or yellow), chopped
- 1 small red onion, thinly sliced
- 1 cup kalamata olives, pitted
- 1 cup feta cheese, crumbled
- 1/4 cup extra virgin olive oil
- 2 tablespoons red wine vinegar
- 1 teaspoon dried oregano
- Salt and pepper to taste
Cooking Instructions:
- Prepare the Vegetables: Begin by washing all your vegetables thoroughly. Chop the tomatoes into bite-sized pieces, ensuring that you remove any excess seeds and juice. Peel the cucumber and slice it into rounds or half-moons, depending on your preference. Chop the bell pepper and thinly slice the red onion. Place all the prepared vegetables into a large mixing bowl.
- Add the Olives and Feta: Once your vegetables are in the bowl, add the pitted kalamata olives. Then crumble the feta cheese on top of the vegetable mixture. The feta will add a creamy, salty flavor that’s essential to a traditional Greek salad.
- Mix the Dressing: In a small bowl, whisk together the extra virgin olive oil, red wine vinegar, dried oregano, and a pinch of salt and pepper. This dressing will bring all the flavors together and enhance the freshness of the vegetables.
- Combine Everything: Pour the dressing over the vegetable and feta mixture in the large bowl. Gently toss everything together using a large spoon, ensuring that the vegetables are coated evenly with the dressing without breaking them apart.
- Taste and Adjust: After mixing, taste the salad to see if it needs any additional salt, pepper, or more vinegar. Adjust the seasoning as necessary to suit your palate.
- Chill and Serve: For the best flavor, let the salad sit for about 10-15 minutes at room temperature or refrigerate it for about 30 minutes before serving. This allows the flavors to meld beautifully.
Extra Tips:
When making Greek salad, the key is to use high-quality ingredients, particularly the olive oil and feta cheese, as they greatly influence the dish’s overall flavor.
Feel free to customize the salad by adding other ingredients such as capers, fresh herbs like parsley or mint, or even avocado for a twist. Remember that a Greek salad is best served fresh, so try to consume it within a day or two of preparation for ideal taste and texture.
Taramosalata: Fish Roe Dip
Taramosalata is a traditional Greek mezze, known for its creamy texture and rich flavor. This delightful dip is made from fish roe, typically from carp or cod, blended with olive oil, lemon juice, and bread or potatoes, giving it a unique taste that complements a variety of dishes. Served alongside warm pita bread or fresh vegetables, taramosalata is a perfect appetizer for gatherings, adding a taste of the Mediterranean to your dining experience.
Preparing this classic dip is relatively simple, making it an accessible choice for both novice cooks and seasoned chefs. The key to achieving the perfect consistency lies in the balance of ingredients and the blending technique. With just a few ingredients, you can create a flavorful dip that’s sure to impress your guests and elevate any meal.
Ingredients (Serves 4-6)
- 200g fish roe (tarama)
- 1 medium onion, finely chopped
- 200ml olive oil
- 1-2 tablespoons lemon juice (to taste)
- 100g stale white bread, crusts removed
- 100ml water (or as needed)
- Salt, to taste
- Freshly ground black pepper, to taste
Cooking Instructions
- Soak the Bread: Begin by soaking the stale white bread in water for about 10 minutes, or until it becomes soft. This will help to create a smooth texture when blended. Once soaked, squeeze out any excess water and set the bread aside.
- Prepare the Base: In a food processor, combine the fish roe and finely chopped onion. Blend these ingredients together until they form a smooth paste. The fish roe provides the salty, umami flavor that’s characteristic of taramosalata, while the onion adds a subtle sweetness.
- Incorporate the Bread: Add the soaked and squeezed bread to the food processor, blending it with the fish roe and onion mixture. This will thicken the dip and give it an airy texture. If the mixture seems too thick, you can add a little water to achieve your desired consistency.
- Emulsify the Mixture: With the processor running, slowly drizzle in the olive oil. This step is vital as it emulsifies the mixture, creating a creamy dip. Keep blending until the taramosalata is well combined and fluffy.
- Add Flavorings: Once the olive oil is fully incorporated, add the lemon juice, salt, and pepper to taste. Blend again until the flavors are well distributed. Adjust the seasoning if necessary, adding more lemon juice for acidity or salt for flavor.
- Chill and Serve: Transfer the taramosalata to a serving bowl and refrigerate for at least 30 minutes before serving. Chilling allows the flavors to meld together beautifully. Serve with warm pita bread, fresh vegetables, or as part of a larger mezze platter.
Extra Tips
To enhance the flavor of your taramosalata, consider using high-quality fish roe, as this will greatly impact the overall taste of the dip. Additionally, you can experiment with different types of bread, such as sourdough, for a unique twist.
If you prefer a smoother texture, blend the dip for longer, and don’t hesitate to adjust the acidity with extra lemon juice to suit your palate. Enjoy your homemade taramosalata as part of a festive Greek feast!
Pita Bread: The Perfect Accompaniment
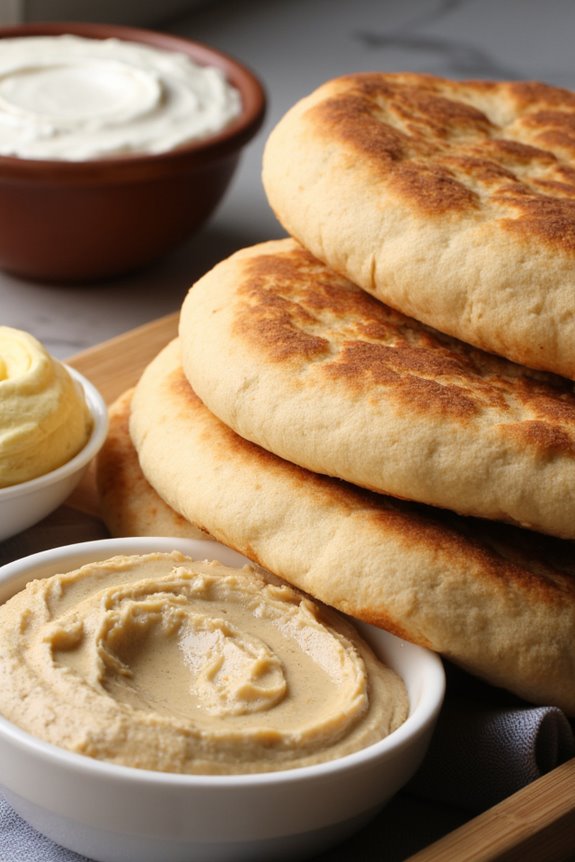
Pita bread is a staple in Greek cuisine and an integral part of the mezze experience. This delicious, fluffy flatbread is perfect for scooping up dips such as tzatziki or hummus, and it can also be stuffed with a variety of fillings. Making your own pita bread at home isn’t only rewarding but also incredibly simple. The result is warm, fresh pitas that are soft on the inside with a lovely pocket that can hold your favorite ingredients.
In this recipe, we’ll guide you through the process of making homemade pita bread from scratch. The dough requires just a few basic ingredients, and with a little bit of time and patience, you’ll be able to enjoy the authentic taste of freshly baked pita bread. Once you have learned how to make pita bread, you’ll find it hard to go back to store-bought versions!
Ingredients (Serves 4-6 people):
- 2 cups all-purpose flour
- 1 cup whole wheat flour
- 1 packet (2 ¼ teaspoons) active dry yeast
- 1 teaspoon salt
- 1 tablespoon sugar
- 1 tablespoon olive oil
- 1 cup warm water (about 110°F)
Cooking Instructions:
- Prepare the Yeast Mixture: In a small bowl, combine the warm water, sugar, and yeast. Stir gently and let it sit for about 5-10 minutes until it becomes frothy. This step guarantees that the yeast is activated, which is vital for the dough to rise properly.
- Mix the Dry Ingredients: In a large mixing bowl, combine the all-purpose flour, whole wheat flour, and salt. Mix these dry ingredients thoroughly to guarantee even distribution of salt and flour types.
- Combine Wet and Dry Ingredients: Once the yeast mixture is frothy, pour it into the bowl with the dry ingredients, along with the olive oil. Use a wooden spoon or your hands to mix everything together until a shaggy dough forms.
- Knead the Dough: Transfer the dough to a lightly floured surface and knead for about 8-10 minutes until it becomes smooth and elastic. If the dough is too sticky, add a little more flour, a tablespoon at a time.
- Let It Rise: Place the kneaded dough in a lightly greased bowl, cover it with a damp cloth or plastic wrap, and let it rise in a warm place for about 1 hour or until it has doubled in size. This fermentation process is key to achieving light and fluffy pitas.
- Shape the Pitas: Once the dough has risen, punch it down to release the air. Divide the dough into 6-8 equal pieces and roll each piece into a ball. On a lightly floured surface, use a rolling pin to flatten each ball into a disk about ¼ inch thick.
- Bake the Pitas: Preheat your oven to 475°F (245°C) and place a baking stone or an inverted baking sheet inside to heat up. Once preheated, carefully place the rolled-out pitas on the hot surface and bake for 5-7 minutes, or until they puff up and are lightly golden.
- Cool and Serve: Remove the pitas from the oven and cover them with a clean kitchen towel to keep them warm. Serve them warm with your favorite dips or as part of a mezze platter.
Extra Tips: When making pita bread, make sure that your oven is fully preheated to achieve the best puff. If you don’t have a baking stone, using an inverted baking sheet works just as well. For added flavor, consider incorporating herbs or spices into the dough.
Additionally, if you have leftover pitas, you can store them in an airtight container for a couple of days or freeze them for longer storage. When reheating, a quick toast on a skillet can revive their soft texture. Enjoy your homemade pita bread!