

I’ve always been enchanted by the sweet allure of Greek desserts. Each bite—from the crispy layers of baklava to the creamy galaktoboureko—brings a taste of Greek culture to your kitchen. These delicious treats are perfect for satisfying any sweet craving. If you’re eager to try making these delightful recipes at home, let’s explore the traditions and techniques that make them so special. You won’t want to miss what’s next in this scrumptious journey!
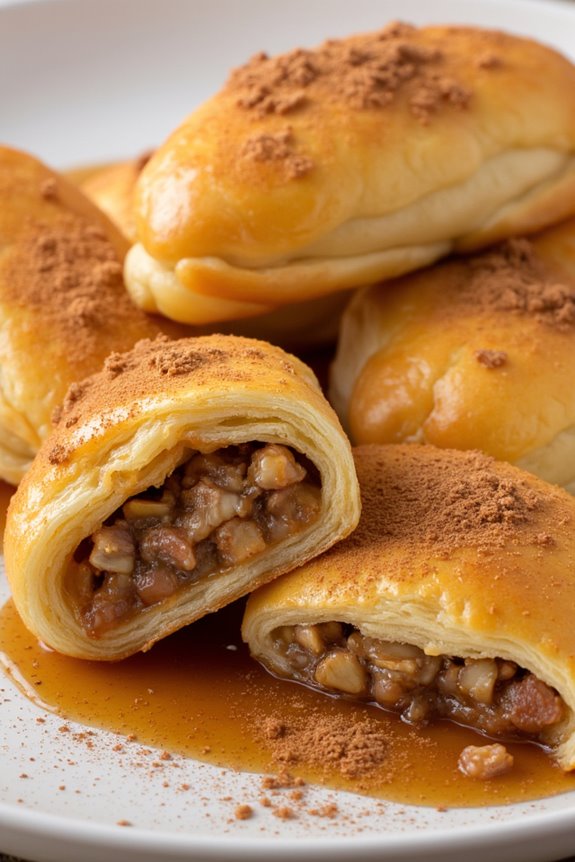
Baklava
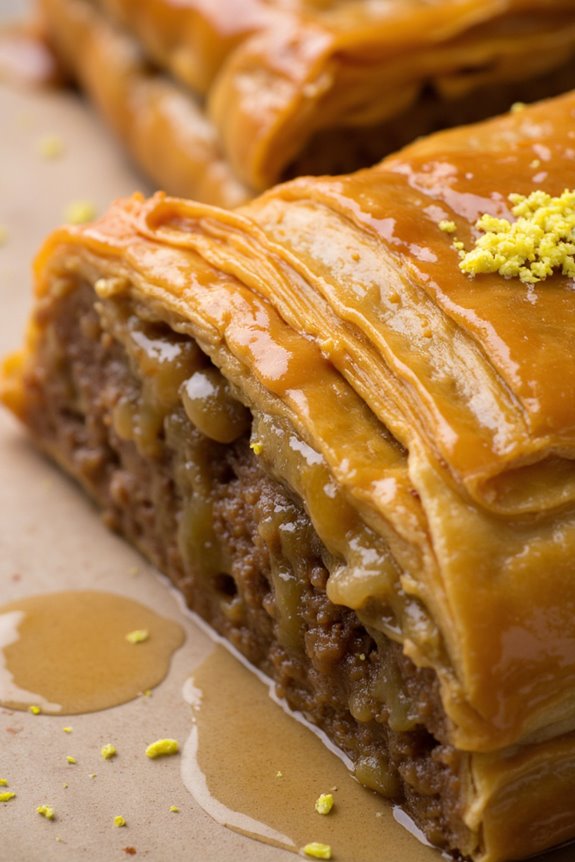
Baklava is a classic Greek dessert that captivates the senses with its layers of flaky pastry, rich nuts, and sweet syrup. This indulgent treat has a long history, with origins tracing back to the Ottoman Empire. The combination of crispy phyllo dough and a mixture of finely chopped nuts, typically walnuts or pistachios, creates a delightful texture that pairs perfectly with the sweet, fragrant syrup made from honey and citrus.
Baklava is often served at festive occasions and family gatherings, making it a beloved staple in Greek cuisine. Creating baklava at home can be a rewarding experience, as the process allows you to appreciate the care and attention that goes into crafting this exquisite dessert. While it may seem intimidating at first, following a few simple steps will help you master the art of baklava-making. The result is a delicious, multi-layered pastry that you’ll be proud to serve to family and friends.
Here’s how to make baklava for 4-6 servings.
Ingredients:
- 1 package (16 oz) phyllo dough, thawed
- 2 cups walnuts, finely chopped
- 1 cup unsalted butter, melted
- 1 teaspoon ground cinnamon
- 1 cup granulated sugar
- 1 cup water
- 1 cup honey
- 1 teaspoon vanilla extract
- Zest of 1 lemon
Instructions:
- Prepare the Nut Filling: In a medium bowl, combine the finely chopped walnuts and ground cinnamon. Mix well to guarantee the nuts are evenly coated with the cinnamon. Set aside as you prepare the phyllo dough.
- Preheat the Oven: Preheat your oven to 350°F (175°C). This guarantees that your baklava will bake evenly and develop a beautiful golden color.
- Prepare the Phyllo Dough: Unroll the thawed phyllo dough and cover it with a damp kitchen towel to prevent it from drying out. Take a 9×13 inch baking dish and brush a thin layer of melted butter on the bottom.
- Layer the Phyllo: Place one sheet of phyllo dough in the baking dish, and brush it lightly with melted butter. Repeat this process with 6-8 sheets, layering and buttering each one. This creates a flaky base for your baklava.
- Add the Nut Mixture: Evenly distribute half of the walnut and cinnamon mixture over the layered phyllo. Then, add another layer of phyllo dough, brushing each sheet with butter as before. Repeat this process until you have used half of the phyllo sheets and added the nut mixture.
- Finish Layering: After adding the second layer of nut filling, continue layering phyllo sheets, brushing each with melted butter until you’ve used up all the remaining phyllo sheets. Guarantee the top layer is well-buttered for a crisp finish.
- Cut the Baklava: Using a sharp knife, carefully cut the baklava into diamond or square shapes. This will make it easier to serve once baked.
- Bake the Baklava: Place the baking dish in the preheated oven and bake for about 45-50 minutes, or until the baklava is golden brown and crisp.
- Prepare the Syrup: While the baklava is baking, combine the sugar, water, honey, vanilla extract, and lemon zest in a saucepan over medium heat. Bring to a boil, then reduce heat and simmer for about 10 minutes. Remove from heat and allow to cool slightly.
- Drizzle the Syrup: Once the baklava is done baking, remove it from the oven and immediately pour the warm syrup evenly over the hot baklava. Allow it to soak into the layers for at least 4 hours, or overnight for the best flavor.
Extra Tips: When making baklava, be sure to keep your phyllo dough covered with a damp towel to prevent it from drying out, as it can become brittle and difficult to work with.
Additionally, feel free to experiment with different nut combinations, such as pistachios or almonds, for a unique twist on the traditional recipe. Finally, for a more aromatic syrup, consider adding a splash of orange blossom water or rose water to the syrup mixture for an extra layer of flavor. Enjoy your homemade baklava!
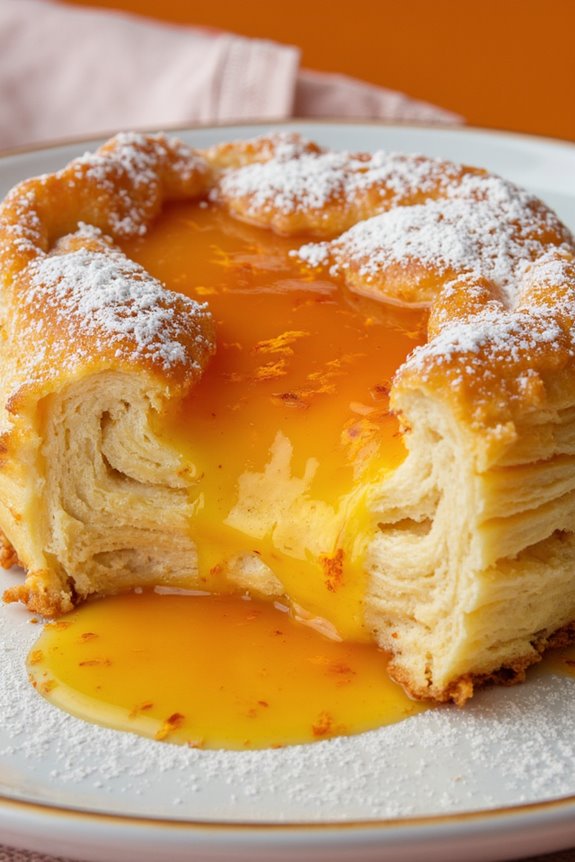
Galaktoboureko
Galaktoboureko is a traditional Greek dessert that combines a rich custard filling with layers of crispy phyllo pastry, all soaked in a sweet syrup. This delightful dish is both creamy and crunchy, making it a favorite among dessert lovers. The name itself translates to “milk pie,” which perfectly describes its luscious custard base made from milk, eggs, and semolina, encased in thin, flaky layers of phyllo dough.
When baked to golden perfection, it’s generously drizzled with a fragrant syrup made from sugar, water, and lemon juice, enhancing its flavor profile and providing a delectable finish.
Preparing Galaktoboureko might seem intimidating at first, but with a little patience and the right technique, you’ll be rewarded with a stunning dessert that impresses both visually and tastefully. This recipe serves 4-6 people, making it perfect for family gatherings or special occasions.
Whether you’re a seasoned baker or a novice in the kitchen, this recipe will guide you step by step to create this iconic Greek sweet that’s sure to leave your guests wanting more.
Ingredients
- 1 package of phyllo pastry (approximately 16 oz)
- 1 cup unsalted butter, melted
- 1 cup granulated sugar
- 4 cups whole milk
- 1 cup semolina
- 4 large eggs
- 1 teaspoon vanilla extract
- Zest of 1 lemon
- 1 cup water
- 1 tablespoon lemon juice
- 1 teaspoon ground cinnamon (optional, for garnish)
Cooking Instructions
1. Prepare the Syrup: In a saucepan, combine 1 cup of sugar, 1 cup of water, and 1 tablespoon of lemon juice. Bring the mixture to a boil over medium heat, stirring until the sugar dissolves. Once boiling, reduce the heat and let it simmer for about 10 minutes.
Remove from heat and allow it to cool before using. This syrup will soak into the Galaktoboureko, adding sweetness and moisture.
2. Make the Custard Filling: In a large saucepan, heat 4 cups of whole milk over medium heat. Gradually whisk in 1 cup of semolina and continue stirring until the mixture thickens, about 10 minutes.
In a separate bowl, beat 4 large eggs with 1 teaspoon of vanilla extract and the zest of 1 lemon. Slowly temper the egg mixture by adding a small amount of the hot milk mixture to the eggs while whisking continuously.
Then, gradually pour the egg mixture back into the saucepan, stirring constantly until the custard is fully combined and thickened. Remove from heat and let it cool slightly.
3. Assemble the Phyllo Layers: Preheat your oven to 350°F (175°C). Take a 9×13 inch baking dish and brush it generously with melted butter.
Carefully layer about 8 sheets of phyllo pastry, brushing each sheet with melted butter before adding the next one. This will create a crispy base for your dessert.
4. Add the Custard: Once you have your base, pour the custard filling evenly over the phyllo layers. Spread it out gently to confirm an even layer.
5. Top with Phyllo: Continue layering phyllo sheets on top of the custard, brushing each layer with melted butter as before. You’ll want to use about 8-10 sheets for the top layer, ensuring it’s well buttered to achieve a golden crust.
6. Bake the Galaktoboureko: Once assembled, cut the top layers of phyllo into diamond or square shapes using a sharp knife. Bake in the preheated oven for about 45-55 minutes or until the top is golden brown and crisp.
7. Soak with Syrup: As soon as the Galaktoboureko comes out of the oven, pour the cooled syrup evenly over the hot dessert. Allow it to soak in for at least 30 minutes before serving.
This will guarantee that the flavors meld together beautifully.
Extra Tips
When preparing Galaktoboureko, it’s important to keep the phyllo dough covered with a damp cloth while you work to prevent it from drying out.
Additionally, for a touch of extra flavor, you can infuse the syrup with a cinnamon stick or a few cloves during the boiling process. If you prefer a nuttier texture, finely chopped pistachios or almonds can be sprinkled between the layers of phyllo and custard.
This dessert is best enjoyed chilled or at room temperature, and it can be stored in the refrigerator for several days, making it a great make-ahead option for gatherings.
Loukoum

Loukoum, also known as Turkish delight, is a beloved Greek dessert that has captured the hearts and taste buds of many. This delectable treat is made from sugar, starch, and a variety of flavorings, offering a soft, chewy texture that melts in your mouth. Traditionally flavored with rosewater, lemon, or orange, Loukoum can also be infused with nuts or spices, making it a versatile dessert suitable for various occasions, from festive gatherings to simple family celebrations.
Making Loukoum at home may seem intimidating, but with the right ingredients and a little patience, you can create this delightful treat that’s certain to impress. The process involves cooking the ingredients to a precise consistency and dusting the finished product with powdered sugar or cornstarch to prevent sticking. Once you master this recipe, you can explore different flavors and add-ins to customize your Loukoum to your liking.
Ingredients (Serves 4-6):
- 2 cups granulated sugar
- 1 cup water
- 1 cup cornstarch
- 1 teaspoon cream of tartar
- 1 tablespoon rosewater (or your choice of flavoring)
- 1 cup chopped nuts (optional, such as pistachios or walnuts)
- Powdered sugar (for dusting)
- Cornstarch (for dusting)
Cooking Instructions:
- Prepare the Mixture: In a medium saucepan, combine the granulated sugar and water. Stir the mixture over medium heat until the sugar dissolves completely. Bring it to a boil, then reduce the heat to low and let it simmer.
- Mix the Cornstarch: In a separate bowl, whisk together the cornstarch and cream of tartar with 1 cup of water until smooth. This mixture will help thicken the Loukoum. Gradually add this mixture to the simmering sugar syrup, stirring constantly to avoid lumps.
- Cook Until Thick: Continue to cook the mixture over low heat while stirring frequently. It will take about 20-30 minutes for the mixture to thicken to a gel-like consistency. Be patient and make sure it doesn’t burn on the bottom.
- Add Flavor: Once thickened, remove the saucepan from the heat. Stir in the rosewater (or your chosen flavoring) and, if using, the chopped nuts. Mix until evenly distributed.
- Set the Mixture: Pour the mixture into a greased square or rectangular pan, spreading it out evenly. Let it cool at room temperature for several hours, or preferably overnight, until it sets completely.
- Cut and Dust: Once set, dust a clean cutting board with powdered sugar and cornstarch mixture. Turn the set Loukoum out onto the board and cut it into bite-sized squares. Dust all sides of the pieces with powdered sugar and cornstarch to prevent sticking.
- Serve and Store: Enjoy your Loukoum immediately, or store it in an airtight container with layers separated by parchment paper. This will help keep them fresh and prevent them from clumping together.
Extra Tips:
When making Loukoum, verify that your cooking equipment is clean and dry to avoid any unwanted moisture. The key to achieving the perfect texture lies in the cooking time and temperature, so keep an eye on the mixture as it thickens.
Feel free to experiment with different flavors and add-ins, such as citrus zest or spices, to create your unique version of this classic dessert. Additionally, using a mix of powdered sugar and cornstarch for dusting will give your Loukoum a nice finish and help prevent them from sticking together.
Enjoy your homemade Loukoum with a cup of coffee or tea for a delightful treat!
Kourabiedes
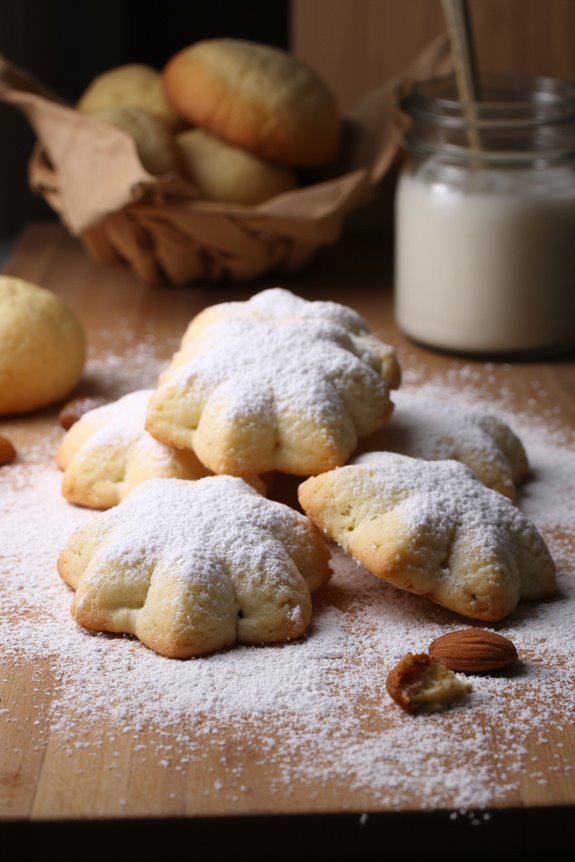
Kourabiedes are traditional Greek almond shortbread cookies that are often enjoyed during festive occasions and holidays. These delicate confections are renowned for their rich buttery flavor and are typically dusted with powdered sugar, giving them a snowy appearance that’s both inviting and festive.
The combination of toasted almonds and fragrant vanilla provides a delightful taste that melts in your mouth, making Kourabiedes a beloved treat in Greek culture. The history of Kourabiedes dates back to the Ottoman Empire, and their name is derived from the Turkish word “kurabiye,” which means cookie.
These cookies aren’t only popular in Greece but have also spread to various Mediterranean countries, each adding its unique twist to the recipe. Whether served with coffee or enjoyed by themselves, Kourabiedes are perfect for sharing with family and friends, making them a staple in Greek households.
Ingredients (Serves 4-6)
- 1 cup unsalted butter, softened
- 1/2 cup powdered sugar, plus extra for dusting
- 1 teaspoon vanilla extract
- 2 cups all-purpose flour
- 1/2 cup finely chopped almonds (toasted)
- 1/4 teaspoon salt
- 1/2 teaspoon baking powder
Instructions
- Preheat the Oven: Begin by preheating your oven to 350°F (175°C). This guarantees that your cookies will bake evenly and achieve the perfect texture.
- Cream the Butter and Sugar: In a large mixing bowl, combine the softened butter and 1/2 cup of powdered sugar. Use an electric mixer or a whisk to cream them together until the mixture is light and fluffy. This step is essential for incorporating air, which will help the cookies to be tender.
- Add Vanilla: Once the butter and sugar are well combined, add the vanilla extract to the mixture. Stir until fully incorporated, allowing the vanilla flavor to meld with the butter and sugar.
- Mix Dry Ingredients: In a separate bowl, whisk together the all-purpose flour, salt, and baking powder. This helps assure that the baking powder is evenly distributed throughout the flour, which will aid in the cookies’ rise.
- Combine Mixtures: Gradually add the dry mixture to the butter mixture. Use a spatula or wooden spoon to gently fold in the flour until just combined. Be careful not to overmix, as this can lead to tough cookies.
- Add Almonds: Fold in the finely chopped toasted almonds into the dough until evenly dispersed. The almonds add a delightful crunch and nutty flavor to the cookies.
- Shape the Cookies: Take small portions of the dough and roll them into balls or shape them into crescent forms, about 1 inch in diameter. Place the shaped cookies on a baking sheet lined with parchment paper, spacing them about 2 inches apart.
- Bake: Bake in the preheated oven for 15-20 minutes, or until the edges are lightly golden. Keep a close eye on them, as they can brown quickly.
- Cool and Dust: Once baked, remove the cookies from the oven and let them cool on the baking sheet for about 10 minutes. Transfer them to a wire rack to cool completely. After they’ve cooled, generously dust the cookies with powdered sugar for that classic Kourabiedes look.
Extra Tips
When making Kourabiedes, toasting the almonds beforehand enhances their flavor and adds depth to the cookies. Be sure to let the cookies cool completely before dusting them with powdered sugar, as warm cookies can cause the sugar to melt and create a sticky mess.
Additionally, you can experiment with the flavor by adding a hint of orange zest or using rose water in place of some of the vanilla for a unique twist. Enjoy your Kourabiedes with a cup of Greek coffee for the ultimate treat!
Melomakarona

Melomakarona are traditional Greek cookies that are particularly popular during the Christmas season. These delightful treats are made with a rich blend of flour, olive oil, and orange juice, giving them a moist and fragrant quality.
They’re typically shaped into small ovals, baked until golden, and then soaked in a syrup made from honey and sugar, which adds a luscious sweetness to the cookies. Often, melomakarona are garnished with chopped walnuts and cinnamon, making them not only delicious but also visually appealing.
The history of melomakarona dates back to ancient Greece, where honey was a symbol of prosperity and happiness. Over time, this cookie has evolved into a beloved seasonal delicacy, enjoyed by families and friends during festive gatherings.
The combination of flavors and textures in melomakarona creates a comforting experience, making them a must-try for anyone interested in Greek desserts.
Ingredients (Serves 4-6)
- 1 cup olive oil
- 1/2 cup sugar
- 1/2 cup orange juice
- Zest of 1 orange
- 1 teaspoon baking powder
- 1 teaspoon cinnamon
- 1/2 teaspoon nutmeg
- 4 cups all-purpose flour
- 1 cup chopped walnuts
- 1 cup honey
- 1/2 cup water
- 1/4 cup sugar (for syrup)
- Ground cinnamon for garnish
Cooking Instructions
1. Preheat the Oven: Start by preheating your oven to 350°F (175°C). This guarantees that the melomakarona will bake evenly and achieve a lovely golden color.
2. Prepare the Dough: In a large mixing bowl, combine 1 cup of olive oil, 1/2 cup of sugar, 1/2 cup of orange juice, and the zest of one orange. Mix well until the sugar dissolves.
Then, add 1 teaspoon of baking powder, 1 teaspoon of cinnamon, and 1/2 teaspoon of nutmeg. Gradually incorporate the 4 cups of all-purpose flour into the mixture until a soft dough forms. Be careful not to overmix.
3. Shape the Cookies: Take small portions of the dough and roll them into oval shapes, about the size of a walnut. Place the shaped cookies onto a baking sheet lined with parchment paper, leaving some space in between each cookie as they’ll expand slightly while baking.
4. Bake the Cookies: Place the baking sheet in the preheated oven and bake for 20-25 minutes, or until the cookies are golden brown. Keep an eye on them as baking times can vary depending on your oven.
5. Prepare the Syrup: While the cookies are baking, make the syrup. In a saucepan, combine 1 cup of honey, 1/2 cup of water, and 1/4 cup of sugar. Bring the mixture to a boil, then reduce the heat and let it simmer for about 10 minutes until it thickens slightly.
Remove from heat and let cool.
6. Soak the Cookies: Once the cookies are out of the oven, allow them to cool for a few minutes before transferring them to a large bowl. Pour the warm syrup over the cookies, making certain they’re well coated.
Let them soak for about 10-15 minutes.
7. Garnish and Serve: After soaking, place the cookies on a serving platter. Sprinkle chopped walnuts and a dash of ground cinnamon on top for an added touch. Serve and enjoy!
Extra Tips
For an even richer flavor, you can add a splash of brandy or whiskey to the dough. Allowing the melomakarona to soak in the syrup for longer will enhance their sweetness and moisture, so feel free to adjust the soaking time based on your preference.
These cookies can be stored in an airtight container for several weeks, making them perfect for holiday gifting or enjoying throughout the season.
Revani
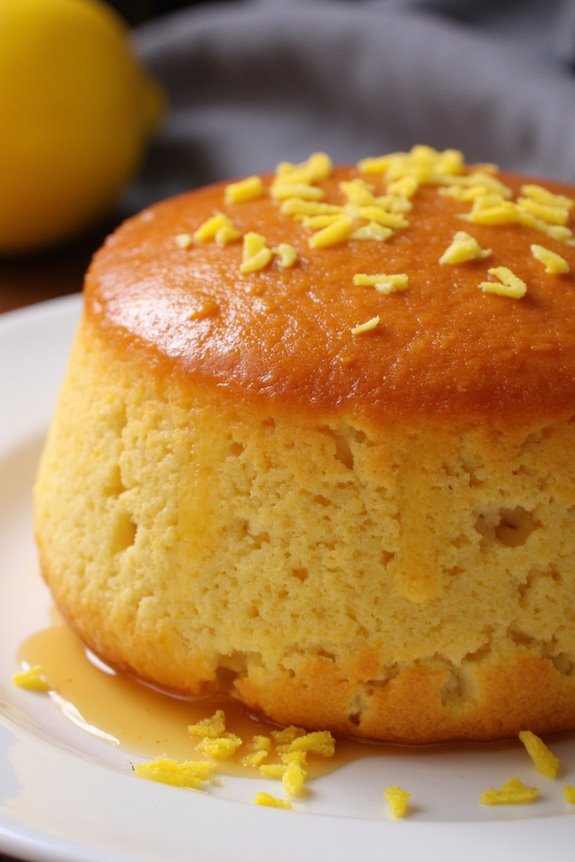
Revani is a traditional Greek dessert made from semolina flour, known for its moist texture and delightful flavor, often enhanced with syrup and a hint of citrus. This delightful cake is typically served during special occasions and celebrations, embodying the warmth and hospitality of Greek culture.
The combination of semolina and yogurt gives Revani its unique consistency, making it a favorite among dessert lovers. It’s usually soaked in a sweet syrup infused with lemon or orange, which adds a rejuvenating contrast to the cake’s richness.
Making Revani at home is a straightforward process that yields impressive results. The cake is baked until golden brown and then drenched in syrup, allowing it to absorb all the sweet goodness. The result is a luscious dessert that pairs beautifully with a cup of coffee or tea.
With its simple ingredients and easy preparation, Revani is perfect for both novice and experienced bakers looking to create a taste of Greece in their kitchen.
Ingredients (Serves 4-6)
- 1 cup semolina
- 1 cup sugar
- 1/2 cup plain yogurt
- 1/2 cup milk
- 1/2 cup vegetable oil
- 3 large eggs
- 1 tablespoon baking powder
- Zest of 1 lemon
- A pinch of salt
For the syrup:
- 1 cup sugar
- 1/2 cup water
- Juice of 1 lemon
Cooking Instructions
- Preheat the oven: Begin by preheating your oven to 350°F (175°C). This guarantees that the Revani bakes evenly and achieves a nice golden color.
- Mix the dry ingredients: In a large bowl, combine the semolina, baking powder, and a pinch of salt. Mix these dry ingredients together thoroughly to guarantee even distribution.
- Combine the wet ingredients: In another bowl, whisk together the sugar, yogurt, milk, vegetable oil, and eggs until well combined. The mixture should be smooth and creamy.
- Combine wet and dry mixtures: Gradually add the dry ingredients to the wet ingredients, stirring gently until just combined. Be careful not to overmix, as this can lead to a denser texture.
- Add lemon zest: Incorporate the lemon zest into the batter, mixing gently to distribute the fragrant oils throughout the mixture.
- Pour into a baking dish: Grease a rectangular baking dish with oil or butter, then pour the batter into the prepared dish, spreading it evenly.
- Bake the cake: Place the dish in the preheated oven and bake for 30-35 minutes, or until the top is golden brown and a toothpick inserted into the center comes out clean.
- Prepare the syrup: While the cake is baking, prepare the syrup by combining sugar, water, and lemon juice in a small saucepan. Bring to a boil over medium heat, then reduce to a simmer for about 10 minutes until slightly thickened. Remove from heat and set aside.
- Soak the cake: Once the cake is done baking, remove it from the oven and immediately pour the warm syrup over it, guaranteeing the cake absorbs the syrup evenly. Let it sit for at least 30 minutes before serving to allow the flavors to meld.
Extra Tips
For an added touch, consider garnishing your Revani with chopped nuts or a dusting of powdered sugar before serving.
Additionally, if you want to experiment with flavors, you can replace the lemon juice in the syrup with orange juice for a different citrus profile. Make sure to let the cake sit for a while after soaking in the syrup; this helps to enhance its flavor and texture, making each bite even more enjoyable.
Halva

Halva is a traditional Greek dessert that has been enjoyed for centuries, boasting a rich history and a delightful taste that appeals to many. This sweet dish is primarily made from semolina or flour, combined with sugar and flavored with various ingredients, such as nuts, honey, or spices.
Halva can be served warm or chilled, making it a versatile treat for any occasion. Its unique texture and sweet, nutty flavor make it a favorite among both locals and visitors to Greece.
Making halva isn’t only a delicious endeavor but also a rewarding one. The process involves slowly cooking the semolina until it reaches the perfect consistency, then combining it with a sweet syrup that infuses the dish with flavor. The result is a sweet, dense dessert that’s often garnished with nuts or dried fruits.
Whether you’re looking to impress guests at a dinner party or simply indulge in a sweet treat, this recipe for Greek halva is sure to fulfill your cravings.
Ingredients (Serves 4-6):
- 1 cup semolina
- 1 cup granulated sugar
- 2 cups water
- 1/2 cup vegetable oil
- 1 teaspoon vanilla extract
- 1/2 cup chopped walnuts or almonds (optional)
- 1/2 teaspoon ground cinnamon (optional)
- A pinch of salt
Cooking Instructions:
- Prepare the Syrup: In a medium saucepan, combine the water and sugar. Bring the mixture to a boil over medium heat, stirring occasionally until the sugar is completely dissolved. Once boiling, remove it from the heat and set aside. This syrup will sweeten and flavor your halva.
- Cook the Semolina: In a large frying pan or saucepan, heat the vegetable oil over medium heat. Once hot, add the semolina and stir constantly for about 5-7 minutes. The semolina should turn a light golden brown and emit a nutty aroma. Be careful not to burn it; continuous stirring is key.
- Combine the Mixtures: Once the semolina is golden, carefully pour the hot syrup into the pan. Be cautious, as the mixture may bubble vigorously. Continue to stir as the syrup integrates with the semolina. This will create a thick, cohesive mixture.
- Add Flavorings: Stir in the vanilla extract and a pinch of salt. If you’re using nuts or ground cinnamon, add them at this stage and mix well to confirm they’re evenly distributed throughout the halva.
- Set the Halva: Transfer the mixture into a greased loaf pan or dish, smoothing the top with a spatula. Allow the halva to cool at room temperature for about 1 hour, and then refrigerate for at least 2 hours to set completely.
- Serve: Once chilled and set, you can slice the halva into pieces. It can be served plain or garnished with additional nuts or a sprinkle of cinnamon for an extra touch.
Extra Tips:
When making halva, be sure to monitor the heat closely while cooking the semolina; too high of a temperature can cause it to burn.
Additionally, feel free to experiment with flavors by adding citrus zest or using different types of nuts. Halva can be stored in an airtight container in the refrigerator for up to a week, making it a great make-ahead dessert for gatherings or a sweet snack to enjoy throughout the week.
Enjoy your homemade Greek halva!
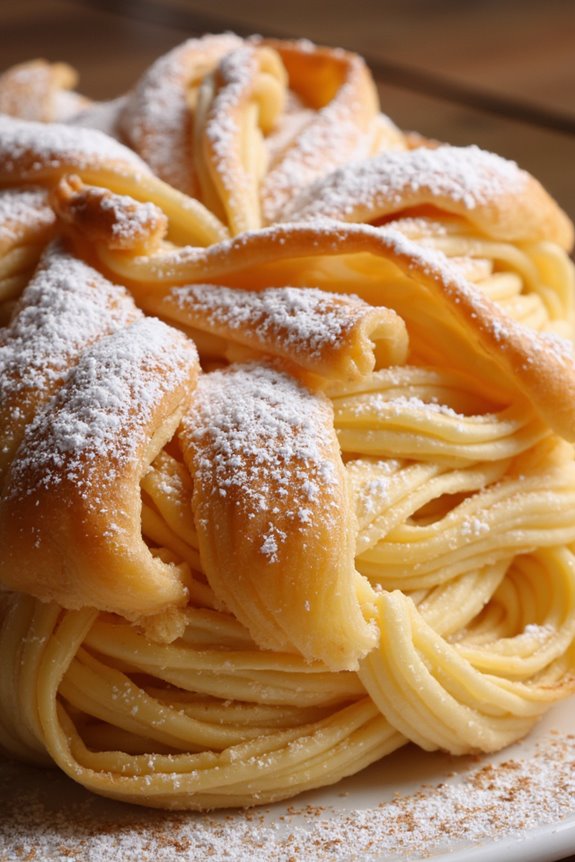
Kataifi
Kataifi is a traditional Greek dessert that showcases the rich culinary heritage of Greece. This delicate pastry is made from thin, thread-like strands of dough that are rolled and filled with a sweet nut mixture, then baked to perfection and soaked in a fragrant syrup. The result is a beautiful and aromatic dish that’s both crispy and luscious, making it a favorite among many dessert lovers. Kataifi is often served during special occasions and festive celebrations, bringing a taste of Greek tradition to the table.
The dough used in Kataifi gives the dessert its signature texture, while the filling usually consists of a blend of nuts like walnuts and almonds, flavored with spices such as cinnamon. The key to a successful Kataifi lies in the syrup, which is typically made from sugar, water, and a hint of lemon juice or rosewater, adding a delightful sweetness to the crunchy pastry. This dessert isn’t only delicious but also visually stunning, making it a perfect treat for gatherings and holidays.
Ingredients (Serves 4-6):
- 1 package kataifi dough (about 400g)
- 200g unsalted butter, melted
- 200g walnuts, finely chopped
- 100g almonds, finely chopped
- 100g sugar
- 1 teaspoon ground cinnamon
- 1 cup sugar (for syrup)
- 1 cup water
- 1 tablespoon lemon juice
- 1 teaspoon vanilla extract
Cooking Instructions:
- Prepare the Filling: In a mixing bowl, combine the chopped walnuts, almonds, sugar, and ground cinnamon. Mix well until all the ingredients are evenly incorporated. This filling adds a nutty flavor and aromatic spice to the Kataifi.
- Preheat the Oven: Preheat your oven to 180°C (350°F). This will guarantee that the Kataifi bakes evenly and achieves a golden-brown crust.
- Prepare the Kataifi Dough: Take the kataifi dough out of the package and gently separate the strands. Working with small sections at a time will make it easier to handle. Brush a baking dish with melted butter.
- Assemble the Kataifi: Take a handful of kataifi dough strands and place a spoonful of the nut filling at one end. Roll the dough tightly around the filling to form a small cylinder. Place the rolled kataifi seam-side down in the prepared baking dish. Repeat this process until all the dough and filling are used.
- Bake the Kataifi: Drizzle the remaining melted butter over the assembled kataifi rolls. Bake in the preheated oven for about 30-35 minutes or until the pastry is golden brown and crispy. Keep an eye on it to prevent burning.
- Prepare the Syrup: While the kataifi is baking, prepare the syrup. In a saucepan, combine 1 cup of sugar, 1 cup of water, and lemon juice. Bring the mixture to a boil, then reduce the heat and let it simmer for about 10 minutes. Add the vanilla extract and remove from heat. Allow the syrup to cool slightly.
- Soak the Kataifi: Once the kataifi is baked, remove it from the oven and immediately pour the warm syrup over the hot pastry. Let it soak for at least 30 minutes to absorb the flavors and moisture.
- Serve: Cut the kataifi into pieces and serve warm or at room temperature. You can garnish it with chopped nuts or a sprinkle of cinnamon if desired.
Extra Tips:
When preparing Kataifi, make certain that the dough remains covered while you work to prevent it from drying out. If you find the kataifi strands difficult to manage, you can lightly spray or brush them with water to make them more pliable.
Additionally, feel free to experiment with different nut combinations for the filling, such as pistachios or hazelnuts, to create a unique twist on this classic Greek dessert.
Portokalopita
Portokalopita, a delightful Greek dessert, translates to “orange pie.” This traditional Greek dish is loved for its unique combination of flaky phyllo pastry and a luscious orange syrup that infuses the pie with a revitalizing citrus flavor. The dessert is often enjoyed during family gatherings or festive occasions, where its vibrant taste and inviting aroma can captivate the senses.
With layers of crispy phyllo and a moist filling, Portokalopita isn’t only a treat for the palate but also a feast for the eyes.
The preparation of Portokalopita is relatively straightforward, making it accessible for both novice and experienced bakers alike. The key to achieving the perfect texture lies in the careful layering of the phyllo dough and the careful preparation of the orange syrup. Once baked to a golden perfection, the pie is generously drizzled with the sweet syrup, allowing it to soak into the layers, creating a delectable dessert that’s sure to impress everyone at the table.
Ingredients (Serves 4-6):
- 500g phyllo pastry
- 3 large oranges (zest and juice)
- 150g granulated sugar
- 100g unsalted butter (melted)
- 3 large eggs
- 1 tsp baking powder
- 1 tsp vanilla extract
- 200g yogurt (plain or Greek)
- 100g chopped walnuts (optional)
- Powdered sugar (for dusting)
Cooking Instructions:
- Preheat the Oven: Begin by preheating your oven to 180°C (350°F). This guarantees that your Portokalopita will bake evenly and develop a lovely golden color.
- Prepare the Syrup: In a saucepan, combine 150g granulated sugar with the juice of the three oranges. Heat over medium heat until the sugar dissolves completely. Once dissolved, bring the mixture to a gentle boil for about 5 minutes. Remove from heat, add the orange zest, and set aside to cool.
- Layer the Phyllo: Take the phyllo pastry out of the package and carefully unroll it. Cover it with a damp towel to prevent it from drying out. Brush a baking dish (approximately 30×20 cm) with melted butter. Layer 5-6 sheets of phyllo pastry in the dish, brushing each layer with melted butter before adding the next.
- Make the Filling: In a large bowl, whisk together the eggs, yogurt, melted butter, baking powder, and vanilla extract until smooth. If using, fold in the chopped walnuts for added texture. Pour this mixture over the layered phyllo.
- Add More Phyllo: Add another layer of phyllo on top of the filling, again brushing each sheet with melted butter. Use about 5-6 sheets for this layer as well. Tuck in any overhanging edges to create a neat appearance.
- Bake the Pie: Transfer the baking dish to the preheated oven and bake for about 30-40 minutes, or until the top is golden brown and crispy.
- Soak with Syrup: Once baked, remove the pie from the oven and immediately pour the cooled orange syrup over the hot pie. Allow it to soak for at least 30 minutes before slicing. This step is vital as it helps the pie absorb the syrup.
- Serve: Dust with powdered sugar before serving. Cut into squares or triangles and enjoy your delicious Portokalopita warm or at room temperature.
Extra Tips:
When preparing Portokalopita, it’s important to keep the phyllo dough covered with a damp towel while working, as it can dry out quickly.
This recipe allows for variations, such as adding a hint of cinnamon or using different nuts, depending on your preference. For a richer flavor, consider adding a splash of liqueur to the syrup. Serve with a dollop of whipped cream or a scoop of vanilla ice cream for an extra indulgent experience.
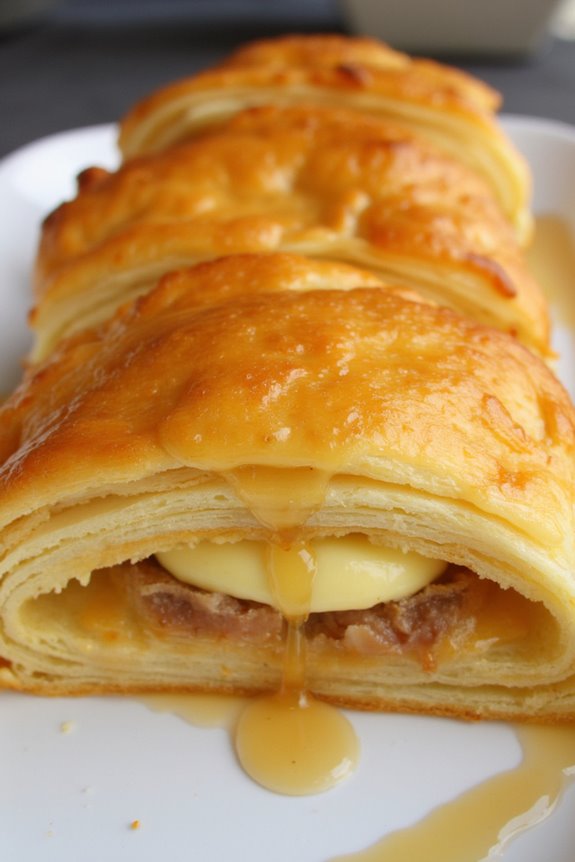
Bougatsa
Bougatsa is a delicious Greek pastry that’s filled with either sweet or savory fillings, but the sweet version is particularly popular as a dessert. This phyllo pastry is typically filled with custard, which is a creamy mixture of milk, sugar, eggs, and flour.
Bougatsa is often sprinkled with powdered sugar and cinnamon before serving, adding an extra layer of sweetness and aroma that makes it truly irresistible. Originating from the northern regions of Greece, particularly Thessaloniki, this dessert has become beloved across the country and beyond.
Making Bougatsa at home can be a rewarding experience, as the flaky layers of phyllo pastry combined with the rich custard filling create a delightful treat that’s sure to impress. While it may seem challenging to work with phyllo dough, with a little patience and practice, you can achieve that perfect golden-brown pastry that’s crispy on the outside and soft on the inside.
Enjoy this sweet delight for breakfast, as a snack, or as a dessert after a meal.
Ingredients (Serves 4-6)
- 1 package of phyllo pastry (about 16 oz)
- 4 cups milk
- 1 cup granulated sugar
- 1/2 cup semolina flour
- 4 large eggs
- 1 teaspoon vanilla extract
- 1/2 cup unsalted butter, melted
- Powdered sugar for dusting
- Ground cinnamon for dusting
Cooking Instructions
1. Prepare the Custard Filling: In a medium saucepan, heat 4 cups of milk over medium heat until it’s warm but not boiling. In a separate bowl, whisk together the sugar, semolina flour, and eggs until well combined. Gradually add the warm milk to the egg mixture, whisking continuously to prevent the eggs from curdling.
Return the mixture to the saucepan and cook over medium heat, stirring constantly until it thickens (about 5-7 minutes). Once thickened, remove from heat and stir in the vanilla extract. Allow the custard to cool slightly.
2. Prepare the Phyllo Pastry: Preheat your oven to 375°F (190°C). Grease a baking dish (approximately 9×13 inches) with some of the melted butter. Carefully unroll the phyllo pastry and cover it with a damp cloth to prevent it from drying out.
Take one sheet of phyllo and place it in the greased dish, brushing it lightly with melted butter. Repeat this process, layering about 6-8 sheets of phyllo, brushing each layer with butter.
3. Add the Custard Filling: Once you have your layers of phyllo, pour the cooled custard filling over the layered pastry, spreading it evenly.
4. Top with More Phyllo: Continue layering more sheets of phyllo over the custard filling, again brushing each layer with melted butter. Aim for another 6-8 layers on top. Once you’ve finished layering, tuck the edges of the phyllo into the sides of the baking dish to seal the filling inside.
5. Bake the Bougatsa: Place the baking dish in the preheated oven and bake for about 30-40 minutes, or until the top is golden brown and crispy.
6. Serve: Once baked, remove from the oven and allow to cool slightly. Dust generously with powdered sugar and ground cinnamon before slicing into squares or rectangles to Serve.
Extra Tips
When working with phyllo pastry, it’s crucial to keep it covered with a damp cloth while you work to prevent it from drying out. If you find that the layers are tearing, don’t worry too much; you can patch them together as phyllo is quite forgiving.
Additionally, for added flavor, you can experiment with the custard filling by incorporating lemon zest or orange zest into the mixture. Enjoy your homemade Bougatsa warm or at room temperature for the best experience!
Sokolatopita

Sokolatopita is a delightful Greek chocolate pie that brings together the rich flavors of chocolate, nuts, and phyllo pastry. This dessert is perfect for those who’ve a sweet tooth and enjoy the combination of crispy textures with a luscious filling.
Originating from the traditional Greek kitchen, Sokolatopita is often served at family gatherings, celebrations, and festive occasions. Its luscious chocolate filling is complemented by the flaky, buttery layers of phyllo, making it an irresistible treat.
This dessert isn’t only easy to prepare but also allows for variations based on personal taste. You can enhance the flavor by adding spices such as cinnamon or nutmeg, or even incorporating different nuts like almonds or walnuts.
The beauty of Sokolatopita lies in its simplicity and the ability to customize it, guaranteeing every bite is a unique experience. So, let’s plunge into creating this delicious Greek chocolate pie!
Ingredients (Serves 4-6):
- 1 package phyllo pastry (about 16 oz)
- 1 cup unsalted butter, melted
- 1 cup granulated sugar
- 4 large eggs
- 1 cup dark chocolate, chopped
- 1 cup milk
- 1 teaspoon vanilla extract
- 1 cup crushed walnuts (or almonds)
- 1 teaspoon baking powder
- Powdered sugar (for dusting)
Cooking Instructions:
1. Preheat the Oven: Begin by preheating your oven to 350°F (175°C). This guarantees the Sokolatopita bakes evenly and achieves a perfect golden crust.
2. Prepare the Phyllo Pastry: Take the phyllo pastry out of the package and lay it flat. Cover it with a damp cloth to prevent it from drying out while you prepare the filling. This is essential as phyllo can become brittle if exposed to air.
3. Make the Chocolate Filling: In a saucepan over medium heat, combine the chopped dark chocolate and milk. Stir until the chocolate is completely melted and the mixture is smooth. Remove from heat and let it cool slightly.
4. Mix the Batter: In a large mixing bowl, whisk together the sugar and eggs until well combined. Gradually add the melted chocolate mixture and vanilla extract, stirring continuously.
Next, fold in the crushed walnuts and baking powder until fully integrated.
5. Layer the Phyllo Pastry: Grease a baking dish with some of the melted butter. Take one sheet of phyllo pastry and brush it with melted butter, then layer another sheet on top. Repeat this process, layering about 6-8 sheets, ensuring they’re well-buttered each time.
6. Add the Filling: Pour the chocolate filling over the layered phyllo and spread it evenly.
7. Top with More Phyllo: Continue layering the remaining phyllo sheets over the filling, buttering each one as you go. Aim for 6-8 layers again on top of the filling to create a nice, flaky top crust.
8. Bake the Sokolatopita: Score the top layers of phyllo with a sharp knife to create diamond shapes (this will make it easier to serve later). Bake in the preheated oven for 30-35 minutes, or until the top is golden brown and crispy.
9. Cool and Dust: Once baked, remove from the oven and let it cool for about 15-20 minutes. Dust with powdered sugar before serving for a beautiful presentation.
Extra Tips:
When making Sokolatopita, be sure not to skip the step of covering the phyllo pastry with a damp cloth; this will keep it from drying out and becoming difficult to work with.
You can also experiment with different types of chocolate or nuts to create your own variations. For added flavor, consider adding a splash of coffee to the chocolate filling or a sprinkle of sea salt on top before serving.
Enjoy this delightful dessert with a scoop of vanilla ice cream or a dollop of whipped cream for an extra special treat!
Patsa
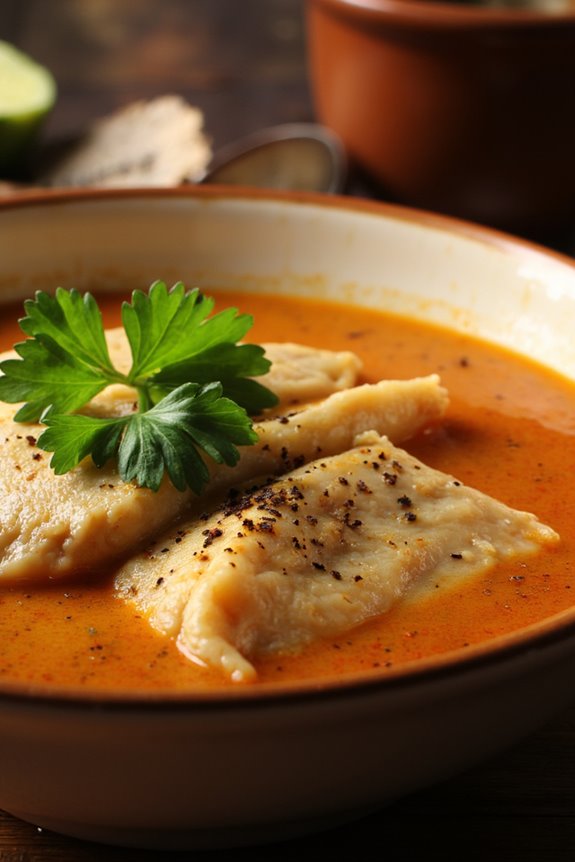
Patsa is a traditional Greek dish, often enjoyed as a comforting meal during the colder months or after a night out. This hearty soup is rich in flavors and is primarily made with tripe, which is the lining of a cow’s stomach. It’s seasoned with a variety of spices and is typically served with a drizzle of vinegar and a sprinkle of fresh herbs, making it a delightful experience for those who appreciate unique flavors.
Patsa isn’t only nourishing but also a great way to explore the culinary diversity of Greek cuisine. The dish is often prepared for special occasions or family gatherings, showcasing the significance of communal dining in Greek culture.
While it may seem intimidating due to its key ingredient, making Patsa at home can be a rewarding endeavor. With a few simple ingredients and some patience, you can create a warming bowl of this traditional soup that’s bound to impress your family and friends.
Ingredients (Serves 4-6)
- 1 kg beef tripe, cleaned and cut into strips
- 2 liters water
- 1 onion, quartered
- 3-4 garlic cloves, minced
- 1 bay leaf
- 2-3 whole cloves
- 1 teaspoon black peppercorns
- 1 teaspoon salt (to taste)
- 1 teaspoon paprika
- 1 teaspoon dried oregano
- 1/2 cup vinegar (white or red)
- Fresh parsley, chopped (for garnish)
- Olive oil (optional, for drizzling)
Cooking Instructions
- Prepare the Tripe: Begin by thoroughly cleaning the tripe under cold running water. Remove any excess fat and cut it into strips. This step is vital as it guarantees that the tripe is clean and ready for cooking.
- Boil the Tripe: Place the cleaned tripe in a large pot and add the water. Bring it to a boil over medium-high heat. This initial boiling helps to remove any lingering odors and impurities. Once boiling, reduce the heat and let it simmer for about 15 minutes.
- Add Aromatics: After simmering, drain the water and rinse the tripe again. In the same pot, add the tripe back in along with the onion, garlic, bay leaf, cloves, peppercorns, and salt. Pour in enough fresh water to cover the tripe completely. Bring it to a boil again, then reduce the heat to low, cover, and let it simmer for 2-3 hours, or until the tripe is tender.
- Season the Soup: Once the tripe is tender, remove the bay leaf and cloves. Add paprika and dried oregano to the pot, stirring well to combine. Let it simmer for an additional 10-15 minutes, allowing the flavors to meld together. Adjust the seasoning with more salt if necessary.
- Serve: Ladle the Patsa into bowls. Drizzle with vinegar and sprinkle with fresh parsley before serving. Optionally, you can add a drizzle of olive oil for extra richness. Serve hot and enjoy!
Extra Tips
When preparing Patsa, it’s important to give yourself plenty of time, as the dish requires slow cooking to develop its rich flavors.
You can also adjust the level of acidity by varying the amount of vinegar according to your taste preference. For an added kick, consider mixing in a bit of chili flakes or serving with crusty bread on the side.
Don’t hesitate to experiment with herbs and spices to personalize your Patsa, creating a dish that feels uniquely yours!
Tsoureki

Tsoureki is a traditional Greek sweet bread, often enjoyed during Easter celebrations but delightful at any time of the year. This rich and aromatic bread is made with a blend of flour, sugar, and milk, and is typically flavored with spices such as mastic and mahleb. The dough is braided into intricate shapes that not only make it visually appealing but also enhance its texture.
Tsoureki is usually enjoyed fresh, served with butter, or used to make French toast, making it a versatile addition to any meal. Making Tsoureki at home can be a rewarding experience, as the aroma of baking bread fills your kitchen with warmth and comfort. The process may seem intricate, but with the right ingredients and a bit of patience, you can achieve a beautifully soft and fluffy bread.
This recipe serves 4-6 people, making it perfect for sharing with family or friends during festive occasions or cozy gatherings.
Ingredients:
- 500g all-purpose flour
- 200ml milk, warmed
- 100g sugar
- 100g unsalted butter, softened
- 2 large eggs
- 1 packet (7g) active dry yeast
- 1 teaspoon salt
- 1 teaspoon ground mahleb (optional)
- 1 teaspoon mastic powder (optional)
- Zest of 1 orange
- 1 egg (for egg wash)
- Sesame seeds (for topping)
Cooking Instructions:
- Activate the Yeast: In a small bowl, combine the warmed milk, sugar, and active dry yeast. Allow it to sit for about 5-10 minutes until it becomes frothy. This step guarantees that the yeast is activated and ready to leaven the dough.
- Mix the Wet Ingredients: In a large mixing bowl, whisk together the softened butter, eggs, and the yeast mixture. You should have a smooth, creamy mixture that’s well-combined.
- Combine Dry Ingredients: In another bowl, mix the flour, salt, ground mahleb, mastic powder, and orange zest. Gradually add the dry mixture to the wet ingredients, stirring with a wooden spoon or spatula until a shaggy dough begins to form.
- Knead the Dough: Transfer the dough onto a lightly floured surface and knead for about 10-15 minutes until it’s smooth and elastic. If the dough is too sticky, sprinkle a little more flour as needed.
- First Rise: Place the kneaded dough in a lightly greased bowl, cover it with plastic wrap or a damp cloth, and let it rise in a warm place for about 1-2 hours, or until it has doubled in size.
- Shape the Dough: Once risen, punch down the dough to release the air. Divide it into three equal portions. Roll each portion into long strands (about 30 cm each) and braid them together to form a loaf. Pinch the ends to seal.
- Second Rise: Place the braided dough on a baking sheet lined with parchment paper. Cover it again and let it rise for another 30-45 minutes until it has puffed up.
- Preheat and Prepare for Baking: Preheat your oven to 180°C (350°F). While the oven is warming, beat the remaining egg and brush it over the surface of the dough. Sprinkle sesame seeds on top for added flavor and texture.
- Bake the Tsoureki: Bake the bread in the preheated oven for 25-30 minutes, or until it’s golden brown and sounds hollow when tapped on the bottom.
- Cool and Serve: Remove the Tsoureki from the oven and let it cool on a wire rack. Slice and enjoy either plain or with spreads of your choice.
Extra Tips:
For an even richer flavor, consider adding a few tablespoons of Greek yogurt to the dough mixture. Additionally, be mindful of the rising times; if your kitchen is cool, the dough may take longer to rise.
Always ascertain that the dough is in a warm, draft-free area to achieve the best results. Tsoureki is best enjoyed fresh, but you can also freeze it for later, just be sure to wrap it tightly to preserve its moisture.
Yogurt With Honey and Nuts

Yogurt with Honey and Nuts is a classic Greek dessert that beautifully combines creamy, tangy yogurt with the sweetness of honey and the crunch of nuts. This dish isn’t only indulgent but also incredibly simple to prepare, making it a perfect option for a quick yet impressive dessert.
Traditionally served as a light end to a meal or as a revitalizing snack, this delightful treat showcases some of the best flavors of Greece, offering a taste of Mediterranean sunshine.
This dessert is versatile and can be enjoyed at any time of the day. You can serve it as a luxurious breakfast, a delightful afternoon snack, or a light dessert after dinner. The combination of yogurt, honey, and a mix of nuts creates a harmonious balance of flavors and textures that will please anyone.
With just a few ingredients, you’ll have a dessert that isn’t only delicious but also packed with protein and healthy fats.
Ingredients (serving size of 4-6 people):
- 4 cups of Greek yogurt
- 1 cup of honey
- 1 cup of mixed nuts (walnuts, almonds, pistachios, or hazelnuts), roughly chopped
- 1 teaspoon of vanilla extract (optional)
- A pinch of cinnamon (optional)
Cooking Instructions:
- Prepare the Yogurt: In a large mixing bowl, take the Greek yogurt and stir it gently to create a smooth and creamy texture. If you’re using vanilla extract, add it at this stage and mix until well combined.
- Layer the Yogurt: Divide the yogurt evenly among serving bowls or cups. Aim for about 2/3 cup of yogurt per serving. This will create a lovely base for your honey and nuts.
- Drizzle with Honey: Take the honey and drizzle it generously over the yogurt in each bowl. You can adjust the amount of honey to your taste preference; some may like it sweeter while others prefer a light drizzle.
- Add the Nuts: Sprinkle the chopped mixed nuts over the honey-drizzled yogurt. Be generous with the nuts to give each bite a satisfying crunch.
- Sprinkle Cinnamon (Optional): If you like, add a pinch of cinnamon over the top for an extra flavor boost. This step is optional but adds a warm spice that complements the other ingredients beautifully.
- Serve Immediately or Chill: You can serve the dessert immediately for a fresh taste, or let it chill in the refrigerator for about 30 minutes to enhance the flavors. This dessert is best enjoyed cold.
Extra Tips: When preparing Yogurt with Honey and Nuts, feel free to customize it by adding your favorite fruits, such as figs, berries, or pomegranate seeds, for added freshness and flavor.
You can also experiment with different types of honey, as each variety will impart a unique taste to the dish. If you’re aiming for a healthier option, consider using a low-fat Greek yogurt and adjust the amount of honey to suit your dietary preferences.
Enjoy this delightful treat any time of day!