

When hosting, I love keeping things simple yet flavorful, and these 14 easy Greek appetizer board recipes do just that.
Picture creamy tzatziki, crispy spanakopita bites, and vibrant Greek salad skewers all coming together for a stress-free gathering.
Each dish not only brings the essence of Greece to my table but also offers the chance to enjoy quality time with friends.
Curious about how to create this delightful spread?
Let’s explore the recipes together.
Tzatziki Dip
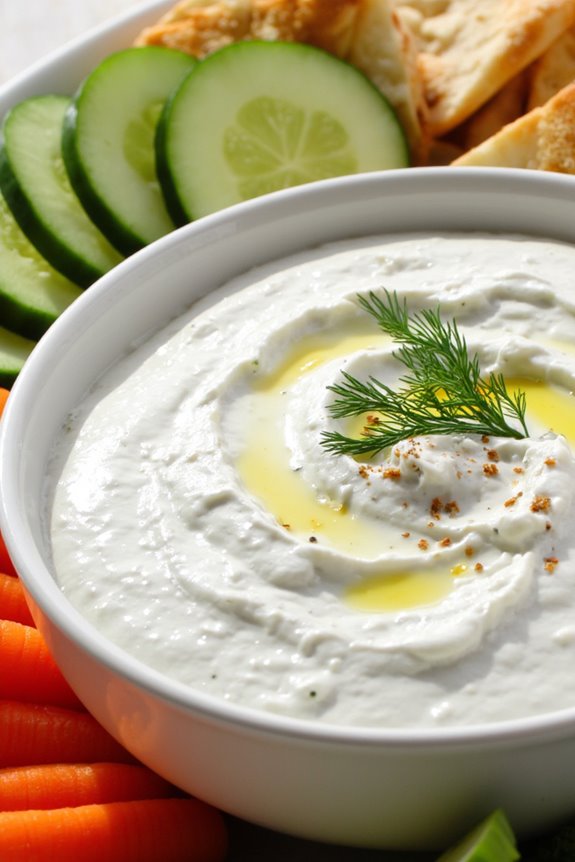
Tzatziki Dip is a classic Greek appetizer that brings together the freshness of cucumbers, the creaminess of yogurt, and the vibrant flavors of garlic and herbs.
This dip isn’t only a staple in Greek cuisine but also a versatile addition to any appetizer board, providing a revitalizing contrast to richer dishes. Traditionally served with pita bread or fresh vegetables, tzatziki can also be used as a sauce for grilled meats or as a flavorful dressing for salads.
Making tzatziki at home is simple and requires minimal ingredients. The key to a great tzatziki lies in the quality of the yogurt and the technique used to prepare the cucumbers. By straining the yogurt and properly salting the cucumbers, you can achieve a thick and creamy dip that’s bursting with flavor.
Perfect for parties, gatherings, or a cozy night in, tzatziki is sure to be a crowd-pleaser.
Ingredients (Serves 4-6)
- 2 cups Greek yogurt
- 1 medium cucumber
- 2 cloves garlic, minced
- 1 tablespoon olive oil
- 1 tablespoon fresh dill, chopped (or 1 teaspoon dried dill)
- 1 tablespoon fresh lemon juice
- Salt, to taste
- Pepper, to taste
Instructions
1. Prepare the Cucumber: Start by washing the cucumber thoroughly. Then, peel the cucumber and cut it in half lengthwise. Remove the seeds using a spoon to avoid excess moisture in the dip. Grate the cucumber using a box grater or a food processor.
After grating, place the cucumber in a clean kitchen towel or cheesecloth, twist it, and squeeze out as much excess liquid as possible. This step is essential to prevent the tzatziki from becoming watery.
2. Combine the Ingredients: In a mixing bowl, add the 2 cups of Greek yogurt. Next, add the minced garlic, olive oil, chopped dill, and fresh lemon juice. Mix these ingredients together until they’re well combined.
3. Incorporate the Cucumber: Once the cucumber has been drained of excess liquid, add it to the yogurt mixture. Stir everything together gently so that the cucumber is evenly distributed throughout the dip.
4. Season to Taste: Taste the tzatziki and add salt and pepper according to your preference. Remember that you can always adjust the seasoning later, so start with a little and add more as needed.
5. Chill and Serve: Cover the bowl with plastic wrap and refrigerate the tzatziki for at least 30 minutes before serving. This will allow the flavors to meld and enhance the overall taste.
When ready to serve, give it a quick stir and transfer it to a serving bowl.
Extra Tips
For an extra burst of flavor, consider adding a splash of red wine vinegar or a pinch of cayenne pepper for some heat.
If you can, prepare the tzatziki a few hours ahead of time or even the day before, as this will allow the flavors to develop more fully. Serve with a variety of accompaniments such as warm pita bread, crunchy vegetable sticks, or as a sauce with grilled meats for a deliciously authentic Greek experience.
Hummus With Olive Oil

Hummus is a classic Greek appetizer that brings a creamy, rich texture and a delightful flavor to any gathering. This versatile dip is made from chickpeas, tahini, lemon juice, and garlic, creating a blend that pairs beautifully with pita bread, fresh vegetables, or even as a spread on sandwiches. The addition of olive oil not only enhances its flavor but also adds a silky finish that makes hummus irresistible.
Whether you’re hosting a party or simply enjoying a cozy evening at home, this hummus recipe is bound to impress your guests.
Making hummus from scratch is straightforward and requires minimal ingredients, making it a budget-friendly option for your appetizer board. With a good food processor, you can whip up a smooth and creamy hummus in just a few minutes. The key to achieving the perfect texture is to use high-quality olive oil and to blend the ingredients until they’re completely smooth.
This recipe serves 4-6 people, making it ideal for sharing or for keeping as leftovers throughout the week.
Ingredients:
- 1 can (15 oz) chickpeas, drained and rinsed
- 1/4 cup tahini
- 2 tablespoons olive oil (plus more for drizzling)
- 2 tablespoons lemon juice
- 1 clove garlic, minced
- 1/2 teaspoon ground cumin
- Salt to taste
- Water (as needed)
- Fresh parsley for garnish (optional)
- Paprika for garnish (optional)
Cooking Instructions:
- Prepare the Ingredients: Start by gathering all your ingredients. Drain and rinse the chickpeas under cold water to remove excess sodium and any canning liquid. This step helps in achieving a cleaner taste in your hummus.
- Blend the Base Ingredients: In a food processor, combine the rinsed chickpeas, tahini, olive oil, lemon juice, minced garlic, ground cumin, and a pinch of salt. Pulse the mixture a few times to start breaking down the chickpeas.
- Process Until Smooth: Continue to blend the mixture for about 1-2 minutes. You may need to stop and scrape down the sides of the bowl to ascertain all ingredients are well combined. If the mixture appears too thick or chunky, add a tablespoon of water at a time while blending until you reach your desired consistency.
- Taste and Adjust Seasoning: Once the hummus is smooth, taste it and adjust the seasoning as needed. You can add more salt, lemon juice, or garlic according to your preference.
- Serve and Garnish: Transfer the hummus to a serving bowl. Drizzle with additional olive oil and sprinkle paprika and chopped parsley on top for garnish. Serve the hummus with warm pita bread, fresh vegetables, or your favorite dipping snacks.
Extra Tips:
For an even creamier hummus, consider peeling the chickpeas before blending; this removes the skins and results in a smoother texture. Additionally, using freshly squeezed lemon juice rather than bottled can enhance the flavor greatly.
Store any leftover hummus in an airtight container in the refrigerator for up to a week, and it can also be frozen for longer storage. Just be sure to give it a good stir after thawing, as the texture may change slightly. Enjoy your homemade hummus!
Spanakopita Bites

Spanakopita Bites are a delightful Greek appetizer that perfectly captures the flavors of traditional spanakopita but in a bite-sized form. These savory pastries are filled with a creamy mixture of spinach, feta cheese, and aromatic herbs, all enveloped in crispy phyllo dough.
They’re perfect for parties, gatherings, or just as a delicious snack to enjoy at home. The flaky texture combined with the rich filling makes these little bites an irresistible treat for anyone who loves Mediterranean cuisine.
Making Spanakopita Bites isn’t only satisfying but also relatively simple. With just a few ingredients and a little bit of time, you can create a platter that will impress your guests and satisfy your taste buds.
Whether served warm out of the oven or at room temperature, these bites are sure to be a hit. Let’s get started on creating this delicious appetizer that showcases the best of Greek flavors.
Ingredients (Serves 4-6)
- 1 package (16 oz) phyllo dough, thawed
- 2 cups fresh spinach, chopped
- 1 cup feta cheese, crumbled
- 1 cup ricotta cheese
- 1 large egg
- 1/4 cup fresh parsley, chopped
- 1/4 cup green onions, chopped
- 1 teaspoon dried dill
- Salt and pepper to taste
- 1/2 cup melted butter (for brushing)
Cooking Instructions
1. Preheat the Oven: Start by preheating your oven to 375°F (190°C). This guarantees that the Spanakopita Bites cook evenly and get nice and crispy.
2. Prepare the Spinach Mixture: In a large bowl, combine the chopped fresh spinach, crumbled feta cheese, ricotta cheese, and the egg. Mix in the chopped parsley, green onions, dried dill, and season with salt and pepper.
Make sure everything is well mixed to create a cohesive filling.
3. Assemble the Phyllo Dough: Lay out a sheet of phyllo dough on a clean surface and brush it lightly with melted butter. Place another sheet on top and repeat the buttering process.
This layering will create a flaky texture when baked. Cut the layered phyllo into strips (about 3 inches wide).
4. Fill and Fold: Take a strip of phyllo dough and place a spoonful of the spinach mixture at one end. Fold the strip over the filling to create a triangle shape, then continue folding the triangle up the strip, maintaining the triangle shape as you go.
Brush the final edge with butter to seal it.
5. Bake the Bites: Place the folded Spanakopita Bites on a baking sheet lined with parchment paper, making sure they’re spaced apart. Brush the tops with additional melted butter for a golden finish.
Bake in the preheated oven for 20-25 minutes, or until they’re golden brown and crispy.
6. Serve: Once baked, remove the Spanakopita Bites from the oven and let them cool for a few minutes. Serve warm or at room temperature with a side of tzatziki sauce for dipping, if desired.
Extra Tips
When working with phyllo dough, it’s important to keep it covered with a damp cloth while you assemble the bites to prevent it from drying out.
Additionally, feel free to customize the filling by adding other ingredients such as artichoke hearts or sun-dried tomatoes for extra flavor. If you want to prepare them in advance, you can assemble the bites, freeze them on a baking sheet, and then transfer them to an airtight container for later use.
Just add an extra few minutes to the baking time if cooking from frozen. Enjoy your Spanakopita Bites!
Greek Salad Skewers

Greek Salad Skewers are the perfect addition to any appetizer board, providing a burst of fresh flavors and vibrant colors that will delight your guests. These skewers combine classic Greek salad ingredients into a convenient and visually appealing format. Perfect for summer gatherings, picnics, or as a light snack, they’re easy to prepare and can be made ahead of time, allowing you to spend more time enjoying the occasion.
This dish isn’t only simple but also customizable. You can mix and match ingredients based on your preferences or what you have on hand. The combination of juicy tomatoes, crunchy cucumbers, creamy feta cheese, and tangy olives results in a revitalizing bite that captures the essence of the Mediterranean. Serve them with a drizzle of olive oil and a sprinkle of oregano for an extra touch of flavor.
Ingredients (Serves 4-6)
- 1 pint cherry tomatoes
- 1 cucumber, sliced into rounds
- 1 bell pepper (red or yellow), cut into bite-sized pieces
- 1 cup feta cheese, cubed
- 1/2 cup Kalamata olives, pitted
- 1/4 cup fresh parsley, chopped (for garnish)
- 2 tablespoons extra virgin olive oil
- 1 teaspoon dried oregano
- Salt and pepper to taste
- Skewers (wooden or metal)
Cooking Instructions
- Prepare the Ingredients: Begin by washing the cherry tomatoes, cucumbers, and bell pepper. Slice the cucumbers into rounds and cut the bell pepper into bite-sized pieces. Cube the feta cheese and set all the ingredients aside.
- Assemble the Skewers: Take a skewer and start by threading on a cherry tomato, followed by a cucumber slice, a piece of bell pepper, a cube of feta cheese, and finally an olive. Repeat this process until the skewer is filled, leaving some space at the ends for handling. Aim for about 4-5 pieces of each ingredient per skewer.
- Repeat for All Skewers: Continue assembling the skewers until all your ingredients are used up. You should be able to make around 8-10 skewers, depending on how much of each ingredient you use.
- Drizzle with Olive Oil: Once all the skewers are assembled, place them on a serving platter. Drizzle the extra virgin olive oil over the skewers evenly, ensuring each one gets a touch of flavor.
- Season and Garnish: Sprinkle the skewers with dried oregano, salt, and pepper to taste. Finish with a sprinkle of fresh parsley for a pop of color and freshness.
- Chill and Serve: If time allows, refrigerate the skewers for about 30 minutes before serving to let the flavors meld together. Serve chilled or at room temperature for the best experience.
Extra Tips
For an added twist, consider marinating the feta cheese in herbs or spices for a more robust flavor. You can also experiment with other vegetables like zucchini or cherry peppers for variation.
If you’re preparing these skewers ahead of time, store them in the refrigerator in an airtight container to maintain freshness. Just be sure to drizzle the olive oil and add seasonings just before serving to keep everything vibrant and flavorful!
Feta and Olive Platter
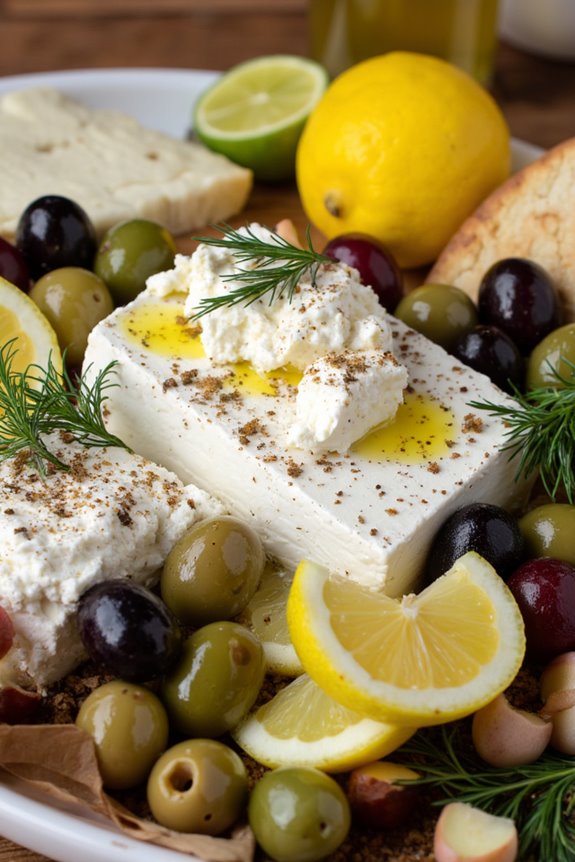
The Feta and Olive Platter is a delightful Mediterranean appetizer that brings a taste of Greece right to your table. This dish isn’t only visually appealing but also incredibly easy to prepare, making it perfect for gatherings or a casual evening at home. The combination of creamy feta cheese with a variety of olives creates a mouthwatering balance of flavors that will have your guests reaching for more.
To elevate the platter, you can include additional elements such as fresh herbs, roasted peppers, and a drizzle of olive oil. The beauty of this dish lies in its versatility; feel free to customize the ingredients based on your preferences or what you have on hand. It’s a fantastic way to introduce the vibrant flavors of Greek cuisine in a simple yet sophisticated manner.
Ingredients (Serves 4-6)
- 8 oz feta cheese, crumbled or in large blocks
- 1 cup assorted olives (Kalamata, green, and Castelvetrano)
- 1/4 cup extra virgin olive oil
- 1-2 teaspoons dried oregano
- 1 clove garlic, thinly sliced
- 1 small lemon, sliced
- Fresh parsley or dill for garnish
- Pita bread or crackers for serving
Instructions
- Prepare the Feta: If using a block of feta cheese, gently crumble it into bite-sized pieces or leave it whole for a more rustic look. Place the feta on a serving platter as the centerpiece of the dish.
- Arrange the Olives: Select a variety of olives to provide different flavors and textures. Arrange them around the feta on the platter, ensuring they’re accessible for guests.
- Add the Olive Oil: Drizzle the extra virgin olive oil over the feta and olives. This not only enhances the flavors but also adds a beautiful sheen to the dish.
- Season with Oregano and Garlic: Sprinkle the dried oregano evenly over the feta and olives. Distribute the thinly sliced garlic around the platter for an aromatic touch.
- Add Lemon Slices: Place the lemon slices strategically on the platter. The citrus will add a revitalizing contrast to the rich feta and olives.
- Garnish: Finish by scattering fresh parsley or dill over the top for a pop of color and added freshness. This also adds a hint of herbal flavor to the dish.
- Serve with Pita Bread or Crackers: Provide a side of pita bread or an assortment of crackers to accompany the platter. Guests can scoop up the feta and olives for a delicious bite.
Extra Tips
When preparing the Feta and Olive Platter, consider letting the dish sit for about 30 minutes at room temperature before serving. This allows the flavors to meld beautifully.
Additionally, experiment with different types of olives, as each variety brings its unique flavor profile. Don’t hesitate to add other ingredients like roasted red peppers or artichoke hearts for an even more diverse platter.
Finally, always use high-quality olive oil, as it greatly enhances the overall taste of the dish.
Grilled Eggplant Rolls

Grilled Eggplant Rolls are a delightful addition to any Greek appetizer board, combining the smoky flavor of grilled eggplant with a rich filling of creamy feta cheese and fresh herbs. These rolls aren’t only visually appealing but also offer a burst of Mediterranean flavors in each bite. Perfect for sharing, they can be served warm or at room temperature, making them a versatile option for gatherings or casual dinners.
The preparation of these rolls is simple and rewarding. By grilling the eggplant slices, you achieve a tender texture that allows them to be easily rolled around the delicious filling. The combination of feta cheese, parsley, and mint adds a rejuvenating taste that complements the grilled eggplant beautifully. Serve these delightful rolls with a drizzle of olive oil and a sprinkle of black pepper for an added touch of flavor.
Ingredients (serves 4-6 people):
- 2 large eggplants
- 1 cup crumbled feta cheese
- 1/4 cup chopped fresh parsley
- 1/4 cup chopped fresh mint
- 2 tablespoons olive oil
- 1 clove garlic, minced
- Salt and pepper to taste
- Lemon wedges for serving (optional)
Cooking Instructions:
- Prepare the Eggplants: Start by washing the eggplants and trimming off the ends. Slice them lengthwise into 1/4-inch thick slices. This will allow for easy rolling once they’re grilled.
- Salt the Eggplant: Place the eggplant slices on a clean surface or in a colander, and sprinkle them generously with salt. Let them sit for about 30 minutes. This will help draw out excess moisture and bitterness, resulting in a better texture and flavor once grilled.
- Rinse and Dry: After 30 minutes, rinse the eggplant slices under cold water to remove the salt. Pat them dry with a paper towel to absorb excess moisture.
- Grill the Eggplant: Preheat your grill or grill pan over medium-high heat. Brush both sides of the eggplant slices with olive oil. Grill the slices for about 3-4 minutes on each side until they’re tender and have nice grill marks. Remove them from the grill and let them cool slightly.
- Make the Filling: In a mixing bowl, combine the crumbled feta cheese, chopped parsley, chopped mint, minced garlic, and a pinch of salt and pepper. Mix well until all ingredients are combined, creating a creamy filling.
- Assemble the Rolls: Take a grilled eggplant slice and place a spoonful of the feta filling on one end. Carefully roll the eggplant slice around the filling, and secure it with a toothpick if necessary. Repeat this process until all eggplant slices and filling are used.
- Serve: Arrange the grilled eggplant rolls on a serving platter. Drizzle with a little olive oil and sprinkle with additional black pepper if desired. Serve with lemon wedges on the side for a zesty finish.
Extra Tips:
For an even richer flavor, consider marinating the grilled eggplant rolls in a light vinaigrette before serving. This can enhance the taste and make them even more irresistible.
Additionally, feel free to experiment with the filling by adding ingredients like sun-dried tomatoes or olives for a unique twist. These rolls can also be made ahead of time; simply store them in the refrigerator and serve them chilled or at room temperature for a convenient appetizer option!
Stuffed Grape Leaves (Dolmas)
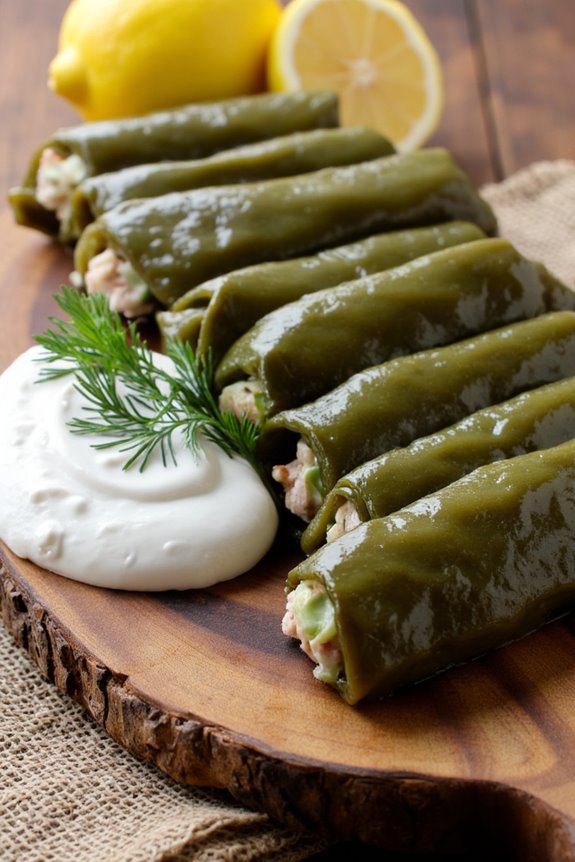
Stuffed grape leaves, known as dolmas, are a beloved Greek appetizer that showcases the vibrant flavors of Mediterranean cuisine. Traditionally, these delightful bites are made with tender grape leaves wrapped around a fragrant filling of rice, herbs, and spices. The combination of fresh ingredients creates a dish that isn’t only delicious but also visually appealing, making it perfect for sharing with family and friends.
Dolmas are often served with a side of tangy yogurt or lemon for dipping, enhancing their flavor profile.
Making dolmas can be a rewarding experience, as the process allows you to connect with the rich culinary traditions of Greece. While some may be intimidated by the idea of rolling grape leaves, with a little practice, you’ll find it easy and enjoyable. This recipe guides you through the steps to create a flavorful batch of stuffed grape leaves that can be enjoyed warm or at room temperature, making them an excellent addition to any appetizer board.
Ingredients (serving size of 4-6 people):
- 1 jar (16 oz) grape leaves in brine, rinsed and drained
- 1 cup long-grain rice
- 1 medium onion, finely chopped
- 2 tablespoons olive oil
- 1/4 cup fresh parsley, chopped
- 1/4 cup fresh dill, chopped
- 1 teaspoon dried mint
- 1/2 teaspoon salt
- 1/4 teaspoon black pepper
- 2 cups vegetable broth or water
- 1 lemon, juiced (for serving)
- Greek yogurt (optional, for serving)
Cooking Instructions:
1. Prepare the Filling: In a medium saucepan, heat the olive oil over medium heat. Add the chopped onion and sauté until it becomes translucent, about 5 minutes. Stir in the rice, parsley, dill, dried mint, salt, and black pepper. Cook for an additional 2-3 minutes, allowing the rice to absorb some of the flavors and become slightly toasted.
Remove from heat and let the mixture cool for a few minutes.
2. Prepare the Grape Leaves: While the filling is cooling, carefully remove the grape leaves from the jar and rinse them thoroughly under cold water to remove excess brine. Lay the leaves flat on a clean surface, vein side up. If the leaves are stiff, briefly blanch them in boiling water for 1-2 minutes to soften them.
3. Stuff the Grape Leaves: Place about 1 tablespoon of the rice mixture at the base of each grape leaf. Fold the sides over the filling, then roll it tightly from the base to the tip, similar to making a burrito.
Repeat this process until all the filling is used, placing the rolled dolmas seam side down.
4. Cook the Dolmas: In a large pot, arrange the stuffed grape leaves tightly in a single layer, seam side down. Add enough vegetable broth or water to cover the dolmas (about 1-2 cups). Place a heatproof plate on top of the dolmas to keep them submerged during cooking.
Bring to a simmer over medium heat, then reduce to low, cover, and cook for about 30-40 minutes, or until the rice is tender and the leaves are soft.
5. Serve: Once cooked, allow the dolmas to cool slightly before serving. Drizzle with fresh lemon juice and Serve with Greek yogurt on the side, if desired.
Extra Tips:
When preparing dolmas, it’s important to choose tender grape leaves for the best texture and flavor. If you have access to fresh grape leaves, you can use those instead, but be sure to blanch them first to soften them.
Additionally, feel free to customize the filling by adding ground meat or other vegetables, depending on your preference. Dolmas can be made ahead of time and stored in the refrigerator, making them an excellent option for entertaining or meal prep.
Roasted Red Pepper Dip

Roasted Red Pepper Dip is a vibrant and flavorful addition to any Greek appetizer board, perfect for sharing with friends and family. This dip combines the sweet and smoky flavors of roasted red peppers with creamy ingredients, creating a delectable spread that pairs beautifully with pita bread, crackers, or fresh vegetables.
It’s not only easy to prepare but also packed with flavor, making it an irresistible choice for gatherings or a cozy night in. This delightful dip can be prepared ahead of time, allowing the flavors to meld beautifully.
Whether you’re hosting a dinner party, enjoying a picnic, or simply indulging in a snack, Roasted Red Pepper Dip will surely impress your guests. Serve it alongside other Greek appetizers, such as olives, feta cheese, and stuffed grape leaves, for a complete Mediterranean experience.
Ingredients (serves 4-6):
- 2 large roasted red peppers (jarred or homemade)
- 1 cup cream cheese, softened
- 1/2 cup sour cream
- 1/4 cup mayonnaise
- 2 cloves garlic, minced
- 1 tablespoon lemon juice
- 1 teaspoon smoked paprika
- Salt and pepper to taste
- Fresh parsley, chopped (for garnish)
Cooking Instructions:
1. Prepare the Roasted Red Peppers: If using jarred roasted red peppers, drain and rinse them under cold water to remove excess oil and preservatives. If you prefer homemade roasted peppers, roast them in the oven at 425°F (220°C) for about 30-40 minutes, turning occasionally, until the skin is charred and blistered.
Allow them to cool, then peel off the skin and remove the seeds.
2. Blend the Ingredients: In a food processor, combine the roasted red peppers, softened cream cheese, sour cream, and mayonnaise. Add the minced garlic, lemon juice, and smoked paprika. Blend until the mixture is smooth and creamy, scraping down the sides of the bowl as needed.
3. Season to Taste: Once blended, taste the dip and add salt and pepper according to your preference. Blend again briefly to incorporate the seasoning.
4. Chill the Dip: Transfer the dip to a serving bowl and cover it with plastic wrap or a lid. Refrigerate for at least 30 minutes to an hour to allow the flavors to meld together. This step is essential for enhancing the taste of the dip.
5. Garnish and Serve: Before serving, give the dip a quick stir and garnish it with freshly chopped parsley. Serve it with an assortment of pita bread, crackers, or fresh vegetables for dipping.
Extra Tips:
For a slightly spicier version of Roasted Red Pepper Dip, consider adding a pinch of red pepper flakes or a dash of hot sauce to the mix. Additionally, if you want to enhance the flavor even further, try adding a tablespoon of chopped olives or sun-dried tomatoes.
This dip can also be made a day in advance; just store it in an airtight container in the refrigerator. The longer it sits, the more the flavors will develop, making it a fantastic make-ahead option for your next gathering!
Mini Pita Bread Sandwiches
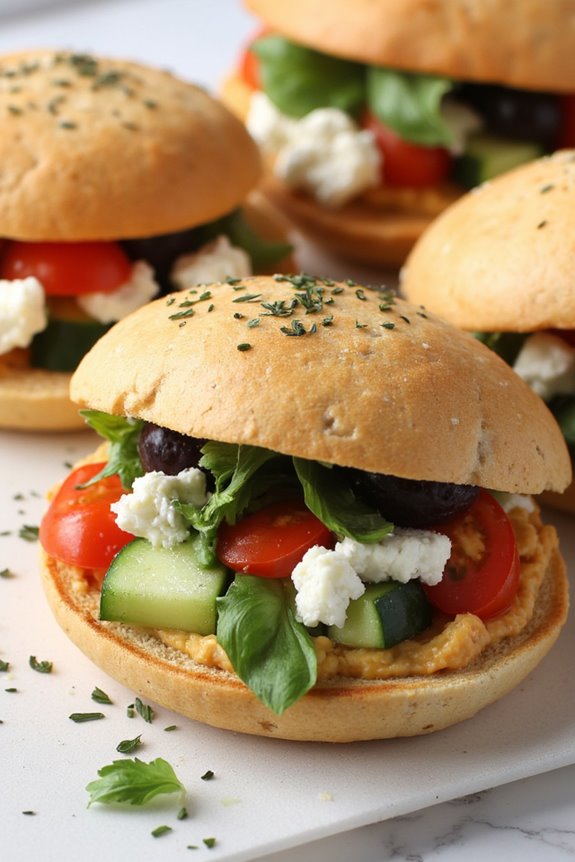
Mini pita bread sandwiches are a delightful addition to any Greek appetizer board, offering a perfect combination of flavors and textures. These bite-sized treats are incredibly versatile and can be filled with a variety of ingredients, making them an ideal choice for entertaining guests.
Whether you’re hosting a casual gathering or a more formal event, these mini sandwiches will impress your friends and family with their fresh ingredients and vibrant flavors.
To create these mini pita bread sandwiches, you’ll need fresh mini pitas as the base, which provide a soft yet sturdy vessel for your fillings. Popular choices include creamy hummus, crisp cucumbers, juicy tomatoes, tangy feta cheese, and aromatic herbs.
With just a few simple ingredients, you can whip up a delicious platter that’s both satisfying and visually appealing. Let’s explore the ingredients and instructions to make these tasty mini sandwiches.
Ingredients (Serves 4-6):
- 12 mini pita breads
- 1 cup hummus (store-bought or homemade)
- 1 cup diced cucumbers
- 1 cup diced tomatoes
- 1 cup crumbled feta cheese
- ½ cup sliced black olives
- ¼ cup chopped fresh parsley or dill
- Olive oil (for drizzling)
- Salt and pepper (to taste)
Instructions:
- Prepare the Pita Breads: Start by carefully slicing each mini pita bread in half to create pockets. This will serve as the base for your fillings. Make sure not to cut all the way through so that the pita remains intact for stuffing.
- Prepare the Filling Ingredients: In separate bowls, arrange the diced cucumbers, diced tomatoes, crumbled feta cheese, and sliced olives. This will allow your guests to customize their mini sandwiches according to their preferences.
- Assemble the Mini Sandwiches: Take a piece of the sliced mini pita and spread a generous tablespoon of hummus inside each pocket. Next, layer in the diced cucumbers, tomatoes, crumbled feta, and olives. You can be as generous or as modest with each ingredient as you like!
- Garnish and Season: Once you’ve filled the pita pockets, sprinkle some chopped fresh parsley or dill into each one for added flavor and crispness. Drizzle a bit of olive oil over the top and season with salt and pepper according to your taste.
- Serve and Enjoy: Arrange the mini pita sandwiches on a serving platter. You can serve them immediately or refrigerate them for up to an hour to allow the flavors to meld together. These sandwiches are best enjoyed fresh but can also be made ahead of time for convenience.
Extra Tips:
When preparing mini pita bread sandwiches, feel free to experiment with different fillings to suit your taste or dietary needs.
Consider adding roasted red peppers, grilled chicken, or even a dollop of tzatziki for a revitalizing twist. If you want to make the sandwiches even more appealing, you can toast the pita bread lightly in a skillet or oven before filling them.
This adds a delightful crunch and enhances the overall flavor of the dish. Enjoy your culinary creation!
Saganaki (Fried Cheese)

Saganaki is a beloved Greek appetizer that showcases the rich flavors and textures of cheese, typically fried to golden perfection. This dish is often prepared with a variety of cheeses, but the most popular choices are Kefalotyri or Graviera, which melt beautifully and develop a crispy crust when cooked.
Saganaki isn’t just a treat for the taste buds; it’s also a feast for the eyes, often served sizzling hot right in the pan, making it an irresistible starter for any Mediterranean meal. The dish is frequently accompanied by a squeeze of fresh lemon juice, enhancing its savory profile and adding a touch of brightness.
This simple yet indulgent recipe is perfect for sharing with friends and family, as it serves 4-6 people. Whether you’re hosting a gathering or just want to indulge in a little Greek flair at home, Saganaki is sure to be a hit. Pair it with olives, fresh bread, or a vibrant Greek salad to create a delightful appetizer board that will transport your guests to the sun-soaked shores of Greece.
Ingredients:
- 1 pound of Kefalotyri or Graviera cheese
- 1 cup all-purpose flour
- 1/2 cup olive oil
- 1 lemon, cut into wedges
- Fresh parsley, chopped (for garnish)
- Salt (to taste)
Cooking Instructions:
- Prepare the Cheese: Begin by cutting the cheese into thick slices, about 1/2 inch thick. This thickness will help the cheese retain its shape while frying and create a wonderful crispy exterior.
- Dredge in Flour: Pour the all-purpose flour onto a plate. Take each slice of cheese and coat it evenly on both sides with flour, shaking off any excess. The flour helps create a crispy crust when the cheese is fried.
- Heat the Oil: In a large skillet, heat the olive oil over medium-high heat. You want the oil hot enough to sizzle when you add the cheese, but not so hot that it smokes. A good test is to sprinkle a small amount of flour into the oil; if it bubbles, the oil is ready.
- Fry the Cheese: Carefully place the floured cheese slices into the hot oil, making sure not to overcrowd the pan. Fry for about 2-3 minutes on each side, or until golden brown. Use tongs to flip the slices gently to avoid breaking them.
- Drain and Serve: Once the cheese is golden and crispy, remove it from the skillet and place it on a plate lined with paper towels to absorb any excess oil. Sprinkle lightly with salt while still hot.
- Garnish and Enjoy: Transfer the fried cheese to a serving platter, garnish with chopped parsley, and serve immediately with lemon wedges on the side for squeezing over the cheese. Enjoy it hot for the best flavor and texture!
Extra Tips:
For the best results, make certain your oil is at the right temperature before adding the cheese, as this will guarantee a crispy crust without making the cheese too greasy.
If you’re concerned about the cheese sticking to the skillet, consider using a non-stick pan or adding a little more oil. Additionally, feel free to experiment with different types of cheese to find your perfect flavor combination, and don’t forget to serve it with some crusty bread for an even more satisfying experience!
Chickpea Salad
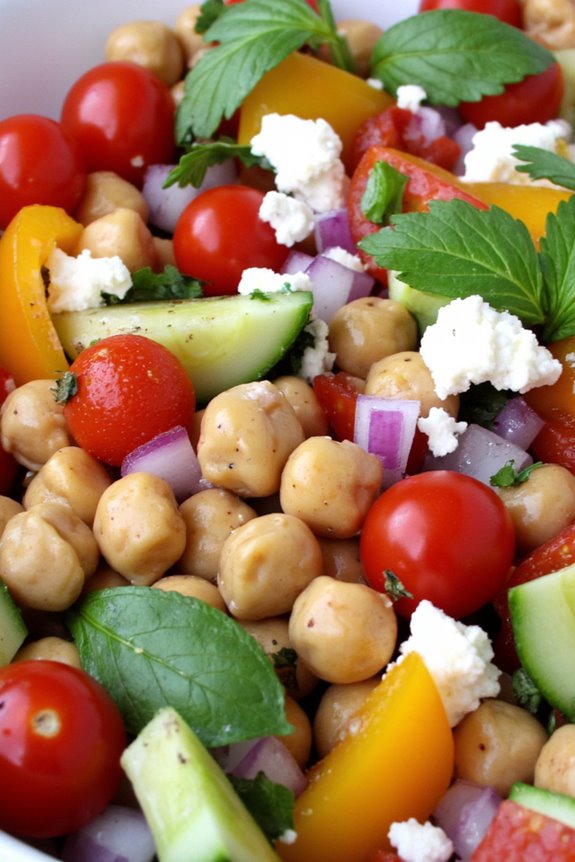
Chickpea salad is a delightful and nutritious addition to any Greek appetizer board. This vibrant dish combines the earthy flavor of chickpeas with fresh vegetables, herbs, and a zesty dressing, making it both rejuvenating and satisfying. Not only is it easy to prepare, but it also offers a great source of protein and fiber, perfect for a light snack or as part of a larger spread. The salad can be made ahead of time and served chilled, allowing the flavors to meld beautifully.
The beauty of this chickpea salad lies in its versatility. You can customize it with your favorite seasonal vegetables or add different herbs to enhance the flavor profile. Serve it as a dip with pita bread or alongside other appetizers such as olives and feta cheese for a complete Greek experience. Whether it’s for a casual gathering or a festive occasion, this salad is sure to impress.
Ingredients (Serves 4-6)
- 1 can (15 oz) chickpeas, drained and rinsed
- 1 cup cherry tomatoes, halved
- 1 cucumber, diced
- 1/2 red onion, finely chopped
- 1 bell pepper (red or yellow), diced
- 1/4 cup fresh parsley, chopped
- 1/4 cup fresh mint, chopped (optional)
- 1/4 cup feta cheese, crumbled (optional)
- 3 tablespoons olive oil
- 2 tablespoons lemon juice
- 1 teaspoon dried oregano
- Salt and pepper to taste
Cooking Instructions
- Prepare the Chickpeas: Start by draining and rinsing the canned chickpeas under cold water. This step helps remove excess sodium and any canning liquid. Once rinsed, place the chickpeas in a large mixing bowl.
- Chop the Vegetables: Dice the cucumber, halve the cherry tomatoes, chop the red onion, and dice the bell pepper. Make sure to cut all vegetables into bite-sized pieces for easy eating. Add all the chopped vegetables to the bowl with the chickpeas.
- Add Fresh Herbs: Finely chop the fresh parsley and mint (if using) and sprinkle them over the mixture in the bowl. Fresh herbs add a burst of flavor and freshness to the salad, enhancing its Mediterranean appeal.
- Prepare the Dressing: In a small bowl, whisk together the olive oil, lemon juice, dried oregano, salt, and pepper. This dressing will bring all the ingredients together, so confirm it’s well combined.
- Combine Everything: Pour the dressing over the chickpea and vegetable mixture. Gently toss everything together until all ingredients are evenly coated with the dressing. Be careful not to mash the chickpeas while mixing.
- Add Feta (optional): If you’re using feta cheese, sprinkle it over the salad and lightly toss to combine. The feta adds a creamy texture and salty flavor that complements the vegetables beautifully.
- Chill and Serve: For the best flavor, cover the salad and refrigerate it for at least 30 minutes before serving. This allows the flavors to meld together. Serve the chickpea salad chilled, either on its own or as part of your Greek appetizer board.
Extra Tips
When making chickpea salad, feel free to get creative with the ingredients. You can substitute or add other vegetables like diced avocado, grated carrots, or even olives for a briny kick.
If you prefer a more robust flavor, let the salad sit in the refrigerator for a few hours or overnight, as this will enhance the taste further. Additionally, for a touch of heat, consider adding a pinch of red pepper flakes. Enjoy your chickpea salad as a healthy and colorful addition to your appetizer spread!
Olive Tapenade
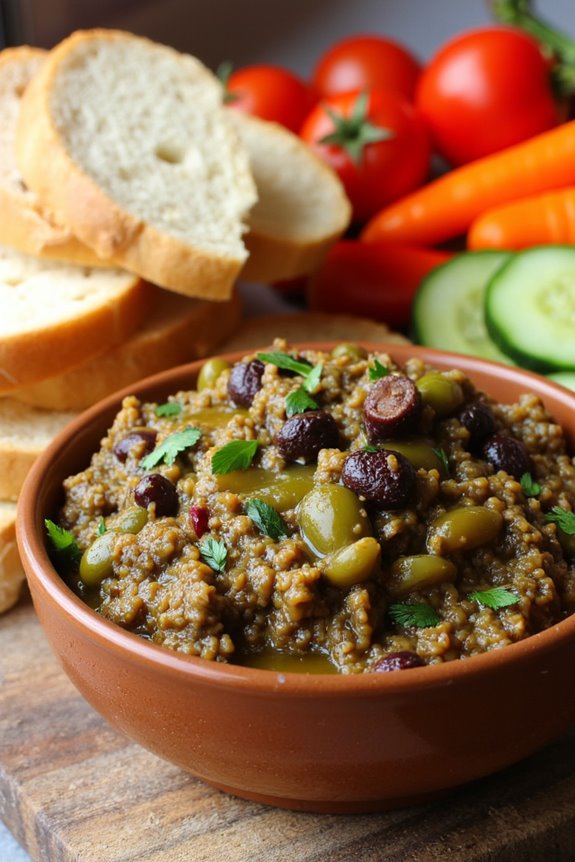
Olive tapenade is a classic Mediterranean spread that bursts with flavor and is perfect for any Greek appetizer board. This dish, originating from the Provence region of France, is made mainly from olives, capers, and olive oil, creating a rich and savory topping that pairs beautifully with crusty bread, crackers, or fresh vegetables.
The blend of tangy, briny, and earthy flavors makes olive tapenade a delightful addition to your appetizer spread, and it’s incredibly easy to prepare. Making olive tapenade isn’t only simple but also quick, allowing you to whip up this flavorful spread in under 15 minutes.
Whether you’re hosting a gathering or just looking for a tasty snack, this recipe will impress your guests and elevate your appetizer game. Plus, it can be made ahead of time and stored in the refrigerator, making it a convenient option for busy hosts.
Ingredients (Serves 4-6 People)
- 1 cup pitted Kalamata olives
- 1 cup pitted green olives (such as Castelvetrano or Gaeta)
- 2 tablespoons capers, rinsed
- 2 cloves garlic, minced
- 1/4 cup extra virgin olive oil
- 1 tablespoon fresh lemon juice
- 1 teaspoon dried oregano
- Freshly ground black pepper, to taste
- Optional: fresh herbs (like parsley or basil) for garnish
Cooking Instructions
- Prepare the Ingredients: Start by gathering all your ingredients and verifying the olives are pitted. If you’re using whole olives, you’ll need to remove the pits first. This will guarantee a smooth and enjoyable tapenade without any unexpected crunches.
- Combine Ingredients in a Food Processor: In a food processor, combine the Kalamata olives, green olives, capers, and minced garlic. These ingredients form the base of your tapenade and work together to create a delicious and robust flavor profile.
- Pulse to Desired Consistency: Pulse the mixture until it reaches a coarse paste. Be careful not to over-process; you want to maintain some texture in the tapenade. Scrape down the sides of the bowl as needed to confirm everything is evenly mixed.
- Add Olive Oil and Lemon Juice: With the food processor running, slowly drizzle in the extra virgin olive oil and lemon juice. This will help emulsify the mixture and create a creamier texture. Continue to pulse until well combined.
- Season and Finalize: Stir in the dried oregano and freshly ground black pepper to taste. Sample your tapenade, and adjust the seasoning if necessary. If you prefer a bit more acidity, feel free to add more lemon juice.
- Serve or Store: Transfer the tapenade to a serving bowl. You can serve it immediately with your choice of bread, crackers, or veggies. Alternatively, cover the bowl with plastic wrap and refrigerate for up to a week. The flavors will deepen as it sits, making it even more delicious.
Extra Tips
For a unique twist, consider adding a tablespoon of chopped sun-dried tomatoes or a splash of balsamic vinegar for added complexity.
If you prefer a spicier kick, you can incorporate a pinch of red pepper flakes. Remember to taste your tapenade during preparation, as the saltiness of the olives and capers can vary. Adjust the seasoning accordingly, and don’t hesitate to experiment with different types of olives to find your perfect blend!
Spanakopita Wontons

Spanakopita, a traditional Greek pastry filled with spinach and feta cheese, is a beloved appetizer that captures the essence of Mediterranean flavors. In this recipe, we take the classic spanakopita and give it a modern twist by wrapping the filling in wonton wrappers.
These Spanakopita Wontons are crispy on the outside and packed with a savory mixture of spinach, feta, and herbs on the inside, making them a delightful addition to any appetizer board. They’re easy to prepare and can be enjoyed hot or at room temperature, making them perfect for gatherings and parties.
To make Spanakopita Wontons, you’ll need fresh ingredients and a little creativity. The wonton wrappers provide a light and flaky texture that contrasts beautifully with the creamy filling. The combination of spinach and feta offers a burst of flavor that’s both satisfying and wholesome.
Whether you’re hosting a dinner party or simply looking to enjoy a delicious snack, these wontons are sure to impress your guests and will disappear quickly from your appetizer board.
Ingredients (Serves 4-6)
- 1 cup fresh spinach, chopped
- 1 cup ricotta cheese
- 1/2 cup feta cheese, crumbled
- 1/4 cup green onions, chopped
- 1 clove garlic, minced
- 1/2 teaspoon dried oregano
- Salt and pepper, to taste
- 20 wonton wrappers
- Olive oil, for brushing
- Optional: lemon wedges, for serving
Cooking Instructions
1. Preheat the Oven: Start by preheating your oven to 375°F (190°C). This guarantees that the wontons cook evenly and become crispy.
2. Prepare the Filling: In a mixing bowl, combine the chopped spinach, ricotta cheese, feta cheese, green onions, minced garlic, oregano, salt, and pepper. Mix well until all ingredients are thoroughly combined.
Taste and adjust seasoning if necessary.
3. Assemble the Wontons: Take a wonton wrapper and place about one tablespoon of the filling in the center. Moisten the edges of the wrapper with a little water using your finger.
Fold the wrapper in half to form a triangle, pressing down to seal the edges. You can also bring the two opposite corners together to create a more decorative shape, sealing it in the same way.
4. Brush with Olive Oil: Place the assembled wontons on a baking sheet lined with parchment paper. Brush the tops lightly with olive oil to help them crisp up in the oven.
5. Bake: Bake the wontons in the preheated oven for 15-20 minutes, or until they’re golden brown and crispy. Keep an eye on them to avoid burning.
6. Serve: Once baked, remove the wontons from the oven and let them cool slightly. Serve warm with lemon wedges on the side for an extra burst of flavor.
Extra Tips
For added depth of flavor, consider sautéing the spinach and garlic in a little olive oil before mixing them with the cheeses and herbs. This can enhance the taste and aroma of your filling considerably.
If you want to make these wontons ahead of time, you can assemble them and keep them in the refrigerator for a few hours before baking. Just remember to brush them with olive oil immediately before putting them in the oven for the best results.
Enjoy your Spanakopita Wontons!
Marinated Artichokes
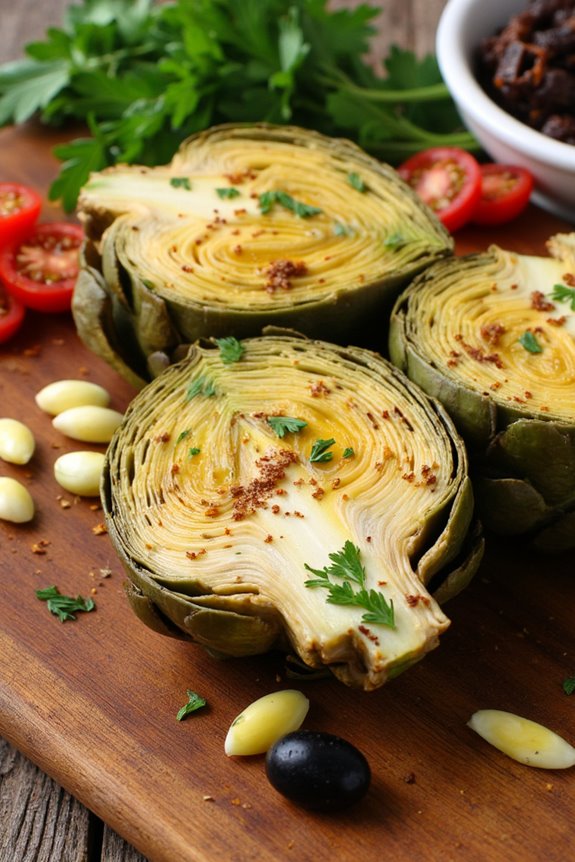
Marinated artichokes are a delightful addition to any Greek appetizer board, offering a burst of flavor that perfectly complements other Mediterranean dishes. These tender artichoke hearts are marinated in a zesty blend of olive oil, vinegar, and herbs, creating a savory treat that can be enjoyed on their own or as part of a larger spread.
Ideal for gatherings, they can easily be prepared ahead of time, allowing the flavors to meld beautifully as they sit.
The great thing about marinated artichokes is their versatility. They can be served on a charcuterie board, tossed into salads, or even used as a topping for bruschetta. With just a handful of ingredients, you can whip up a batch that brings a taste of Greece right to your home.
Plus, their vibrant presentation and tangy flavor will surely impress your guests.
Ingredients (Serves 4-6):
- 1 jar (14 oz) marinated artichoke hearts
- 1/4 cup extra virgin olive oil
- 2 tablespoons red wine vinegar
- 2 cloves garlic, minced
- 1 teaspoon dried oregano
- 1/2 teaspoon crushed red pepper flakes (optional)
- Salt and pepper to taste
- Fresh parsley, chopped (for garnish)
Cooking Instructions:
- Prepare the Artichokes: If using jarred marinated artichoke hearts, drain them from the liquid and set them aside. If you prefer to use fresh artichokes, clean and trim them before cooking until tender, about 20-30 minutes in boiling salted water. Once cooked, let them cool before cutting them into quarters.
- Make the Marinade: In a mixing bowl, combine the extra virgin olive oil, red wine vinegar, minced garlic, dried oregano, and crushed red pepper flakes if using. Stir well to mix all the ingredients together, creating a fragrant marinade.
- Combine Artichokes and Marinade: Add the drained artichoke hearts to the bowl with the marinade. Stir gently to guarantee that all the artichokes are well-coated in the marinade mixture.
- Season and Marinate: Taste the mixture and season with salt and pepper according to your preference. Cover the bowl with plastic wrap or transfer the artichokes and marinade to a sealed container. Refrigerate for at least 1 hour, preferably overnight, to allow the flavors to develop.
- Serve: Before serving, remove the marinated artichokes from the refrigerator and let them sit at room temperature for about 15-20 minutes. Transfer to a serving platter, sprinkle with chopped fresh parsley, and enjoy as part of your Greek appetizer board.
Extra Tips:
To enhance the flavors even further, consider adding other ingredients to your marinated artichokes, such as sliced olives, capers, or sun-dried tomatoes.
These additions will provide extra depth and texture. Additionally, allow the marinated artichokes to sit for longer if you can; the more time they’ve to soak in the marinade, the more flavorful they’ll be.
Always taste before serving and adjust seasoning if needed. Enjoy your delicious marinated artichokes!