

Have you ever noticed how Greek cuisine is perfect for embracing plant-forward days? It’s all about fresh flavors and wholesome ingredients that make every meal feel nourishing and satisfying. From zesty Greek salads to hearty lentil soups, there’s an abundance of delicious meat-free dishes to explore. Join me as we discover 12 healthy Greek recipes that will enhance your dining experience while staying true to authentic Greek flavors. Let’s get cooking and enjoy the vibrant world of Greek food together!
Greek Salad With Chickpeas
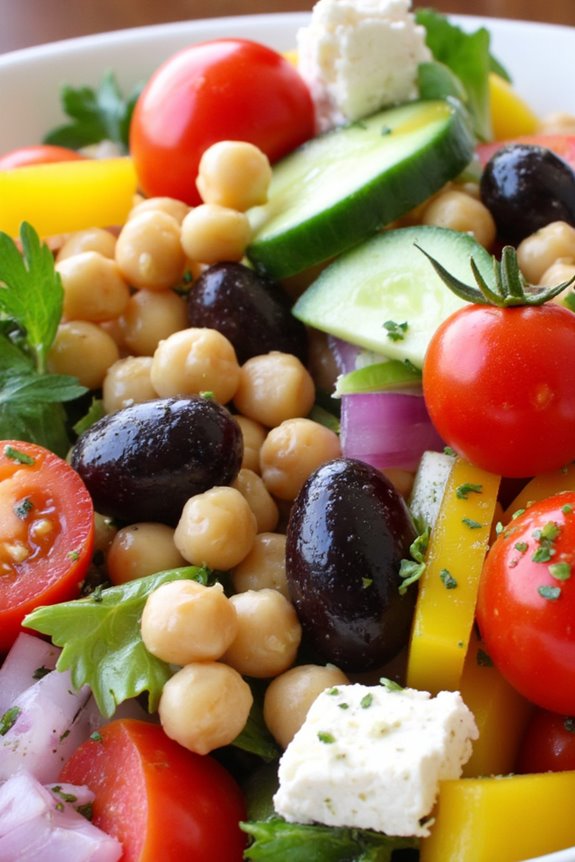
Greek Salad With Chickpeas is a vibrant and nutritious dish that captures the essence of Mediterranean flavors. This salad isn’t only visually appealing with its colorful ingredients but also packed with protein and fiber thanks to the addition of chickpeas.
It’s a simple yet satisfying dish that can serve as a side or a light main course, perfect for warm weather or as a revitalizing meal any time of the year. This salad is easy to prepare and requires minimal cooking, making it a great option for those busy weeknights or for entertaining guests.
The combination of fresh vegetables, creamy feta cheese, and zesty dressing creates a delightful blend of textures and flavors. Plus, it’s a fantastic way to incorporate more plant-based ingredients into your diet while enjoying the delicious tastes of Greece.
Ingredients (Serves 4-6)
- 1 can (15 oz) chickpeas, drained and rinsed
- 1 medium cucumber, diced
- 1 pint cherry tomatoes, halved
- 1 bell pepper (red or yellow), diced
- 1 small red onion, finely chopped
- 1 cup Kalamata olives, pitted and halved
- 1 cup feta cheese, crumbled
- 1/4 cup fresh parsley, chopped
- 1/4 cup olive oil
- 2 tablespoons red wine vinegar
- 1 teaspoon dried oregano
- Salt and pepper to taste
Cooking Instructions
- Prepare the Vegetables: Begin by washing and chopping all the fresh vegetables. Dice the cucumber and bell pepper, halve the cherry tomatoes, and finely chop the red onion. Place all the chopped vegetables into a large mixing bowl.
- Add the Chickpeas: Once the vegetables are prepared, add the drained and rinsed chickpeas to the bowl. Chickpeas not only provide protein but also add a nice texture to the salad.
- Include the Olives and Feta: Next, add the Kalamata olives and crumbled feta cheese to the bowl. The olives introduce a briny flavor that complements the creamy feta beautifully.
- Make the Dressing: In a small bowl, whisk together the olive oil, red wine vinegar, dried oregano, salt, and pepper. This dressing will enhance the flavors of the salad and bring all the ingredients together.
- Combine Everything: Pour the dressing over the salad mixture and gently toss everything together until well combined. Make sure all the ingredients are evenly coated with the dressing.
- Garnish and Serve: Finally, sprinkle the chopped fresh parsley over the top of the salad for a pop of color and added freshness. Serve immediately, or let it chill in the fridge for about 30 minutes to allow the flavors to meld.
Extra Tips
For an added twist, consider incorporating other vegetables such as radishes or avocados for extra flavor and texture. You can also customize the salad by adding ingredients like artichoke hearts or sun-dried tomatoes.
This Greek Salad With Chickpeas can be made ahead of time, making it perfect for meal prep or potlucks. Just be sure to keep the dressing separate until you’re ready to serve to prevent the salad from becoming soggy. Enjoy this healthy and delicious dish as a revitalizing meal anytime!
Spanakopita (Spinach Pie)

Spanakopita, a traditional Greek dish, is a savory pie filled with a delicious mixture of spinach, feta cheese, and herbs, all enveloped in flaky layers of phyllo pastry. This vegetarian delight isn’t only healthy but also packed with flavor, making it a favorite among both vegetarians and meat-lovers alike.
The combination of nutrient-rich spinach and protein-packed feta creates a wholesome meal that can be enjoyed at any time of the day, whether as a main dish or a snack.
Preparing Spanakopita can be a fun and rewarding experience. Although it may seem intimidating to work with phyllo pastry, once you get the hang of it, you’ll find that the crispy, golden layers are well worth the effort.
This recipe guides you through each step, guaranteeing that your Spanakopita turns out perfectly crispy and flavorful. Serve it warm with a side of yogurt or a fresh salad for a complete meal that embodies the essence of Greek cuisine.
Ingredients (Serves 4-6):
- 1 package (16 oz) phyllo pastry
- 1 lb fresh spinach (or 10 oz frozen spinach, thawed and drained)
- 1 cup feta cheese, crumbled
- 1/2 cup ricotta cheese
- 1/2 cup onion, finely chopped
- 3 cloves garlic, minced
- 2 large eggs
- 1/4 cup fresh dill, chopped (or 1 tablespoon dried dill)
- 1/4 cup olive oil
- Salt and pepper, to taste
- 1 tablespoon lemon juice
- 1/4 cup melted butter (for brushing)
Cooking Instructions:
1. Preheat Oven: Start by preheating your oven to 375°F (190°C). This guarantees that the Spanakopita will bake evenly and achieve a beautifully golden crust.
2. Prepare the Filling: In a large skillet, heat 2 tablespoons of olive oil over medium heat. Add the chopped onion and sauté until translucent, about 3-4 minutes.
Then, add the minced garlic and cook for an additional minute. If using fresh spinach, add it to the skillet and cook until wilted (about 5 minutes). If using frozen spinach, make sure it’s well-drained before mixing it in. Remove from heat and allow it to cool slightly.
3. Combine Ingredients: In a large mixing bowl, combine the cooled spinach mixture with crumbled feta, ricotta, eggs, dill, lemon juice, salt, and pepper. Mix well until all ingredients are evenly incorporated.
4. Assemble the Phyllo Layers: On a clean surface, lay out a sheet of phyllo pastry and brush it lightly with melted butter. Place another sheet on top and brush it again. Repeat this process until you have about six layers of phyllo.
5. Add the Filling: Spoon the spinach filling along one edge of the layered phyllo, leaving some space at the edges. Carefully fold the sides over the filling and roll the phyllo tightly to enclose the filling, creating a log-shaped pie.
6. Place in Baking Dish: Transfer the rolled Spanakopita to a greased baking dish, seam side down. Brush the top with more melted butter. Optionally, you can cut the top into diagonal slits to allow steam to escape while baking.
7. Bake: Place the baking dish in the preheated oven and bake for approximately 30-40 minutes, or until the pastry is golden brown and crispy.
8. Cool and Serve: Once baked, remove from the oven and let it cool for a few minutes before slicing. Serve warm or at room temperature.
Extra Tips:
When working with phyllo pastry, keep the unused sheets covered with a damp cloth to prevent them from drying out.
If you’re short on time, you can also make the filling ahead of time and store it in the refrigerator. For added flavor, experiment with different herbs such as parsley or mint, and don’t hesitate to adjust the cheese ratio to suit your taste.
Enjoy your Spanakopita with a dollop of tzatziki or a squeeze of fresh lemon for an extra burst of flavor!
Vegetarian Moussaka

Vegetarian Moussaka is a delightful twist on the classic Greek dish, traditionally made with layers of eggplant, potatoes, and a rich meat sauce. This meatless version maintains the essence of the original while incorporating a medley of vegetables and lentils, making it not only healthier but also packed with flavor.
The creamy béchamel sauce on top adds a luscious touch, creating a satisfying dish that’s perfect for family gatherings or a comforting weeknight dinner.
This dish isn’t only delicious but also versatile, allowing you to adapt the vegetables used based on what’s in season or what you have on hand. It’s a great way to incorporate more vegetables into your diet without sacrificing taste. Serve it with a fresh green salad and some crusty bread for a complete meal that everyone will love.
Ingredients (Serves 4-6):
- 2 medium eggplants, sliced into ¼ inch rounds
- 3 medium potatoes, sliced into ¼ inch rounds
- 1 medium onion, chopped
- 2 cloves garlic, minced
- 1 bell pepper, diced
- 1 zucchini, diced
- 1 cup cooked lentils (or canned, drained)
- 1 can (14 oz) diced tomatoes
- 1 teaspoon dried oregano
- 1 teaspoon ground cinnamon
- Salt and pepper to taste
- Olive oil for frying
- 2 cups milk (or plant-based milk)
- 3 tablespoons butter
- 3 tablespoons all-purpose flour
- 1/2 cup grated Parmesan cheese (optional)
- 1/4 teaspoon nutmeg (optional)
Cooking Instructions:
1. Prepare the Vegetables: Start by slicing the eggplants and potatoes. Sprinkle the eggplant slices with salt and let them sit for about 30 minutes to draw out the bitterness. Rinse and pat dry afterwards. This step is essential for achieving a more tender texture.
2. Cook the Potatoes: In a large pot of salted boiling water, add the potato slices and cook for about 5-7 minutes until slightly tender but not fully cooked. Drain and set aside. This will guarantee the potatoes don’t become mushy during baking.
3. Sauté the Vegetables: In a large skillet, heat some olive oil over medium heat. Add the chopped onion and garlic, and sauté until translucent. Then, add the bell pepper and zucchini, cooking for another 5 minutes until tender.
Stir in the cooked lentils, diced tomatoes, oregano, cinnamon, salt, and pepper. Let this mixture simmer for about 10 minutes until it thickens slightly.
4. Prepare the Béchamel Sauce: In a saucepan, melt butter over medium heat. Once melted, whisk in the flour and cook for about 1-2 minutes to form a roux. Gradually whisk in the milk, continuing to stir until the sauce thickens and is smooth.
Season with salt, pepper, and nutmeg. If desired, stir in half of the grated cheese for added flavor.
5. Assemble the Moussaka: Preheat your oven to 375°F (190°C). In a large baking dish, layer half of the potato slices on the bottom, followed by half of the eggplant slices. Spread the vegetable and lentil mixture over the eggplant, and then layer the remaining eggplant and potatoes on top.
Pour the béchamel sauce evenly over the top.
6. Bake the Moussaka: Sprinkle the remaining cheese on top of the béchamel, if using. Bake in the preheated oven for about 45-50 minutes or until the top is golden brown and bubbly.
Allow the moussaka to cool for about 10-15 minutes before serving. This resting time will help the layers set, making it easier to cut and serve.
Extra Tips:
When preparing Vegetarian Moussaka, feel free to experiment with other vegetables such as mushrooms, carrots, or spinach for added flavor and nutrition.
You can also make the dish ahead of time; it stores well in the refrigerator and can be reheated, making it a fantastic option for meal prep. For those who prefer a gluten-free option, substitute the all-purpose flour in the béchamel with a gluten-free flour blend.
Enjoy your cooking adventure with this classic Greek comfort food!
Stuffed Bell Peppers With Rice and Herbs

Stuffed bell peppers are a delightful and nutritious dish that embodies the essence of Greek cuisine. This vibrant recipe highlights the freshness of herbs and vegetables, combined with the wholesome goodness of rice. Perfect for a family meal or as a dish to serve at gatherings, these stuffed peppers aren’t only visually appealing but also packed with flavor.
By using a variety of herbs, this recipe brings a taste of the Mediterranean right to your table, all while being completely meat-free. This recipe is ideal for 4-6 people and is a great way to introduce more plant-based meals into your diet. The combination of rice, fresh vegetables, and aromatic herbs creates a filling and satisfying dish that can be enjoyed warm or at room temperature.
Serve these stuffed peppers with a side of Greek yogurt or a simple green salad for a complete meal that everyone will love.
Ingredients
- 4-6 large bell peppers (any color)
- 1 cup long-grain rice (uncooked)
- 2 cups vegetable broth or water
- 1 medium onion, finely chopped
- 2 cloves garlic, minced
- 1 medium zucchini, diced
- 1 medium tomato, diced
- 1 cup fresh spinach, chopped
- 1/2 cup fresh parsley, chopped
- 1/4 cup fresh dill, chopped
- 1 teaspoon dried oregano
- 1 teaspoon salt
- 1/2 teaspoon black pepper
- 1/4 cup olive oil
- 1/2 cup feta cheese, crumbled (optional)
- Lemon wedges, for serving
Cooking Instructions
- Prepare the Bell Peppers: Preheat your oven to 375°F (190°C). Begin by washing the bell peppers and slicing off the tops. Remove the seeds and membranes from the insides. If needed, trim the bottoms slightly to guarantee they stand upright. Arrange the prepared peppers in a baking dish.
- Cook the Rice: In a medium saucepan, combine the rice and vegetable broth (or water) and bring to a boil. Reduce the heat to low, cover, and let it simmer for about 15 minutes or until the rice is cooked and all the liquid is absorbed. Remove from heat and let it cool.
- Sauté the Vegetables: In a large skillet, heat olive oil over medium heat. Add the chopped onion and sauté until it becomes translucent, about 5 minutes. Add the minced garlic and cook for an additional minute until fragrant.
- Add the Remaining Ingredients: Stir in the diced zucchini and cook for about 3-4 minutes until slightly softened. Next, add the diced tomato, chopped spinach, parsley, dill, oregano, salt, and pepper. Cook for another 2-3 minutes until the spinach wilts and the mixture is well combined.
- Combine Rice and Vegetable Mixture: Once the rice has cooled slightly, add it to the skillet with the sautéed vegetables. If using, fold in the crumbled feta cheese. Mix everything together until fully combined.
- Stuff the Peppers: Carefully spoon the rice and vegetable mixture into each bell pepper, packing it gently but not too tightly. Confirm that the filling is heaped above the rim of the peppers.
- Bake the Peppers: Cover the baking dish with aluminum foil and bake in the preheated oven for 30 minutes. Then, remove the foil and bake for an additional 10-15 minutes until the peppers are tender and the tops are slightly browned.
- Serve: Remove the stuffed peppers from the oven and let them cool for a few minutes. Serve warm with lemon wedges on the side for squeezing over the peppers.
Extra Tips
For an added burst of flavor, consider roasting the bell peppers briefly before stuffing them to enhance their sweetness. You can also experiment with various grains, like quinoa or couscous, instead of rice for a different texture.
Feel free to incorporate other vegetables or adjust the herbs based on your preferences. If you want to make this dish ahead of time, you can prepare the filling and stuff the peppers a day in advance, then simply bake them when ready to serve. Enjoy your delicious and healthy Greek stuffed bell peppers!
Greek Lentil Soup (Fakes)

Greek Lentil Soup, known as Fakes, is a hearty and nutritious dish that embodies the essence of Mediterranean cooking. This soup isn’t only a staple in Greek households but also a delightful way to incorporate plant-based protein into your diet. Made with lentils, aromatic vegetables, and flavored with herbs, Fakes is both filling and heartwarming. It’s perfect for chilly evenings or when you’re looking for a light yet satisfying meal.
The beauty of this soup lies in its simplicity and the wholesome ingredients that come together to create a rich and flavorful dish. Lentils are packed with protein and fiber, making Fakes a healthy option for anyone, including vegetarians and vegans. This recipe is easy to prepare, and with minimal effort, you can enjoy a bowl of delicious Greek comfort food that’s sure to please everyone at your table.
Ingredients (Serves 4-6)
- 1 cup brown or green lentils, rinsed
- 1 large onion, chopped
- 2 carrots, diced
- 2 stalks celery, diced
- 3 cloves garlic, minced
- 1 can (14 oz) diced tomatoes, with juices
- 6 cups vegetable broth or water
- 1 teaspoon dried oregano
- 1 teaspoon dried thyme
- 2 bay leaves
- Salt and pepper, to taste
- 2 tablespoons olive oil
- Fresh parsley, chopped (for garnish)
- Lemon wedges (for serving)
Cooking Instructions
- Prepare the Vegetables: Begin by washing and chopping your vegetables. Dice the onion, carrots, and celery into small pieces, and mince the garlic. Having your ingredients prepped will make the cooking process smoother.
- Sauté the Aromatics: In a large pot, heat the olive oil over medium heat. Once hot, add the chopped onion, carrots, and celery. Sauté for about 5-7 minutes until the vegetables are softened and the onions are translucent. This will create a flavorful base for your soup.
- Add Garlic: Stir in the minced garlic and sauté for another minute until fragrant. Garlic adds depth to the flavor of the soup, so it’s important not to skip this step.
- Incorporate the Lentils and Tomatoes: Add the rinsed lentils and the can of diced tomatoes (with their juices) to the pot. Stir to combine all the ingredients together. The lentils will absorb flavors from the vegetables and tomatoes as they cook.
- Add Broth and Seasonings: Pour in the vegetable broth or water, and add the dried oregano, thyme, and bay leaves. Stir everything together, and bring the mixture to a boil.
- Simmer the Soup: Once boiling, reduce the heat to low and cover the pot. Let the soup simmer for about 30-40 minutes, or until the lentils are tender. Stir occasionally to make certain nothing sticks to the bottom.
- Season to Taste: After the lentils are cooked, remove the bay leaves and season the soup with salt and pepper according to your preference. This is the moment to adjust the flavors to your liking.
- Serve: Ladle the soup into bowls and garnish with chopped fresh parsley. Serve with lemon wedges on the side for a burst of acidity that enhances the flavors of the soup.
Extra Tips
When making Greek Lentil Soup, feel free to customize it with your favorite vegetables or herbs. For a spicier version, add a pinch of red pepper flakes or a splash of vinegar for added tang.
If you want a thicker consistency, blend a portion of the soup and mix it back in. This soup can be made ahead of time, as it tastes even better the next day when the flavors have had time to meld. Store leftovers in the refrigerator for up to three days, or freeze for future meals. Enjoy your healthy and delicious Fakes!
Roasted Vegetable and Feta Wrap

Roasted Vegetable and Feta Wrap is a delightful and nutritious dish that captures the essence of Mediterranean flavors while keeping it meat-free. This vibrant wrap combines a variety of seasonal vegetables, roasted to perfection, and paired with tangy feta cheese, all wrapped in a soft and warm tortilla. Perfect for a quick lunch or a light dinner, these wraps aren’t only easy to prepare but also packed with vitamins and minerals that will energize your day.
The beauty of this recipe lies in its versatility; you can customize the roasted vegetables according to your preference or what you have on hand. Bell peppers, zucchini, and eggplant are excellent choices, but feel free to throw in some cherry tomatoes or red onions for an extra burst of flavor. Whether you serve them with a side of Greek yogurt or a simple salad, these wraps provide a satisfying meal that everyone will love.
Ingredients (serving size: 4-6 people):
- 2 medium zucchini, sliced
- 1 medium red bell pepper, chopped
- 1 medium yellow bell pepper, chopped
- 1 medium eggplant, diced
- 1 red onion, sliced
- 3 tablespoons olive oil
- Salt and pepper to taste
- 1 teaspoon dried oregano
- 1 teaspoon garlic powder
- 1 cup crumbled feta cheese
- 4-6 whole wheat tortillas
- Fresh spinach or arugula, for serving
- Optional: Tzatziki sauce for drizzling
Cooking Instructions:
- Preheat the Oven: Begin by preheating your oven to 400°F (200°C). This guarantees that your vegetables will roast evenly and develop a nice caramelization.
- Prepare the Vegetables: In a large mixing bowl, combine the sliced zucchini, chopped bell peppers, diced eggplant, and sliced red onion. These vegetables not only provide great flavor but also a colorful presentation.
- Season the Vegetables: Drizzle the olive oil over the vegetables, and sprinkle with salt, pepper, dried oregano, and garlic powder. Toss everything together thoroughly, making certain the vegetables are well-coated with the oil and seasonings.
- Roast the Vegetables: Spread the seasoned vegetables evenly on a baking sheet lined with parchment paper. Place the baking sheet in the preheated oven and roast for about 20-25 minutes, or until the vegetables are tender and slightly browned. Halfway through, give them a stir to promote even roasting.
- Assemble the Wraps: Once the vegetables are roasted, remove them from the oven and let them cool slightly. Lay a tortilla flat on a clean surface, then add a generous handful of fresh spinach or arugula, followed by a portion of the roasted vegetables. Top with crumbled feta cheese.
- Wrap It Up: Fold the sides of the tortilla inward and then roll it up from the bottom to the top, creating a wrap. Repeat this process until all tortillas are filled and wrapped.
- Serve: Slice the wraps in half, if desired, and serve immediately. You can add a drizzle of tzatziki sauce on top or serve it on the side for dipping.
Extra Tips:
For added flavor and nutrition, consider marinating the vegetables in lemon juice and fresh herbs before roasting. This will enhance the Mediterranean taste and can be done an hour in advance.
Additionally, if you want a bit of crunch, feel free to add some toasted pine nuts or walnuts inside the wrap. These wraps can also be made ahead of time and stored in the refrigerator, making them perfect for meal prep or on-the-go lunches.
Enjoy your Roasted Vegetable and Feta Wraps, knowing they’re packed with wholesome goodness!
Tzatziki With Pita and Veggies

Tzatziki is a classic Greek dip that isn’t only invigorating but also incredibly versatile. This yogurt-based sauce, infused with cucumber, garlic, and a touch of dill, makes for a delightful addition to any meal or can be enjoyed on its own with pita bread and fresh vegetables.
Pairing tzatziki with warm pita and a colorful assortment of veggies turns this dish into a satisfying and healthy snack or appetizer, perfect for gatherings or a light lunch.
Making tzatziki is straightforward and can be done in just a few simple steps. The key to an authentic tzatziki lies in the quality of the yogurt and the freshness of the ingredients. Greek yogurt lends a creamy texture and rich flavor, while cucumbers add a crisp, invigorating bite.
Serve the tzatziki alongside warm pita bread and a variety of veggies for dipping, and you have a healthy, no-meat dish that everyone will love!
Ingredients (Serves 4-6):
- 2 cups Greek yogurt
- 1 medium cucumber, grated and excess water squeezed out
- 2-3 cloves garlic, minced
- 2 tablespoons fresh dill, chopped (or 1 tablespoon dried dill)
- 1 tablespoon olive oil
- 1 tablespoon lemon juice
- Salt and pepper to taste
- 4-6 pita bread rounds
- 1 cup assorted fresh veggies (carrots, bell peppers, cherry tomatoes, cucumber sticks, etc.)
Instructions:
1. Prepare the Cucumber: Start by grating the cucumber using a box grater or a food processor. Once grated, place the cucumber in a clean kitchen towel or cheesecloth and squeeze out as much excess water as you can. This step is vital to prevent the tzatziki from becoming watery.
2. Mix the Yogurt: In a large mixing bowl, add the Greek yogurt. This will be the base of your tzatziki, so make sure it’s of good quality for the best flavor and texture.
3. Add Flavors: To the yogurt, add the squeezed cucumber, minced garlic, chopped dill, olive oil, and lemon juice. Stir everything together until well combined. The garlic should be adjusted to your taste; start with two cloves and add more if you prefer a stronger flavor.
4. Season: Taste the mixture and season with salt and pepper according to your preference. Mix again to guarantee the seasoning is evenly distributed.
5. Chill: Cover the bowl with plastic wrap and refrigerate the tzatziki for at least 30 minutes. This chilling time allows the flavors to meld together beautifully.
6. Prepare the Pita and Veggies: While the tzatziki is chilling, preheat your oven to 375°F (190°C). Cut the pita bread into wedges and arrange them on a baking sheet. Bake for about 5-7 minutes until they’re warm and slightly crispy.
Meanwhile, wash and cut your assorted veggies into bite-sized pieces for dipping.
7. Serve: Once the tzatziki has chilled, remove it from the fridge and give it a quick stir. Transfer it to a serving bowl and arrange the warm pita wedges and fresh veggies around it. Serve immediately and enjoy!
Extra Tips:
For an extra layer of flavor, consider adding a pinch of smoked paprika or a drizzle of extra virgin olive oil over the tzatziki before serving.
You can also experiment with different herbs, such as mint or parsley, to give the dip a unique twist. If you’re preparing this dish ahead of time, it can be stored in the refrigerator for up to three days, making it a great option for meal prep or entertaining.
Enjoy your delicious and healthy Greek-inspired dish!
Grilled Vegetable Souvlaki

Grilled Vegetable Souvlaki is a delicious and vibrant dish that celebrates the flavors of Greece while keeping it entirely meat-free. This recipe features an assortment of colorful vegetables, marinated in a zesty blend of herbs and spices, and then skewered and grilled to perfection. The result is a delightful dish that can be served as an appetizer, a main course, or even as part of a larger mezze spread.
Pair these skewers with warm pita bread and a tangy tzatziki sauce for a truly authentic experience. This dish isn’t only healthy but also incredibly easy to prepare, making it perfect for weeknight dinners or summer barbecues. The marinated vegetables, including bell peppers, zucchini, and mushrooms, become tender and slightly charred when grilled, enhancing their natural flavors.
With its colorful presentation and mouthwatering aroma, Grilled Vegetable Souvlaki is sure to impress both vegetarians and meat-lovers alike.
Ingredients (Serves 4-6):
- 1 red bell pepper, cut into 1-inch pieces
- 1 yellow bell pepper, cut into 1-inch pieces
- 1 zucchini, sliced into 1-inch rounds
- 1 red onion, cut into wedges
- 8 oz (about 225g) mushrooms, halved
- 1/4 cup olive oil
- 3 tablespoons lemon juice
- 2 cloves garlic, minced
- 1 teaspoon dried oregano
- 1 teaspoon dried thyme
- Salt and pepper, to taste
- Skewers (wooden or metal)
Cooking Instructions:
- Prepare the Vegetables: Begin by washing and cutting your vegetables into uniform pieces. This guarantees that they cook evenly on the grill. Aim for roughly 1-inch pieces for the bell peppers, onion, and zucchini, and halved mushrooms.
- Make the Marinade: In a bowl, whisk together the olive oil, lemon juice, minced garlic, dried oregano, dried thyme, salt, and pepper. This marinade will infuse the vegetables with flavor and help them stay moist during grilling.
- Marinate the Vegetables: Place the cut vegetables in a large zip-top bag or a bowl. Pour the marinade over the vegetables, seal the bag or cover the bowl, and toss to coat everything evenly. Let them marinate for at least 30 minutes at room temperature or up to 2 hours in the refrigerator for more intense flavor.
- Prepare the Skewers: If you’re using wooden skewers, soak them in water for about 30 minutes before grilling to prevent burning. If using metal skewers, you can skip this step.
- Assemble the Skewers: Thread the marinated vegetables onto the skewers in an alternating pattern for a colorful presentation. Leave a little space between each piece to guarantee even cooking.
- Preheat the Grill: Heat your grill to medium-high heat. If using a grill pan, preheat it on the stovetop.
- Grill the Souvlaki: Once the grill is hot, place the skewers on it. Grill for about 10-15 minutes, turning occasionally, until the vegetables are tender and slightly charred. Keep an eye on them to avoid burning.
- Serve: Remove the skewers from the grill and let them cool for a minute. Serve warm with tzatziki sauce, pita bread, and a sprinkle of fresh herbs if desired.
Extra Tips:
For added flavor, consider adding cherry tomatoes or eggplant to your vegetable mix. You can also experiment with different herbs and spices in the marinade, such as basil or paprika, to create your unique twist on this dish.
If you’re looking for a smoky flavor, try grilling the vegetables over charcoal instead of gas. Serve with a side of Greek salad for a complete meal!
Olive and Tomato Bruschetta

Olive and Tomato Bruschetta is a delightful appetizer that captures the essence of Mediterranean cuisine, making it a perfect addition to any healthy meal spread. This dish combines the robust flavors of ripe tomatoes and a variety of olives with a touch of fresh herbs, all served on crunchy toasted bread.
Whether you’re hosting a gathering or simply looking for a light snack, this bruschetta is sure to impress with its vibrant colors and invigorating taste.
The simplicity of Olive and Tomato Bruschetta allows for easy preparation while still delivering a burst of flavor in every bite. With just a few ingredients, you can create a dish that isn’t only delicious but also packed with nutrients.
This recipe is ideal for vegetarians and those seeking to incorporate more plant-based options into their diet. Serve it as an appetizer or a light lunch, and enjoy the healthy benefits it brings to your table.
Ingredients (Serves 4-6 people):
- 1 baguette or ciabatta loaf
- 2 cups cherry tomatoes, halved
- 1 cup mixed olives (Kalamata, green, etc.), pitted and chopped
- 2 cloves garlic, minced
- 1/4 cup fresh basil, chopped
- 1/4 cup extra virgin olive oil
- 1 tablespoon balsamic vinegar
- Salt and pepper to taste
- Optional: Crumbled feta cheese for topping
Cooking Instructions:
- Prepare the Bread: Preheat your oven to 400°F (200°C). Slice the baguette or ciabatta loaf into 1/2-inch thick slices. Arrange the slices on a baking sheet and brush both sides lightly with olive oil. Bake for about 5-7 minutes, or until golden and crispy, flipping halfway through for even toasting.
- Make the Topping: In a medium mixing bowl, combine the halved cherry tomatoes and chopped olives. Add the minced garlic, chopped basil, and balsamic vinegar. Drizzle in the extra virgin olive oil, and season with salt and pepper to taste. Gently toss everything together until well mixed.
- Assemble the Bruschetta: Once the bread is toasted, remove it from the oven and let it cool slightly. Spoon a generous amount of the olive and tomato mixture onto each slice of toasted bread. If desired, sprinkle crumbled feta cheese on top for added flavor.
- Serve: Arrange the bruschetta on a serving platter. Optionally, drizzle a little more olive oil over the top before serving. Enjoy your Olive and Tomato Bruschetta as a delightful appetizer or snack!
Extra Tips: To enhance the flavor of your bruschetta, consider letting the tomato and olive mixture sit for about 15-20 minutes before serving. This allows the ingredients to marinate and develop a richer taste.
Additionally, feel free to experiment with different types of bread or add other toppings like roasted red peppers or artichokes for a unique twist. Enjoy!
Cucumber and Feta Salad
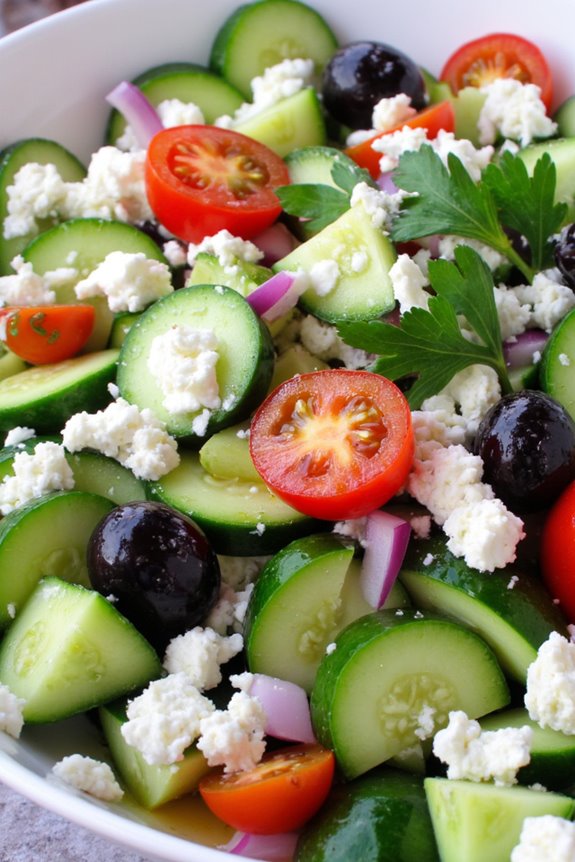
Cucumber and Feta Salad is a revitalizing and vibrant dish that embodies the flavors of Greece. Perfect for hot summer days or as a light side for any meal, this salad isn’t only easy to prepare but also packed with nutrients. With crunchy cucumbers, creamy feta cheese, and a zesty dressing, this salad is sure to please everyone at the table.
This dish highlights the simplicity of Mediterranean ingredients, making it a healthy no-meat option that can be enjoyed by vegetarians and meat-lovers alike. The combination of fresh herbs and tangy olives adds depth to the salad, making it a delightful addition to any gathering or a quick weekday lunch.
Ingredients (Serves 4-6)
- 4 cups of diced cucumbers
- 1 cup of crumbled feta cheese
- 1 cup of cherry tomatoes, halved
- 1/2 red onion, finely chopped
- 1/2 cup of Kalamata olives, pitted and sliced
- 1/4 cup of fresh parsley, chopped
- 1/4 cup of olive oil
- 2 tablespoons of red wine vinegar
- 1 teaspoon of dried oregano
- Salt and pepper to taste
Cooking Instructions
- Prepare the Vegetables: Begin by washing and peeling the cucumbers if desired. Dice them into bite-sized pieces and place them in a large mixing bowl. Halve the cherry tomatoes and finely chop the red onion, adding them to the bowl with the cucumbers.
- Add the Feta and Olives: Crumble the feta cheese into the bowl with the vegetables. Add the sliced Kalamata olives for an extra burst of flavor. The combination of these ingredients will create a delicious contrast of textures and tastes.
- Mix in Fresh Herbs: Chop the fresh parsley and sprinkle it over the salad mixture. This won’t only enhance the visual appeal but also add a fresh, aromatic flavor that complements the other ingredients beautifully.
- Prepare the Dressing: In a small bowl, whisk together the olive oil, red wine vinegar, dried oregano, salt, and pepper. This dressing will bring all the flavors together, so make sure to mix it well until it’s fully combined.
- Combine and Toss: Pour the dressing over the salad mixture and gently toss everything together until the vegetables are well coated. Be careful not to break the feta too much; you want to maintain some larger chunks for texture.
- Chill and Serve: Allow the salad to chill in the refrigerator for at least 30 minutes before serving. This will give the flavors time to meld and enhance the overall taste. Serve cold as a revitalizing side dish or a light main course.
Extra Tips
For added flavor, consider incorporating other ingredients such as bell peppers or avocado. You can also experiment with different herbs like mint or dill for a unique twist.
If you prefer a creamier texture, substitute some of the feta with Greek yogurt. This salad is best enjoyed fresh, but if you have leftovers, store them in an airtight container in the refrigerator for up to 2 days. Just be aware that the cucumbers may release some water, so give it a gentle toss before serving again.
Baked Eggplant With Tomato Sauce

Baked Eggplant With Tomato Sauce is a delightful Greek dish that brings together the savory flavors of the Mediterranean in a healthy, meat-free option. This recipe showcases the rich, earthy taste of eggplant, complemented by a robust tomato sauce, fresh herbs, and a sprinkle of cheese, making it a wholesome meal that’s both satisfying and nutritious.
Perfect for a family dinner or a gathering with friends, this dish is sure to impress even the most ardent meat lovers.
The preparation of Baked Eggplant With Tomato Sauce is simple and straightforward, allowing the natural flavors of the ingredients to shine. By baking the eggplant instead of frying it, this recipe maintains a healthy profile while still delivering a rich and hearty flavor.
Serve it alongside a fresh salad or some warm crusty bread for a complete meal that isn’t only delicious but also packed with vitamins and minerals.
Ingredients (Serves 4-6 people):
- 2 large eggplants
- 4 cups of diced tomatoes (fresh or canned)
- 1 medium onion, chopped
- 3 cloves of garlic, minced
- 1 tablespoon olive oil
- 1 teaspoon dried oregano
- 1 teaspoon dried basil
- Salt and pepper to taste
- 1 cup of crumbled feta cheese (optional)
- Fresh parsley, chopped for garnish
Cooking Instructions:
1. Preheat the Oven: Begin by preheating your oven to 375°F (190°C). This guarantees that your eggplant bakes evenly and achieves a nice, tender texture.
2. Prepare the Eggplants: Slice the eggplants in half lengthwise and scoop out some of the flesh with a spoon, leaving about half an inch of flesh inside. This will create a boat-like shape for the filling. Sprinkle the insides with salt and let them sit for about 30 minutes to draw out excess moisture and bitterness.
After 30 minutes, rinse and pat them dry with a paper towel.
3. Make the Tomato Sauce: In a large skillet, heat the olive oil over medium heat. Add the chopped onion and sauté until translucent, about 5 minutes. Stir in the minced garlic and cook for an additional minute until fragrant.
Add the diced tomatoes, oregano, basil, salt, and pepper. Simmer the sauce on low heat for about 20 minutes, allowing the flavors to meld together.
4. Fill the Eggplant Boats: After the sauce is ready, spoon the tomato mixture into each eggplant half, generously filling them. If you have any leftover tomato sauce, you can pour it over the top.
5. Bake the Eggplants: Place the filled eggplants in a baking dish and cover with aluminum foil. Bake in the preheated oven for 30 minutes. After 30 minutes, remove the foil and sprinkle crumbled feta cheese on top, if using.
Return to the oven and bake for an additional 15-20 minutes, until the eggplants are tender and the cheese is slightly golden.
6. Garnish and Serve: Once baked, remove the eggplants from the oven and let them cool for a few minutes. Garnish with fresh chopped parsley before serving. Enjoy your healthy and flavorful Baked Eggplant With Tomato Sauce!
Extra Tips:
When preparing Baked Eggplant With Tomato Sauce, feel free to customize the recipe by adding other ingredients such as bell peppers, zucchini, or mushrooms to the tomato sauce for added texture and flavor.
If you’re looking for a vegan option, simply omit the feta cheese or replace it with a dairy-free alternative. Remember to keep an eye on the baking time as ovens can vary, and you want to achieve a perfectly tender eggplant.
Greek Yogurt Parfait With Honey and Nuts

Greek Yogurt Parfait With Honey and Nuts is a delightful and nutritious dish that showcases the rich flavors and textures of Greek cuisine. This parfait isn’t only a perfect breakfast option but also serves as a satisfying snack or a light dessert. The creamy Greek yogurt provides a rich base that’s both high in protein and probiotics, promoting gut health.
Layered with sweet honey, crunchy nuts, and fresh fruit, this recipe creates a harmonious balance of flavors and nutrients that can be enjoyed by everyone. Preparing this parfait is incredibly simple and can be done in a matter of minutes, making it an ideal choice for busy mornings or gatherings.
You can customize it with your favorite fruits and nuts, allowing for a versatile dish that can be adapted to your personal taste. Whether you prefer the sweetness of berries, the crunchiness of almonds, or the richness of walnuts, this healthy Greek yogurt parfait is sure to please.
Ingredients (serving size: 4-6 people)
- 4 cups of Greek yogurt
- 1 cup of honey
- 1 cup of mixed nuts (such as almonds, walnuts, and pistachios), roughly chopped
- 2 cups of fresh fruits (such as strawberries, blueberries, and bananas), sliced or whole
- 1 teaspoon of vanilla extract (optional)
- A pinch of cinnamon (optional)
Instructions
- Prepare the Ingredients: Gather all your ingredients. Wash and slice the fresh fruits as needed. If you’re using whole fruits, keep them intact for layering later. Roughly chop the mixed nuts to guarantee they’re manageable for eating and layering in the parfait.
- Layer the Yogurt: In a clear glass or bowl, start by adding a generous scoop of Greek yogurt to the bottom. This will serve as the base of your parfait. If you’re using vanilla extract, you can mix it into the yogurt at this stage for added flavor.
- Add Honey: Drizzle a layer of honey over the yogurt. This will add sweetness and a beautiful gloss to your parfait. You can adjust the amount of honey based on your preference for sweetness.
- Incorporate the Fruits: Next, add a layer of your chosen fresh fruits on top of the honey. You can mix different fruits together or create separate layers with different types of fruit for a colorful presentation.
- Sprinkle Nuts: After the fruit layer, add a layer of the chopped mixed nuts. The nuts will provide a satisfying crunch and introduce healthy fats into the dish.
- Repeat Layers: Repeat the layering process (yogurt, honey, fruit, nuts) until you reach the top of the glass or bowl, finishing with a layer of nuts for a visually appealing presentation.
- Serve Immediately or Chill: Enjoy your Greek yogurt parfait right away or place it in the refrigerator for a short period if you’d like it to be chilled before serving.
Extra Tips
For an added touch, consider garnishing your parfait with a sprinkle of cinnamon or additional honey drizzled on top before serving. Feel free to experiment with different fruits and nuts based on seasonal availability, as this will keep the dish fresh and exciting.
If you’re preparing this parfait in advance, it’s best to store the components separately and assemble just before serving to retain the crunchiness of the nuts and freshness of the fruits.