

Greek yogurt has become my go-to secret for creating budget-friendly meals that don’t skimp on nutrition or flavor. Its versatility is simply amazing, whether I’m making a vibrant parfait or a savory dip. I’ve rounded up 11 fantastic recipes that highlight what Greek yogurt can do, making it easy to enjoy something delicious and healthy. If you’re looking to elevate your meals without breaking the bank, these tasty options are perfect for you. Let’s explore these ideas together and get inspired!
Greek Yogurt Parfait With Fresh Fruits and Granola
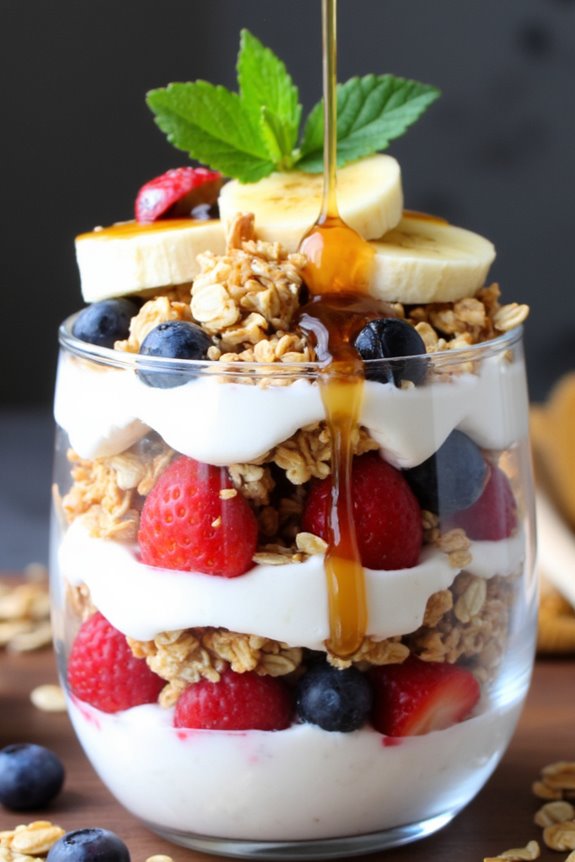
Greek Yogurt Parfait is a delightful and nutritious dish that’s perfect for breakfast, brunch, or even a healthy dessert. The combination of creamy homemade Greek yogurt, vibrant fresh fruits, and crunchy granola creates a delicious harmony of flavors and textures. Not only is this parfait visually appealing, but it also guarantees that each spoonful delivers a punch of protein, vitamins, and minerals, making it a wholesome choice for any meal of the day.
Preparing this parfait is incredibly simple and can be customized to suit individual tastes. You can mix and match different fruits based on the season or your preferences, and even switch up the granola for a variety of flavors. Layering the ingredients isn’t just about aesthetics, but it also guarantees that each spoonful delivers a little bit of everything, making it a satisfying treat.
Ingredients (Serves 4-6):
- 4 cups homemade Greek yogurt
- 2 cups fresh mixed berries (strawberries, blueberries, raspberries, etc.)
- 1 large banana, sliced
- 1 cup granola (store-bought or homemade)
- 2 tablespoons honey or maple syrup (optional)
- Fresh mint leaves for garnish (optional)
Cooking Instructions:
- Prepare the Greek Yogurt: If you haven’t made the Greek yogurt yet, start by straining plain yogurt through a cheesecloth or a fine-mesh sieve for several hours or overnight. This will thicken the yogurt and give it that creamy texture characteristic of Greek yogurt.
- Wash and Cut Fruits: Rinse the fresh berries under cold water and pat them dry with a paper towel. For the strawberries, remove the stems and slice them into halves or quarters, depending on their size. Slice the banana into rounds.
- Layer the Ingredients: Take serving glasses or bowls and begin layering the parfait. Start with a generous scoop of Greek yogurt at the bottom, followed by a layer of mixed berries and banana slices.
- Add Granola: Sprinkle a layer of granola over the fruits. This will add a delightful crunch to the parfait. You can use your favorite granola or make your own for a personalized touch.
- Repeat the Layers: Continue to repeat the layers of Greek yogurt, fruits, and granola until the glasses are filled. Aim for about two to three layers, depending on the size of your serving dishes.
- Drizzle with Sweetener: If you prefer a touch of sweetness, drizzle honey or maple syrup on top of the last layer of granola. This is optional, so adjust according to your taste.
- Garnish and Serve: Finish off the parfait with a few mint leaves for a pop of color and freshness. Serve immediately for the best texture, or cover and refrigerate for a couple of hours if you need to prepare them in advance.
Extra Tips:
Feel free to get creative with your parfait by incorporating different nuts, seeds, or even a dollop of nut butter for added flavor and nutrition.
Consider using seasonal fruits to enhance freshness, and don’t hesitate to experiment with flavored yogurts for a twist on the classic Greek yogurt. The parfait can also be made the night before; however, if you’re doing this, keep the granola separate until just before serving to maintain its crunchiness.
Enjoy your delicious homemade Greek Yogurt Parfait!
Savory Greek Yogurt Dip With Veggies

Savory Greek Yogurt Dip is a delightful and healthy appetizer that’s perfect for any gathering or casual snack time. This versatile dip combines the creaminess of Greek yogurt with a medley of herbs and spices, creating a flavor-packed accompaniment for fresh, crunchy vegetables. Not only is this dip easy to make, but it also offers a nutritious option that can be enjoyed by everyone, making it an excellent choice for parties, picnics, or even a light lunch.
The beauty of this dip lies in its simplicity and the ability to customize it to your taste. By incorporating various herbs and spices, you can create your own unique flavor profile. Pair it with an assortment of colorful veggies such as bell peppers, cucumbers, and carrots to elevate the presentation and add a revitalizing crunch. This dish serves 4-6 people, making it a perfect sharing option for family and friends.
Ingredients
- 2 cups plain Greek yogurt
- 1 tablespoon olive oil
- 1 clove garlic, minced
- 1 teaspoon dried dill
- 1 teaspoon dried oregano
- 1 teaspoon salt
- 1/2 teaspoon black pepper
- 1 tablespoon lemon juice
- Assorted fresh vegetables (e.g., bell peppers, cucumbers, carrots, cherry tomatoes)
Cooking Instructions
- Prepare the Yogurt Base: In a mixing bowl, add 2 cups of plain Greek yogurt. This will be the creamy foundation of your dip. Greek yogurt is rich in protein and provides a tangy flavor that pairs well with herbs and spices.
- Add the Flavorings: To the yogurt, add 1 tablespoon of olive oil, 1 clove of minced garlic, 1 teaspoon of dried dill, 1 teaspoon of dried oregano, 1 teaspoon of salt, 1/2 teaspoon of black pepper, and 1 tablespoon of lemon juice. These ingredients will infuse the yogurt with bold flavors and create a well-rounded dip.
- Mix Thoroughly: Using a whisk or a spatula, mix all the ingredients together until they’re well combined and smooth. Confirm there are no lumps, and taste the dip to adjust seasoning if necessary. If you prefer a thinner consistency, you can add a little water or extra lemon juice.
- Chill the Dip: Cover the bowl with plastic wrap or transfer the dip to a serving dish. Refrigerate for at least 30 minutes to allow the flavors to meld together. Chilling also enhances the dip’s revitalizing qualities, making it perfect for hot days.
- Prepare the Veggies: While the dip is chilling, wash and cut your assorted fresh vegetables into bite-sized pieces. Arrange them on a platter for an appealing presentation. The vibrant colors of the veggies will contrast beautifully with the creamy dip.
- Serve: Once the dip has chilled, remove it from the refrigerator and give it a quick stir. Serve it alongside the fresh vegetable platter, inviting your guests to enjoy the healthy pairing.
Extra Tips
For added depth of flavor, consider experimenting with fresh herbs instead of dried ones, such as parsley or chives. You can also customize the dip further by adding ingredients like diced cucumbers for a tzatziki-style twist or a pinch of cayenne pepper for a spicy kick.
Serve the Savory Greek Yogurt Dip with pita chips or whole-grain crackers for extra crunch, and don’t hesitate to make it a day ahead; the flavors will only improve as they sit!
Creamy Greek Yogurt Salad Dressing

Homemade Greek Yogurt Salad Dressing is a delightful way to enhance your salads with flavor while keeping things healthy. This dressing combines the creamy texture of Greek yogurt with fresh herbs and zesty lemon juice, creating a light yet satisfying addition to your greens. It’s perfect as a drizzle over mixed salads, or as a dip for fresh vegetables, bringing a revitalizing taste to your meals.
Making this dressing from scratch not only guarantees that you know exactly what goes into it, but it also allows you to adjust the flavors to your liking. Whether you prefer a hint of garlic or a splash of vinegar, this recipe is versatile and can be tailored to suit your palate. Enjoy the balance of creaminess and tanginess that Greek yogurt provides, making it a favorite among salad dressings.
Ingredients (Serves 4-6):
- 1 cup plain Greek yogurt
- 2 tablespoons olive oil
- 2 tablespoons lemon juice
- 1 tablespoon red wine vinegar
- 1 clove garlic, minced
- 1 teaspoon Dijon mustard
- 1 teaspoon honey (optional)
- Salt and pepper to taste
- Fresh herbs (such as dill, parsley, or chives) for garnish
Cooking Instructions:
- Combine the Base Ingredients: In a medium-sized mixing bowl, add 1 cup of plain Greek yogurt. This will serve as the creamy base of your dressing. The yogurt should be thick and smooth, which will provide a luscious texture to your dressing.
- Add the Liquid Ingredients: Pour in 2 tablespoons of olive oil, 2 tablespoons of lemon juice, and 1 tablespoon of red wine vinegar. These ingredients will add depth of flavor and a nice tang to the dressing. Whisk them together until fully combined with the yogurt.
- Incorporate Flavorings: Next, add 1 minced garlic clove and 1 teaspoon of Dijon mustard to the mixture. If you prefer a touch of sweetness, you can also stir in 1 teaspoon of honey. This will balance the acidity and enhance the overall flavor profile of your dressing.
- Season to Taste: Sprinkle salt and pepper to taste over the mixture. Start with a pinch of each, and adjust according to your preference. Whisk everything together until you achieve a smooth and well-blended dressing.
- Add Fresh Herbs: Finally, finely chop your choice of fresh herbs, such as dill, parsley, or chives, and fold them into the dressing. This will add brightness and a pop of color, making your dressing not only delicious but visually appealing as well.
- Chill and Serve: Transfer the dressing to a sealed container and refrigerate for at least 30 minutes before serving. This allows the flavors to meld beautifully. Serve drizzled over your favorite salad or as a dip for fresh vegetables.
Extra Tips:
When making your Creamy Greek Yogurt Salad Dressing, feel free to experiment with different herbs and spices to customize the flavor to your liking. You can also adjust the thickness of the dressing by adding more yogurt for creaminess or a splash of water to thin it out.
To keep the dressing fresh, store it in an airtight container in the refrigerator for up to a week. Enjoy the vitality of homemade dressing that enhances any salad or veggie platter!
Greek Yogurt Pancakes for a Healthy Breakfast

Start your day off right with these fluffy Greek Yogurt Pancakes, a delicious and nutritious twist on a classic breakfast favorite. By incorporating homemade Greek yogurt, these pancakes not only pack a protein punch but also offer a creamy texture that makes them irresistibly soft.
Perfect for a weekend brunch or a weekday treat, they can be topped with your favorite fruits, nuts, or a drizzle of maple syrup to elevate your morning meal.
These pancakes are incredibly easy to whip up and require minimal ingredients, making them ideal for those busy mornings. With the addition of Greek yogurt, this recipe isn’t only healthier but also provides a satisfying start to your day.
Whether you enjoy them plain or loaded with toppings, these pancakes are bound to become a staple in your breakfast rotation.
Ingredients (Serves 4-6)
- 1 cup all-purpose flour
- 1 tablespoon baking powder
- 1/2 teaspoon baking soda
- 1/4 teaspoon salt
- 1 cup Greek yogurt (homemade or store-bought)
- 2 large eggs
- 1 tablespoon honey or maple syrup
- 1 teaspoon vanilla extract
- 1/4 cup milk (adjust for desired consistency)
- Butter or oil for cooking
Cooking Instructions
- Combine Dry Ingredients: In a large mixing bowl, whisk together the all-purpose flour, baking powder, baking soda, and salt. This step guarantees that the leavening agents are evenly distributed throughout the flour, helping your pancakes rise evenly.
- Mix Wet Ingredients: In a separate bowl, combine the Greek yogurt, eggs, honey (or maple syrup), vanilla extract, and milk. Use a whisk to blend these ingredients until smooth. The yogurt provides moisture and richness, while the eggs help bind the mixture together.
- Incorporate Dry and Wet Mixtures: Gradually add the dry ingredients to the wet mixture, stirring gently with a spatula or wooden spoon. Be careful not to overmix; a few lumps are perfectly fine as they’ll disappear during cooking. The goal is to create a thick, batter-like consistency.
- Preheat the Griddle or Pan: Heat a non-stick skillet or griddle over medium heat and add a small amount of butter or oil. Allow it to melt and coat the surface, assuring that your pancakes won’t stick.
- Cook the Pancakes: Pour about 1/4 cup of batter onto the heated skillet for each pancake. Cook until you see bubbles forming on the surface and the edges look set, about 2-3 minutes. Carefully flip the pancakes and cook for another 2-3 minutes on the other side until golden brown.
- Serve and Enjoy: Once cooked, transfer the pancakes to a plate and keep them warm while you repeat the process with the remaining batter. Serve with your choice of toppings like fresh fruit, yogurt, or syrup.
Extra Tips
For an extra touch, consider adding mix-ins to the batter such as blueberries, chocolate chips, or chopped nuts for added flavor and texture.
If you prefer a lighter pancake, you can substitute half of the all-purpose flour with whole wheat or almond flour. Additionally, if you find the batter too thick, simply add a little more milk until it reaches your desired consistency.
Enjoy your delicious and healthy Greek Yogurt Pancakes!
Spiced Greek Yogurt Chicken Marinade
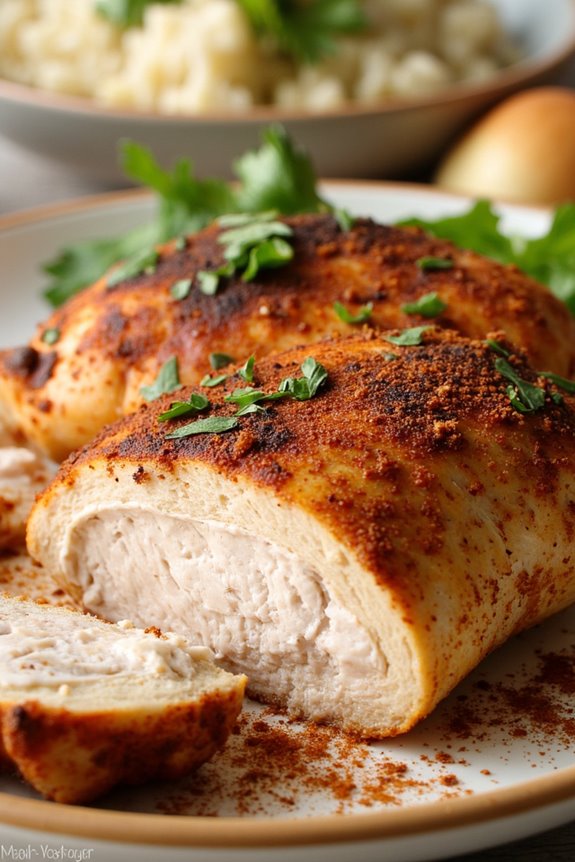
If you’re looking for a flavorful and healthy way to prepare chicken, the Spiced Greek Yogurt Chicken Marinade is a fantastic choice. This marinade not only tenderizes the chicken but also infuses it with a delightful blend of spices and the creaminess of Greek yogurt. The yogurt acts as a perfect base, providing moisture while helping the spices adhere to the chicken.
Whether you’re planning a family dinner, a barbecue with friends, or meal prepping for the week, this marinade is versatile and easy to make.
To create the perfect balance of flavors, you can customize the spices to suit your palate. The combination of garlic, cumin, and paprika gives the chicken a warm and aromatic profile, while the addition of lemon juice brightens up the dish. After marinating, the chicken can be grilled, baked, or sautéed to perfection, making it a great addition to salads, wraps, or served alongside your favorite sides.
Ingredients (Serves 4-6)
- 1 cup Greek yogurt
- 1/4 cup olive oil
- 3 tablespoons lemon juice
- 4 cloves garlic, minced
- 2 teaspoons ground cumin
- 2 teaspoons smoked paprika
- 1 teaspoon ground coriander
- 1 teaspoon salt
- 1/2 teaspoon black pepper
- 1/2 teaspoon cayenne pepper (optional for heat)
- 2 pounds chicken thighs or breasts (boneless and skinless)
- Fresh herbs (such as parsley or cilantro) for garnish
Cooking Instructions
- Prepare the Marinade: In a large mixing bowl, combine the Greek yogurt, olive oil, lemon juice, minced garlic, ground cumin, smoked paprika, ground coriander, salt, black pepper, and cayenne pepper (if using). Whisk the ingredients together until well blended, creating a smooth marinade.
- Marinate the Chicken: Add the chicken thighs or breasts to the bowl with the marinade. Confirm each piece of chicken is thoroughly coated with the yogurt mixture. Cover the bowl with plastic wrap or transfer the chicken and marinade to a resealable plastic bag, removing as much air as possible. Refrigerate for at least 2 hours, ideally overnight for maximum flavor.
- Preheat Cooking Surface: If grilling, preheat your grill to medium-high heat. If baking, preheat your oven to 400°F (200°C). For stovetop cooking, heat a large skillet over medium heat and add a drizzle of olive oil.
- Cook the Chicken: Remove the chicken from the marinade, allowing excess to drip off. For grilling, place the chicken on the grill and cook for about 6-7 minutes per side, or until the internal temperature reaches 165°F (75°C). For baking, place the chicken on a lined baking sheet and bake for 25-30 minutes or until cooked through. If sautéing, cook the chicken in the skillet for about 6-8 minutes per side.
- Garnish and Serve: Once cooked, remove the chicken from the heat and let it rest for a few minutes. Garnish with freshly chopped herbs before slicing and serving. This chicken pairs beautifully with a side of rice, salad, or in wraps.
Extra Tips
For an even deeper flavor, consider adding additional spices such as turmeric or cinnamon to the marinade. You can also experiment with different types of yogurt, such as low-fat or non-fat, depending on your dietary preferences.
If you have any leftover marinade, it can be used as a dressing for salads or as a dipping sauce for vegetables. Always make sure to discard any leftover marinade that has been in contact with raw chicken to prevent cross-contamination.
Enjoy your delicious Spiced Greek Yogurt Chicken!
Greek Yogurt Smoothie Bowl
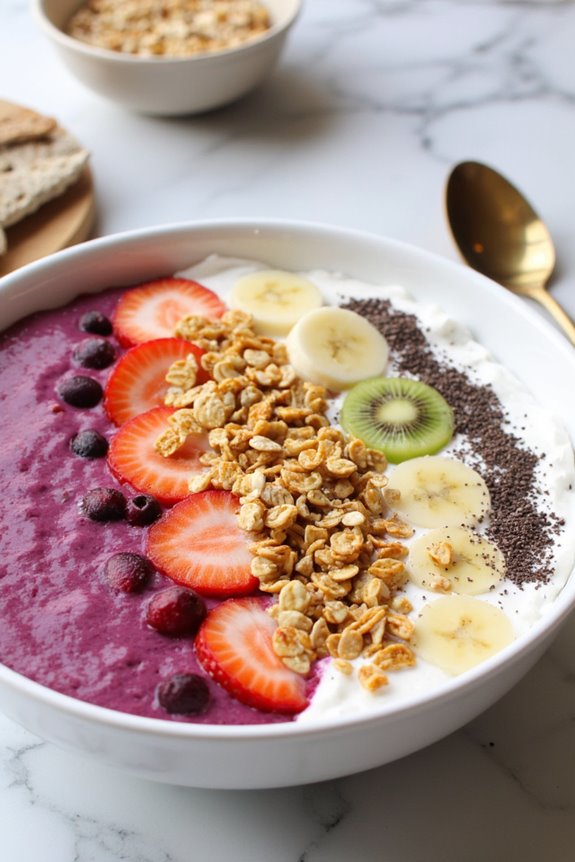
Greek Yogurt Smoothie Bowls are a delightful and nutritious way to start your day or enjoy a revitalizing snack. Packed with protein and probiotics, Greek yogurt serves as the perfect base for this creamy and flavorful bowl. By blending your favorite fruits and adding a variety of toppings, you can customize this dish to suit your taste preferences while ensuring a balanced meal that keeps you full and energized.
The beauty of the Greek Yogurt Smoothie Bowl lies in its versatility. You can use any fruits you have on hand, such as bananas, berries, or mangoes, and create layers of texture and flavor with various toppings like granola, nuts, and seeds. This bowl isn’t only visually appealing but also promotes healthy eating habits, making it a favorite among health enthusiasts and families alike.
Let’s plunge into this delicious recipe that serves 4-6 people.
Ingredients:
- 2 cups of homemade Greek yogurt
- 2 cups of frozen mixed berries (strawberries, blueberries, raspberries)
- 1 ripe banana
- 1 cup of spinach (optional for added nutrition)
- 1 cup of almond milk (or any milk of your choice)
- 2 tablespoons of honey or maple syrup (optional)
- ½ cup of granola
- ¼ cup of chopped nuts (almonds, walnuts, or pistachios)
- Fresh fruit slices for topping (e.g., banana, strawberries, kiwi)
- Chia seeds or flaxseeds for garnish (optional)
Cooking Instructions:
- Prepare the Ingredients: Before you start blending, gather all your ingredients. If you’re using fresh fruits instead of frozen, consider adding some ice cubes to achieve a thicker consistency. Peel the banana and chop any fresh fruits you’ll be using for toppings.
- Blend the Smoothie Base: In a blender, combine the homemade Greek yogurt, frozen mixed berries, ripe banana, spinach (if using), and almond milk. If you like your smoothie a bit sweeter, add the honey or maple syrup. Blend on high speed until the mixture is smooth and creamy, pausing to scrape down the sides if needed.
- Adjust Consistency: Check the consistency of your smoothie base. If it’s too thick, add a splash more almond milk and blend again. You want it to be thick enough to hold toppings but smooth enough to eat with a spoon.
- Assemble the Smoothie Bowls: Divide the smoothie mixture evenly among 4-6 bowls. Use the back of a spoon to smooth the tops of each bowl for an even surface.
- Add Toppings: Begin layering your toppings on each smoothie bowl. Start with a generous sprinkle of granola in the center, then artfully arrange your fresh fruit slices around it. Finish with a sprinkle of chopped nuts and a few chia seeds or flaxseeds for an extra nutrient boost.
- Serve Immediately: Enjoy your Greek Yogurt Smoothie Bowls right away for the best texture and flavor. You can also serve them with a straw or a spoon, depending on your preference.
Extra Tips:
When preparing your Greek Yogurt Smoothie Bowl, feel free to experiment with different flavor combinations and textures. If you prefer a thicker bowl, use less milk or more yogurt. For added protein, consider mixing in a scoop of your favorite protein powder or nut butter.
Additionally, try incorporating seasonal fruits or superfoods like acai or matcha to keep the dish exciting and full of nutrients. Always remember to serve the bowls fresh, as the ingredients can lose their vibrant colors and textures if left to sit for too long. Enjoy your healthy and delicious Greek Yogurt Smoothie Bowl!
Greek Yogurt and Cucumber Tzatziki Sauce
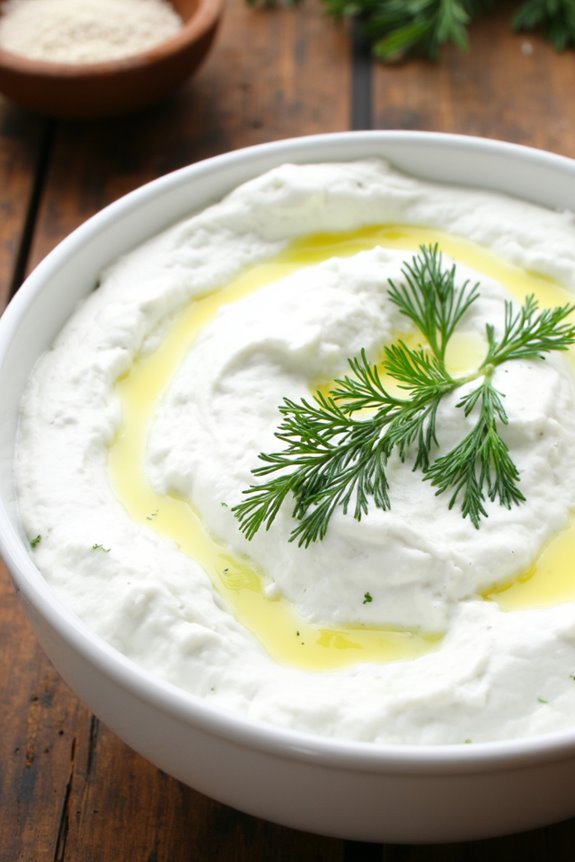
Greek yogurt and cucumber tzatziki sauce is a revitalizing and flavorful addition to many dishes, making it a perfect companion for grilled meats, pita bread, or fresh vegetables. This creamy sauce isn’t only easy to prepare but also packed with nutrients, thanks to the yogurt and cucumber combination. Its cool and tangy flavor profile adds a delightful contrast to warm dishes, making every bite a balanced experience.
To prepare the Greek yogurt and cucumber tzatziki sauce, you’ll need fresh ingredients that can easily come together in just a few minutes. The key to a great tzatziki is using high-quality Greek yogurt and properly draining the cucumber to avoid excess moisture. This sauce isn’t only delicious but also versatile, as it can be used as a dip, a condiment, or even a salad dressing.
Ingredients (serving size: 4-6 people)
- 2 cups plain Greek yogurt
- 1 medium cucumber
- 2 cloves garlic, minced
- 2 tablespoons olive oil
- 1 tablespoon white wine vinegar or lemon juice
- 1 tablespoon fresh dill, chopped (or 1 teaspoon dried dill)
- Salt and pepper, to taste
Cooking Instructions
- Prepare the Cucumber: Start by washing the cucumber thoroughly. Using a box grater, grate the cucumber into a bowl. Once grated, sprinkle a little salt over the cucumber and let it sit for about 10 minutes. This process will help draw out excess moisture from the cucumber, which is essential for a thick tzatziki sauce.
- Drain the Cucumber: After letting the cucumber sit, take a clean kitchen towel or cheesecloth and place the grated cucumber into it. Gather the corners of the towel and twist to squeeze out as much moisture as possible. This step is essential to prevent the sauce from becoming watery.
- Mix the Ingredients: In a large mixing bowl, combine the drained cucumber, Greek yogurt, minced garlic, olive oil, white wine vinegar (or lemon juice), and chopped dill. Stir the mixture until all ingredients are evenly incorporated.
- Season the Sauce: Taste the tzatziki sauce and season it with salt and pepper according to your preference. Remember that the flavors will meld together as it sits, so err on the side of caution with the salt.
- Chill and Serve: Cover the bowl with plastic wrap or transfer the tzatziki sauce to an airtight container. Refrigerate for at least 30 minutes to allow the flavors to develop. Serve chilled with your favorite dishes.
Extra Tips
For an even more flavorful tzatziki, consider adding a squeeze of fresh lemon juice just before serving to brighten up the flavors. You can also experiment with different herbs, such as mint, for a unique twist.
If you prefer a spicier kick, try adding a pinch of cayenne pepper or crushed red pepper flakes. This tzatziki sauce can be made ahead of time and stored in the refrigerator for up to 3 days, making it a convenient option for meal prep or entertaining. Enjoy this delicious sauce with your favorite Mediterranean dishes!
Healthy Greek Yogurt Mac and Cheese
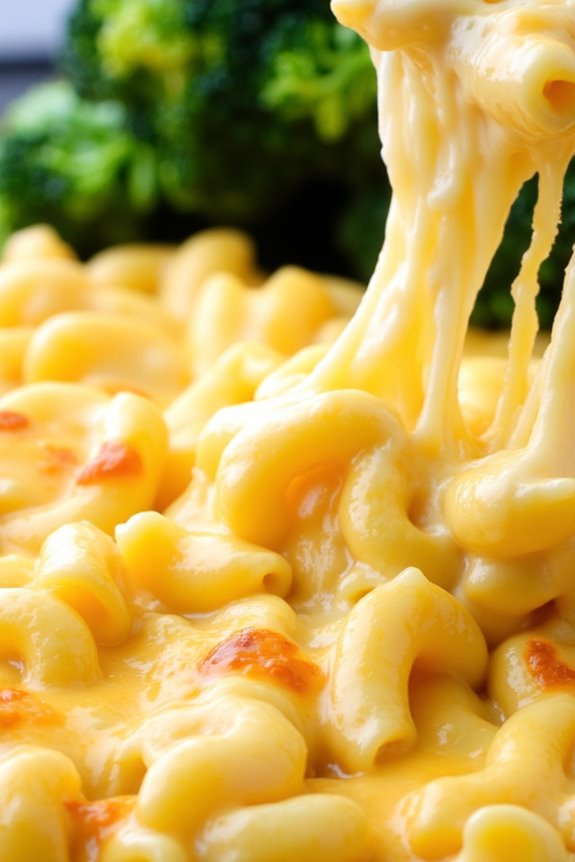
Mac and cheese is a classic comfort food loved by many, but it often comes with a hefty dose of calories and saturated fat. By incorporating Greek yogurt into this recipe, you can create a creamy, delicious dish that packs a protein punch and reduces the unhealthy fats typically found in traditional mac and cheese. This Healthy Greek Yogurt Mac and Cheese isn’t only easy to make, but it also offers a nutritious twist on a beloved favorite, making it perfect for family dinners or gatherings with friends.
In this recipe, the Greek yogurt serves as a healthy substitute for heavy cream or cheese, providing a smooth texture and tangy flavor while keeping the dish lighter. You can easily customize the cheese blend to suit your taste, and feel free to mix in your favorite vegetables or proteins for added nutrition. This dish serves 4-6 people, making it an ideal option for sharing or meal prepping for the week ahead.
Ingredients:
- 8 ounces elbow macaroni
- 1 cup Greek yogurt (plain, non-fat or low-fat)
- 1 cup shredded sharp cheddar cheese
- ½ cup grated Parmesan cheese
- 1 cup milk (any kind)
- 2 tablespoons butter
- 1 teaspoon garlic powder
- 1 teaspoon onion powder
- Salt and pepper to taste
- Optional: ½ cup steamed broccoli or spinach, chopped
Cooking Instructions:
- Cook the Pasta: Begin by bringing a large pot of salted water to a boil. Add the elbow macaroni and cook according to the package instructions until al dente, usually about 7-9 minutes. Once cooked, drain the pasta and set it aside.
- Prepare the Cheese Sauce: In the same pot, reduce the heat to medium and add the butter. Allow it to melt completely before adding the milk, stirring to combine. Gradually stir in the Greek yogurt, sharp cheddar cheese, and Parmesan cheese until everything is well combined and melted. This mixture should be creamy and smooth.
- Season the Sauce: Add the garlic powder, onion powder, salt, and pepper to the cheese sauce. Taste and adjust the seasoning if necessary. If you’re adding vegetables like broccoli or spinach, fold them into the sauce at this stage.
- Combine Pasta and Sauce: Once the cheese sauce is ready, add the cooked macaroni back into the pot. Stir thoroughly to ascertain that all the pasta is coated evenly with the creamy sauce.
- Serve: Remove from heat, and let it sit for a couple of minutes to thicken slightly. Serve warm, and enjoy your healthier take on mac and cheese!
Extra Tips:
When making Healthy Greek Yogurt Mac and Cheese, be mindful of the temperature when adding the Greek yogurt to the cheese sauce. Too much heat can cause the yogurt to curdle, so it’s best to combine it over low to medium heat.
Additionally, feel free to experiment with different types of cheese to find your perfect flavor combination, and consider adding breadcrumbs on top before baking for a crunchy texture if you desire a baked version. Enjoy your nutritious yet indulgent dish!
Greek Yogurt Fruit and Nut Energy Bites
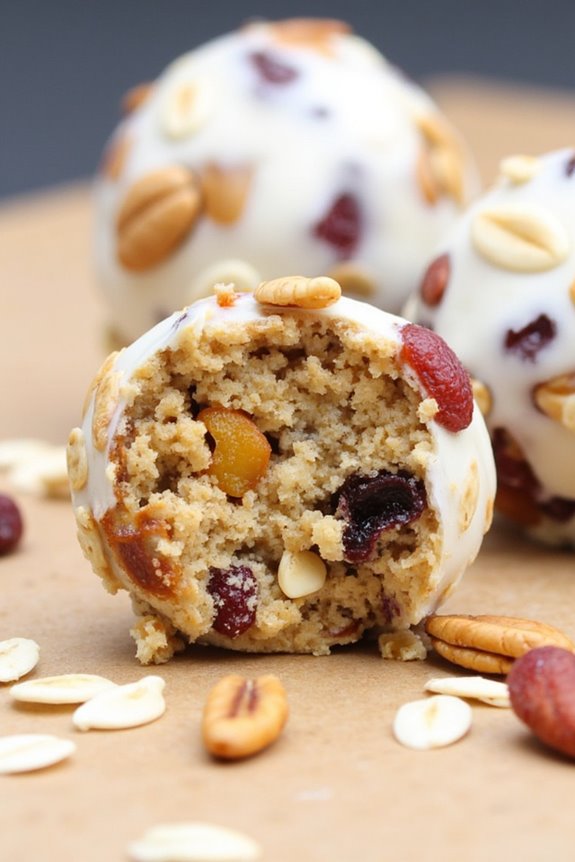
Greek Yogurt Fruit and Nut Energy Bites are a nutritious and delicious snack that’s perfect for any time of day. Made with creamy homemade Greek yogurt, these energy bites are packed with protein, fiber, and healthy fats. They aren’t only easy to prepare but also customizable, allowing you to add your favorite fruits and nuts for an extra burst of flavor.
These bites are perfect for busy mornings, post-workout snacks, or a quick treat when you’re on the go. The combination of Greek yogurt with oats, dried fruits, and nuts creates a delightful texture that’s both chewy and satisfying.
These energy bites can be made in advance and stored in the refrigerator, making them a convenient option for meal prep. With just a few simple ingredients and minimal effort, you can whip up these tasty snacks that will keep you energized and satiated throughout the day.
Ingredients (serving size: 4-6 people):
- 2 cups homemade Greek yogurt
- 1 cup rolled oats
- 1/2 cup almond butter (or any nut butter of choice)
- 1/2 cup honey or maple syrup
- 1/2 cup chopped dried fruits (such as cranberries, apricots, or raisins)
- 1/2 cup chopped nuts (such as almonds, walnuts, or pecans)
- 1 teaspoon vanilla extract
- 1/2 teaspoon cinnamon (optional)
- Pinch of salt
Cooking Instructions:
- Prepare the Base Mixture: In a large mixing bowl, combine the homemade Greek yogurt, almond butter, honey (or maple syrup), and vanilla extract. Stir well until all the ingredients are fully incorporated and form a creamy mixture.
- Add Dry Ingredients: Gradually add the rolled oats, chopped dried fruits, chopped nuts, cinnamon (if using), and a pinch of salt to the yogurt mixture. Fold the ingredients together gently until everything is evenly distributed and coated with the yogurt mixture.
- Chill the Mixture: Cover the bowl with plastic wrap or a lid and refrigerate the mixture for about 30 minutes. This step helps the mixture firm up, making it easier to shape into bites.
- Shape the Energy Bites: Once chilled, use your hands to scoop out small portions of the mixture (about 1 tablespoon each) and roll them into balls. Place the energy bites on a parchment-lined baking sheet or plate.
- Store the Bites: After shaping all the energy bites, you can enjoy them immediately or store them in an airtight container in the refrigerator for up to a week. They can also be frozen for longer shelf life.
Extra Tips: Feel free to experiment with different combinations of dried fruits and nuts based on your preferences or dietary restrictions. You can also add ingredients like chia seeds, flaxseeds, or even dark chocolate chips for added flavor and nutrition.
When rolling the bites, wetting your hands slightly can help prevent sticking. Enjoy these energy bites as a quick snack, or pack them in lunchboxes for a healthy treat on the go!
Greek Yogurt Overnight Oats
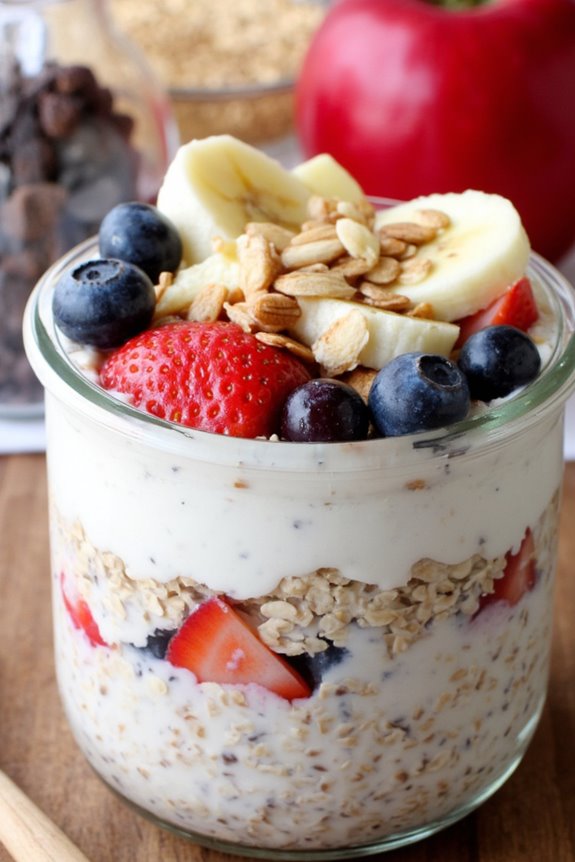
Greek Yogurt Overnight Oats are a delightful and nutritious way to start your day. This meal combines the creaminess of Greek yogurt with the heartiness of oats, complemented by your favorite toppings. Not only are they simple to prepare, but they also offer a perfect balance of protein, fiber, and healthy fats, making them an ideal breakfast for busy mornings.
With a little planning, you can whip up a batch of these overnight oats and enjoy a delicious breakfast that’s ready to go when you are. This recipe is versatile, allowing you to customize it with seasonal fruits, nuts, and seeds. You can also experiment with different flavorings like vanilla extract, cinnamon, or honey to suit your taste preferences.
Preparing Greek Yogurt Overnight Oats is all about layering the right ingredients, so grab your mason jars or bowls, and let’s get started on this wholesome meal prep!
Ingredients (Serves 4-6 people):
- 2 cups rolled oats
- 2 cups unsweetened almond milk (or milk of choice)
- 2 cups Greek yogurt (plain or flavored)
- 2 tablespoons honey or maple syrup (optional)
- 1 teaspoon vanilla extract
- 1/2 teaspoon ground cinnamon (optional)
- 1 cup fresh fruit (berries, sliced bananas, or diced apples)
- 1/2 cup nuts or seeds (almonds, walnuts, chia seeds)
- A pinch of salt
Cooking Instructions:
- Combine Dry Ingredients: In a large mixing bowl, combine the rolled oats, ground cinnamon (if using), and a pinch of salt. This step helps to evenly distribute the dry ingredients, guaranteeing every bite is flavorful.
- Mix Wet Ingredients: In a separate bowl, whisk together the almond milk, Greek yogurt, honey or maple syrup (if using), and vanilla extract until smooth. This mixture will provide the creaminess and sweetness to your oats.
- Combine Mixtures: Pour the wet ingredients into the bowl with the dry ingredients. Stir well to make sure all the oats are coated in the yogurt mixture. This step is vital for the oats to absorb the liquid and soften overnight.
- Layer and Store: Divide the oat mixture evenly among 4-6 mason jars or airtight containers. If you prefer, you can layer the oats with fresh fruit and nuts at this stage for added texture and flavor. This layering not only looks appealing but also keeps the toppings fresh until you’re ready to eat.
- Chill Overnight: Seal the jars or containers and place them in the refrigerator. Allow the oats to soak overnight or for at least 4 hours. This soaking time is important for the oats to soften and absorb the flavors.
- Serve and Enjoy: In the morning, give the oats a good stir, and add additional toppings such as fresh fruit, nuts, or a drizzle of honey if desired. Enjoy your Greek Yogurt Overnight Oats cold, or warm them up slightly in the microwave if you prefer.
Extra Tips:
For the best results, use old-fashioned rolled oats rather than quick oats, as they provide a better texture. You can also prepare the oats in advance for up to 3-4 days, making them perfect for meal prep.
Feel free to switch up the flavors by adding cocoa powder, nut butter, or different fruits according to the season. Experiment with toppings like coconut flakes or granola for added crunch!
Greek Yogurt Cheesecake Bars
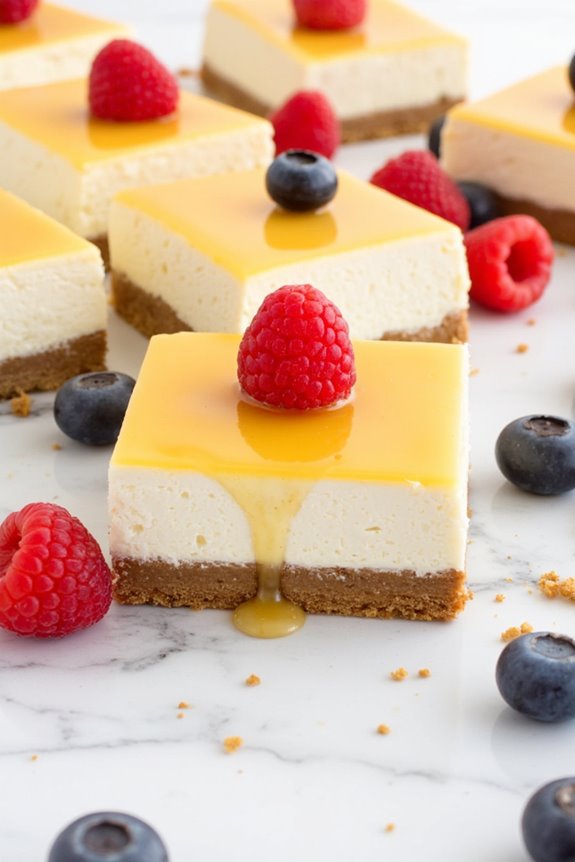
Greek Yogurt Cheesecake Bars are a delightful and healthier twist on the classic cheesecake, perfect for satisfying your sweet tooth without the guilt. The creamy texture of Greek yogurt combined with a hint of tanginess creates a luscious filling that’s both rich and light.
These bars aren’t only easy to prepare but also make for a perfect dessert to share with friends and family at gatherings or as a special treat at home.
The crust is made from crushed graham crackers mixed with a little melted butter, providing a crunchy base that balances the smooth filling beautifully. Once baked, the cheesecake bars can be chilled in the refrigerator, allowing them to set perfectly. They’re best enjoyed cold, and you can even top them with fresh fruit or a drizzle of honey for an extra touch of sweetness.
Ingredients (Serves 4-6)
- 1 ½ cups graham cracker crumbs
- ½ cup unsalted butter, melted
- 2 cups Greek yogurt (plain, full-fat or low-fat)
- 1 cup cream cheese, softened
- ¾ cup granulated sugar
- 3 large eggs
- 2 teaspoons vanilla extract
- 1 tablespoon lemon juice
- 1 tablespoon cornstarch
Cooking Instructions
1. Preheat the Oven: Start by preheating your oven to 325°F (160°C). This guarantees the cheesecake bars bake evenly and helps achieve a smooth texture.
2. Prepare the Crust: In a mixing bowl, combine the graham cracker crumbs and melted butter. Stir until the crumbs are fully coated with the butter. Press this mixture firmly into the bottom of an 8×8 inch baking pan to form an even layer. Bake in the preheated oven for about 10 minutes, until lightly golden. Remove from the oven and set aside to cool slightly.
3. Make the Filling: In a large mixing bowl, combine the Greek yogurt, softened cream cheese, and granulated sugar. Using a hand mixer, beat on medium speed until smooth and creamy, guaranteeing there are no lumps.
Add in the eggs, one at a time, mixing well after each addition. Then, incorporate the vanilla extract, lemon juice, and cornstarch, mixing until fully blended.
4. Combine and Pour: Once the filling is smooth, pour it over the pre-baked crust, spreading it evenly with a spatula. Tap the pan gently on the counter to remove any air bubbles.
5. Bake the Cheesecake Bars: Place the pan back in the oven and bake for 30-35 minutes or until the edges are set and the center is slightly jiggly. It will firm up as it cools.
6. Cool and Chill: After baking, remove the pan from the oven and allow it to cool at room temperature for about 30 minutes. Once cooled, cover it and refrigerate for at least 4 hours, preferably overnight, to let the flavors meld and the texture set completely.
7. Slice and Serve: Once chilled, carefully lift the cheesecake bars out of the pan using the edges of the parchment paper (if used). Slice into squares and serve. Optionally, top with fresh fruit or a drizzle of honey before serving.
Extra Tips
For best results, make sure your cream cheese is at room temperature to avoid lumps in your filling. Additionally, you can customize these cheesecake bars by adding different flavorings, such as almond extract or even a swirl of fruit puree on top before baking.
If you prefer a more decadent treat, consider adding a chocolate ganache layer on top after the bars have chilled. These Greek Yogurt Cheesecake Bars are versatile, delicious, and sure to impress your guests!