

Spring is here, and with it comes a craving for fresh, vibrant dishes. Greek cuisine is perfect for this season with its emphasis on fresh vegetables and bold flavors. Picture a colorful Greek Village Salad or a zesty Lemon and Herb Quinoa Tabbouleh on your table. Each recipe is a celebration of spring’s essence. Let’s explore these delightful dishes that will elevate your seasonal meals.
Greek Village Salad With Fresh Herbs
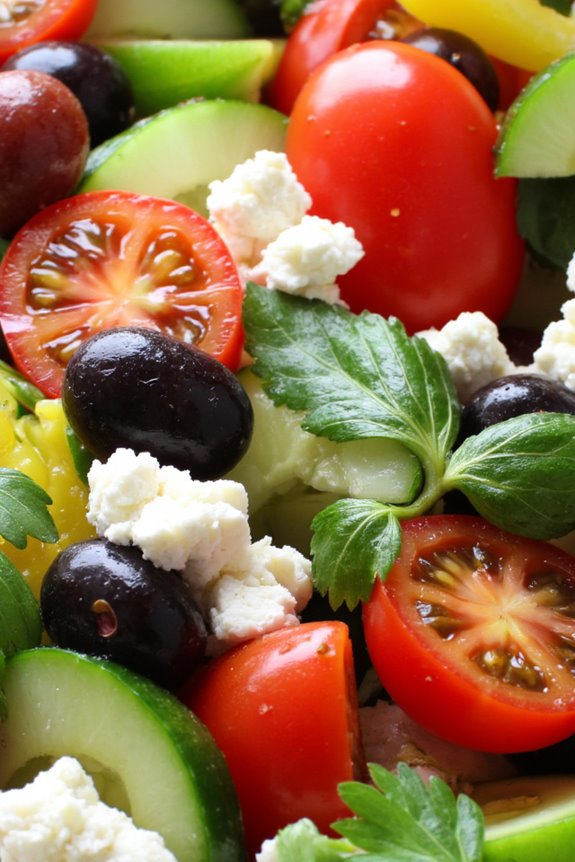
Greek Village Salad, also known as Horiatiki, is a vibrant and invigorating dish that embodies the flavors of the Mediterranean. This salad is typically made with fresh, seasonal ingredients and is a staple in Greek cuisine, perfect for warm weather.
It’s not only delicious but also healthy, making it an ideal side dish or a light meal on its own. The combination of crunchy vegetables, tangy feta cheese, and aromatic herbs creates a delightful medley that’s sure to impress your family and friends.
This salad is known for its simplicity and reliance on high-quality ingredients. The key to a perfect Greek Village Salad lies in using fresh vegetables such as ripe tomatoes, crunchy cucumbers, and crisp bell peppers.
Adding a handful of fresh herbs like parsley and oregano elevates the flavors even further. Toss in some olives and a generous drizzle of olive oil, and you have a stunning dish bursting with the essence of Greece. Serve it as a side to grilled meats or enjoy it as a light lunch with some crusty bread.
Ingredients (Serves 4-6)
- 4 ripe tomatoes, chopped
- 1 cucumber, diced
- 1 bell pepper (red or green), sliced
- 1 small red onion, thinly sliced
- 1 cup Kalamata olives, pitted
- 200g feta cheese, crumbled
- 1/4 cup extra virgin olive oil
- 2 tablespoons red wine vinegar
- 1 teaspoon dried oregano
- Fresh parsley, chopped (for garnish)
- Salt and freshly ground black pepper, to taste
Cooking Instructions
- Prepare the Vegetables: Start by washing all the fresh vegetables thoroughly. Chop the tomatoes into large chunks, dice the cucumber, and slice the bell pepper into thin strips. For the onion, make sure to thinly slice it to avoid overpowering the salad with a strong onion flavor.
- Combine the Vegetables: In a large salad bowl, combine the chopped tomatoes, diced cucumber, sliced bell pepper, and thinly sliced red onion. Gently toss the vegetables together to guarantee even distribution.
- Add the Olives and Feta: Next, add the Kalamata olives to the salad bowl. Crumble the feta cheese over the top of the vegetables. The feta should be in large chunks to provide a creamy texture that contrasts nicely with the crunchiness of the vegetables.
- Make the Dressing: In a small bowl, whisk together the extra virgin olive oil, red wine vinegar, dried oregano, and a pinch of salt and pepper. This dressing will enhance the flavors of the salad while bringing everything together.
- Dress the Salad: Pour the dressing over the salad and gently toss everything together to coat the vegetables, olives, and feta with the dressing evenly. Be careful not to break the feta too much during this process.
- Garnish and Serve: Before serving, sprinkle the chopped fresh parsley over the salad for added color and flavor. Serve the salad immediately, or let it sit for about 10-15 minutes to allow the flavors to meld.
Extra Tips
For the best flavor, use high-quality ingredients, especially the olive oil and feta cheese. If you prefer a little extra zest, consider adding a squeeze of fresh lemon juice before serving.
You can also customize the salad by adding other ingredients like capers, artichoke hearts, or even grilled zucchini. This dish is best enjoyed fresh but can be stored in the refrigerator for a day or two; just be aware that the vegetables may soften over time.
Lemon and Herb Quinoa Tabbouleh
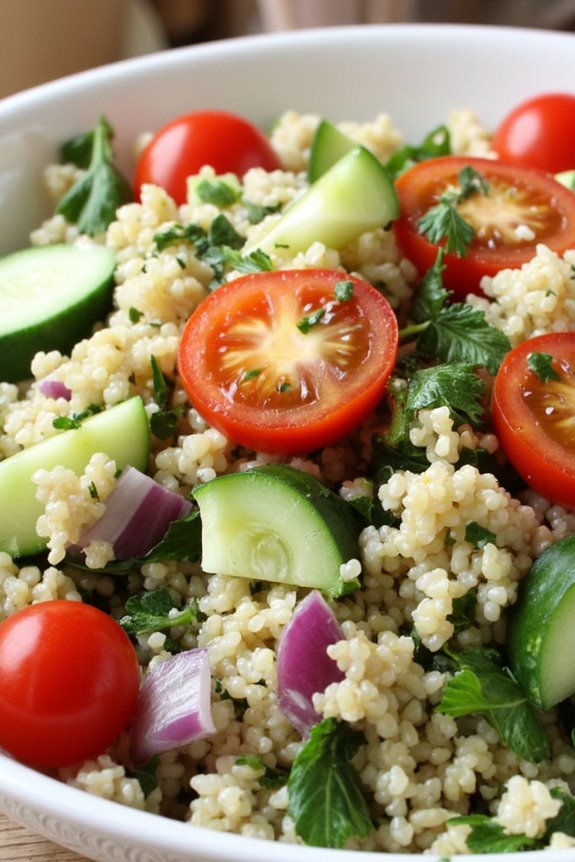
Lemon and Herb Quinoa Tabbouleh is a fresh and vibrant dish that captures the essence of spring with its bright flavors and wholesome ingredients. This modern twist on the traditional tabbouleh replaces bulgur with quinoa, making it a gluten-free option while still delivering that classic, invigorating taste. Packed with parsley, mint, and a zesty lemon dressing, this salad is perfect as a light lunch, side dish, or even a main course.
Preparing this dish isn’t only quick and easy but also allows you to make the most of seasonal herbs and vegetables. The combination of quinoa’s nutty flavor, the crispness of cucumbers, and the tanginess of tomatoes creates a delightful medley that’s both nutritious and satisfying. Serve it chilled or at room temperature, and enjoy a taste of the Mediterranean right in your kitchen.
Ingredients (serving size: 4-6 people)
- 1 cup quinoa, rinsed
- 2 cups water or vegetable broth
- 1 cup fresh parsley, finely chopped
- 1/2 cup fresh mint, finely chopped
- 1 cup cherry tomatoes, halved
- 1 cucumber, diced
- 1/4 cup red onion, finely chopped
- 1/4 cup olive oil
- 1/4 cup fresh lemon juice
- Salt and pepper, to taste
Cooking Instructions
- Cook the Quinoa: In a medium saucepan, combine the rinsed quinoa and water (or vegetable broth). Bring it to a boil over medium-high heat, then reduce the heat to low, cover the pan, and let it simmer for about 15 minutes or until the quinoa is fluffy and the liquid is absorbed. Once cooked, remove from heat and let it cool for a few minutes.
- Prepare the Vegetables: While the quinoa is cooling, wash and chop the parsley, mint, cherry tomatoes, cucumber, and red onion. Make sure to chop them finely for a balanced texture and flavor throughout the dish.
- Mix the Dressing: In a small bowl, whisk together the olive oil, fresh lemon juice, salt, and pepper. Taste the dressing and adjust the seasoning as needed. The bright acidity of the lemon juice should complement the earthy flavors of the quinoa and herbs.
- Combine the Ingredients: In a large mixing bowl, combine the cooled quinoa, chopped vegetables, parsley, and mint. Pour the dressing over the mixture and gently toss until everything is evenly coated. Be careful not to mash the quinoa; you want to keep it fluffy.
- Chill and Serve: Cover the bowl and refrigerate the tabbouleh for at least 30 minutes to allow the flavors to meld. Serve chilled or at room temperature as an invigorating side dish or light main course.
Extra Tips
For added flavor, consider incorporating additional ingredients like feta cheese or olives, which can enhance the Mediterranean flair of the dish. You can also substitute the vegetables based on what’s in season or available in your pantry, making this recipe versatile.
Finally, make sure to taste and adjust the seasoning before serving, as the freshness of the herbs and vegetables can influence the overall flavor. Enjoy your Lemon and Herb Quinoa Tabbouleh!
Grilled Vegetable Souvlaki
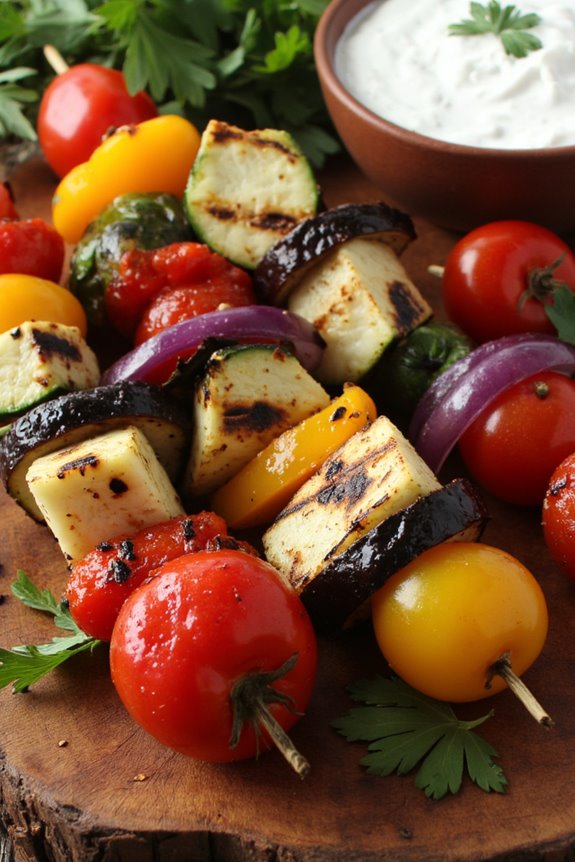
Grilled Vegetable Souvlaki is a vibrant and flavorful dish that showcases the best of fresh, seasonal vegetables. This Greek-inspired recipe is perfect for a warm spring day, whether you’re enjoying a backyard barbecue or a cozy family dinner. Souvlaki, traditionally made with meat, is here reimagined with a colorful medley of vegetables, making it a delightful, vegetarian option that everyone will love.
The marinated veggies are skewered and grilled to perfection, allowing their natural sweetness to shine through while infusing them with smoky flavor. This dish isn’t only visually appealing but also versatile. You can mix and match your favorite vegetables, and the accompanying tzatziki sauce adds a creamy, tangy contrast that beautifully complements the grilled flavors.
Serve it with warm pita bread or over a bed of fragrant rice for a complete meal. With fresh ingredients and simple preparation, Grilled Vegetable Souvlaki is an excellent choice for a nutritious and satisfying meal that celebrates the flavors of spring.
Ingredients (Serves 4-6):
- 1 red bell pepper, cut into bite-sized pieces
- 1 yellow bell pepper, cut into bite-sized pieces
- 1 medium zucchini, sliced into thick rounds
- 1 medium eggplant, cut into cubes
- 1 red onion, cut into wedges
- 8-10 cherry tomatoes
- 1/4 cup olive oil
- 3 tablespoons lemon juice
- 2 teaspoons dried oregano
- 2 cloves garlic, minced
- Salt and pepper to taste
- 8-10 wooden or metal skewers (if using wooden, soak in water for 30 minutes)
Cooking Instructions:
- Prepare the Marinade: In a large mixing bowl, combine the olive oil, lemon juice, dried oregano, minced garlic, salt, and pepper. Whisk the ingredients together until well blended. This marinade will enhance the flavors of the vegetables and help them grill beautifully.
- Marinate the Vegetables: Add all the chopped vegetables (red bell pepper, yellow bell pepper, zucchini, eggplant, red onion, and cherry tomatoes) to the bowl with the marinade. Toss the vegetables gently until they’re evenly coated. Cover the bowl with plastic wrap and let it marinate in the refrigerator for at least 30 minutes, allowing the flavors to meld.
- Preheat the Grill: While the vegetables are marinating, preheat your grill to medium-high heat. If using a grill pan, heat it on the stove over medium heat. Properly heating the grill guarantees that the vegetables will get nice grill marks and cook evenly.
- Skewer the Vegetables: After marinating, take the vegetables out of the refrigerator. Thread the marinated vegetables onto the skewers, alternating between different types for a colorful presentation. Make sure to leave a little space between each piece to allow for even cooking.
- Grill the Souvlaki: Place the skewers on the hot grill and cook for about 10-15 minutes, turning occasionally, until the vegetables are tender and have nice grill marks. Keep an eye on them to prevent burning, as cooking times may vary depending on the grill.
- Serve and Enjoy: Once the vegetables are grilled to your liking, remove them from the grill and let them cool for a minute. Serve the Grilled Vegetable Souvlaki with tzatziki sauce, warm pita bread, or over rice. Enjoy the fresh flavors of spring!
Extra Tips:
When making Grilled Vegetable Souvlaki, feel free to customize the vegetables based on seasonal availability or personal preference. Other great additions could include mushrooms, asparagus, or even tofu for added protein.
To enhance the flavor, consider adding fresh herbs like parsley or dill to the marinade. If you’re planning to prepare this dish ahead of time, marinate the vegetables the night before for an even deeper flavor.
Always verify that your grill is well-oiled to prevent sticking, and keep a spray bottle of water handy to manage any flare-ups during grilling. Enjoy your spring feast!
Spinach and Feta Stuffed Peppers

Spring is the perfect time to embrace fresh ingredients and vibrant flavors, and what better way to celebrate the season than with Spinach and Feta Stuffed Peppers? This dish combines the earthy taste of spinach with the creamy, tangy flavor of feta cheese, all enveloped in sweet bell peppers. Not only are these stuffed peppers visually appealing, but they also offer a nutritious and satisfying meal that can be enjoyed warm or at room temperature.
Whether you’re hosting a spring gathering or simply looking for a delicious weeknight dinner option, these stuffed peppers are versatile and easy to prepare. They can serve as a delightful main dish or a colorful side dish that complements grilled meats or a fresh salad. Let’s plunge into this delicious recipe and bring a taste of Greece to your table.
Ingredients (serving size: 4-6 people):
- 4 large bell peppers (any color)
- 2 cups fresh spinach, chopped
- 1 cup feta cheese, crumbled
- 1 cup cooked rice (or quinoa)
- 1/2 cup onion, finely chopped
- 2 cloves garlic, minced
- 1 tablespoon olive oil
- 1 teaspoon dried oregano
- 1 teaspoon salt
- 1/2 teaspoon black pepper
- 1/4 cup fresh parsley, chopped (for garnish)
- Optional: 1/4 teaspoon red pepper flakes for heat
Cooking Instructions:
- Preheat the Oven: Begin by preheating your oven to 375°F (190°C). This guarantees that the peppers cook evenly and develop a nice roasted flavor.
- Prepare the Peppers: While the oven warms up, wash the bell peppers, slice the tops off, and remove the seeds and membranes. This step is important to create a hollow base for stuffing.
- Sauté the Vegetables: In a large skillet, heat the olive oil over medium heat. Add the chopped onion and garlic, sautéing for about 3-4 minutes until they become translucent and fragrant. This will help build the flavor base for the filling.
- Mix the Filling: In a large bowl, combine the sautéed onion and garlic with the chopped spinach, cooked rice (or quinoa), crumbled feta cheese, oregano, salt, black pepper, and optional red pepper flakes. Stir well until all ingredients are evenly incorporated.
- Stuff the Peppers: Carefully spoon the spinach and feta mixture into each prepared bell pepper, packing it gently to guarantee they’re well-filled. Place the stuffed peppers upright in a baking dish.
- Bake the Peppers: Cover the baking dish with aluminum foil and bake in the preheated oven for 25-30 minutes. This helps the peppers soften and allows the flavors to meld together.
- Remove the Foil and Finish Baking: After the initial baking time, remove the foil and bake for an additional 10-15 minutes, until the tops are lightly golden and the peppers are tender.
- Garnish and Serve: Once done, remove from the oven and let cool for a few minutes. Garnish with fresh parsley before serving. These stuffed peppers can be enjoyed warm or at room temperature.
Extra Tips: For added depth of flavor, consider adding other ingredients to the filling, such as chopped sun-dried tomatoes, olives, or even pine nuts.
To save time, you can prep the filling a day in advance and store it in the refrigerator until you’re ready to stuff the peppers. Additionally, feel free to use different types of cheese or grains based on your preferences; this recipe is highly adaptable!
Zucchini Fritters With Tzatziki Sauce

Zucchini fritters are a delightful way to celebrate the fresh produce of spring while enjoying the vibrant flavors of Greek cuisine. These crispy, golden-brown fritters are made with shredded zucchini, fresh herbs, and a touch of feta cheese, making them a perfect appetizer or light main dish.
Paired with a revitalizing tzatziki sauce, which features creamy yogurt, crisp cucumbers, and aromatic garlic, this dish is sure to be a hit at any gathering. The combination of textures and flavors in zucchini fritters brings a taste of the Mediterranean to your table.
They’re easy to prepare and can be served warm or at room temperature, making them an excellent choice for picnics or potlucks. Whether you’re looking for a new side dish or a unique vegetarian offering, these fritters are sure to impress your family and friends.
Ingredients (serving size: 4-6 people):
- 4 medium zucchinis
- 1 teaspoon salt
- 1 cup all-purpose flour
- 1 teaspoon baking powder
- 2 large eggs
- 1 cup crumbled feta cheese
- 1/2 cup chopped fresh dill (or parsley)
- 1/2 teaspoon black pepper
- 1/4 cup grated Parmesan cheese
- Olive oil (for frying)
For the Tzatziki Sauce:
- 1 cup Greek yogurt
- 1 medium cucumber, grated and excess water squeezed out
- 2 cloves garlic, minced
- 1 tablespoon olive oil
- 1 tablespoon white vinegar
- Salt and pepper to taste
- Fresh dill for garnish
Cooking Instructions:
1. Prepare the Zucchini: Start by washing the zucchinis thoroughly. Trim off the ends and grate them using a box grater or food processor. Place the grated zucchini in a colander and sprinkle with salt. Allow it to sit for about 15-20 minutes to draw out excess moisture.
Afterward, use your hands to squeeze out as much liquid as possible from the zucchini.
2. Make the Fritter Mixture: In a large mixing bowl, combine the drained zucchini, flour, baking powder, eggs, crumbled feta cheese, chopped dill, black pepper, and grated Parmesan cheese. Mix well until all ingredients are evenly distributed and form a cohesive batter.
3. Heat the Oil: In a large skillet, pour enough olive oil to cover the bottom of the pan (about 1/4 inch deep) and heat over medium heat. To test if the oil is ready, drop a small spoonful of the batter into the oil; it should sizzle immediately.
4. Fry the Fritters: Using a spoon or your hands, scoop out portions of the fritter mixture and carefully place them into the hot oil, flattening them slightly with the back of the spoon. Fry for about 3-4 minutes on each side or until golden brown and crispy.
Work in batches to avoid overcrowding the pan.
5. Drain the Fritters: Once cooked, transfer the fritters to a paper towel-lined plate to drain any excess oil. Continue frying until all the batter is used.
6. Prepare the Tzatziki Sauce: In a separate bowl, mix together the Greek yogurt, grated cucumber, minced garlic, olive oil, white vinegar, and a pinch of salt and pepper. Stir until well combined. Adjust seasoning as desired.
7. Serve: Arrange the zucchini fritters on a serving platter and garnish with fresh dill. Serve warm alongside the tzatziki sauce for dipping.
Extra Tips:
For the best texture, be sure to squeeze out as much moisture from the zucchini as possible; this will help the fritters achieve a crispy exterior.
You can also customize the flavors by adding different herbs or spices based on your preference. If you want to make the fritters ahead of time, they can be kept warm in a low oven or reheated in a skillet before serving.
Enjoy these fritters fresh for the best taste, but they can also be stored in an airtight container in the refrigerator for a couple of days.
Roasted Asparagus With Feta and Lemon

Spring is the perfect time to enjoy fresh, tender vegetables, and asparagus is one of the star players of the season. Its vibrant green color and delicate flavor make it an ideal side dish for a variety of meals.
Roasting asparagus not only enhances its natural taste but also gives it a delightful crispness. When paired with tangy feta cheese and zesty lemon, this dish transforms into a revitalizing and flavorful accompaniment that’s sure to impress family and friends.
This Roasted Asparagus With Feta and Lemon recipe isn’t only simple to prepare but also quick to cook, making it a fantastic choice for busy weeknights or elegant dinner parties. The combination of flavors creates a harmonious balance that brings out the best in asparagus.
Whether served alongside grilled meats or as part of a vegetarian feast, this dish will surely be a hit on your table.
Ingredients (serves 4-6)
- 1 ½ pounds fresh asparagus, trimmed
- 3 tablespoons olive oil
- 1 teaspoon sea salt
- ½ teaspoon black pepper
- 1 lemon, zested and juiced
- ½ cup crumbled feta cheese
- 2 tablespoons chopped fresh parsley (optional)
Cooking Instructions
- Preheat the Oven: Begin by preheating your oven to 400°F (200°C). This high temperature will guarantee that the asparagus roasts properly and develops a nice, crispy exterior.
- Prepare the Asparagus: Rinse the asparagus under cool water and pat it dry with a paper towel. Trim the woody ends of the asparagus by snapping them off or cutting them with a knife. The asparagus will naturally break where the tender part meets the tougher end.
- Season the Asparagus: In a large bowl, combine the trimmed asparagus with olive oil, sea salt, and black pepper. Toss the asparagus until it’s evenly coated in the oil and seasonings. This step ensures that each piece is flavorful and will roast evenly.
- Arrange on a Baking Sheet: Spread the seasoned asparagus in a single layer on a baking sheet. Make sure the spears aren’t overcrowded, as this will prevent them from roasting properly and allow for even browning.
- Roast the Asparagus: Place the baking sheet in the preheated oven and roast for about 15-20 minutes, or until the asparagus is tender and lightly browned. You can check for doneness by piercing the thickest part of a spear with a fork; it should be tender but still have a slight crunch.
- Add Feta and Lemon: Once the asparagus is done roasting, remove it from the oven and immediately drizzle the lemon juice over the top. Sprinkle the lemon zest and crumbled feta cheese evenly across the asparagus while it’s still hot. The warmth will help soften the feta slightly, enhancing its flavor.
- Garnish and Serve: For an extra touch, sprinkle the chopped parsley over the dish before serving. This adds a pop of color and freshness. Serve the roasted asparagus warm as a delightful side dish.
Extra Tips
When selecting asparagus, look for bright green stalks with firm tips. Thinner spears tend to be more tender, while thicker ones have a heartier bite.
If you prefer a little extra flavor, consider adding minced garlic or red pepper flakes to the olive oil mixture before tossing the asparagus. Feel free to experiment with different cheeses as well; goat cheese or Parmesan can also be delicious alternatives to feta.
Chickpea and Cucumber Salad
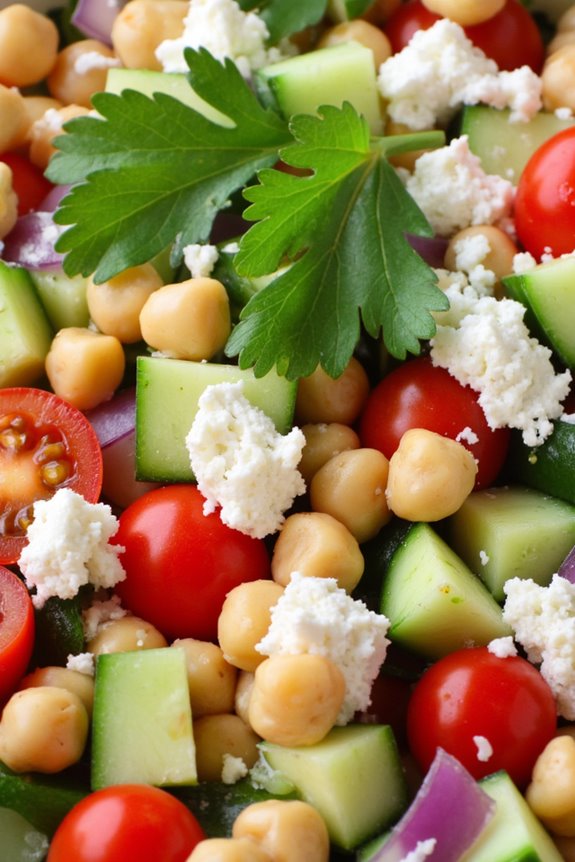
This revitalizing Chickpea and Cucumber Salad is a perfect dish to celebrate the vibrant flavors of Greek cuisine during the spring. Combining protein-packed chickpeas with crisp cucumbers, this salad isn’t only delicious but also incredibly nutritious.
It’s light yet filling, making it an ideal accompaniment to grilled meats, or it can stand alone as a satisfying vegetarian meal. The addition of fresh herbs and a zesty dressing brings everything together, making each bite a delightful experience.
Perfect for gatherings or a simple weeknight meal, this salad is easy to prepare and can be made in advance. The flavors meld beautifully if allowed to rest in the refrigerator for a bit, making it a great option for meal prep. Serve it chilled for a revitalizing treat that highlights the best of springtime ingredients.
Ingredients (Serves 4-6):
- 1 can (15 oz) chickpeas, drained and rinsed
- 1 large cucumber, diced
- 1 cup cherry tomatoes, halved
- 1/2 red onion, finely chopped
- 1/4 cup fresh parsley, chopped
- 1/4 cup feta cheese, crumbled
- 3 tablespoons olive oil
- 2 tablespoons red wine vinegar
- 1 teaspoon dried oregano
- Salt and pepper to taste
Cooking Instructions:
1. Prepare the Vegetables: Begin by rinsing the canned chickpeas under cold water to remove excess sodium and any canning liquid. Drain well.
Next, dice the cucumber into bite-sized pieces, halve the cherry tomatoes, and finely chop the red onion. This step guarantees that all vegetables are ready and evenly sized for the best presentation and taste.
2. Combine Ingredients: In a large mixing bowl, add the chickpeas, diced cucumber, halved cherry tomatoes, and chopped red onion. Gently fold these ingredients together to evenly distribute each component, making sure that every bite has a mix of flavors.
3. Add Fresh Herbs and Cheese: Toss in the chopped parsley and crumbled feta cheese. The parsley adds a fresh flavor and the feta contributes a creamy, salty note to the salad.
Be careful not to overmix at this stage to keep the feta intact.
4. Make the Dressing: In a small bowl, whisk together the olive oil, red wine vinegar, dried oregano, salt, and pepper. This dressing will add a tangy and aromatic flavor to the salad.
Taste the dressing before pouring it over the salad to adjust the seasoning as preferred.
5. Dress the Salad: Pour the dressing over the salad mixture and gently toss everything together until well-coated. The dressing should enhance the flavors of the vegetables without overpowering them.
6. Chill and Serve: Cover the salad and refrigerate for at least 30 minutes before serving. This allows the flavors to meld beautifully.
Serve chilled, garnished with additional parsley or feta if desired.
Extra Tips: For added crunch and flavor, consider incorporating other vegetables such as bell peppers or radishes. You can also substitute the feta with avocado for a creamy vegan alternative.
If you like a bit of spice, a dash of red pepper flakes can elevate the dish. This salad keeps well in the refrigerator for a couple of days, making it a great option for leftovers or meal prep!
Greek Yogurt and Dill Dip
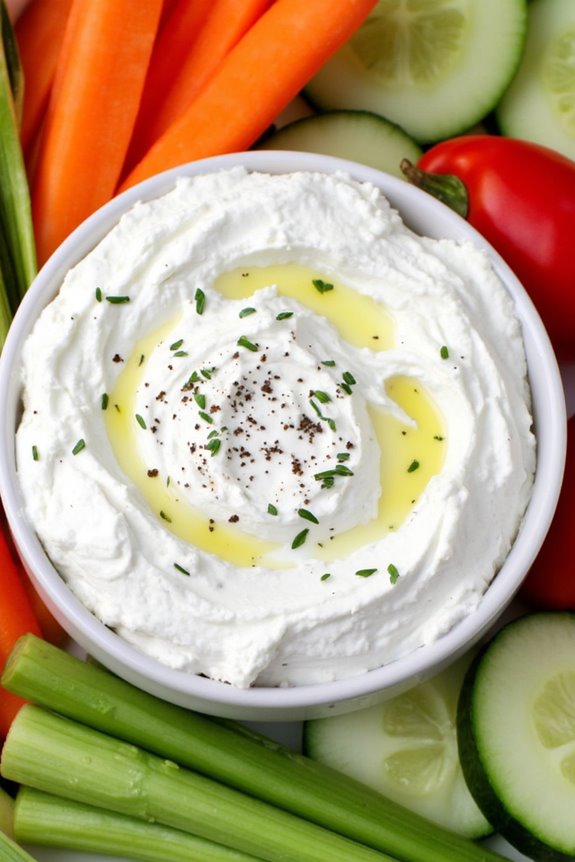
Greek Yogurt and Dill Dip is a revitalizing and zesty addition to any spring gathering. This dip isn’t only easy to make but also packs a punch with its vibrant flavors, making it a perfect accompaniment for fresh vegetables, pita bread, or as a spread on sandwiches.
The creamy texture of Greek yogurt combined with the aromatic dill creates a delightful contrast that’s sure to please your palate. Whether you’re hosting a party or simply enjoying a quiet evening at home, this dip is a healthful choice that everyone will love.
To prepare this dip, fresh ingredients are key. The use of high-quality Greek yogurt provides a rich base, while fresh dill elevates the flavor profile. This dish isn’t only delicious but also nutritious, as Greek yogurt is packed with protein and probiotics, making it a wholesome addition to your spring menu.
Serve it chilled for the best experience, and consider pairing it with an assortment of colorful veggies for a visually appealing spread.
Ingredients (Serves 4-6):
- 2 cups Greek yogurt
- 1/4 cup fresh dill, finely chopped
- 1 clove garlic, minced
- 1 tablespoon lemon juice
- 1 teaspoon olive oil
- Salt and pepper to taste
- Optional: 1/4 cup finely chopped cucumber for added crunch
Cooking Instructions:
- Prepare the Ingredients: Begin by gathering all your ingredients. Finely chop the fresh dill and mince the garlic clove. If you choose to include cucumber, make sure to chop it finely as well. This will guarantee that the flavors blend well together in the dip.
- Mix the Base: In a medium-sized mixing bowl, add the 2 cups of Greek yogurt. This will serve as the creamy base of your dip.
- Add Flavors: To the bowl of yogurt, add the finely chopped dill, minced garlic, lemon juice, and olive oil. The lemon juice will give a slight tang, while the olive oil adds richness to the dip.
- Season: Sprinkle salt and pepper to taste. Start with a small amount, then taste the mixture and adjust according to your preference. If you’re adding cucumber, mix it in at this stage.
- Combine: Using a spatula or whisk, thoroughly combine all the ingredients until the mixture is smooth and well-blended. Make sure there are no lumps, and the dill is evenly distributed throughout.
- Chill: Cover the bowl with plastic wrap or transfer the dip to a serving dish with a lid. Refrigerate for at least 30 minutes before serving. This chilling time allows the flavors to meld together beautifully.
- Serve: Once chilled, remove the dip from the refrigerator and give it a quick stir. Serve it with an assortment of fresh vegetables, pita chips, or use it as a delightful sandwich spread.
Extra Tips:
For an extra layer of flavor, consider adding a pinch of smoked paprika or a dash of hot sauce to the dip. This can elevate the taste and add a bit of heat if desired.
Additionally, homemade pita chips are an easy and delicious complement to this dip. Simply cut pita bread into triangles, brush them lightly with olive oil, sprinkle with salt, and bake until crisp.
Enjoy your Greek Yogurt and Dill Dip as a revitalizing treat this spring!
Lemon Garlic Shrimp With Arugula

Lemon Garlic Shrimp with Arugula is a vibrant and flavorful dish that embodies the essence of Mediterranean cuisine. The combination of succulent shrimp, zesty lemon, and aromatic garlic makes it a delightful option for spring dinners. This dish not only showcases the freshness of seasonal ingredients but is also quick to prepare, making it perfect for weeknight meals or entertaining guests.
The peppery notes of arugula add a revitalizing contrast to the sweetness of the shrimp, creating a harmonious balance of flavors that will tantalize your taste buds. This recipe isn’t only delicious but also healthy, as it features lean protein and plenty of greens.
Pair it with crusty bread or a light salad for a complete meal that everyone will love. Whether you’re a seasoned cook or a beginner, this Lemon Garlic Shrimp with Arugula is sure to impress and become a staple in your spring recipe repertoire.
Ingredients (Serves 4-6)
- 1 pound large shrimp, peeled and deveined
- 4 cups fresh arugula
- 4 cloves garlic, minced
- 1/4 cup olive oil
- 1 lemon, juiced and zested
- 1/2 teaspoon red pepper flakes (optional)
- Salt and pepper to taste
- Fresh parsley, chopped (for garnish)
Cooking Instructions
- Prepare the Shrimp: Start by rinsing the shrimp under cold water and patting them dry with paper towels. This step is vital to guarantee that the shrimp sear well in the pan and don’t steam. Season the shrimp lightly with salt and pepper.
- Sauté the Garlic: In a large skillet, heat the olive oil over medium heat. Once the oil is hot, add the minced garlic and sauté for about 1 minute until fragrant but not browned. Be careful not to burn the garlic, as it can turn bitter.
- Cook the Shrimp: Increase the heat to medium-high, and add the seasoned shrimp to the skillet. Cook the shrimp for 2-3 minutes on one side until they turn pink and opaque. Flip the shrimp over and add the red pepper flakes, if using, then cook for another 2-3 minutes until fully cooked and just opaque.
- Add Lemon: Once the shrimp are cooked, squeeze the lemon juice over the shrimp and sprinkle in the lemon zest. Toss everything in the skillet to make sure the shrimp are coated with the lemon and garlic mixture. Cook for an additional minute to allow the flavors to meld.
- Combine with Arugula: Remove the skillet from heat and add the fresh arugula directly to the shrimp mixture. Toss gently until the arugula wilts slightly from the residual heat. This should only take a minute or so, as you want the arugula to maintain its crispness.
- Serve: Transfer the Lemon Garlic Shrimp with Arugula to a serving platter. Garnish with chopped fresh parsley for added color and freshness. Serve immediately, and enjoy!
Extra Tips
When cooking Lemon Garlic Shrimp with Arugula, it’s vital to use fresh, high-quality shrimp for the best flavor. If you prefer a more intense citrus flavor, consider marinating the shrimp in lemon juice and zest for 15-30 minutes before cooking.
Additionally, you can customize the dish by adding other vegetables, such as cherry tomatoes or bell peppers, to create a more colorful presentation. Serve with a side of crusty bread to soak up the delicious garlic-lemon sauce!
Strawberry and Feta Salad With Mint
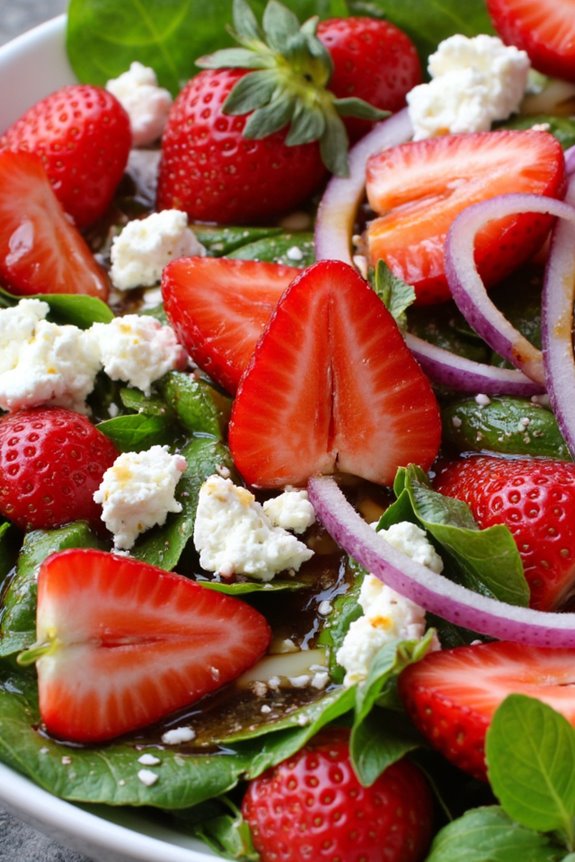
As the warmer weather arrives, nothing beats a revitalizing salad that combines the sweetness of strawberries with the saltiness of feta cheese. The Strawberry and Feta Salad With Mint is an ideal dish for springtime gatherings, picnics, or even as a light meal on its own.
This salad not only bursts with vibrant colors but also offers a delightful combination of flavors and textures that’s sure to please any palate. The freshness of the mint adds an invigorating touch, making this salad a perfect companion for grilled meats or seafood.
To prepare this salad, you’ll need ripe strawberries and creamy feta cheese, along with a few simple pantry staples. The dressing is a key component, tying together the sweet and savory elements. With just a quick assembly of ingredients, you can create a dish that looks as good as it tastes.
Whether you serve it as a starter or a side, this Strawberry and Feta Salad With Mint is sure to become a favorite in your spring recipe repertoire.
Ingredients (Serves 4-6)
- 4 cups fresh strawberries, hulled and sliced
- 1 cup feta cheese, crumbled
- 1/2 cup fresh mint leaves, chopped
- 1/4 cup red onion, thinly sliced
- 2 tablespoons olive oil
- 1 tablespoon balsamic vinegar
- Salt and black pepper to taste
Cooking Instructions
- Prepare the Strawberries: Start by washing the strawberries under cold running water. Remove the green tops (hull) and slice them into thin pieces. Place the sliced strawberries in a large mixing bowl.
- Add the Red Onion: Take the red onion and slice it thinly. The onion adds a crunchy texture and a slight bite to the salad. Add the sliced onion to the bowl with the strawberries.
- Incorporate the Feta: Crumble the feta cheese over the strawberry and onion mixture. The feta should be evenly distributed throughout the salad to guarantee that each bite has a balanced flavor profile.
- Mix the Mint: Chop the fresh mint leaves and sprinkle them over the salad. Mint brings a revitalizing aspect to the dish, enhancing the overall taste.
- Prepare the Dressing: In a small bowl, whisk together the olive oil and balsamic vinegar. Season with salt and black pepper to taste. This dressing will complement the sweetness of the strawberries and the saltiness of the feta.
- Combine Ingredients: Drizzle the dressing over the salad ingredients in the mixing bowl. Gently toss everything together with a spatula or salad tongs, being careful not to crush the strawberries or feta.
- Serve: Transfer the salad to a serving platter or individual bowls. Garnish with additional mint leaves if desired. Serve immediately for the best flavor and freshness.
Extra Tips
For an added layer of flavor, consider toasting some nuts, such as walnuts or almonds, and sprinkling them on top just before serving. This will provide a delightful crunch and a nutty flavor that complements the salad beautifully.
Additionally, if you prefer a sweeter dressing, you can add a teaspoon of honey or maple syrup to the olive oil and balsamic vinegar mixture. Make sure to adjust the salt and pepper according to your taste preferences, allowing the salad to truly shine!