

Snacking can be both delicious and nutritious, especially with Greek yogurt as a base. It’s versatile, rich in protein, and pairs well with so many ingredients. From sweet parfaits to savory dips, there’s a world of options to explore. If you’re looking for simple yet satisfying midday bites, you’re in for a treat with these 14 recipes that not only taste great but also fuel your day. Let’s take a closer look.
Greek Yogurt Parfait With Fresh Fruits
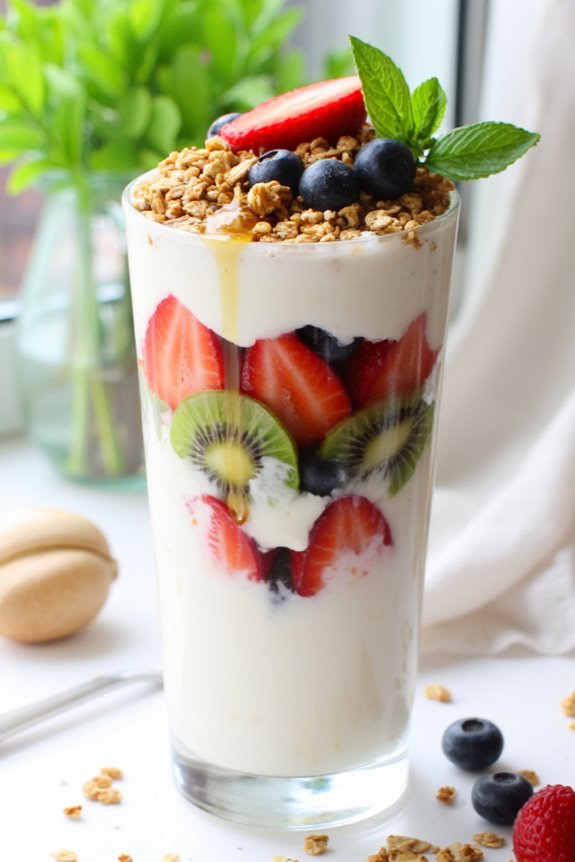
Greek Yogurt Parfait with Fresh Fruits is a delightful and nutritious treat that makes for an ideal breakfast, snack, or dessert. Layered with creamy Greek yogurt, vibrant fresh fruits, and a crunchy element for texture, this parfait not only looks stunning but also packs a punch of flavor and health benefits.
The combination of protein-rich yogurt and antioxidant-packed fruits provides a satisfying and energizing way to start your day or to enjoy as a revitalizing afternoon snack. This recipe is incredibly versatile, allowing you to customize it with your favorite fruits and toppings.
Whether you prefer the sweetness of strawberries and blueberries or the tropical taste of mango and kiwi, the options are endless. Complete with a drizzle of honey or a sprinkle of granola, this Greek Yogurt Parfait is sure to please everyone at the table, making it a perfect choice for serving 4-6 people.
Ingredients (serving size of 4-6 people):
- 4 cups of plain Greek yogurt
- 2 cups of mixed fresh fruits (e.g., strawberries, blueberries, bananas, kiwi)
- 1 cup of granola
- 4 tablespoons of honey or maple syrup (optional)
- Fresh mint leaves for garnish (optional)
Instructions:
- Prepare the Fruits: Start by washing and cutting the fresh fruits as needed. For strawberries, hull and slice them; for bananas, peel and slice; and for kiwis, peel and chop into bite-sized pieces. This preparation guarantees that the fruits are fresh and ready to be layered into the parfait.
- Layer the Greek Yogurt: In a tall glass or parfait cup, spoon in about half a cup of Greek yogurt as the first layer. Use a spoon to spread it evenly across the bottom, creating a smooth base for the parfait.
- Add the Fruits: Next, add a layer of the prepared mixed fresh fruits on top of the yogurt. Aim for about a cup of fruits, spreading them evenly across the yogurt layer. This adds a burst of flavor and color to your parfait.
- Incorporate Granola: Sprinkle a layer of granola over the fruit. Use approximately 1/4 cup of granola, making sure it covers the fruit layer. This will provide a delightful crunch and contrast to the creamy yogurt and juicy fruits.
- Repeat Layers: Repeat the layering process by adding another half cup of Greek yogurt, followed by another layer of mixed fruits, and then a final sprinkle of granola. You can repeat this up to three layers, based on the size of your cup and the amount of ingredients available.
- Drizzle with Honey: If desired, drizzle some honey or maple syrup over the top layer of granola for added sweetness. This step is optional but enhances the flavor beautifully.
- Garnish and Serve: Finally, garnish with fresh mint leaves for an added touch of freshness and visual appeal. Serve immediately or refrigerate for a short period before serving.
Extra Tips:
When preparing Greek Yogurt Parfaits, feel free to get creative with your ingredient choices. You can mix in nuts, seeds, or even nut butter for added flavor and nutrition.
For a lower sugar option, consider using unsweetened Greek yogurt and fresh fruits that are in season, as they tend to be sweeter and more flavorful. Additionally, if you make the parfaits in advance, keep the granola separate until serving to maintain its crunchiness.
Enjoy your delicious and healthy Greek Yogurt Parfait with Fresh Fruits!
Savory Greek Yogurt Dip With Herbs
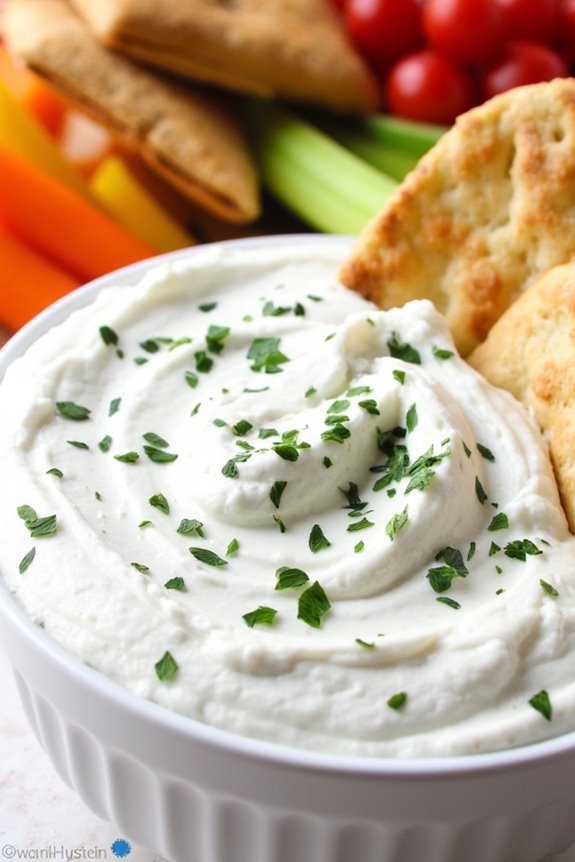
Savory Greek Yogurt Dip With Herbs is a delightful and healthy option for any gathering or snack time. This dip isn’t only easy to prepare but also packed with flavor and nutrients, making it an excellent choice for those looking to incorporate more wholesome ingredients into their diet.
The creamy texture of Greek yogurt serves as the perfect base, while fresh herbs and spices add layers of taste that elevate this simple recipe into something truly special. Perfect for dipping crunchy vegetables, pita chips, or spreading on sandwiches, this dip is versatile and can be tailored to your personal taste preferences.
Whether you’re hosting a party or simply enjoying a quiet evening at home, this savory dip is sure to please. With its bright flavors and creamy consistency, it’s a dish that will leave everyone wanting more.
Ingredients (Serves 4-6 people):
- 2 cups plain Greek yogurt
- 2 tablespoons olive oil
- 1 tablespoon fresh lemon juice
- 1 teaspoon garlic powder
- 1 teaspoon onion powder
- 1 teaspoon dried dill
- 1 teaspoon dried oregano
- 1 teaspoon fresh parsley, chopped
- 1/2 teaspoon salt
- 1/4 teaspoon black pepper
- Optional: fresh vegetables or pita chips for serving
Cooking Instructions:
- Prepare the Base: In a medium-sized mixing bowl, add 2 cups of plain Greek yogurt. This will serve as the creamy base for your dip. Make sure to use full-fat or low-fat yogurt based on your preference for texture and richness.
- Add the Olive Oil and Lemon Juice: Pour in 2 tablespoons of olive oil and 1 tablespoon of fresh lemon juice to the yogurt. The olive oil will add richness, while the lemon juice provides a tangy brightness that balances the flavors.
- Incorporate Spices and Herbs: Sprinkle in 1 teaspoon each of garlic powder, onion powder, dried dill, and dried oregano. Additionally, stir in 1 teaspoon of chopped fresh parsley, along with 1/2 teaspoon of salt and 1/4 teaspoon of black pepper. These spices and herbs will infuse the yogurt with savory flavors.
- Mix Thoroughly: Using a whisk or a spatula, mix all the ingredients together until well combined. Ascertain there are no lumps in the yogurt, and the herbs and spices are evenly distributed throughout the dip.
- Taste and Adjust: After mixing, taste the dip and adjust the seasoning if necessary. You can add more salt, pepper, or lemon juice based on your preference.
- Chill Before Serving: Cover the bowl with plastic wrap or transfer the dip to an airtight container. Refrigerate for at least 30 minutes before serving. This chilling time allows the flavors to meld together and enhances the overall taste of the dip.
- Serve: When ready to serve, transfer the dip to a serving bowl and offer it alongside fresh vegetables, pita chips, or your favorite snacks.
Extra Tips: For an extra burst of flavor, consider adding finely chopped fresh herbs like chives or mint to the dip before serving. You can also experiment with different spices, such as smoked paprika or cumin, to create your unique twist on this savory dip.
If you have any leftovers, store them in an airtight container in the refrigerator for up to three days; the flavors will continue to develop, making it even more delicious!
Honey and Almond Greek Yogurt Bowl
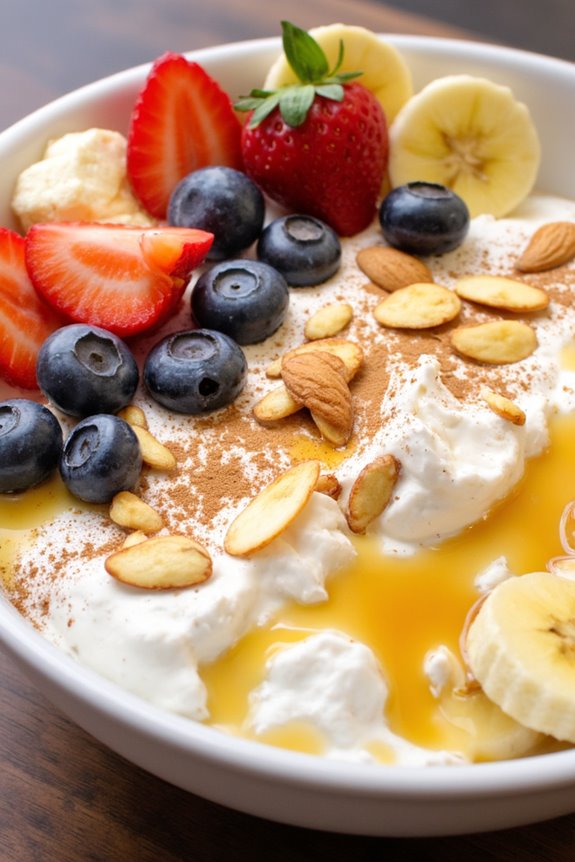
If you’re looking for a nutritious and delicious snack, the Honey and Almond Greek Yogurt Bowl is the perfect choice. This dish combines the creaminess of Greek yogurt with the natural sweetness of honey and the crunch of almonds, making it a satisfying treat that can be enjoyed any time of the day.
Not only is it easy to prepare, but it also provides a great source of protein and healthy fats, keeping you energized and satisfied.
This versatile bowl can be customized to suit your taste buds, so feel free to add your favorite fruits or seeds for an extra boost of flavor and nutrition. Whether you’re enjoying it as a post-workout snack or a quick breakfast, this Honey and Almond Greek Yogurt Bowl is sure to impress with its simple yet delightful combination of ingredients.
Ingredients (Serves 4-6):
- 4 cups Greek yogurt
- 1/2 cup honey
- 1 cup sliced almonds
- 1 teaspoon vanilla extract
- Fresh fruit for topping (such as berries or banana slices, optional)
- A pinch of cinnamon (optional)
Instructions:
1. Prepare the Yogurt Base: Start by placing the 4 cups of Greek yogurt in a large mixing bowl. This will be the base of your bowl, so ascertain it’s a good quality yogurt for the best flavor and texture.
2. Add Sweetness and Flavor: Pour in the 1/2 cup of honey and the 1 teaspoon of vanilla extract into the yogurt. The honey not only sweetens the yogurt but also adds a lovely floral note.
Gently stir the mixture with a spatula until the honey and vanilla are fully incorporated into the yogurt, creating a creamy and smooth consistency.
3. Toast the Almonds: In a dry skillet over medium heat, add the 1 cup of sliced almonds. Stir continuously for about 3-5 minutes or until the almonds are golden brown and fragrant.
This step enhances the flavor of the almonds and adds a delightful crunch to your dish.
4. Assemble the Bowls: Once the yogurt mixture is ready and the almonds are toasted, it’s time to assemble your bowls. Spoon the yogurt mixture into individual serving bowls or one large serving dish.
5. Top with Almonds and Extras: Generously sprinkle the toasted almonds over the yogurt. If desired, add fresh fruit on top, such as berries or banana slices, for added color and nutrition.
You can also sprinkle a pinch of cinnamon for an extra flavor dimension.
6. Serve and Enjoy****: Your Honey and Almond Greek Yogurt Bowls are now ready to be served! Enjoy immediately while the almonds are still crunchy.
Extra Tips:
To make this dish even more nutritious, consider adding a handful of chia seeds or flaxseeds for added fiber and omega-3 fatty acids.
You can also substitute the honey with maple syrup or agave nectar for a vegan option. If you prefer a creamier texture, opt for full-fat Greek yogurt, or mix in a bit of whipped cream for a richer bowl.
This recipe is highly customizable, so feel free to experiment with different toppings and flavors to make it your own!
Spicy Greek Yogurt Hummus
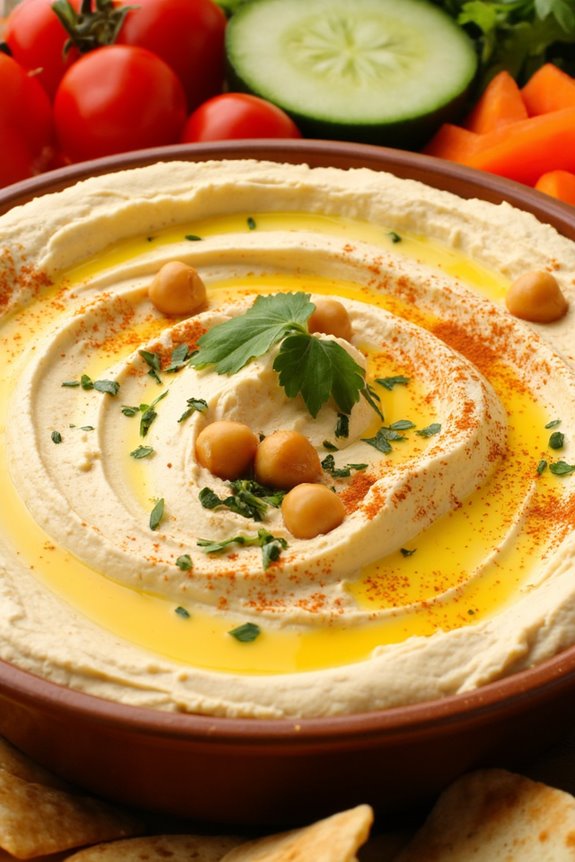
Looking to elevate your snacking game? This Spicy Greek Yogurt Hummus is the perfect blend of creamy texture and bold flavor, making it an ideal dip for veggies, pita chips, or even as a spread on sandwiches.
Utilizing Greek yogurt as a base not only adds a delightful creaminess but also increases the protein content, making it a healthier choice than traditional hummus. The addition of spices brings a kick that will tantalize your taste buds, making this dish a crowd-pleaser at any gathering.
This recipe is simple and quick to prepare, requiring no cooking time, just a bit of blending and mixing. With its zesty flavor and smooth consistency, you’ll find yourself reaching for this hummus again and again.
It’s perfect for a light snack, an appetizer for parties, or a nutritious addition to your lunchbox. So grab your ingredients and let’s get started on creating this delicious Spicy Greek Yogurt Hummus that serves 4-6 people!
Ingredients:
- 1 cup plain Greek yogurt
- 1 can (15 oz) chickpeas, drained and rinsed
- 2 tablespoons tahini
- 2 tablespoons olive oil
- 2 cloves garlic, minced
- 1 tablespoon lemon juice
- 1 teaspoon ground cumin
- 1 teaspoon smoked paprika
- 1/2 teaspoon cayenne pepper (adjust to taste)
- Salt and pepper to taste
- Fresh herbs for garnish (optional)
Instructions:
1. Prepare the Ingredients: Gather all the ingredients needed for the hummus. Rinse and drain the chickpeas well to remove any excess sodium.
Mince the garlic and measure out all the spices and liquids. This step guarantees that you have everything ready for a smooth blending process.
2. Blend the Base: In a food processor or high-speed blender, combine the Greek yogurt, chickpeas, tahini, olive oil, minced garlic, and lemon juice.
Start blending on low speed to incorporate the ingredients, gradually increasing to high speed until the mixture is smooth and creamy. This step is essential for achieving the desired texture.
3. Add the Spices: Once the base is smooth, add the ground cumin, smoked paprika, cayenne pepper, salt, and pepper to the mixture.
Blend again until the spices are well incorporated. Taste the hummus and adjust the seasoning if necessary, adding more cayenne for heat or salt for flavor.
4. Adjust Consistency: If the hummus is too thick, you can add a little water, one tablespoon at a time, until you reach your preferred consistency.
Blend again after each addition to guarantee a uniform texture. This step allows you to customize the hummus to your liking.
5. Serve and Garnish: Transfer the Spicy Greek Yogurt Hummus to a serving bowl.
If desired, drizzle a little olive oil on top and sprinkle with fresh herbs for added flavor and presentation. Serve with an assortment of fresh vegetables, pita chips, or your favorite dippers. Enjoy!
Extra Tips:
For an extra layer of flavor, consider roasting your chickpeas before blending them into the hummus.
Simply toss them in a bit of olive oil and your favorite spices and roast them at 400°F (200°C) for about 20 minutes. This will add a delightful crunch and depth of flavor to your hummus.
Additionally, feel free to experiment with different spices or add-ins, such as roasted red peppers or jalapeños, to customize the hummus to your taste preferences.
Greek Yogurt and Cucumber Salad
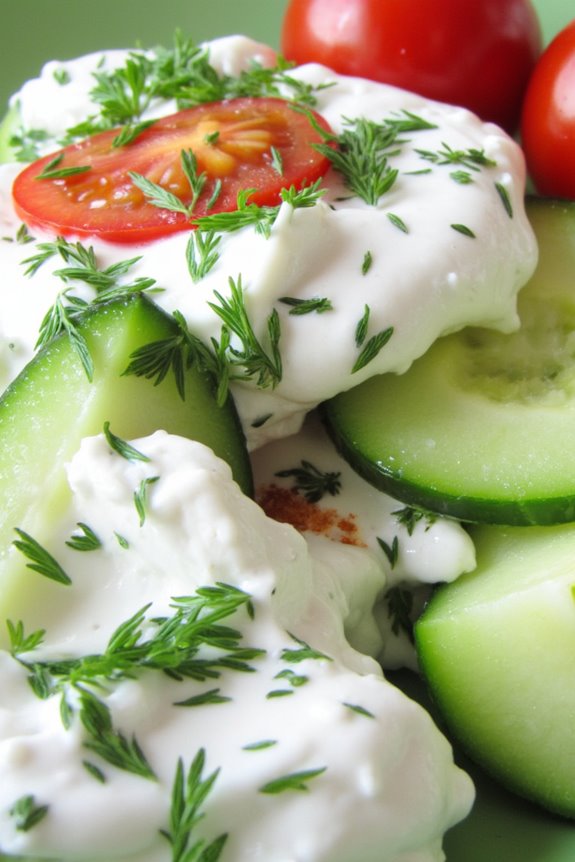
Greek Yogurt and Cucumber Salad is a revitalizing and healthy dish that brings together the creamy texture of Greek yogurt with the crisp, invigorating taste of cucumbers. This salad isn’t only easy to prepare but also packed with nutrients, making it an ideal snack or side dish for any meal.
The combination of flavors and textures creates a delicious and satisfying experience that can complement a variety of cuisines. This salad is perfect for warm days when you crave something light and revitalizing. The cooling effect of the cucumbers combined with the tanginess of Greek yogurt makes this dish incredibly invigorating.
You can enjoy it as a dip with pita bread or as a side salad to accompany grilled meats and vegetables. Whether you’re hosting a gathering or just looking for a quick and healthy snack, Greek Yogurt and Cucumber Salad is a versatile recipe that everyone will love.
Ingredients (serving size: 4-6 people)
- 2 large cucumbers, diced
- 2 cups Greek yogurt
- 2 cloves garlic, minced
- 2 tablespoons fresh dill, chopped (or 1 tablespoon dried dill)
- 1 tablespoon lemon juice
- 1 teaspoon salt
- 1/2 teaspoon black pepper
- Optional: cherry tomatoes, halved (for garnish)
Cooking Instructions
1. Prepare the Cucumbers: Start by washing the cucumbers thoroughly under running water. Once clean, peel them if desired (leaving the skin on adds extra texture and nutrients). Cut the cucumbers in half lengthwise and then dice them into small pieces.
Place the diced cucumbers in a colander and sprinkle a little salt over them. Let them sit for about 10-15 minutes to draw out excess moisture.
2. Mix the Dressing: In a large mixing bowl, add the Greek yogurt. Next, incorporate the minced garlic, chopped dill, lemon juice, salt, and black pepper. Whisk everything together until you achieve a smooth and creamy consistency.
This will be the base of your salad and should be well combined for the best flavor.
3. Combine Ingredients: After the cucumbers have released some of their moisture, pat them dry with paper towels to prevent the salad from becoming watery. Add the cucumbers to the yogurt mixture and gently fold them in, ensuring that all the cucumber pieces are coated evenly with the yogurt dressing.
4. Chill and Serve: Once mixed, cover the bowl with plastic wrap or a lid and refrigerate the salad for at least 30 minutes. This chilling time allows the flavors to meld together beautifully.
When ready to serve, give the salad a gentle stir and taste for seasoning. Adjust salt and pepper if necessary. If desired, garnish with halved cherry tomatoes before serving.
Extra Tips
When making Greek Yogurt and Cucumber Salad, using full-fat Greek yogurt will give you a richer and creamier texture, but feel free to use a lower-fat version if preferred.
For added flavor, consider mixing in other herbs such as mint or parsley based on your taste. You can also add a dash of olive oil for an extra layer of richness. This salad is best enjoyed fresh, but it can be stored in an airtight container in the refrigerator for a day or two.
Enjoy this healthy and delicious dish as part of your balanced diet!
Chocolate Greek Yogurt Bark

Chocolate Greek Yogurt Bark is a delectable and healthy snack that combines the creaminess of Greek yogurt with the rich flavor of chocolate. This delightful treat is perfect for satisfying your sweet tooth without the guilt, making it an ideal option for both kids and adults alike.
The combination of yogurt and chocolate creates a luscious bark that you can customize with various toppings, such as nuts, fruits, or seeds, giving you endless possibilities for flavor. This easy-to-make snack isn’t only delicious but also packed with protein, making it a great option for a post-workout treat or a mid-afternoon pick-me-up.
The invigorating taste of yogurt paired with the sweetness of chocolate makes it a perfect indulgence for any time of the day. Plus, it’s a fun recipe to get the whole family involved in, allowing you to experiment with different toppings and flavors.
Ingredients (Serves 4-6):
- 2 cups Greek yogurt (plain or flavored)
- 1 cup dark chocolate chips or chopped dark chocolate
- 1 tablespoon honey or maple syrup (optional, for sweetness)
- ½ cup mixed nuts (e.g., almonds, walnuts, pecans) or granola
- ½ cup fresh berries (e.g., strawberries, blueberries, raspberries)
- Pinch of sea salt (optional)
Cooking Instructions:
- Prepare the Baking Sheet: Line a baking sheet with parchment paper or a silicone mat. This will prevent the yogurt from sticking and make it easy to lift the bark once it’s set.
- Melt the Chocolate: In a microwave-safe bowl, combine the dark chocolate chips and microwave in 30-second intervals, stirring in between until completely melted and smooth. Alternatively, you can melt the chocolate using a double boiler on the stove.
- Mix the Yogurt: In a separate bowl, stir the Greek yogurt and honey or maple syrup together until well combined. This step is optional if you prefer the natural taste of yogurt.
- Spread the Yogurt: Pour the Greek yogurt mixture onto the prepared baking sheet. Use a spatula to spread it into an even layer, approximately ½ inch thick.
- Drizzle the Chocolate: Once the yogurt is spread evenly, drizzle the melted chocolate over the top. Use a knife or a toothpick to swirl the chocolate into the yogurt, creating a marbled effect.
- Add Toppings: Sprinkle the mixed nuts, fresh berries, and a pinch of sea salt over the chocolate and yogurt mixture. Feel free to get creative with your toppings or use your favorites.
- Freeze: Place the baking sheet in the freezer and let the bark set for at least 2-3 hours or until completely frozen.
- Break into Pieces: Once set, remove the bark from the freezer and lift it off the baking sheet using the parchment paper. Break it into pieces of your desired size and enjoy!
Extra Tips: When making Chocolate Greek Yogurt Bark, feel free to experiment with different flavors of Greek yogurt, such as vanilla or strawberry, for a unique twist. You can also substitute the dark chocolate with milk chocolate or white chocolate based on your preference.
Additionally, consider using dried fruits, coconut flakes, or seeds as toppings for added texture and flavor. Store any leftover bark in an airtight container in the freezer for a quick and healthy snack option later on!
Greek Yogurt Smoothie With Spinach
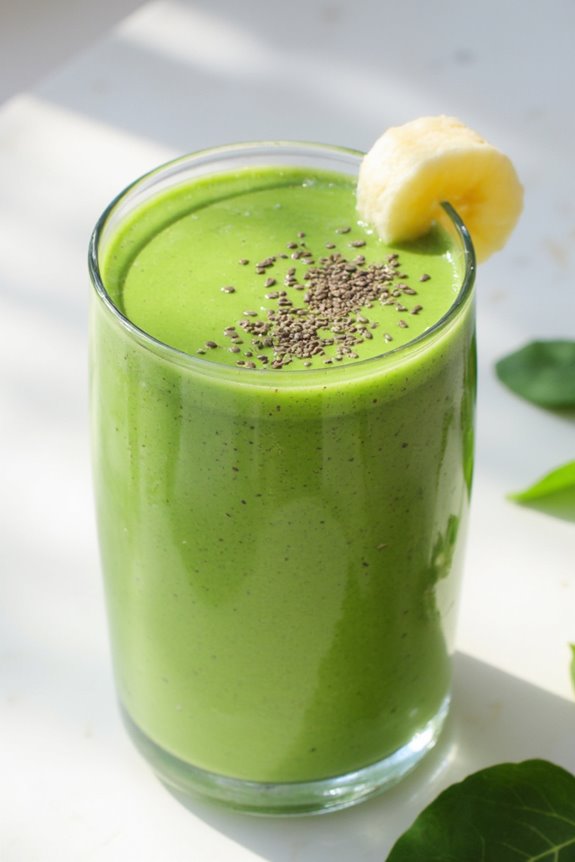
Greek yogurt smoothies are a delightful way to incorporate nutritious ingredients into your daily diet while enjoying a tasty treat. This Greek Yogurt Smoothie with Spinach isn’t only packed with protein and probiotics from the yogurt but also enriched with vitamins and minerals from the spinach. The creamy texture and vibrant green color make it an appealing option for both adults and kids, making it perfect for breakfast, a snack, or even a post-workout rejuvenation.
In addition to its health benefits, this smoothie is incredibly easy to prepare. With just a handful of ingredients, you can whip up a delicious and invigorating drink in no time. The combination of yogurt and spinach creates a smooth base that can be enhanced with your favorite fruits or sweeteners, allowing for customization according to your taste preferences.
So grab your blender, and let’s get started on this wholesome Greek Yogurt Smoothie with Spinach!
Ingredients (serving size: 4-6 people):
- 2 cups Greek yogurt
- 2 cups fresh spinach leaves
- 1 large banana
- 1 cup frozen pineapple chunks
- 1 cup almond milk (or any milk of your choice)
- 2 tablespoons honey (optional)
- 1 tablespoon chia seeds (optional)
- Ice cubes (optional, for a colder smoothie)
Cooking Instructions:
- Prepare Ingredients: Start by gathering all your ingredients. Wash the fresh spinach leaves thoroughly to remove any dirt or grit. Peel the banana and gather your frozen pineapple chunks. Having everything ready will make the blending process smoother.
- Combine Ingredients in Blender: In a blender, add the Greek yogurt first as it will help create a creamy base. Then, add the washed spinach leaves, banana, and frozen pineapple chunks. These fruits not only add sweetness but also enhance the smoothie’s flavor and texture.
- Add Liquid: Pour in the almond milk or your preferred milk. This will help the blender mix the ingredients smoothly. Adjust the amount of milk based on your desired consistency; add more for a thinner smoothie or less for a thicker one.
- Sweeten and Enhance (Optional): If you like your smoothie a bit sweeter, add the honey. You can also incorporate chia seeds for added nutrition and texture. These ingredients are optional but can elevate the smoothie’s health benefits.
- Blend Until Smooth: Secure the lid on your blender and blend the mixture on high speed until it reaches a smooth and creamy consistency. This should take about 30 seconds to 1 minute. Stop and scrape down the sides if necessary to make sure everything is well combined.
- Taste and Adjust: After blending, taste your smoothie. If you prefer it sweeter, feel free to add more honey or other sweeteners. If it’s too thick, add a little more milk and blend again until you reach your desired consistency.
- Serve: Pour the smoothie into glasses and serve immediately. You can garnish with a sprinkle of chia seeds or a slice of banana on the rim of the glass for an appealing presentation.
Extra Tips: To enhance the flavor of your Greek Yogurt Smoothie with Spinach, consider adding a handful of other fruits such as berries or mango for added sweetness and color. If you want to make it a meal replacement, consider adding a scoop of protein powder or nut butter for extra sustenance.
This smoothie can also be made ahead of time and stored in the refrigerator for a quick grab-and-go option, just remember to give it a good shake before enjoying.
Berry Greek Yogurt Popsicles

Berry Greek Yogurt Popsicles are a revitalizing and healthy treat that are perfect for hot summer days or as a nutritious snack any time of the year. Made with creamy Greek yogurt and packed with vibrant berries, these popsicles aren’t only delicious but also provide a good dose of protein and vitamins.
You can customize them with your favorite berries, whether it’s strawberries, blueberries, raspberries, or a mix of all three, making them versatile and fun to create.
These popsicles are incredibly easy to make and require just a few simple ingredients. They’re an excellent way to cool off while offering a guilt-free indulgence. Kids and adults alike will love the creamy texture and fruity flavor, making them a perfect addition to any family gathering or a delightful treat for yourself.
Get ready to enjoy a burst of berry goodness in every bite!
Ingredients (Serves 4-6)
- 2 cups Greek yogurt (plain or vanilla)
- 1 cup mixed berries (strawberries, blueberries, raspberries, chopped if large)
- 2-3 tablespoons honey or maple syrup (adjust to taste)
- 1 teaspoon vanilla extract (optional)
- 1 tablespoon lemon juice (optional)
Cooking Instructions
- Prepare the Berries: Wash your mixed berries thoroughly. If you’re using strawberries, remove the green tops and chop them into smaller pieces. This will help them blend better and guarantee that every popsicle has a nice distribution of fruit.
- Mix the Yogurt: In a large mixing bowl, combine the Greek yogurt, honey or maple syrup, vanilla extract, and lemon juice. Stir well until all the ingredients are fully combined and the mixture is smooth. Taste the mixture and adjust the sweetness if necessary.
- Combine the Ingredients: Gently fold the prepared berries into the yogurt mixture. Be careful not to over-mix; you want to keep some pieces of fruit intact for added texture in your popsicles.
- Pour into Molds: Spoon the yogurt and berry mixture into popsicle molds, filling them about ¾ of the way full. Leave a little space at the top to allow for expansion as they freeze. If you have leftover mixture, you can use small cups or ice cube trays as additional molds.
- Insert Sticks and Freeze: Place the popsicle sticks into the molds, making sure they’re centered. Put the molds in the freezer and allow them to freeze for at least 4-6 hours, or until fully solid.
- Unmold and Serve: Once frozen, run warm water over the outside of the popsicle molds for a few seconds to help loosen them. Carefully pull the popsicles out of the molds and serve immediately. Enjoy a cool treat on a hot day!
Extra Tips
To make your Berry Greek Yogurt Popsicles even more exciting, consider adding a swirl of fruit puree for a beautiful marbled effect, or layer different flavors by alternating layers of yogurt and berries in the molds.
You can also substitute the berries with other fruits like mango or peaches for a tropical twist. For a creamier texture, use full-fat Greek yogurt, and if you prefer a dairy-free version, opt for coconut yogurt instead.
Enjoy experimenting with flavors and have fun with your creations!
Greek Yogurt and Avocado Toast
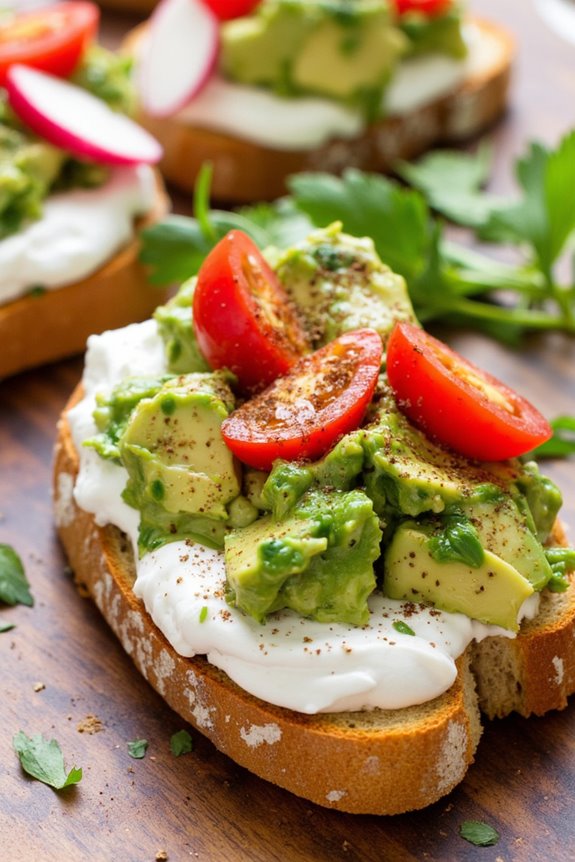
Greek Yogurt and Avocado Toast is a delicious and nutritious snack that combines the creamy texture of Greek yogurt with the rich, buttery flavor of ripe avocados. This dish isn’t only quick to prepare but also a powerhouse of healthy fats, proteins, and essential nutrients.
Perfect for breakfast or as a light afternoon snack, it’s guaranteed to satisfy your taste buds while fueling your body with goodness.
To make this dish even more delightful, you can add various toppings such as fresh herbs, spices, or even a sprinkle of seeds for added crunch. The combination of Greek yogurt and avocado offers a wonderful balance of flavors and textures, making it a versatile option that can be customized to your liking.
Enjoy this healthy treat with friends or family, and share the joy of good food with those you love.
Ingredients (Serves 4-6)
- 4 ripe avocados
- 2 cups Greek yogurt (plain or flavored)
- 6 slices whole grain or sourdough bread
- 1 tablespoon olive oil
- 1 teaspoon lemon juice
- Salt and pepper to taste
- Optional toppings: sliced radishes, cherry tomatoes, red pepper flakes, or fresh herbs (e.g., cilantro or parsley)
Cooking Instructions
- Prepare the Avocado Mixture: Cut the avocados in half, remove the pit, and scoop the flesh into a bowl. Add the lemon juice, olive oil, salt, and pepper. Mash the avocado using a fork or a potato masher until you reach your desired level of smoothness. You can leave it slightly chunky for added texture if preferred.
- Toast the Bread: While preparing the avocado mixture, heat a skillet or toaster. Toast the slices of whole grain or sourdough bread until golden brown and crispy. This adds a wonderful crunch and enhances the overall flavor of the dish.
- Combine Yogurt and Avocado: In a separate bowl, take the Greek yogurt and stir it gently to make it creamy. You can mix in a pinch of salt or herbs if you wish. This step helps to marry the flavors of yogurt and avocado together when you assemble the toast.
- Assemble the Toast: Spread a generous layer of Greek yogurt on each slice of toasted bread. Top it with a big scoop of the avocado mixture, spreading it evenly over the yogurt.
- Add Optional Toppings: If desired, add your choice of toppings such as sliced radishes, halved cherry tomatoes, or a sprinkle of red pepper flakes for some heat. Fresh herbs can be added for a burst of freshness and flavor.
- Serve Immediately: Arrange the assembled avocado toast on a serving platter or individual plates and serve immediately while the bread is warm and crispy.
Extra Tips
For an extra layer of flavor, consider toasting some seeds or nuts to sprinkle on top of your avocado toast.
You can also experiment with different types of bread, such as rye or gluten-free options, to cater to various dietary preferences.
If you have leftover avocado mixture, it can be stored in an airtight container for a short time, but it’s best enjoyed fresh to maintain its vibrant flavor and texture.
Enjoy your Greek Yogurt and Avocado Toast as a hearty snack or a light meal!
Cinnamon Apple Greek Yogurt
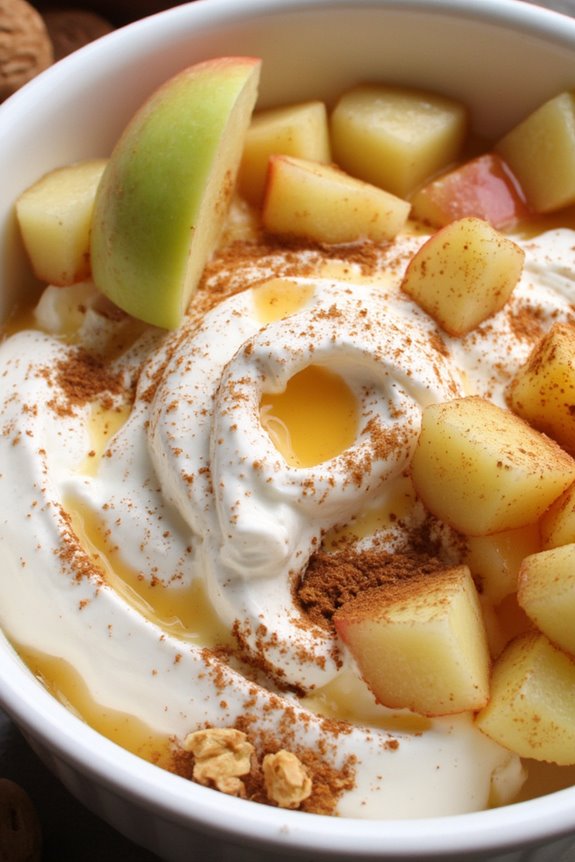
Cinnamon Apple Greek Yogurt is a delightful and nutritious snack that combines the creamy texture of Greek yogurt with the sweet and spiced flavors of apples and cinnamon. This dish isn’t only easy to prepare but also packed with protein and essential nutrients, making it a perfect option for breakfast, an afternoon snack, or even a light dessert.
The combination of fresh apples, warm cinnamon, and velvety yogurt creates a satisfying treat that can be enjoyed by the whole family.
With just a few simple ingredients, you can whip up this delicious dish in no time. It’s versatile enough that you can customize it with your favorite toppings, such as nuts, granola, or a drizzle of honey.
Whether you’re looking for a quick snack to keep you energized throughout the day or a healthy dessert option, Cinnamon Apple Greek Yogurt is sure to please your palate and keep you feeling full.
Ingredients
- 4 cups Greek yogurt (plain or vanilla)
- 2 medium apples, diced (preferably Granny Smith or Honeycrisp)
- 1 teaspoon ground cinnamon
- 2 tablespoons honey or maple syrup (adjust to taste)
- 1 teaspoon vanilla extract
- Optional toppings: chopped nuts (walnuts or pecans), granola, raisins
Instructions
- Prepare the Apples: Begin by thoroughly washing and dicing the apples into small bite-sized pieces. If you prefer, you can peel the apples, but leaving the skin on adds extra fiber and nutrients. Place the diced apples in a medium bowl.
- Add Cinnamon and Sweetener: Sprinkle the ground cinnamon over the diced apples and drizzle the honey or maple syrup on top. Toss the apples gently to coat them evenly with the cinnamon and sweetener. This step will infuse the apples with flavor and sweetness.
- Mix the Yogurt: In a separate large bowl, combine the Greek yogurt and vanilla extract. Stir well to confirm that the vanilla is evenly distributed throughout the yogurt, creating a deliciously flavored base for your snack.
- Combine Ingredients: Gently fold the cinnamon-apple mixture into the Greek yogurt until the apples are evenly distributed. Be careful not to overmix, as you want the yogurt to remain creamy and fluffy.
- Serve and Garnish: Spoon the Cinnamon Apple Greek Yogurt into individual serving bowls or a large serving dish. If desired, sprinkle with optional toppings such as chopped nuts, granola, or raisins for added texture and flavor.
- Chill (Optional): For a revitalizing taste, you can refrigerate the mixture for about 30 minutes before serving. This allows the flavors to meld together and the yogurt to become even cooler.
Extra Tips
For a fun twist, you can experiment with different types of apples or spices, such as nutmeg or allspice, to create your own unique flavor profile.
Additionally, if you’re looking to make this dish even more filling, consider adding some rolled oats or chia seeds for added texture and nutrition.
This recipe can also be made ahead of time and stored in the refrigerator for up to two days, making it a great option for meal prep.
Enjoy your Cinnamon Apple Greek Yogurt as a nutritious snack or a delightful dessert!
Greek Yogurt Energy Bites

Greek Yogurt Energy Bites are a delicious and nutritious snack option that’s perfect for busy days or post-workout refueling. Packed with protein from the Greek yogurt and energy-boosting ingredients like oats and nut butter, these bites provide a satisfying treat that curbs hunger without the guilt.
They’re simple to prepare and can be customized with your favorite add-ins, making them a versatile choice for any palate. These energy bites aren’t only easy to make, but they also require minimal ingredients and no baking, making them a great option for both novice and experienced cooks.
They can be enjoyed as a quick breakfast, an afternoon snack, or even a healthy dessert. Plus, they store well in the fridge, so you can make a batch in advance for those busy days ahead.
Ingredients (Serves 4-6)
- 1 cup Greek yogurt
- 1 cup rolled oats
- 1/2 cup nut butter (e.g., almond or peanut butter)
- 1/4 cup honey or maple syrup
- 1/4 cup mini chocolate chips or dried fruit (optional)
- 1/2 teaspoon vanilla extract
- A pinch of salt
Cooking Instructions
- Combine the Base Ingredients: In a large mixing bowl, combine the Greek yogurt, nut butter, honey (or maple syrup), and vanilla extract. Use a spatula to mix these ingredients until they’re smooth and well combined.
- Add Dry Ingredients: Next, add the rolled oats and salt to the mixture. If you’re using chocolate chips or dried fruit, fold them in at this stage. Stir until all ingredients are evenly incorporated, ensuring that the oats are well coated with the yogurt and nut butter mixture.
- Chill the Mixture: Cover the bowl with plastic wrap or a lid and refrigerate the mixture for about 30 minutes. This chilling time helps the mixture firm up, making it easier to form into bites.
- Form the Bites: Once chilled, remove the bowl from the refrigerator. Use your hands or a small cookie scoop to form the mixture into bite-sized balls, about 1 inch in diameter. Place the formed bites on a baking sheet lined with parchment paper.
- Store or Serve: After forming all the bites, you can either enjoy them immediately or store them. To store, transfer the bites to an airtight container and keep them in the refrigerator for up to a week.
Extra Tips
For added flavor and nutrition, feel free to mix in seeds like chia or flaxseed, or even shredded coconut. You can also experiment with different nut butters and sweeteners for variety.
If you find the mixture too sticky, a small amount of additional oats can help. Finally, these energy bites can be frozen for longer storage; just thaw them in the refrigerator before enjoying.
Mediterranean Greek Yogurt Bowl
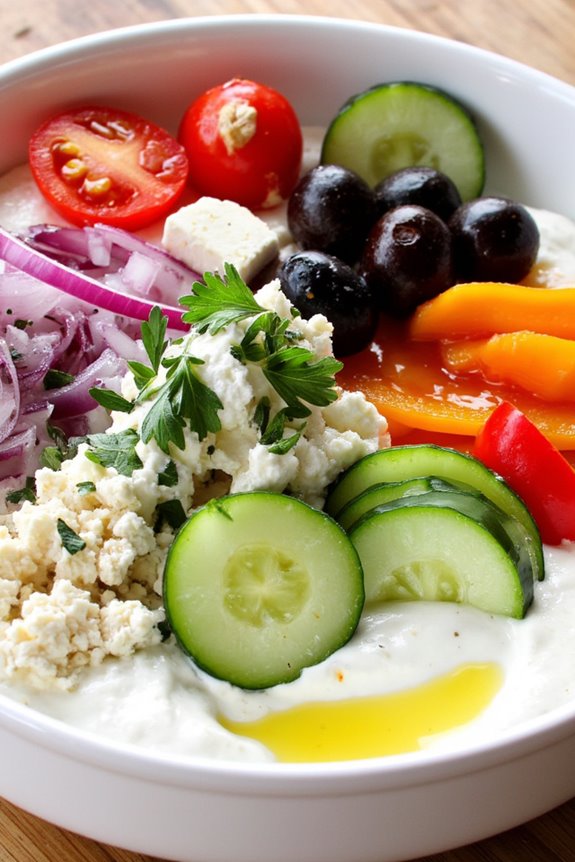
The Mediterranean Greek Yogurt Bowl is a delightful and nutritious snack that combines the creaminess of Greek yogurt with a medley of fresh ingredients inspired by Mediterranean cuisine. This dish isn’t only invigorating but also packed with protein, fiber, and healthy fats, making it ideal for a light meal or a satisfying snack.
Whether you’re looking for a quick breakfast option or a post-workout refuel, this yogurt bowl can be easily customized to suit your taste preferences.
Creating your Mediterranean Greek Yogurt Bowl is a simple process that allows for creativity and seasonal variations. You can mix and match toppings based on what you have on hand, using fresh vegetables, fruits, nuts, and herbs. The result is a vibrant and colorful dish that’s as pleasing to the eye as it’s to the palate.
Perfect for sharing, this recipe serves 4-6 people, making it an excellent choice for brunch with friends or family gatherings.
Ingredients (Serves 4-6):
- 4 cups Greek yogurt (plain, full-fat or low-fat)
- 1 cup cherry tomatoes, halved
- 1 cucumber, diced
- 1 cup bell peppers (red, yellow, or green), diced
- 1/2 cup red onion, finely chopped
- 1 cup Kalamata olives, pitted and halved
- 1/2 cup feta cheese, crumbled
- 1/4 cup fresh parsley, chopped
- 2 tablespoons extra virgin olive oil
- 1 tablespoon lemon juice
- Salt and pepper to taste
- Optional: Pita chips or bread for serving
Cooking Instructions:
- Prepare the Base: Start by spooning the Greek yogurt into a large serving bowl or individual bowls. Use a spatula or the back of a spoon to smooth the surface of the yogurt, creating a nice base for the toppings.
- Chop the Vegetables: Take the cherry tomatoes, cucumber, and bell peppers, and chop them into bite-sized pieces. Make sure to add a variety of colors for a more appealing presentation. Place the chopped vegetables in a mixing bowl.
- Mix the Dressing: In a small bowl, whisk together the extra virgin olive oil, lemon juice, salt, and pepper. This will add a zesty flavor to the vegetables. Pour the dressing over the chopped vegetables and toss gently to combine, ensuring everything is well-coated.
- Assemble the Bowl: Layer the dressed vegetables evenly over the Greek yogurt base. Start with the cucumbers and cherry tomatoes, followed by the bell peppers and red onion for a beautiful color contrast.
- Add the Finishing Touches: Scatter the Kalamata olives and crumbled feta cheese over the top of the vegetable layer. Finally, sprinkle the chopped parsley for a fresh finishing touch.
- Serve: If desired, serve with pita chips or bread on the side for a complete meal. Enjoy your Mediterranean Greek Yogurt Bowl immediately, or refrigerate for a short time before serving.
Extra Tips:
To elevate your Mediterranean Greek Yogurt Bowl even further, consider adding some sliced avocado for creaminess or a sprinkle of za’atar spice for an extra layer of flavor.
You can also substitute different vegetables based on your personal preferences or what’s in season. For a touch of sweetness, consider adding some honey drizzled on top or fresh fruits like figs or berries. Enjoy the versatility of this dish by experimenting with various toppings and flavors!
Lemon Poppy Seed Greek Yogurt Muffins

Lemon Poppy Seed Greek Yogurt Muffins are a delightful way to enjoy a healthy snack or breakfast option. These muffins are light, fluffy, and packed with flavor, thanks to the zesty lemon and the nutty crunch of poppy seeds. Using Greek yogurt not only enhances the moisture content but also adds a good dose of protein, making these muffins both tasty and nutritious.
They’re perfect for an on-the-go breakfast or a delicious afternoon treat with a cup of tea.
Creating these muffins is a breeze, and they require simple ingredients that are often found in the pantry. The combination of lemon zest and juice gives them a revitalizing taste, while the poppy seeds add a unique texture. You can enjoy them fresh from the oven or store them for later, making them a versatile addition to your snack repertoire.
Ingredients (Serves 4-6):
- 1 cup all-purpose flour
- 1 cup whole wheat flour
- 1 teaspoon baking powder
- 1 teaspoon baking soda
- ½ teaspoon salt
- 1 cup Greek yogurt
- ½ cup granulated sugar
- 2 large eggs
- ¼ cup vegetable oil
- 2 tablespoons lemon juice
- Zest of 1 lemon
- 2 tablespoons poppy seeds
Cooking Instructions:
- Preheat the Oven: Begin by preheating your oven to 350°F (175°C). This guarantees that your muffins bake evenly and rise properly as soon as they hit the heat.
- Prepare the Muffin Tin: Grease a muffin tin or line it with muffin liners to prevent sticking. This will make it easier to remove the muffins once they’re baked.
- Mix Dry Ingredients: In a large mixing bowl, whisk together the all-purpose flour, whole wheat flour, baking powder, baking soda, and salt. This step guarantees that the leavening agents are evenly distributed throughout the flour.
- Combine Wet Ingredients: In another bowl, mix the Greek yogurt, granulated sugar, eggs, vegetable oil, lemon juice, and lemon zest. Whisk until the mixture is smooth and well combined. The Greek yogurt will add moisture and richness to the muffins.
- Combine Wet and Dry Mixtures: Gradually add the wet ingredients to the dry ingredients, stirring gently until just combined. Be careful not to overmix, as this can lead to dense muffins. Fold in the poppy seeds gently.
- Fill the Muffin Tin: Using a spoon or an ice cream scoop, fill each muffin cup about ¾ full with the batter. This allows room for the muffins to rise without overflowing.
- Bake: Place the muffin tin in the preheated oven and bake for 18-20 minutes, or until a toothpick inserted into the center of a muffin comes out clean. Keep an eye on them to avoid overbaking.
- Cool: Once baked, remove the muffins from the oven and let them cool in the tin for about 5 minutes. Then transfer them to a wire rack to cool completely.
Extra Tips:
For an added zing, consider drizzling a simple lemon glaze over the muffins once they’ve cooled. To make the glaze, mix powdered sugar with a bit of lemon juice until you reach your desired consistency.
Additionally, these muffins can be stored in an airtight container for up to three days or frozen for longer storage. Just pop them in the microwave for a few seconds to enjoy them warm!
Greek Yogurt and Nut Butter Dip

Greek Yogurt and Nut Butter Dip is a deliciously creamy and nutritious snack that pairs perfectly with a variety of dippers, such as fruit, crackers, or even pretzels. This dip combines the tangy flavor of Greek yogurt with the rich, smooth texture of nut butter, creating a delightful balance that’s both satisfying and healthy.
It’s an excellent option for a quick afternoon snack, a post-workout treat, or even as a fun addition to a party platter. Making this dip isn’t only simple but also customizable. You can choose your favorite nut butter—be it almond, peanut, or cashew—and even add a touch of sweetness with honey or maple syrup.
This recipe serves 4-6 people, making it perfect for sharing with friends and family. Whether you’re hosting a gathering or simply enjoying a quiet night in, this Greek Yogurt and Nut Butter Dip is bound to please.
Ingredients (serves 4-6):
- 1 cup Greek yogurt (plain, full-fat or low-fat)
- 1/2 cup nut butter (peanut butter, almond butter, or cashew butter)
- 2 tablespoons honey or maple syrup (optional, for sweetness)
- 1 teaspoon vanilla extract
- A pinch of salt
- Fresh fruit, crackers, or pretzels for dipping
Cooking Instructions:
- Combine Ingredients: In a medium mixing bowl, add the Greek yogurt and nut butter. If you’re using honey or maple syrup for sweetness, add it in at this stage along with the vanilla extract and a pinch of salt. This combination will form the base of your dip.
- Mix Thoroughly: Using a whisk or a spatula, blend the ingredients together until the mixture is smooth and well combined. Confirm there are no lumps of nut butter or yogurt remaining for a creamy texture.
- Taste and Adjust: After mixing, taste the dip. If you desire a sweeter flavor, feel free to add more honey or maple syrup, adjusting according to your preference. Mix again until everything is evenly incorporated.
- Chill (Optional): If you prefer a colder dip, cover the bowl with plastic wrap or a lid and refrigerate for about 30 minutes. Chilling will also allow the flavors to meld together beautifully.
- Serve: Once ready, transfer the dip to a serving bowl. Arrange your chosen dippers—fresh fruit slices, crunchy crackers, or pretzels—around the bowl for an appealing presentation.
Extra Tips:
To enhance the flavor of your Greek Yogurt and Nut Butter Dip even further, consider adding mix-ins such as cinnamon, cocoa powder, or even some chopped nuts for added texture.
This dip can also be stored in an airtight container in the refrigerator for up to 3 days, making it a convenient option for meal prep. If you’re looking to make it more visually appealing, sprinkle some chia seeds or granola on top before serving. Enjoy this versatile dip for a nutritious snack any time of the day!