

When I want to indulge my sweet tooth without the guilt, Greek yogurt is my go-to ingredient. It’s impressively versatile, morphing into everything from creamy cheesecakes to refreshing popsicles. I’ve rounded up 12 scrumptious recipes that feel like a treat but are still health-conscious. Ready to explore these delicious options? Let’s get inspired with some guilt-free sweet treats!
Greek Yogurt Parfait With Berries and Granola
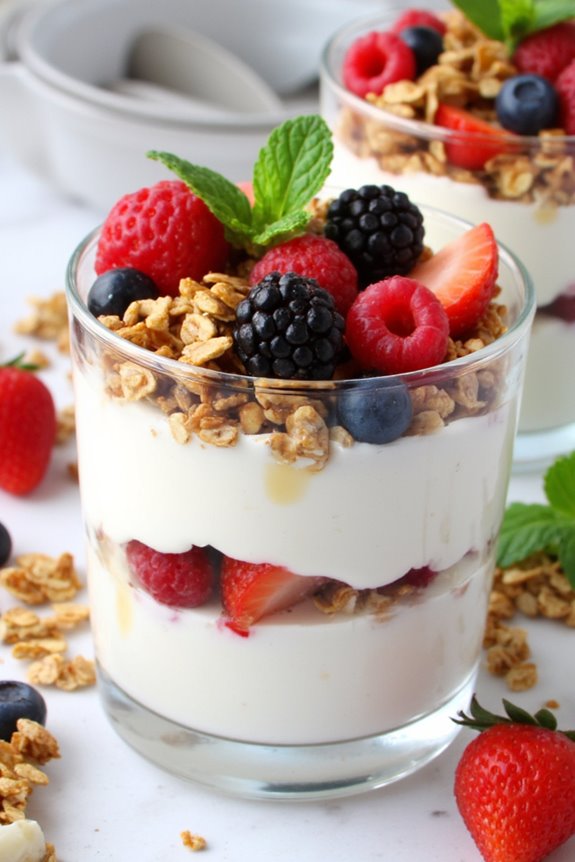
Greek yogurt parfaits are a delicious and nutritious dessert option that can be enjoyed any time of the day. Layered with fresh berries and crunchy granola, this delightful treat isn’t only pleasing to the eye but also packed with protein, vitamins, and fiber. Perfect for a warm summer day or a satisfying breakfast, these parfaits are incredibly easy to prepare and can be customized to suit your taste preferences.
The beauty of a Greek yogurt parfait lies in its versatility. You can use any combination of fruits, nuts, and toppings that you prefer. This recipe focuses on a classic combination of berries and granola, but feel free to experiment with seasonal fruits or toppings like honey, nut butter, or coconut flakes. The result is a visually appealing dessert that’s as delicious as it’s healthy, making it an ideal choice for family gatherings or a simple weeknight indulgence.
Ingredients (Serves 4-6):
- 4 cups Greek yogurt (plain or flavored)
- 2 cups mixed berries (strawberries, blueberries, raspberries, blackberries)
- 1 cup granola
- 2 tablespoons honey (optional)
- Fresh mint leaves for garnish (optional)
Instructions:
- Prepare the Berries: Rinse the mixed berries under cold running water and pat them dry with a clean kitchen towel. If you’re using strawberries, hull and slice them into smaller pieces for easier layering.
- Set Up Serving Glasses: Choose clear glasses or bowls for serving the parfaits. This allows for a beautiful display of the layers. You can use mason jars, parfait cups, or even simple dessert bowls.
- Layer the Ingredients: Start by adding a generous scoop of Greek yogurt to the bottom of each glass. Follow this with a layer of mixed berries, spreading them evenly over the yogurt. Then, sprinkle a layer of granola on top of the berries. Repeat this process until the glasses are filled, usually 2-3 layers depending on the size of your serving glasses.
- Add Sweetness: If desired, drizzle a small amount of honey over the top layer of granola for added sweetness. This step is optional, depending on your preference for sweetness.
- Garnish and Serve: Finish off the parfaits by adding a few additional berries on top and a sprig of fresh mint for garnish. Serve immediately, or refrigerate for up to an hour before serving to allow the flavors to meld.
Extra Tips:
When making Greek yogurt parfaits, choose high-quality Greek yogurt for the best flavor and texture. If you prefer a sweeter yogurt, opt for flavored varieties, but be mindful of added sugars.
You can also customize the recipe by incorporating different fruits like bananas or peaches, or by adding nuts and seeds for extra crunch. To make it a more filling dessert, consider adding a layer of nut butter or chia seeds for added nutrition.
Enjoy your delicious Greek yogurt parfait as a wholesome dessert or snack!
Chocolate Greek Yogurt Mousse

If you’re looking for a rich and indulgent dessert that won’t completely derail your healthy eating goals, Chocolate Greek Yogurt Mousse is the perfect solution. This delightful dessert combines the creamy texture of Greek yogurt with the rich flavor of chocolate, creating a deliciously satisfying treat that’s both light and decadent.
With only a few simple ingredients, you can whip up this mousse in no time, making it an ideal choice for entertaining guests or enjoying a comforting evening at home.
The secret to achieving the perfect mousse lies in the careful folding of ingredients to maintain the airy texture. This recipe isn’t only easy to follow but also allows for customization; feel free to experiment with different types of chocolate or add a sprinkle of sea salt for an enhanced flavor profile.
Serve it in elegant glasses for a touch of sophistication, or in casual bowls for a cozy dessert experience. Either way, this Chocolate Greek Yogurt Mousse is sure to impress!
Ingredients (Serves 4-6):
- 2 cups plain Greek yogurt
- 1 cup dark chocolate chips (approximately 6 ounces)
- ¼ cup honey or maple syrup (adjust based on sweetness preference)
- 1 teaspoon vanilla extract
- A pinch of salt
- Whipped cream and chocolate shavings (for garnish, optional)
Cooking Instructions:
- Melt the Chocolate: Start by placing the dark chocolate chips in a microwave-safe bowl. Heat in the microwave in 20-30 second intervals, stirring in between, until completely melted and smooth. Be cautious not to overheat the chocolate, as it can seize up. Once melted, let it cool slightly.
- Combine Yogurt and Sweetener: In a large mixing bowl, add the plain Greek yogurt, honey (or maple syrup), and vanilla extract. Use a whisk to combine these ingredients until smooth and creamy. The yogurt should be well incorporated with the sweetener, ensuring a harmonious blend.
- Incorporate Chocolate: Once the melted chocolate has cooled a bit (it should be warm but not hot), gradually fold it into the yogurt mixture. Use a spatula to gently fold the chocolate into the yogurt, being careful to maintain the lightness of the mixture. Continue folding until you see a uniform chocolate color without streaks.
- Chill the Mousse: Transfer the mousse mixture into serving glasses or bowls. Cover with plastic wrap or lids, and place them in the refrigerator to chill for at least 30 minutes. This allows the mousse to set up a bit and gain the perfect texture.
- Serve and Garnish: Once chilled, remove the mousse from the refrigerator. If desired, top each serving with a dollop of whipped cream and a sprinkle of chocolate shavings for an added touch of elegance. Serve immediately and enjoy!
Extra Tips:
For a more intense chocolate flavor, consider using dark chocolate with a higher cocoa percentage. You can also adjust the sweetness of the mousse by varying the amount of honey or maple syrup according to your taste preferences.
If you’d like to add a twist, try incorporating a splash of espresso or coffee liqueur into the mixture for a mocha flavor. This mousse can be made a day in advance, making it a convenient dessert option for busy schedules.
Enjoy experimenting with different toppings and flavors to make this dessert your own!
Lemon Greek Yogurt Cheesecake
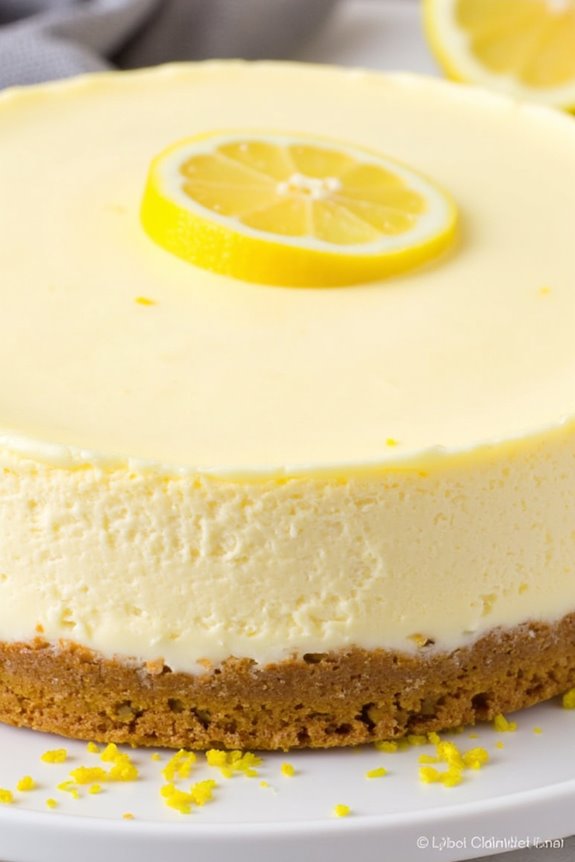
Lemon Greek Yogurt Cheesecake is a delightful twist on the traditional cheesecake, offering a lighter and healthier alternative without sacrificing flavor. This dessert combines the creamy texture of Greek yogurt with the bright, zesty notes of fresh lemon juice and zest, creating a revitalizing treat that’s perfect for any occasion.
Whether you’re serving it at a dinner party or enjoying a slice after a family meal, this cheesecake is sure to impress with its vibrant flavor and smooth consistency.
The crust is made with crushed graham crackers, providing a lovely crunch that complements the creamy filling perfectly. This recipe is simple to follow and results in a cheesecake that isn’t only delicious but also packed with protein from the Greek yogurt. It’s an ideal dessert to satisfy your sweet tooth without overwhelming your dietary goals.
Ingredients (Serves 4-6)
- 1 ½ cups graham cracker crumbs
- ½ cup unsalted butter, melted
- 2 cups plain Greek yogurt
- 1 cup cream cheese, softened
- ¾ cup granulated sugar
- 3 large eggs
- 1 tablespoon lemon zest
- ¼ cup fresh lemon juice
- 1 teaspoon vanilla extract
Cooking Instructions
- Prepare the Crust: Preheat your oven to 325°F (160°C). In a medium bowl, combine the graham cracker crumbs and melted butter. Mix until the crumbs are evenly coated. Press the mixture firmly into the bottom of a 9-inch springform pan to form the crust. Bake for 10 minutes, then remove from the oven and set aside to cool.
- Make the Filling: In a large mixing bowl, combine the Greek yogurt, softened cream cheese, and granulated sugar. Use an electric mixer on medium speed to blend until smooth and creamy, guaranteeing there are no lumps.
- Add the Eggs and Flavorings: Add the eggs one at a time, mixing well after each addition. Then, add the lemon zest, lemon juice, and vanilla extract. Mix until everything is fully combined and smooth, scraping down the sides of the bowl as needed.
- Combine and Pour: Pour the filling over the cooled crust in the springform pan. Use a spatula to spread it evenly across the top. Tap the pan gently on the counter to release any air bubbles.
- Bake the Cheesecake: Place the cheesecake in the preheated oven and bake for 40-45 minutes, or until the edges are set but the center is still slightly jiggly. Turn off the oven and leave the cheesecake inside for an additional hour to cool gradually.
- Chill and Serve: After the cheesecake has cooled, remove it from the oven and let it cool to room temperature. Once cool, refrigerate for at least 4 hours, or overnight for the best flavor and texture. Before serving, carefully remove the springform pan and slice the cheesecake into wedges.
Extra Tips
For an extra touch of flavor, consider adding a fruit topping, such as fresh berries or a lemon glaze, before serving. If you prefer a sweeter cheesecake, feel free to adjust the sugar according to your taste.
Additionally, verify that all ingredients are at room temperature before mixing to achieve a smooth filling. This cheesecake can also be made a day in advance, making it a great option for entertaining. Enjoy your delicious Lemon Greek Yogurt Cheesecake!
Honey Almond Greek Yogurt Bark

If you’re looking for a rejuvenating and healthy dessert that satisfies your sweet tooth without the guilt, Honey Almond Greek Yogurt Bark is the perfect choice. This delightful treat combines creamy Greek yogurt with the natural sweetness of honey and the crunch of almonds, making it not only delicious but also packed with protein and nutrients.
It’s simple to prepare and can be customized with your favorite toppings, making it a versatile dessert option for any occasion. This Greek yogurt bark is ideal for serving 4-6 people, making it perfect for sharing with family or friends.
The best part is that it requires minimal ingredients and no baking, allowing you to whip it up quickly and enjoy it as a rejuvenating snack or dessert. Just a few hours in the freezer and you’ll have a delightful, chilled treat that everyone will love.
Ingredients for Honey Almond Greek Yogurt Bark (Serves 4-6):
- 2 cups plain Greek yogurt
- 1/4 cup honey (plus extra for drizzling)
- 1/2 teaspoon vanilla extract
- 1/2 cup sliced almonds
- 1/4 cup dried fruit (such as cranberries or apricots)
- Pinch of sea salt
Cooking Instructions:
- Prepare the Yogurt Mixture: In a medium bowl, combine the Greek yogurt, honey, vanilla extract, and a pinch of sea salt. Mix well until all ingredients are thoroughly blended and the mixture is smooth. This step is vital as it creates the base flavor of your bark.
- Line the Baking Sheet: Take a baking sheet and line it with parchment paper. This will prevent the yogurt from sticking and make it easy to remove once frozen. Make sure the parchment paper covers the entire bottom of the baking sheet.
- Spread the Yogurt Mixture: Pour the yogurt mixture onto the prepared baking sheet. Using a spatula, spread the mixture evenly, smoothing it out to about 1/4 inch thick. The thickness can vary depending on your preference, but keeping it uniform helps in achieving even freezing.
- Add Toppings: Sprinkle the sliced almonds and dried fruit evenly over the yogurt mixture. Press them lightly into the yogurt to guarantee they stick. This step adds texture and flavor to the bark, so feel free to get creative with your toppings.
- Freeze the Bark: Place the baking sheet in the freezer and allow the yogurt bark to freeze for at least 4-6 hours, or until it’s completely firm. This step is essential as it transforms the creamy yogurt into a delightful, crunchy treat.
- Break into Pieces: Once frozen, remove the bark from the freezer and lift it out of the baking sheet using the parchment paper. Break the bark into pieces of your desired size. Drizzle a little extra honey over the top for added sweetness, if desired.
- Serve and Enjoy: Serve the Honey Almond Greek Yogurt Bark immediately or store any leftovers in an airtight container in the freezer for later enjoyment. This treat is best enjoyed cold, so keep it stored properly to maintain its texture.
Extra Tips:
For a fun twist, try experimenting with different toppings such as fresh berries, dark chocolate chips, or seeds like chia or sunflower.
You can also substitute the honey with maple syrup or agave nectar for a different sweetness profile. Guarantee the bark is well-wrapped if storing in the freezer to prevent freezer burn, and remember to let it sit for a minute or two at room temperature before enjoying for the best texture.
Strawberry Greek Yogurt Popsicles
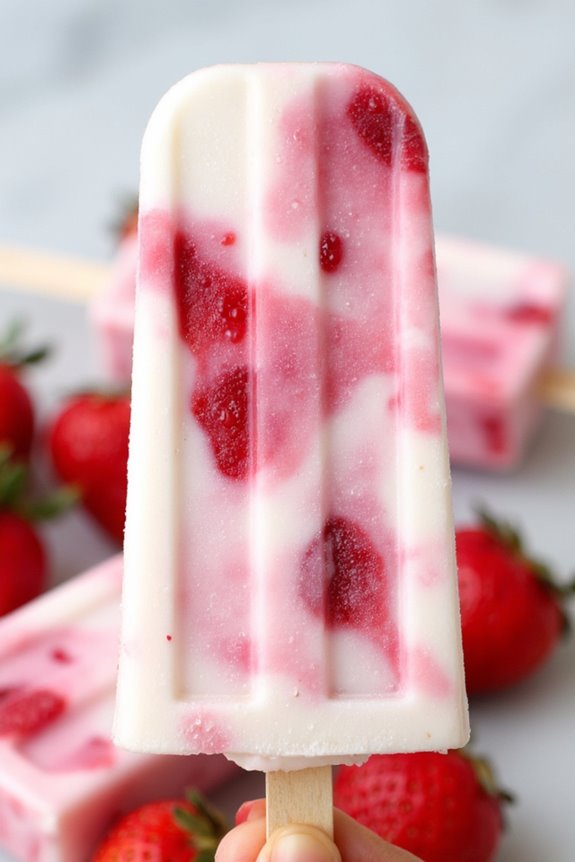
Indulging in a rejuvenating treat during the warmer months is a delightful way to cool off, and what better way than with homemade Strawberry Greek Yogurt Popsicles? Not only are these popsicles deliciously creamy and bursting with fruity flavor, but they’re also packed with protein thanks to the Greek yogurt.
This recipe combines the sweetness of ripe strawberries with the tanginess of yogurt, creating a wholesome dessert that both kids and adults will love. Making Strawberry Greek Yogurt Popsicles is straightforward and requires minimal ingredients. You can easily customize the recipe by adding other fruits or sweeteners according to your preference.
These popsicles are perfect for a summer gathering, a party, or simply as a healthy snack at home. Get ready to enjoy a frozen treat that’s as nutritious as it’s tasty!
Ingredients (Serves 4-6)
- 2 cups fresh strawberries, hulled and chopped
- 1 cup plain Greek yogurt
- 1/4 cup honey or maple syrup (adjust based on sweetness preference)
- 1 teaspoon vanilla extract
- 1 tablespoon lemon juice
Instructions
- Prepare the Strawberries: Start by washing and hulling the strawberries. Chop them into small pieces and set aside. You can also blend them for a smoother texture if desired.
- Mix the Yogurt Mixture: In a mixing bowl, combine the Greek yogurt, honey (or maple syrup), vanilla extract, and lemon juice. Stir well until the mixture is smooth and all ingredients are fully incorporated.
- Combine Ingredients: Gently fold the chopped strawberries into the yogurt mixture. If you prefer a marbled effect, you can reserve some strawberries to add later. Be careful not to overmix, as you want to maintain some strawberry pieces for texture.
- Fill the Molds: Pour the yogurt and strawberry mixture into popsicle molds, leaving a little space at the top as the mixture will expand when frozen. If desired, add the reserved strawberry pieces on top for added visual appeal.
- Insert Sticks and Freeze: Place popsicle sticks into the center of each mold. If your molds don’t have a stick holder, you can freeze them for about 1-2 hours until slightly firm, then insert the sticks. Freeze the popsicles for at least 4-6 hours, or until completely solid.
- Unmold and Enjoy: To remove the popsicles, run warm water over the outside of the molds for a few seconds to loosen them. Gently pull the popsicles out and enjoy immediately!
Extra Tips
For a fun twist, you can experiment with other fruits like blueberries, raspberries, or bananas to create a mixed fruit popsicle. If you want a sweeter popsicle, feel free to adjust the amount of honey or sweetener based on your taste.
These popsicles can also be stored in the freezer for up to 2 weeks, making them a convenient treat to have on hand whenever you crave something cool and rejuvenating. Enjoy your homemade Strawberry Greek Yogurt Popsicles!
Peanut Butter Banana Greek Yogurt Dip

If you’re seeking a quick and nutritious dessert that satisfies your sweet tooth, search no more than Peanut Butter Banana Greek Yogurt Dip. This delightful treat combines the rich flavors of creamy peanut butter with the natural sweetness of ripe bananas, all while benefiting from the protein-packed goodness of Greek yogurt.
It’s perfect for a snack or dessert and can easily be served at parties or for a cozy night in.
The best part about this dip is its versatility. You can pair it with an array of dippers, from fresh fruit slices to crunchy pretzels, making it an excellent choice for both kids and adults.
Whether you’re hosting a gathering or simply treating yourself, this Peanut Butter Banana Greek Yogurt Dip is sure to be a hit!
Ingredients (Serves 4-6):
- 2 cups plain Greek yogurt
- 1 ripe banana, mashed
- 1/2 cup creamy peanut butter
- 2 tablespoons honey (or maple syrup for a vegan option)
- 1 teaspoon vanilla extract
- A pinch of salt
- Sliced fruit (apples, strawberries, or bananas) for dipping
Cooking Instructions:
- Prepare the Ingredients: Begin by gathering all the ingredients. Confirm your banana is ripe for the best flavor and sweetness. This guarantees that your dip will have a smooth and creamy consistency.
- Mash the Banana: In a medium-sized bowl, take the ripe banana and mash it with a fork until it’s smooth. You can leave some small chunks if you prefer a bit of texture in your dip.
- Combine Ingredients: Add the Greek yogurt, peanut butter, honey (or maple syrup), vanilla extract, and a pinch of salt to the bowl with the mashed banana. Using a spatula or a whisk, mix everything together until it’s well combined and smooth.
- Taste and Adjust: After mixing, taste the dip and adjust the sweetness if desired by adding a bit more honey or maple syrup. This is the time to tweak the flavors to suit your preference.
- Chill (Optional): For a cooler treat, cover the bowl with plastic wrap and place it in the refrigerator for about 30 minutes. Chilling can enhance the flavors and make the dip invigorating.
- Serve: Once ready, transfer the dip to a serving bowl and arrange your sliced fruits or other dippers around it. Enjoy with friends and family!
Extra Tips:
When making Peanut Butter Banana Greek Yogurt Dip, feel free to get creative with add-ins. You can sprinkle some cinnamon or cocoa powder for an extra flavor kick.
Additionally, if you have any leftovers, store them in an airtight container in the refrigerator for up to three days. Just give the dip a good stir before serving again, as it may thicken slightly.
Enjoy your delicious and healthy treat!
Greek Yogurt Fruit Salad
Greek Yogurt Fruit Salad is a rejuvenating and nutritious dessert that combines the creamy goodness of Greek yogurt with a vibrant medley of fresh fruits. This dessert is perfect for any occasion, whether it’s a family gathering, a summer barbecue, or simply a light and healthy treat after dinner.
The creamy yogurt adds a rich texture, while the fruits provide a burst of flavor and essential vitamins. It’s not only delicious but also a great way to incorporate more fruits into your diet.
This recipe is incredibly versatile; you can use any combination of your favorite fruits, such as berries, bananas, or stone fruits. To enhance the flavor, you can also add a drizzle of honey or a sprinkle of nuts or granola on top.
This Greek Yogurt Fruit Salad isn’t only a feast for the eyes but also a wholesome choice for satisfying your sweet cravings without the guilt.
Ingredients (Serves 4-6):
- 2 cups plain Greek yogurt
- 1 cup strawberries, hulled and sliced
- 1 cup blueberries
- 1 cup diced pineapple
- 1 cup diced kiwi
- 1 banana, sliced
- 2 tablespoons honey (optional)
- 1 teaspoon vanilla extract (optional)
- ¼ cup granola or chopped nuts (for topping, optional)
Cooking Instructions:
1. Prepare the Fruits: Begin by washing all the fruits thoroughly. Hull the strawberries and slice them into thin pieces. For the pineapple, peel and core it before cutting it into small cubes.
Dice the kiwi and slice the banana. Place all the prepared fruits into a large mixing bowl.
2. Mix the Yogurt: In a separate bowl, take the Greek yogurt and stir in honey and vanilla extract if you’re using them. This step adds sweetness and flavor to the yogurt.
Mix well until the ingredients are fully combined and smooth.
3. Combine Ingredients: Gently fold the yogurt mixture into the bowl of fruits. Use a spatula or a large spoon to combine the yogurt and fruits carefully.
Be gentle to avoid mashing the fruit, as you want to keep the pieces intact for a nice texture.
4. Chill (Optional): If desired, cover the fruit salad with plastic wrap and place it in the refrigerator for about 30 minutes.
Chilling allows the flavors to meld together and makes for a rejuvenating experience, especially on warm days.
5. Serve and Top: Once ready to serve, spoon the Greek yogurt fruit salad into bowls or glasses.
If you like, sprinkle granola or chopped nuts on top for added crunch and flavor.
Extra Tips:
When preparing your Greek Yogurt Fruit Salad, feel free to get creative with your fruit choices based on what’s in season or what you have on hand.
You can also make this dish ahead of time, but it’s best to add any crunchy toppings just before serving to keep them crisp. For a fun twist, consider adding a splash of citrus juice or a sprinkle of cinnamon for extra flavor. Enjoy your delicious, healthy dessert!
Mocha Greek Yogurt Cake
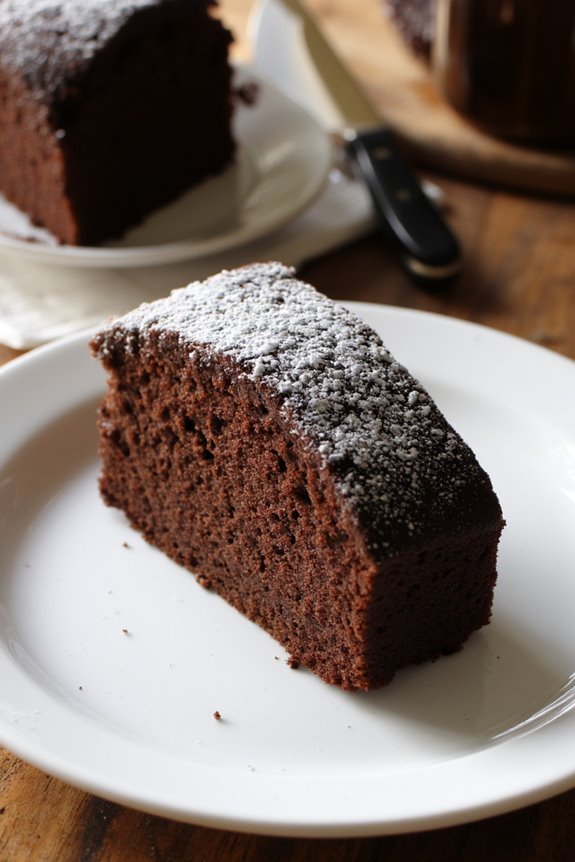
If you’re looking for a delicious and healthier dessert option, the Mocha Greek Yogurt Cake is the perfect recipe to try. This delightful cake combines the rich flavors of coffee and chocolate with the creamy texture of Greek yogurt, resulting in a moist and flavorful treat that everyone will love.
It’s great for gatherings, as it serves 4-6 people and is sure to impress your guests with its unique taste and presentation. The use of Greek yogurt not only adds moisture to the cake but also packs in protein, making it a guilt-free indulgence.
Whether you’re serving it at a celebration or just as a sweet treat for yourself, this cake is easy to prepare and requires minimal ingredients. Let’s explore the recipe so you can make this delightful Mocha Greek Yogurt Cake at home!
Ingredients
- 1 cup all-purpose flour
- 1/2 cup unsweetened cocoa powder
- 1 cup granulated sugar
- 1/2 teaspoon baking soda
- 1/4 teaspoon baking powder
- 1/4 teaspoon salt
- 3 large eggs
- 1/2 cup Greek yogurt (plain)
- 1/2 cup brewed coffee (cooled)
- 1/4 cup vegetable oil
- 1 teaspoon vanilla extract
- Optional: powdered sugar or cocoa powder for dusting
Cooking Instructions
- Preheat the Oven: Begin by preheating your oven to 350°F (175°C). This guarantees that your cake bakes evenly and rises properly.
- Prepare the Baking Pan: Grease a 9-inch round cake pan with cooking spray or butter, and line the bottom with parchment paper. This will prevent the cake from sticking to the pan and make for easier removal once it’s baked.
- Mix Dry Ingredients: In a medium-sized bowl, whisk together the all-purpose flour, cocoa powder, granulated sugar, baking soda, baking powder, and salt until fully combined. This step helps to evenly distribute the leavening agents and flavors throughout the cake.
- Combine Wet Ingredients: In a separate large bowl, beat the eggs until light and frothy. Then, add the Greek yogurt, cooled brewed coffee, vegetable oil, and vanilla extract. Mix well until the ingredients are smooth and well incorporated.
- Combine Wet and Dry Ingredients: Gradually add the dry mixture to the wet ingredients, stirring gently until just combined. Avoid overmixing, as this can lead to a denser texture.
- Bake the Cake: Pour the batter into the prepared cake pan and spread it evenly. Place it in the preheated oven and bake for 25-30 minutes, or until a toothpick inserted into the center comes out clean.
- Cool the Cake: Once baked, remove the cake from the oven and allow it to cool in the pan for about 10 minutes. Then, carefully transfer it to a wire rack to cool completely. This cooling process is vital for the texture of the cake.
- Serve: Once the cake is completely cool, you can dust it with powdered sugar or cocoa powder if desired. Slice and serve to your guests, and enjoy the rich flavors of your Mocha Greek Yogurt Cake!
Extra Tips
When preparing the Mocha Greek Yogurt Cake, consider using high-quality cocoa powder for a deeper chocolate flavor. You can also add chocolate chips to the batter for an extra touch of indulgence.
Additionally, this cake pairs beautifully with a dollop of whipped cream or a scoop of vanilla ice cream on the side. If you want to enhance the coffee flavor, try adding a teaspoon of espresso powder to the dry ingredients.
Remember to store any leftovers in an airtight container at room temperature for up to three days to maintain its moisture. Enjoy your baking!
Coconut Greek Yogurt Pudding
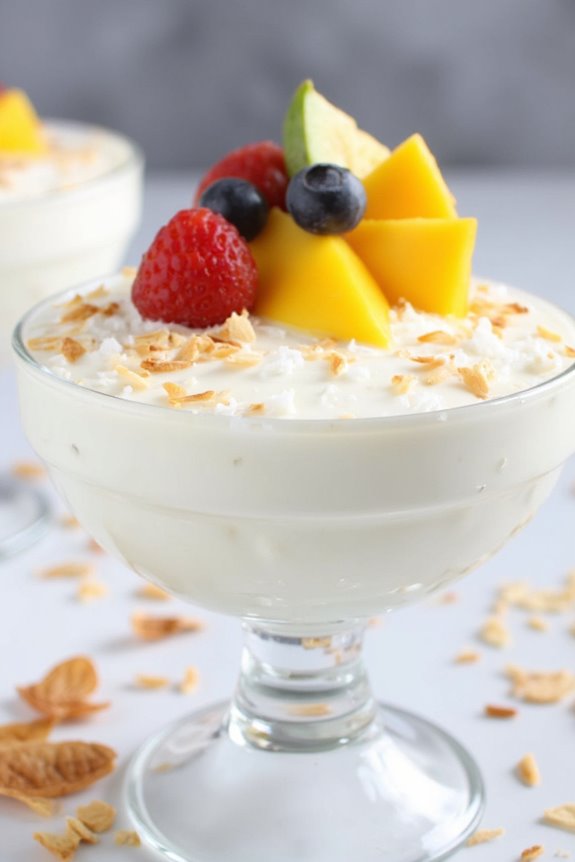
Coconut Greek Yogurt Pudding is a delightful twist on traditional pudding that combines the creamy texture of Greek yogurt with the tropical flavor of coconut. This dessert isn’t only delicious but also packed with protein, making it a healthier option for satisfying your sweet cravings.
The velvety consistency of the pudding is enhanced by the addition of coconut milk, giving it a rich and indulgent taste. Whether you’re serving it as an invigorating dessert on a warm day or a light evening treat, this pudding is sure to impress.
In addition to its great flavor, Coconut Greek Yogurt Pudding is incredibly easy to prepare. With just a few simple ingredients, you can whip up this dessert in no time. It’s perfect for gatherings, potlucks, or even as a special everyday treat.
The best part? You can customize it by adding your favorite toppings like fresh fruits, nuts, or a drizzle of honey. Let’s plunge into the recipe!
Ingredients (Serves 4-6):
- 2 cups plain Greek yogurt
- 1 cup coconut milk (canned)
- 1/4 cup honey or maple syrup
- 1 teaspoon vanilla extract
- 1/2 teaspoon salt
- 1/4 cup shredded coconut (unsweetened, for garnish)
- Fresh fruit (such as mango or berries, for garnish)
Cooking Instructions:
- Combine Ingredients: In a medium mixing bowl, combine the plain Greek yogurt, coconut milk, honey or maple syrup, vanilla extract, and salt. Use a whisk to blend the ingredients until smooth and fully incorporated. This step guarantees that the flavors meld together and the pudding achieves a creamy texture.
- Taste and Adjust: After mixing, taste the pudding mixture to see if you’d like to adjust the sweetness. If you prefer it sweeter, feel free to add more honey or maple syrup to taste. This is a great way to personalize the dessert to your liking.
- Chill the Pudding: Once the mixture is well combined and sweetened to your preference, cover the bowl with plastic wrap or transfer it to individual serving cups. Place it in the refrigerator and let it chill for at least 2 hours. Chilling allows the flavors to develop and the pudding to firm up.
- Serve and Garnish: After chilling, remove the pudding from the refrigerator. Spoon it into serving dishes if you haven’t done so already. Top each serving with shredded coconut and fresh fruit of your choice. This not only adds a visual appeal but also enhances the tropical flavor of the dish.
- Enjoy: Serve the Coconut Greek Yogurt Pudding immediately and enjoy the creamy, invigorating taste!
Extra Tips:
When making Coconut Greek Yogurt Pudding, opt for full-fat Greek yogurt and coconut milk for a richer flavor and creamier texture. If you’re looking for a dairy-free option, choose a plant-based yogurt alternative.
To enhance the tropical vibe, consider adding a squeeze of lime juice or zest from a lime to the mixture before chilling. Additionally, this pudding can be prepared a day in advance, making it a convenient option for parties or meal prep.
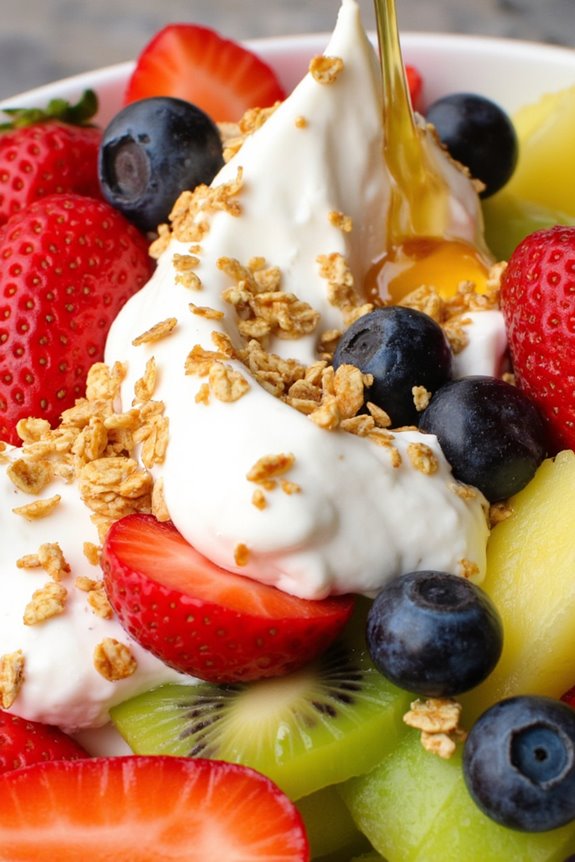
Berry Greek Yogurt Smoothie Bowl
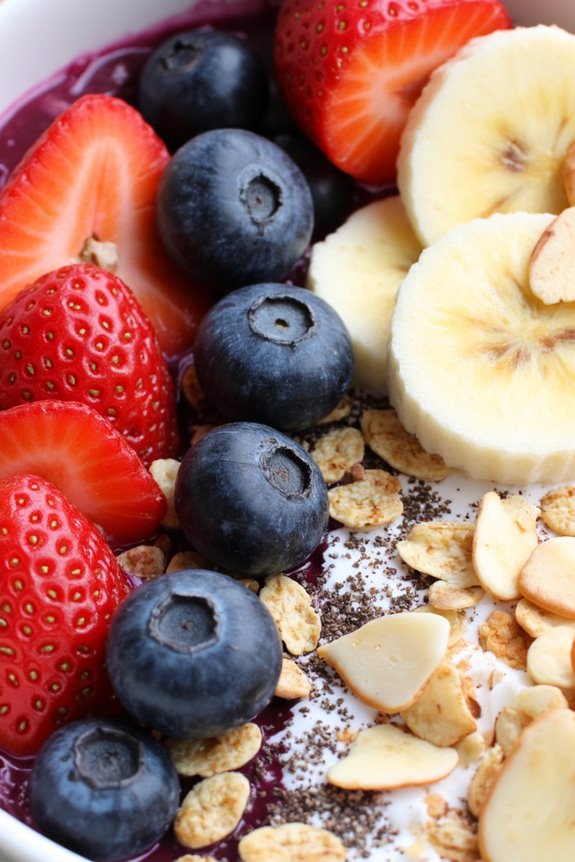
Indulge in a revitalizing and nutritious Berry Greek Yogurt Smoothie Bowl that’s perfect for breakfast or as a delightful dessert. Bursting with vibrant flavors from fresh berries and creamy Greek yogurt, this dish isn’t only visually appealing but also packed with protein, vitamins, and antioxidants.
It’s a versatile recipe that allows you to customize your toppings and base according to your preference, making it a fantastic choice for a healthy yet indulgent treat.
This smoothie bowl is incredibly easy to prepare and can be made in just a few minutes. The combination of Greek yogurt and frozen berries creates a thick, luscious texture that you can enjoy with a spoon.
Top it with your favorite fruits, nuts, or seeds for an added crunch and flavor that will keep you satisfied. Gather your ingredients and get ready to enjoy a delicious and nutritious Berry Greek Yogurt Smoothie Bowl!
Ingredients (Serves 4-6)
- 4 cups frozen mixed berries (strawberries, blueberries, raspberries)
- 2 cups plain Greek yogurt
- 1 banana
- 1 cup almond milk (or milk of choice)
- 2 tablespoons honey or maple syrup (optional, for sweetness)
- 1 teaspoon vanilla extract
- Toppings: fresh berries, sliced banana, granola, shredded coconut, chia seeds, nuts
Instructions
1. Prepare the Base: In a blender, combine the frozen mixed berries, Greek yogurt, banana, almond milk, honey (if desired), and vanilla extract. Start blending on low speed to break down the larger pieces, then gradually increase to high speed until the mixture is smooth and creamy.
You may need to stop and scrape down the sides of the blender to verify everything is well mixed.
2. Adjust Consistency: Once blended, check the consistency of the smoothie. If it’s too thick for your liking, add a little more almond milk, a tablespoon at a time, until you reach your preferred thickness. If you prefer a thicker bowl, you can skip this step.
3. Serve in Bowls: Once the smoothie is blended to your liking, divide it evenly among four to six bowls. Use a spatula to scoop out the mixture if necessary to verify you get every bit into the bowls.
4. Add Toppings: Now comes the fun part! Top each bowl with your choice of fresh berries, sliced banana, granola, shredded coconut, chia seeds, and nuts. Be creative with your toppings and arrange them in a visually appealing way for a beautiful presentation.
5. Enjoy Immediately: Serve the Berry Greek Yogurt Smoothie Bowl right away while it’s cold and revitalizing. Grab a spoon and dig in to enjoy the delicious layers of flavor and texture.
Extra Tips
For an extra boost of nutrition, consider adding a handful of spinach or kale to the blender for added greens without compromising the flavor.
You can also experiment with different types of yogurt, such as flavored Greek yogurt, which can add a new taste dimension to your smoothie bowl.
Prepare the base ahead of time and store it in the refrigerator for up to a day, but be sure to add the toppings just before serving to keep everything fresh and crunchy.
Cinnamon Roll Greek Yogurt Pancakes

Indulge in a delightful twist on traditional pancakes with these Cinnamon Roll Greek Yogurt Pancakes. Combining the creamy texture of Greek yogurt with the warm, comforting flavors of cinnamon and vanilla, this recipe creates a breakfast that’s not only delicious but also packed with protein.
Perfect for a weekend brunch or a special occasion, these pancakes are bound to impress your family and friends while keeping things wholesome and nutritious. The addition of a cinnamon swirl and a light glaze on top gives these pancakes an irresistible cinnamon roll-like appeal.
You can easily customize these pancakes by adding nuts, raisins, or even a drizzle of maple syrup for an extra touch of sweetness. Whether you’re looking to start your day off right or satisfy your sweet tooth, these Cinnamon Roll Greek Yogurt Pancakes will deliver!
Ingredients (Serves 4-6)
- 1 cup all-purpose flour
- 1 teaspoon baking powder
- 1/2 teaspoon baking soda
- 1/4 teaspoon salt
- 1 teaspoon ground cinnamon
- 1/2 cup Greek yogurt (plain or vanilla)
- 1/2 cup milk (dairy or non-dairy)
- 1 large egg
- 2 tablespoons honey or maple syrup
- 1 teaspoon vanilla extract
- 2 tablespoons melted butter (or coconut oil)
- For the cinnamon swirl:
- 2 tablespoons brown sugar
- 1 teaspoon ground cinnamon
- For the glaze (optional):
- 1/2 cup powdered sugar
- 1 tablespoon milk
- 1/2 teaspoon vanilla extract
Cooking Instructions
- Mix Dry Ingredients: In a large mixing bowl, whisk together the flour, baking powder, baking soda, salt, and ground cinnamon until well combined. This step guarantees that the leavening agents are evenly distributed throughout the flour, resulting in fluffy pancakes.
- Combine Wet Ingredients: In a separate bowl, mix the Greek yogurt, milk, egg, honey (or maple syrup), vanilla extract, and melted butter. Stir until all the wet ingredients are well blended. This mixture will add moisture and flavor to the pancakes.
- Combine Mixtures: Pour the wet ingredients into the bowl of dry ingredients. Gently fold the mixture together using a spatula until just combined. Be careful not to overmix; a few lumps are okay, as overmixing can lead to dense pancakes.
- Prepare the Cinnamon Swirl: In a small bowl, combine the brown sugar and ground cinnamon. Set aside. This mixture will be swirled into the pancakes for that delicious cinnamon roll flavor.
- Cook the Pancakes: Preheat a non-stick skillet or griddle over medium heat. Lightly grease with butter or oil. Pour about 1/4 cup of pancake batter onto the skillet. Use a spoon to create a small swirl of the cinnamon sugar mixture in the center of the pancake. Allow it to cook for 2-3 minutes or until bubbles form on the surface and the edges look set.
- Flip and Finish: Carefully flip the pancake and cook for an additional 2-3 minutes until golden brown. Remove from the skillet and keep warm while you repeat the process with the remaining batter.
- Make the Glaze (Optional): In a small bowl, whisk together the powdered sugar, milk, and vanilla extract until smooth. Drizzle over the pancakes just before serving for an extra sweet touch.
Extra Tips
For the best flavor and texture, let the batter rest for about 5-10 minutes before cooking the pancakes. This allows the flour to absorb the moisture and results in a fluffier pancake.
If you like your pancakes a bit sweeter, feel free to adjust the amount of honey or maple syrup in the batter. Additionally, serve the pancakes immediately after cooking to enjoy them warm, and consider adding toppings like fresh fruits, nuts, or a dollop of Greek yogurt for a nutritious boost!
Chocolate Chip Greek Yogurt Cookies

If you’re looking for a healthier twist on a classic treat, these Chocolate Chip Greek Yogurt Cookies blend the creamy goodness of Greek yogurt with the irresistible sweetness of chocolate chips.
These cookies aren’t only delicious but also packed with protein, making them a great option for a guilt-free dessert or snack. The Greek yogurt adds moisture and a slight tang, resulting in a chewy cookie that will satisfy your sweet tooth without the added calories of traditional cookies.
Baking these cookies is simple and quick, perfect for a busy afternoon or a fun baking project with the kids. The combination of whole wheat flour and Greek yogurt enhances the nutritional profile, while the chocolate chips guarantee that every bite is filled with delightful sweetness.
Whether enjoyed fresh from the oven or stored for later, these cookies are sure to become a favorite in your dessert repertoire.
Ingredients (Serves 4-6):
- 1 cup Greek yogurt (plain, non-fat or low-fat)
- 1/2 cup brown sugar
- 1/4 cup granulated sugar
- 1/4 cup unsalted butter, softened
- 1 large egg
- 1 teaspoon vanilla extract
- 1 1/2 cups whole wheat flour
- 1/2 teaspoon baking soda
- 1/2 teaspoon baking powder
- 1/4 teaspoon salt
- 1 cup semi-sweet chocolate chips
Cooking Instructions:
- Preheat the Oven: Begin by preheating your oven to 350°F (175°C). This guarantees that the cookies will bake evenly and develop a nice golden-brown color.
- Mix Wet Ingredients: In a large mixing bowl, combine the Greek yogurt, brown sugar, granulated sugar, softened butter, egg, and vanilla extract. Use a hand mixer or whisk to beat the mixture until it’s well combined and smooth. This step is essential as it incorporates air into the batter, which helps the cookies rise.
- Combine Dry Ingredients: In a separate bowl, whisk together the whole wheat flour, baking soda, baking powder, and salt. Mixing these dry ingredients separately helps to evenly distribute the leavening agents throughout the flour, assuring a consistent texture in the cookies.
- Combine Wet and Dry Mixtures: Gradually add the dry mixture to the wet mixture, stirring until just combined. Be careful not to overmix, as this can lead to tough cookies. The batter should be thick and slightly sticky.
- Fold in Chocolate Chips: Gently fold the semi-sweet chocolate chips into the dough. This will guarantee that the chips are evenly distributed without breaking them apart.
- Scoop and Bake: Using a tablespoon or cookie scoop, drop spoonfuls of dough onto a lined baking sheet, leaving a few inches between each cookie to allow for spreading. Bake in the preheated oven for 10-12 minutes, or until the edges are lightly golden. Keep an eye on them as baking times may vary slightly depending on your oven.
- Cool: Once baked, remove the cookies from the oven and let them cool on the baking sheet for about 5 minutes before transferring them to a wire rack to cool completely. This cooling period helps the cookies firm up, making them easier to handle.
Extra Tips:
For added flavor, consider mixing in some nuts or dried fruit along with the chocolate chips.
If you want to reduce the sugar content further, you can replace some of the brown sugar with a sugar substitute. Additionally, these cookies can be stored in an airtight container for up to a week, and they also freeze well, so you can enjoy a sweet treat anytime!